Search the Community
Showing results for tags 'Tamiya'.
-
Hi everybody, Been busy the last weeks and made an other one, was the first model i bought and kept it untill i had the feeling i could do it because it wasn't a easy model to make... I only make Tamiya for the moment as they fit wonderfull and are a easy task but the paint job was difficult... I hope you can enjoy and as always, feel free to let me know what you think as i can only learn from it but keep in mind this in only the third model i have made... Now started with the Tamiya Corsair... As always the paint i used was only Tamiya and painted it with my airbrush, otherwise straight out the box...
-
My latest completion, Yes, another Spitfire! The now quite old Tamiya kit is a very easy and satisfying build. Mine is straight out the box and was a really relaxing and satisfying model to complete. This is option 2 from the kit - 92 Squadron RAF November 1940. I like the half black wing id reintroduced in the wake of the BoB along with the tail band marking and the light coloured spinner. I also have the newer Airfix Mk 1 in the stash and am keen to see how the Airfix kit builds compared to the Tamiya example. Of all the Spitfire marks the Mk 1 is my favourite, and i think this kit caputure the look very well. Thanks for looking, Cheers Greg
- 21 replies
-
- 34
-

-
 #16/2018 After P-40 and P-47, here´s my dad´s next USAAF subject, the first Malcolm hooded P-51 for our collection. Tamiya Mustang Mk.III kit, main markings are from Kits World Decals, the rest from Aeromaster and the kit. Vallejo Metal Color Aluminium for the NMF, Gunze and Tamiya acrylics for the rest, brass wire for the whip antenna. To get closer to the original my dad filled the wing panel lines with putty, partly it broke out again, guess that happend on the real aircrafts too. The kit has several flaws. The only correction my dad did was to shorten the ammo bay panel covers, didn´t turn out perfect but it looks ok. Build thread here: https://www.britmodeller.com/forums/ind ... -fs-usaaf/ The model shows the Mustang of 1st Lt Ralph "Kidd" Hofer, 334th FS 4th FG, in 1944. Hofer was shot down and killed on July 2nd 1944, either by Hungarian 109s or AA fire. DSC_0019 by Reinhard Spreitzhofer, auf Flickr DSC_0001 by Reinhard Spreitzhofer, auf Flickr DSC_0002 by Reinhard Spreitzhofer, auf Flickr DSC_0003 by Reinhard Spreitzhofer, auf Flickr DSC_0004 by Reinhard Spreitzhofer, auf Flickr DSC_0005 by Reinhard Spreitzhofer, auf Flickr DSC_0006 by Reinhard Spreitzhofer, auf Flickr DSC_0007 by Reinhard Spreitzhofer, auf Flickr DSC_0008 by Reinhard Spreitzhofer, auf Flickr DSC_0009 by Reinhard Spreitzhofer, auf Flickr DSC_0010 by Reinhard Spreitzhofer, auf Flickr DSC_0011 by Reinhard Spreitzhofer, auf Flickr DSC_0012 by Reinhard Spreitzhofer, auf Flickr DSC_0013 by Reinhard Spreitzhofer, auf Flickr DSC_0014 by Reinhard Spreitzhofer, auf Flickr DSC_0016 by Reinhard Spreitzhofer, auf Flickr DSC_0017 by Reinhard Spreitzhofer, auf Flickr DSC_0018 by Reinhard Spreitzhofer, auf Flickr
 -
My dad´s US bird builds continue. A Malcolm hooded version is still missing in our collection. Gonna use the Tamiya kit and do a shiny version, not yet decided which scheme. DSC_0009 by Reinhard Spreitzhofer, auf Flickr
-
#Tamiya's brand new, highly detailed 1/48 US #Grumman F-14D #Tomcat Model Kit is now open for pre-order from Wonderland! This excellent kit is based on the real-life Modern Era US Navy #Jet Fighter. https://www.wonderlandmodels.com/blog/article/tamiyas-new-148-f-14d-tomcat-model-kit/
-
Hello Everyone ... Been busy down in the Group builds area. However im still managing to finish other projects. Heres the first Mosquito Ive built since i was 15. I used Tamiya’s 1/48 Mk.VI Fighter and the kit decals for a plane that was assigned to 143 Squadron Banff Wing. I found photo’s of this Mosquito using the Double rail rockets, and wing slipper tanks. I scratch built the Rocket fences that would go between the Rocket rails and the slipper tanks. Im hoping you like it. I opted to leave the plane unarmed to show the bomb bay detail and the Rocket fence details. The only issue is related to a mixup caused by me while decaling. I wasn't paying attention and didn't align the fuselage roundels and codes correctly. Without further talk I give you my Mossie. 1st some build photos And now the Finished Mossie. I hope it meets with your approval and as usual Comments, question, and jokes are welcome. Dennis Im not sure whats next ? Harrier, Hornet, or P-40N but I will start it soon.
- 23 replies
-
- 38
-
-
 This is the third P-47 I've built, but the first Razorback. I liked the look of the P-47 in the RAF camouflage so it was a toss up between this scheme and the SEAC green, brown light grey scheme. Since my last P-47 was a SEAC camouflaged aircraft I decided to go with the RAF day fighter scheme. These aircraft were painted in the USA using colours "equivalent" to the RAF colours of Dark Green, Ocean Grey and Medium Sea Grey. The aircraft I've depicted is one operated by the No 73 Operational Training Unit (OTU) Roayal Air Force (RAF) based at RAF Fayid in Egypt in 1946. I wanted to go for a well weather dusty look as I figured the sand and sun would knock the aircraft around a bit. I'm pretty happy with the finish I achieved The Kit Tamiya 1/48 P-47D Razorback (Kit No 61086) The Tamiya P-47's are still IMHO the best fitting 1/48 prop kits out there. Aftermarket Ultracast Seat Ultracast Wheels Decals Freightdog 1/48 'Brits Abroad' Tamiya kit decals for the stencils. The set in my kit were the older style and were unusable but a mate came to rescue with the newer style which performed significantly better. Paint For Dark Green - Mr Color 12 "Olive Drab USAAF Aircraft For Ocean Grey - Mr Color 305 (FS36118) For Medium Sea Grey - Mr Color 315 (FS16440) For Sky - Mr Color Sky Other various Mr Color/Mr Hobby greens and greys for weathering Various Vallejo Acrylics for details Clear Coats Gloss - Gaianotes Clear Gloss Flat - Gaianotes Clear Flatt with a final coat of Testors Dullcoate Weathering Oil paints AK/Mig Filters Tamiya Weathering Sets The Base The surround is made from cheap skirting from Bunnings. I've made it so the ground section can be changed depending on the model. The sand is the stuff left over from one of those kids puzzle fossils they have to dig out. I originally was going to use this for the entire base but some research into where 73 OTU was based, RAF Fayid in Egypt, revealed that the base had extensive tarmac areas The tarmac is just a sheet of card painted with machinery grey spray paint
- 25 replies
-
- 48
-
-

-
- Tamiya
- P-47D Razorback
- (and 1 more)
-
Hello all! I have recently been getting interested in the older range of Tamiya 1/700 waterline ships. Over the years I have built plenty of them, but never Japanese subjects. When I was in my local model shop I noticed a couple of boxes which were cheap but had multiple kits in them, and I chose the Japanese Military Transport set. It had two kits in it, and was only £7.50. Of course, the costs did not stop there, as I feel ships are incomplete if unadorned by etch, so I ordered some Eduard stuff: IJN railings, watertight doors and inclined ladders, just to give the kits a bit more detail. First up I did the Tank transporter. I rigged it with Uni Caenis fly-tying thread, and added two lots of the etch, but found that the ladders were too big for the ship, which was a shame. I don't know if Eduard over-scaled them or something. The railings were very awkward - they had individual stanchions for fitting to the deck, and despite using CA gel and/or PVA they fell off if you just looked at them. I tried to weather the ship a bit with Tamiya weathering powders but may have overdone it a bit: One obvious thing missing to my eyes was the row of scuttles along the side. On the next kit I did, the Submarine launcher, I remedied that and drilled out scuttles following the box artwork. This time I trimmed off the stanchions and made the ship have two-bar railings. It was tricky trying to deal with the sheer on the bows and the angle down aft, and I did not quite get the rails to line up properly. Again I used UniCaenis thread for rigging, but I also used some speaker-wire cable core for the derrick cables. The masts are too thick I think, and could have done with being replaced (if I have not mangled the language) and that is the plan for my next ship from Tamiya. Once again the inclined ladders were too large. Each one of these gives me practice, I have another set with three vessels in it and they seem to be a newer mould, from in the 1990's rather than 1970's for this set. Thanks for looking, Ray PS I think I may have posted the Tank Landing Craft before, but I thought it was a good idea to show both together as they are from the same box.
-
Here are some pictures of the Tamiya Bismark. The amount of PE I used to improve this kit, I should have just bought the Revell kit. I use White Ensign decking, Flyhawk and Eduard PE. I know the guns are showing brass inside, but I did not notice this until I took these pictures!
- 8 replies
-
- 20
-
-
- Tamiya
- Kreigs Marine
- (and 1 more)
-
 Concerning building IJN aircraft's like the Airfix or Tamiya A6M2b Zero it seems to be an simple and quick build by using Tamiya AS colours (spraycans). https://www.emodels.co.uk/tamiya-as-29-gray-green-100ml-spray-can-86529.html So what about the Tamiya AS 29 Greygreen? Is it usefull as an alternativ to for example Humbrol Hu 91 wich is also available as spraycan (concerning Airfix Zero)? https://www.airfix.com/uk-en/mitsubishi-a6m2b-zero-1-72-1.html Not much has been written about the Tamiya AS snd DT paints. But I like them and have used the silver and aluminium AS and ST paints a lot during building NMT aircraft's as the Airfix and Tamiya P-51D Mustang. I also tried the Humbrol spraycans with good results combined with the Tamiya AS and TS paints. Albeit there aren't that many colours available from Humbrol (mostly RAF colours). But the cans are bigger and cheaper than the Tamiya cans. Cheers / André
 -
Courtesy of the 1/48 Armor Modelling Group on FB next release from Tamiya will be a Churchill VII. A crew half-figure and two marking options to allow Crocodile or gun tank to be built. Sprue shots from Tamiya Blog It appears that only the visible track links are supplied. This is a pain as, in NW Europe Churchills ran without the centre section of the trackguards fitted. This was to avoid debris between the larger turret and trackguard causing damage. Otherwise it looks OK. I like the moulded in roadwheels which should save much hair being torn out. Open hull hatches would have been good but they are simple enough to cut out and replace I suppose. EDIT: Apparently the post war mods in Tamiya's 35th kit have been removed in this one so it's a WW2 vehicle OOB.
-
Hi All, Heres the Tamiya 1/35 Brummbar late. I've added the ATAK Zimmerit set and painted with Tamiya acrylics. Goes together really well and with a bit of time the Zimmerit can look pretty good I think. You can simulate battle damage easily and it takes paint well Usual comment s & critique appreciated. Cheers David
-
Tamiya's excellent (aren't they always), Nismo boxing of their 350Z coupe. Tamiya TS-47 'Chrome Yellow' and TS-94 'Metallic Grey': As ever please feel free to post outrage, ask a question or male a comment. Have a great weekend everyone. Ian.
-
Yep. another completed, but to be fair it was started long before the 350Z that I posted here a couple of weeks ago. So straight to the point, this is another Tamiya kit, and it is as ever superbly engineered, and fits just about perfectly. The BIG thing for this project however was the excellent Tamiya plastic - this is the 'Taisan' boxing and it's molded entirely in glossy black !! - so I'll let y'all guess how many primer coats it took before applying the glossy white top coats. Decals are by Scale Design, no I've not heard of them either but they're the best part of twenty years old and behaved flawlessly. As ever thanks for taking the time to look and / or comment, please ask any question or hurl any criticism. Not sure what's next, will see what calls to me from the stash when I go in to the cave next week. AFN Ian.
-
-
I've been looking for this kit for 2 years. Finally got an unstarted kit off eBay a few months back. My plan was to paint it in the alternative colour that was daytona orange, all freehand airbrushed and the red pin stripes to be masked and airbrushed on. Am I up to the challenge? Well, let's find out. First problem was Tamiya had cocked up the tank badge location, the tank badges should sit in a recessed circle just like the tail unit, well that was soon modified and I got the paintwork underway. More to come.
- 21 replies
-
- 10
-
-
-
 Hello, back again. Today's effort is in keeping with this year's resolution to try and complete some shelf queens, which have been laying about for years (or sometimes, decades!), just to clean up the place a bit. It is basically the Tamiya 1/72 F-84G, modified to an F-84E version, and adorned with parts of a resin detail set and some colorful decals depicting one of Col George E Laven's colorful F-84E's (he had several). First off, was to get to an F-84E from the "G" kit. As the question of how to do this was raised by several in other forums, here's what it takes: `1) Fill in the large blow-in doors just ahead of the wings on both sides of the aircraft 2) Fill in the mid-air re-fueling door lines at the inner front of the top of the left wing 3) Replace the air brake below the fuselage with the earlier, 4-hole version 4) Check references about the canopy, while earlier F-84E's had the clear main canopy, they were all eventually replaced with the "G" model re-inforced canopy. Date of service being depicted is important here. I had intended to make this a build thread, but since I worked on it haphazardly, it didn't work out. However, here are a couple of reference photos: Several points worth mentioning about the build. Figure "A" above shows where the earlier 4-hole air brake will be installed. (The last photo on this post will show the correct brake installed on the finished model). Figure "B" shows the filled-in blow-in door Also, figure "C" shows where the cover over the machine guns should be. WARNING, the Tamiya 1/72 F-84G kit doesn't like to have this door closed. You will have to fight mightily to close it!!! Also shown installed is the Aires resin cockpit, and just ahead of that, the resin intake splitter. This part was used, as it gave me a great place to hide the lead nose weight. This would cause problems later however, as the resin part lacks the little "arms" to which the nose well doors attach, which led to glue and paint problems later on. If I were to build another Tamiya kit, I would use the kit splitter assembly instead. The next photo shows all of the filling, sanding and loss of panel lines involved in closing the gun bay door, but I was determined. (Next time, I won't be, but I'll be doing a war-fighter "G", not a pretty show plane. I didn't want to detract from the color scheme. Another downside of closing the bay door is that in the end, I ended up having to raise the windscreen slightly, to get everything to fit. That's when I decided to pose the canopy open, to help disguise this fact. Figure "D" shows the approximate position (if the wing were attached)where the fuel filler door lines must be filled. One reason I had put off the build so long was also the decals. I used AeroMaster 72-195, and they were great. Tough and thin, they required a couple of applications of setting solution to get them to lay down on some of the rather severe curves. Normally, I use Micro Set and Micro Sol, but on this model, I had to break out the Walther's Solvaset, carefully applied only to the decals, NOT on the Alclad II bare metal! Each wingtip fuel tank has eight different decals to get the checkerboard design done. I was afraid of doing this, but they worked well. I would recommend putting all 4 outer decals on each wing tank at the same time, so that you can move them around to line up while tey are wet. You kind of have to worry about how they overlap at the edges, but it works out okay. In any event, here are the final photos: I'm very glad to add the colorful model next to Laven's F-100C, which I did last year. See you next time, Ed
- 14 replies
-
- 26
-
-
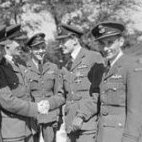
This is the very nice Tamiya kit used along side the Cutting Edge Crossdressing Stormbirds decal sheet. Yellow 17 was flown by Lt Hans Dorn of 1/JG7 and was captured at Fassberg by No 616 Squadron RAF in May 1945. I could find very little information on Dorn, I suspect he was a replacement pilot and fairly new to JG 7, seeing little or no action in his time there. As for yellow 17, she was designated AM-52 and ferried back to England for evaluation before being declared surplus and shipped off to Canada. From there, she was sold along with 300 other surplus aircraft and scrapped. As I said the Tamiya kit is a real pleasure to build. Painted with Gunze RLM 82/83/76 with weathering kept pretty light as this machine looked almost brand new when captured, in all likelihood it was.
- 15 replies
-
- 36
-
-
 Hi folk's one of the few RAF kit's in the small stash is the Meteor,I bought it for the prototype's GB but never started it so what better kit to mark the RAF's entry into the jet age,I will do the operational squadron scheme for this build,here's the box and content's. That's it for now see you April 1st.
 -
Morning folk's second build in the RAF GB was to mark it's entry into the jet age,Tamiya's kit has been around a while but still is a cracking build and a fare size to I can imagine those pilot's progressing from single engine fighter's getting a bit of a shock,anyway here she is and thank's for looking in.
-
This thread will document the construction of my 1:48 Tamiya Mosquito B. IV. I will build this aircraft as a member of the Pathfinder Force, from no. 109 squadron. Pathfinder mosquitoes utilized specialized electronics, like the Oboe transponder in order to navigate to target areas where they would precisely (in 1940s terms) drop their fire bombs and flares, lighting up target areas, and marking them for the main bomber stream that would follow. The particular aircraft I'm going to build is this. The project will be right out of the box. I have always loved the Mosquito. My favorite being the NF II version. However, I chose the pathfinder for this build, as I think it better commemorates the immense contributions made by the RAF, and the scientists and engineers it employed, to electronic warfare, avionics technology.
- 26 replies
-
- 13
-
-
The model I packed away ≈ 15 years ago. A quick image history to catch up to the present state of construction. My first use of MR. PAINT The test color came out much lighter. I guess due to the lack of primer. Camera color looks off between photos, I will investigate. My own masks... Not too shabby, although I'm always tense while taking off the masking tape.
- 14 replies
-
- 14
-
-
Hi folk's,most of us of a certain age will remember Airfix's Spitfire Vb released in the seventies with it's beautiful artwork and that lovely blue plastic, since then that aircraft of Zumbach's has alway's been a favourite of mine due to it being often published with other's in colour which as you know was a rare wartime occurrence,Anyway as part of the RAF 100 GB I wanted to build a tribute to those overseas airmen especially from the occupied countries of Europe many who would never again see their homeland,Tamiya's Vb is not perfect if you are that way inclined but build's like a dream and look's like Mitchell's legend in every sense,Techmod decal's and I chose the earliest incarnation of his aircraft in the day fighter scheme. ,
-
Hi folk's my other build for this GB is Tamiya's Spitfire Vb flown by Polish pilot Jan Zumbach,another part of the RAF's story has been the large number of overseas personel that have swelled the rank's over it's history particularly during WW2 especially from those countries occupied by the Axis power's.This will be my first Tamiya Spitfire so really looking forward to it. Now the decal's I got fromKing Kit for £3:99 so the kit was bought a couple of week's ago for this GB,I think the plan will be to use the Tamiya decal's with the AM codes etc as the roundel's don't look right to me.
-
 Hi, my other cat in the collection. This is a machine from the Desert Storm operation this time. I used the decals from Fightertown, wheels and RBF from Eduard, Chairs and ChinPOD from Aires (Quickboost) I hope you will like it
- 25 replies
-
- 62
-


.thumb.jpg.ba34a9f6ddce411193946dbdcc7b5fe8.jpg)