Search the Community
Showing results for tags 'TAMIYA'.
-
Tamiya kit with some details added.
-
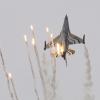
 G’day folks. Latest off the bench for me is Tamiya’s 1/48 F-84G converted to a Royal Danish Air Force RF-84G using the MADS resin set. I wanted to build something other than a NMF Thunderjet as they are not often seen. Some brief research and I found that the Danes flew them in their regular guise as well as a reconnaissance platform. A bit more research revealed that Hi-Decal did the markings and MADS did the tank. I think the RAF temperate grey/green over PRU blue got it over the line. The MADS resin set consists of a replacement port tank in the way of a T-33 Fletcher photo recon tank and a vertical camera housing. I believe it was the French that came up with the idea of loading an oblique camera into the T-33 tank of which a few nations followed with the same idea. Located behind the nose gear bay, the vertical camera resulted in the battery being relocated to a different part of the fuselage. Photos of these aircraft have been hard to come by and for that reason some educated assumptions have been made regarding stencils and the finish of the aircraft. The colour of the emerald green is probably the most dubious part as that can be interpreted many different ways. I had a few issues with the Hi-Decal markings namely the tip tank lightning bolts which ended up being masked and painted after the fragile decal fell apart into several pieces. In summary… RF-84G Thunderjet, Reconnaissance Flight, 729th Squadron, Royal Danish Air Force; Karup AFB, spring 1957. Tamiya 1/48 F-84G - Item 61060 MADS 1/48 F-84G Thunderjet Recce Pod - Item M.Access 004 Quickboost 1/48 F-84G Ejection Seat with safety belts - Item QB 48-493 Hi-Decal 1/48 F-84G Decals - Item HDL 48017 Cutting Edge and Tamiya kit stencils Gunze acrylic and lacquer paints - (Custom PRU blue) To the pics… Cheers, Mick
- 20 replies
-
- 23
-

-
 Some time ago I got from a polish friend the last book for my collection about Polish Figting Teams in WWII. It is the first edition of "Polish Wings Nr.6" with title "Spitfire Mk.I/II". also too I have just like the other issues in my collection it is a very nice and interesting publication about first version of Spitfire in polish figting teams. my historie template for this model: At second sources I used the polish KAGERO publication 15027: Polish Spitfires with 8 version off free decals include. Very interesting are many Spitfires with special letter-coder variants in form of additionaly names from girlfriend or/ and wifes!
- 7 replies
-
- 2
-
-
- Spitfire Mk.IIa
- P8397
- (and 4 more)
-
 Hey everyone, You can see my introduction thread here. So, everything has arrived. Got the cutting mat and some tools, it's all pretty exciting! The tweezers I pinched from some manicure set thing, I read that they can come in handy! Obligatory picture of the box (I think they are obligatory anyways, I see them a lot). Now this is all the sprues, more than I thought there would be. Felt a tad overwhelmed at this point, excited overwhelmed but enough to make me think 'this is gonna be hard'. Some individual sprue pictures, I'm loving all the detail in this. Even the figures head doesn't to bad, I had read that I might need to get a replacement head from somewhere (forget the name now). So, all the sprues are back in the box and I've set my cutting mat up. Honestly I'm a weird mix of excited and anxious, I don't want to muck it up, although saying that I am anticipating mistakes galore. I'm glad I've posted up the start for all you to see and witness my first ever build, I'm imagining that will give me added motivation to complete. I had a quick look around online for extra bits for the Matilda, I know you can get little shiny, gold bits (damn memory, can't remember the name of them either!) that make for a more accurate build. It's a tad confusing for someone like me who doesn't yet know all the ins and outs, could anyone recommend a definitive accessory to buy to add on to this kit, that would be braw. Anyways, I'm off now to make my first start on it or better yet I'll go through the instructions first. Take care folks, Pi P.S Sorry about the photos, I've only got my phone will probably have to invest in a decent camera at some point!
- 20 replies
-
- 1
-
-
- Tamiya
- First Build
- (and 3 more)
-
 The answer is: no! (to me, at least ) Few words on the kit: it's well known, and as Troy Smith pointed out in my WIP thread (see here if you're interested), has some shape issues, concerning mainly wings and fuselage shape. I didn't feel like I was able to fix them, though, so I decided to build this kit as an experiment for various techniques such as, for instance, salt chipping (first time ever for me), an doing my own mask for roundels. No aftermarkets used, but definitely some scratch - building involved: - cables and wires and few other details inside the cockpit - radio switches box (cockpit again) - brake lines on undercarriages - pitot tube (using a prescription needle) - back canopy thermoformed, as the kit one is too wide and tends to break at the minimum pressure - IFF aerials, using hair probably something else, but I don't remember now. Roundels, fin flag and code letters were airbrushed, using self made masks. The only kit decals I've used are the serial numbers and the stencils. The AC I intended to reproduce is this: A quite battered one, indeed. Here are the pics: Weathering details Bottom view r More detail pics to follow
- 41 replies
-
- 36
-
-
Hi, this is my finished Tamiya Mosquito B MkIV (1/48 scale). technically this kit isn't finished as i haven't painted the cockpit frames yet as i have to wait for the masks to arrive, but i didn't think it was worth putting it in WIP just for that. this kit was a dream to build, as the only fit issue was a small one with the fuselage halves, which was solved by the removal of the rear firewall/bulkhead. the decals however were a big letdown. they had lots of silvering (i didn't apply gloss varnish as previously i have never really had any silvering on the cartography decals I've used) and even when micro sol was applied they had difficulties adhering to the details. also, i rather clumsily moved one of the decals that was covered in micro sol out of line, and when i try to move it back it split (my fault). before i built this kit i had little interest in the mosquito, but after building the kit and doing some research i am quito fond of it.
-
After almost a year and a half, I managed to finish this model (build shown here - http://www.britmodeller.com/forums/index.php?/topic/234955564-f4u-1-birdcage-tamiya-148/ ) I was so... happy I did (i.e. fed-up with it) that in the pictures below I forgot to do some minor touch-ups and paint some of the lights on the fuselage. Quite happy with the outcome, ecstatic I managed to finish it. It was an excellent platform to try some weathering techniques for the first time.
- 9 replies
-
- 12
-
-
- F4U Corsair
- 1/48
- (and 1 more)
-
Hi everybody; here we go, back to aircraft modelling after a figure painting interlude. This time it's Tamiya Spitfire Mk Vb in 1/48, my first Tamiya kit and second Spit ever (first one dates back an era or so ... ). The idea is to do an OOB build, meaning that I will not use aftermarkets, but I intend to do some scratchbuilding. Here's the kit boxart Sprue shots I'll be doing this Aircraft (which is one of the options of the kit) So I started with a quick dryfit of the main parts: fuselage Wings Wings to fuselage, showing a couple of points that will require a minimum amount of tidying up: With tail planes fitted I'll be largely copying from Stix's thread (here) for this build. Please feel free to add any comments/contributions to the thread; as usual, I'm mainly doing it to learn from others. Next post is showing some initial surgery
-
Tamiya should do more 1/48 Spits, not only the I and V.... here´s their Mk.Vb trop, another Tamiya shake and bake kit. Built oob some years ago, painted with Gunze and Tamiya acrylics Model shows an a/c of RAF 601 Sqn in North Africa
-
 Hi folks, another corsair from me. This time a MkI, JT132 '7J' of 1835 and 732 Sqn's out in Maine, New England, 1943/44. This particular corsair was low flying and clipped another-JT160 and both ended up going into Lake Sebago with both S/L VR Gill and S/L RL Knott. Both corsairs are still down there and there is some footage out there of JT160 which appears to show it well preserved in the lake. The kit was oob apart from some Eduard paint masks and ignition wire from fuse wire. It has an early style cowl which wraps around the top so I did some re-scribing there. The colours are similar to my previous Corsair with the exception of light gull gray (light gray) undersides, 'Indian red' inner rear fuselage and deep dull green cockpit interior. The decals were a mix of allsorts. The 7&J are made from Xtradecal white decals with red decal cut out to fit inside. This aircraft is unique in having a Canadian maple leaf on the cowl and also some artwork on the side in the form of a horse or a flying pig? I couldn't make it out well enough so left it out.
- 24 replies
-
- 35
-
-
- Corsair Mk1
- FAA
- (and 3 more)
-
I still remember one of the early models my mother bought for me, at a time I was very young to go to the centre of Athens and buy kits myself. It was an Academy F4U. I even bought my first reference book for a model back then. That was some 25ish years go. Ever since I always felt that the F4U was the most striking WW2 airplane along with the Spitfire. When Tamiya introduced their 1/32 gem I began contemplating building one. However, for reasons of space and (at the time) money, I decided to try the 1/48 first - kind of like a rehearsal. Tamiya's 1/48 is a good kit. A very good kit. But when its big brother came out, I felt it was kinda felt left behind - even after one considers the scale difference. In my eyes it got left behind big way. Especially when it comes to the cockpit, lots of details (granted, not easily visible in 1/48) are omitted. So, I set out to add some detail, not with expensive after-market kits - which would increase my budget for his kit but with a bit of scratch-building here and there. Along with Tamiya's kit I will use photo-etched parts from Eduard, including the placards and resin wheels and control surfaces just to add a bit of character there. In the process some more after-market kits where added, so the original plan was somewhat... extended. My first modifications were to rebuilt the mounting mechanism for the pilots seat (Tamiya has a hideous solid slope-y mount there), add the front plates of the feet-rest, add wiring here and there and replace some of the clunky controls. Below are pictures of the cockpit parts and the sides which detail reworked and added where missing. I also added the air-hose and the map pouch.I removed the headrest as well - seems that many early Corsairs did not have those so I thought I'd do mine that way too. The instrument panel and harness from Eduard. The latter was modified with some brass foil to add a bit of depth and 'randomness' (sec photo). Prior to painting, everything was primed with AK Interactive grey primer. I have to admit I quite liked this primer, easy to spray and my wife did not complain about the smell! Awesome! The cockpit was then pre-shaded, especially on the head-rest and seat-mount mechanism. I mixed my own shade of Dark Green and washed everything with Light Earth oil. I have to admit working with a dark-coloured cockpit was something I have not done before in my 'second modelling life' and I was afraid I was going to mess it up. But I am happy with how things turned out.I had do omit the bob lever by the pilot seat - I need to think how to rebuilt it and fit it in the space I got there. 'Till next time, thnx for watching
- 46 replies
-
- 11
-
-
Build out of the box. It's like all Tamiya models the fit is very good. This is the Tamiya box 61061. To the engine I added some copper wire and the first tries to use Vallejo Cipping Fluid. Didn't work out on the wings as I wanted. I like the effect on the drop tanks. The blue is a mix from Vallejo Model Air 091 Insignia Blue and Model Color 522 Satin Varnish. Overall a really relaxing build. Thanks for looking. Jan Remco
-
Hello Guys, Below are the images of my "Final Reveal" for the Tamiya 1/48 Douglas A-1J Skyraider. After the images, I will include some notes regarding this build; my opinions of the kit in terms of quality, cost, value for money etc and any points to look out for if you decide to buy and build this kit. I hope you like the following views, and, forgive me for all the photos, but I always have a problem trying to decide what to show! I bought this kit for $32.00 from Hobbylinc.com last year, but it is now for sale from their website at $33.29: http://www.hobbylinc.com/tamiya-douglas-a-1j-skyraider-usaf-attack-aircraft-plastic-model-airplane-kit-1:48-scale-61073 Quality of molded product: The parts are molded well, zero flash on the majority of parts and if there was flash, it was very little. There were no warped parts and ejector pins were away from seen surfaces. The parts are molded with finely recessed panel lines to aid highlighting them when painting, and every parts details are crisp and faultless. The clear parts were very clear, not thick and there were no blemishes or distortions to disrupt the visual transparency. I give the Quality of molded product a score of 10/10 Quality of Engineering/Fits: This kit literally falls together, and without a shadow of a doubt, this has to be the best kit that I have had the pleasure to put together, out of the 15 I have built to date since starting modeling in January of 2014. The molded parts come loaded with nice details within the cockpit, on the undercarriage and the exterior surfaces. I give the Quality of Engineering/Fits a score of 10/10 Assembly and Painting Instructions: The assembly instructions come in black and white and they are clear, concise and easy to follow with each part clearly numbered along with the Tamiya color code for that part to be painted in. There is a separate sheet for painting guides for two Squadron markings. A full size view sheet is included that can be used as a paper mask for when painting your model. I always take a few photo-copies of this sheet and use the copies for this task. I give the instructions a score of 10/10 Decals: There is one sheet of decals that do not include the smaller stencils such as "Danger", "No Step" "Caution" etc and therefore, there are only 28 decals to put onto this model. That includes the 4 decals that go onto the propeller- one on each blade. The decals are thicker than normal, take a long time to release from the backing paper and some are delicate when applying to the plane. I had one tear on me, but I managed to position the two torn parts together to hide the tear. Be careful and patient when using these decals. I give the decals a score of 6 out of 10. Packaging: There are four bags of light grey/beige sprues and a bag with a clear sprue inside. These are within a card exterior box base and lid which is pretty sturdy, has great artwork and some images of the finished model in the two different color/marking schemes on two opposite sides of the box. I give the packaging 9/10 Value for money: 10/10! Would I recommend this kit...a resounding YES, ABSOLUTELY!! It offers a great looking build with two full sprues of weapons/ordnance and options for layout of those weapons. It includes a nicely detailed cockpit that looks great built OOB! There are options to have the rear canopy open or closed, the two fuselage and one ventral air-brake doors open or closed, the ailerons posed up or down, a detailed radial engine and a Pilot figure to finish it off. There are after-market extras that can be purchased for enhancing this kit, such as resin cockpit tub and ejector seats, PE parts and resin bombs and undercarriage, should you feel the need to "enhance" this kit further, although in my opinion it looks great built OOB. My only two "issues" with this kit are; 1) The decals; if Tamiya were to include Cartograf decals into this kit, it would have a perfect score of 10 out of 10. 2) The artwork on the box illustrates a "Whip Antenna" on the port-side of the fuselage next to the rear sliding canopy, but this isn't included in the kit. I therefore scratch built the Whip Antenna" mounting block by carving/sanding the end of a piece of sprue and cutting it off. I then stuck this to the end of a cocktail stick and painted it black. I then made the Antenna by using the "Stretched Sprue" method and cut a piece to length, stuck it to the mounting block and painted that black. When it was dry, I mounted it to the plane. If you're thinking of buying this kit, think no more, go ahead, make your day, you won't be disappointed!! Below is my "Final Reveal" YouTube video link for this build: https://www.youtube.com/edit?o=U&video_id=hzqeA71uvB4 Thanks in advance for taking a look and commenting, much appreciated! Cheers, Martin
- 17 replies
-
- 22
-
-
 Can anyone clarify the differences between these kits, i.e. what's different between kit 14104 and 14114 (Valencia Editions), 14105 and 14115 (U.S. Inter-Coloring Editions)? Is it just the decals and the No. 46 bit, or is there new plastic in the later kits? Cheers, Andrew
 -
 Seatbelt and Mask sets for Tamiya F4U-1A Corsair 1:32 HGW Models As with the set for the Revell 1:32 Fw-190, reviewed HERE, this set has been released in HGW’s Basic Line. The quality is the same as the previously reviewed set, as are the components, i.e. a sheet of laser cut seatbelts, etched buckles and clasps for the seatbelts and a sheet of masks. Being laser cut, the edges of both the seatbelts and masks are as crisp and clean as you could want. Only the small join to the sheet marring the perfection. If you’re using a new No11 blade then you should be able to cut them out without the need for any further cleaning up. The buckles and clasps are quite small, even in this scale, but the seatbelts are stiff enough to pass through them with relative ease. The completed assemblies should be given a bit of a dark wash to tone them down a bit, and then just attached to their appropriate positions. They will probably need a bit of a bend to get them to sit correctly and realistically. Job done. As with the masks in the Fw-190 set, these too have suffered a little bit of shrinkage, which hopefully has been taken into account. The set includes masks for both the interior and exterior of the windshield and canopy, which is a great help, particularly for the interior. Just fit and, using your favourite paints and airbrush, spray away. Conclusion This is another very useful set by HGW, and can be used by any level of modeller. The masks are generally used for when painting with an airbrush, but I’m sure they could be useful for those who don’t. The seatbelts are little more fiddly, but with a bit of care and patience, anyone can have a good looking addition to the kits seat. Very highly recommended. Review samples courtesy of
 -
Hi all, I am new on this forum and this diorama is my biggest work, so far. The basic kits were the Hasegawa's old bf 109E and the Tamiya reissued Opel Blitz. During the building I used a lot of PE and detail sets, such as Eduard, Part, Hauler, SBS Model! Hope you like it! Thanks or watching! Cheers, Matyi from Hungary
- 44 replies
-
- 53
-
-
- messerschmitt
- bf 109
- (and 7 more)
-
Hello, everyone. I finished Tamiya's golden oldie - the Sd.FZ.222 Leichter Panzerpahwagen. It's in Afrika Korps paint scheme. I also used Eduard's PE set to make it look better. It was fun. There's an thread on this subject in WIP section. Hope you will like it. Enjoy. Kind regards. Dawid
- 31 replies
-
- 26
-
-
- Sd.Kfz.222
- Tamiya
- (and 2 more)
-
 All, I present you with the latest off the bench, Tamiya's 1/72 Mosquito FB VI with Xtradecal's 617 Squadron set. I have really enjoyed building this kit from start to finish. I'd recommend it to anyone. Built out of the box, with the addition of some brake pipes, air filters over the carb intakes and small detail to the wheel wells. I fear that I may have over weathered it slightly behind the radiators, but hey I still like it. Apologies for the poor lighting on the photos, I struggle to get good light. Over to you for your comments. Thanks for looking. Leon
- 22 replies
-
- 37
-
-
Hi :-) My current project: the lovely Huckebein. Thank you for looking!
-
- 1
-
-
- Focke Wulf
- Tamiya
- (and 1 more)
-
With the release of the new Tamiya 1/32nd Mosquito coming soon, I remembered, that I had made a couple of 1/48th scale Tamiya Mosquitos when they were first released, that had been put up the loft. I made both the FB Mk VI, and the B Mk IV. They have been up there, in a box for the last 16 plus years. This is the FB Mk VI released way back in 1998. It is painted with Aeromaster acrylic. The decals are from Aeromaster Set 48-426 Mosquito Raiders Part 11. 248 Squadron, Banff Strike Wing. The starboard fuselage roundel has lifted a bit, and a crack has appeared around a panel underneath the fuselage. I had not discovered weathering at this stage, so no panel lines or exhaust stains have been applied. Thanks for looking, Joe Can't wait for the 1/32nd Mosquito. Thanks for looking, Joe
- 24 replies
-
- 37
-
-
- Ready for inspection.
- Tamiya
- (and 2 more)
-
i am looking to buy a Tamiya 1:350 Yamato kit, and found the Tamiya 78025 and 78030 sets. but i need some help to clarify the differences on the sets. i know the 78030 is a premium edition with some photo etch sets. both should be the new retooled sets, but i am not 100% sure. 78030 78025
-
 As I said before this will be my entry to the GB, something of a departure from my modelling comfort zone... what am I saying, lately EVERYTHING I've been building is a some sort of departure from my modelling comfort zone, I'm not even sure what my comfort zone is nowadays.... This will of course be built as the version driven by Patrick Depallier in 1976
- 27 replies
-
- 5
-
-
- Tamiya
- tyrell p34
- (and 1 more)
-
Hiya guys, in the last months, while starting my "career" in scale model building, I've been collecting articles from the Internet and magazines looking for better ways to replicate - using Tamiya acrylics - german and soviet afvs colours ww2, my favourite period. What follows is everything I found so far. Hope you folks find this helpful, also for further experiments etc...... if you use other mixes, just post your recipes here Disclaimer: of these mixes I've only tried the German dunkelgelb (xf-59+xf-57). Which I like it much. I cannot judge the other mixes. Use them at your own risk 4BO for WW2 Soviet afvs xf-61 (6) + xf-5 (4) + xf-8 (4) + xf-13 (1) xf-13 (3) + xf-5 (2) ------------ highlights: add some xf-12 xf-13 ----------- highlights: xf-13 (3) + xf-4 (1/2) + xf-2 (1/2) xf-67 (3) + xf-4 (1) + xf-2 *** WW2 German afvs Dunkelgrau (7021) xf-63 (3) + xf-60 (1.5) xf-63 (8.5) + xf-18 (1) + a few drops of xf-15 (double the amount of xf-15 for the highlights) Olivgrun (6003) xf-58 xf-58 + xf-21 (lighter shade) Dunkelgelb (7028) xf-60 (4) + xf-59 (1) xf-60 + xf-57 xf-57 xf-59 + xf-57 (highlights: add xf-55. Shadows: xf-72 Shokobraun (8017) xf-64 Gelbbraun (8020) xf-60 + xf-59 Red Oxyde/primer xf-64 + xf-7 xf-64
-
Hi! This is my last completed kit, a nice, fast and trouble free build, as is often the case with Tamiya ;-) Thanks for looking!
-
French Somua S35 Medium Tank 1:35 Tamiya Designed and built in the 1930s, the Somua was considered by many to be the best medium tank of the time, and was even technically superior to the German Panzer IIIs is came up against during the Battle of France. It was well armoured, and its fully cast body with impervious to most tank munitions of the time, but the casting process was complex and expensive in France at the time, so resulted in an expensive and difficult to maintain tank. Its use was of limited effect during the battle due to strategic and tactical errors on the part of French command, which resulted in many tanks being lost to mechanical breakdowns during sustained dashes to intercept the next German thrust into Allied territory. After the fall of France it saw use under Vichy flags in Africa before switching sides to fight the Italians as Allies, but many were also pressed into service with the Germans, who added cupola doors to allow the tank commander access to the outside world, which assisted in situational awareness, communication with troops, as well as escape in the event of the tank being hit. Immediately post war a few S35s saw limited service with the reborn French military before they were relegated to museum pieces. The Kit A totally new tooling from Tamiya, this tank will sit nicely next to the Char B1 Bis (also from Tamiya), as well as some of the other new French tanks that have recently been forthcoming from various companies in this golden age of AFV modelling. Inside the standard glossy top-opening box that Tamiya have used for years, you will find five sprues of parts in a sand coloured styrene, a clear sprue, a bag of track links, another bag containing a length of metal chain and some poly-caps, decals, a multi-language background information booklet that also contains the colour painting and decaling diagrams, plus the instruction booklet that is printed separately. The first item to note is the amount of very nicely done cast texture on the main parts. It has been crafted to avoid looking too regular, and it's very nice to see that Tamiya have expended the energy to get it done. It is a typical Tamiya product that is simple in parts, whilst managing to be cleverly constructed, using limited slide-moulding where necessary to improve things like the gun muzzle. The inclusion of individual track links that simply click together is a boon, and should appeal to even the most ardent lover of the rubber-band track option, because it couldn't be simpler! Overall quality is excellent, and the attention to detail shows in touches like the sprue gates on the parts with casting texture. These have been moulded into the mating surfaces to ease removal and avoid damaging the texture and creating work for the modeller. Construction begins with the lower hull sides, which are separate inserts that cover blank areas of the hull sides, allowing the deep detail to be moulded more simply than if they were integral. Final drive assemblies are added at the rear, and they are installed into their slots along with the rounded derriere of the vehicle, which completes the tub onto which the road wheels and their bogies are added. Road wheels are hung in pairs of pairs with no overlap, which requires the modeller to built up four sets of four wheels on a bogie that has a long leaf-spring suspension unit on the top side, with the paired wheels pivoting at the centre underneath. An additional solo wheel is installed just in front of the drive sprocket, which slips over the axle using the supplied poly-caps. Care with the glue should leave you with a fully workable set of road wheels. The large idler wheels sit at the front in between tensioning rods, with the lower side skirt added to protect the road wheels from enemy fire. The mud-shedding curved sections fit over these and protect the suspension units into the bargain. A pair of large poly-caps are added to the sponson floors at the rear and are covered by a styrene cylinder, which is the mechanism by which the upper and lower hull clip together later in the build. Small return rollers/skids fit to the top of the skirts, and details such as number plate, towing eyes and road lights are added to the front and rear. The tracks are individual links, as previously noted, and clip together with firm pressure to form a workable track run with no glue. Each side uses 105 links, which means you won't be able to model the first 50 tanks off the production line, as they used more narrower links than later models. Now for the down-sides… of which there had to be at least one. The links are a little fiddly with my sausage-fingers in the mix, but they do have tiny separation marks on the contact ridge that varies between almost invisible, and a tiny hole in the piece that would respond well to a squirt of Vallejo putty, made flat by rubbing off the excess with your finger. There are also two tiny (and I mean tiny) raised ejector pin marks, one at each of the inside edges of the track links. You can take one of two attitudes to this. Shrug and add a little dirt to the tracks, or scrape them away gently with a #11 blade, which takes a matter of seconds for each one, as I found out when I had a go. The latter shouldn't slow you down by much, and that's the (admittedly tedious) route I'll be going down. Next comes the detailing of the upper hull, which is a single part to which various hatches and panels are added, along with two large louvered engine panels on the engine deck that slope in both directions from the horizontal. The upper hull is now mated with the lower hull by inserting the tongue at the front under the corresponding lip in the front of the lower hull. The hull is then levelled, and pushed home into the poly-caps that were installed earlier. I'm not entirely sure why you would leave the halves able to come apart, but that's the way Tamiya designed it, and it's not a problem. Grab-handles, stowage boxes and pioneer tools are added around the upper surfaces, and the prominent exhausts and their shrouds fix to the space between the two engine panels. A three-part tarpaulin roll has been cleverly designed to give an organic look and undercut ends for realism, and this is added to the rear slope of the engine deck along with a rather convoluted towing hook. To the hook is added the towing chain, which is made up from the metal chain supplied, and plastic hooks/loops. You will need to cut the chain into two 60mm lengths, so ensure you have the correct pliers/nips handy to do the job before you start. An Antenna base is added at the rear (although many S35s didn't have the required radios initially), and work can then start on the turret. The turret is an enlarged version of the one found on the Char 1Bis, and suffers the same lack of cupola doors found there. The cupola is split fore/aft and has vision port doors added, before being placed on the top of the turret using a bayonet retaining ring. The main turret is split horizontally around the bottom, and has the vision ports inserted from inside before it is closed up for good. The main gun is inserted into a simple cylindrical mount with a poly-cap allowing it to be posed at any angle, but with no breech detail within. The muzzle is hollow, and all you have to do is remove the moulding seam to make good. It is held in place by the mantlet, which glues to the front of the turret, and is then covered by the armoured cover for both the main gun and stub of the coaxial machine gun that sits by its side. An access door is mounted on one of the rear facets of the turret, which the commander often sat on, half out of the turret, in order to gain better situational awareness that was denied to him with no cupola exit. These doors were added in German service, and made a much smaller target of him as a result, exposing his head rather than most of his body outside the tank. There is a crew figure included in the box, in the same pose as the chap on the box art, and he is made up from eight parts, including helmet and sidearm. He is well-sculpted, and his backside is shaped to fit the aperture, so should gel well with the model. Markings Traditionally, Tamiya's decals have been a bit of a weak-point of an otherwise solid package, but lately the thick leathery carrier film has been left behind for a more modern thin one, and the whites have become more true to my understanding of white. The sheet is well printed with good register, colour density and sharpness, with the aforementioned thin carrier film, and from it you can build one of three machines, as follows: No.56, 18th dragoon Regiment – sky/green/brown horizontal camouflage, blue heart on the hull, and white 56 with French roundel on the turret. No.42 13th Dragoon Regiment - sky/green/brown horizontal camouflage on hull, patches of the same colours on the turret. White 42 and French roundels on the turret, plus red diamond. No.20, 4th Cuirassier Regiment - sky/green/brown horizontal camouflage with light blue cupola. White 20 and French roundel on the turret. Red/white chevalier shield motif on the hull. Conclusion Another good model from Tamiya, or a slightly unusual subject, but one that fits nicely with the current vogue of tanks from WWI and interwar periods. Construction should be straight forward and a good replica of this quirky tank should be achievable out of the box with relative ease. Inclusion of a figure, real chain and the individual link tracks are just a bonus. Well done Tamiya – quality over quantity seems to be their motto when it comes to new subjects. Highly recommended. Review sample courtesy of