Search the Community
Showing results for tags 'TAMIYA'.
-

US NAVY & USMC in 1/48 - F4F-4 on the table
Petr_Kreps posted a topic in Work in Progress - Aircraft
Hello to all, Some time ago I decided to switch from 1/72 scale to 1/48, I sold the whole collection (around 80 kits) and start to build a new one. My goal is to build collection of main types of US NAVY and USMC planes from WWII until now. I am faster in buying models than building them, so my stash contains around 60 boxes (you can check my Scalemates profile), but so far I finished just one Another 3 are in WIP, all of them from Tamiya, A-1H, F4D and F4F. A-1H Skyraider, VA-25, 577 - I am after basic wash, semigloss varnish and final weathering is in front of me. Gunze H and Tamiya Acrylic colours were used and I used mask for main marking, the rest are decals from the box. F4D Skyray, VMF-114, 3 - Final semigloss varnish applied and I will start final weathering. Gunze H and Tamiya Acrylic colours were used and I used mask to airbrush main marking, the rest are decals from the box. F4F-4 Wildcat, VMF-223, 28 - Gunze H used on bottom surface and AK RC on top. I struggle with decals on sides of fuselage. Tamiya and Techmod didn’t work, so I tried Eduard from their F4F-4 Profipack but didn’t work as well. I will remove the decals, repaint fuselage and use mask to airbrush the signs. This is where I struggle. -
Having become bored with my more elaborate builds, I thought it might recharge my modeling mojo to take on a simple Japanese destroyer – and perhaps actually finish it! Tamiya’s of the 1/350 scale IJN Kagero seems like a perfect choice. If it lives up to the Tamiya reputation of great fitting parts, assembly should be a snap. Just to keep things interesting I picked up the Infini brass upgrade set for it too. I’m hoping to complete this one fairly quickly with a minimum of the scratchbuilding which tends to bog down my projects. We’ll see, but this should be a fun, straightforward build! True to form, Tamiya’s Kagero hull parts fit beautifully and the hull went together quickly. My only quibble here is the split hull design. While the waterline/full hull option here is nice, molding the lower hull separately builds in a bit of extra effort to integrate the lower and upper portions. I definitely prefer the simpler single hull approach of their earlier USS Fletcher kit. That said, the join was pretty good and only a little Mr. Surfacer 1200 was needed to blend things.
-
After a few months of it dusting away in my spray booth, finally got around to finishing it up. Did end up being a lot simpler compared to my previous T-72m1 also from tamiya, but still fairly happy with the results Everything aside from the tracks came with the kit itself out of the box with the tracks themselves being the ones from MENG
-
My first GB of the year, looking for a nice easy build. My entry is Tamiya’s 1/72 F-84G, plan is to finish it in the scheme shown on the box art.
-
After a longer quarter scale vehicle abstinence, it´s time for my dad to start a new one. DSC_0008 by grimreaper110, auf Flickr didn´t have enough AK RC SCC15 left, so used AK RC Forrest Green instead, it´s more or less the same green tone. DSC_0009 by grimreaper110, auf Flickr DSC_0010 by grimreaper110, auf Flickr
-
#4/2024 After some pause, time for a 1/48 vehicle between all the aircraft. Tamiya kit oob, thanks to the quality it was an easy and straight forward build. Painted with AC RC Forrest Green Build thread here https://www.britmodeller.com/forums/index.php?/topic/235135794-medic148-austin-k2y-ambulance/ DSC_0001 by grimreaper110, auf Flickr DSC_0010 by grimreaper110, auf Flickr DSC_0003 by grimreaper110, auf Flickr DSC_0004 by grimreaper110, auf Flickr DSC_0005 by grimreaper110, auf Flickr DSC_0006 by grimreaper110, auf Flickr DSC_0007 by grimreaper110, auf Flickr DSC_0008 by grimreaper110, auf Flickr DSC_0009 by grimreaper110, auf Flickr DSC_0012 by grimreaper110, auf Flickr DSC_0013 by grimreaper110, auf Flickr
-
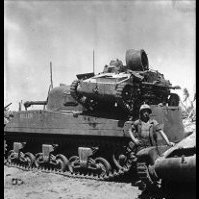
Did the British Army use the Late Producton M3 Stuart ? Cheers Wellzy
-
 Hello my friends, Here it is! My 2nd Honda Repsol bike, with cowls in place this time, is now ready for inspection. Even if it is a bit less detailed (mainly regarding cables running under the dashboard), I admit I love it and probably even prefer it to the first one, maybe because it is the last build, but above all because the cowls in place give the best perception in term of design and aerodynamics of this beautiful G.P bike. The decision to build a new model is for me, as for most of you I suppose, the result of an aesthetic crush, and the first time I saw the Tamiya box-art of this 2014 Honda Repsol, I thought I would build it some day. I finally build it 2 times! For this 2nd build, I sometimes used alternative approaches for some details (no use of the provided decals for the Black stripes on the seat cowl and the tank cover, or yet use of the Kevlar Fiber pattern SK decals inside the upper cowl instead of the painting option), but most of the time, I was faithful to my first build. So, the Top Studio Chain set was patiently assembled and set in place another time to represent faithfully the chain, and, to give another example (I could give many), the rims were dug using the same technique than for the first build. Here are below the pics: I have now to try to represent Marc Marquez on this bike (from a Valentino Rossi figure I recall), what will be another challenge. I just began the work: Thanks for watching Cheers, Olivier P.S: for those of you interested, here are the links to the first build WIP and RFI:
- 21 replies
-
- 17
-

-

-
- 1/12
- Honda Repsol 2014
- (and 1 more)
-
This is my model of Tamiya’s Mazda MX-5 ND / Mk IV (kit #24342). The model is an homage to a real car formerly owned by a former member of our local MX-5 club. Wheels are Aoshima 19” AVS Model T6 (#045527), exhaust tips are Hobby Design (actual car had two dual-tip outlets, though perhaps not this big!) and paint is Tamiya TS-95 Pure Metallic Red over grey primer. Grant. With “stock” sibling
- 10 replies
-
- 26
-
-
- Mazda MX-5
- Tamiya
- (and 1 more)
-
HI everyone!🙂 this is my TAMIYA 1/24 FIAT 500 A very cute little car... the kit is aged,however,I think it's a good kit I did some modification and detail up hope you guys like it!
- 16 replies
-
- 34
-
-
 My record in group builds is frankly appalling but I'm hoping I can find the enthusiasm and most importantly the time to make a 2nd contribution to this GB. I couldn't not do a French jet, as my in-progress Streak is an Adl'A jet and my 'Streak for the GB is a Belgian jet, I decided I'd do a plank wing F-84G as a French jet, marcher la planche = walk the plank. When Modelzone were in trouble they were selling a lot of stock off cheaply, I came away with half a dozen Academy F-84E/Gs at £4.99 a pop! This is one of those kits, I'll be doing it in the markings of ER2/33, a reconnaissance unit based at Cognac, deep in the Charente department of France in 1955, the decals are courtesy of Model Art. The wingtip fuel tanks feature a stylised seagull, the historical markings of SAL6, the unit continues as a reconnaissance unit to this day, equipped with the MQ-9 Reaper. The subject aircraft can be seen here, if you look closely, you can see a camera fairing on the belly of the aircraft beneath the cockpit, hopefully, somebody can help out with the details of this (Patrice @TEMPESTMK5 what do you know)? Here'e the box... ...the contents... ...and the decals. I like the Academy kit, it's not a shake and bake kit, it needs some effort especially around the inserts on the fuselage where the panels depicting an E/very early G (no auxiliary intakes), or standard G (auxiliary intakes), also, it does have some sink marks (notably on the wing upper surfaces above the wheel well walls), but I'm happier dealing with that than I am mucking up a Tamiya kit at several times the cost (I can already hear you asking "Who can muck up a Tamiya kit", "Well!!!..." I reply and passing my drink to somebody to hold while I demonstrate that I am that man). I just hope I haven't bitten off more than I can chew time wise!
 -
I’m guessing this is the Italeri kit with new decals based on the price but will be happy to be proven wrong. https://www.hlj.com/1-48-scale-f-a-18f-super-hornet-us-navy-special-paint-tam38104
-
This Kit has been such a pleasure to make .... 5th model now... think i'm getting the idea. 🤓 BUILD DIARY
-
 ok here we go..... This is the version i'm going to do - as now restored at Duxford. No 3rd Party Items just things i had knocking around at home ... like the odd bit of wire Later found out that the IFF? tranmitter should not be there? oh well its there now! First time using photo eched parts ...interesting Just taped in place.... the fit is just great on this kit! Another day another few bits of primer... Mr Surfacer 1500 naturally Same bits detail painted Cut the tail elevators to droop a little. All orifices filled - ready for a coat of Tamiya Surfacer. The undercarriage covering panels are just blue tacked in place ... i thought better than having two undercarrige stalks poking out in the way. Never used Tamiya Surface Primer before .... lets see! Seems Ok... Its bought out some details i had not even seen before Thats it for now.....
- 10 replies
-
- 14
-
-
Hi Modellers My F-14 Tamiya in 48 scale Managed to squeeze an Eduard Cockpit fitted with Quintadecals into it. Eduards Cockpit is not meant to be built into a closed model, thats for sure. Alpha probe and camera underneath the nose aftermarket, exhaust a mix from reskit and KA models. Decals a mix of furball and modelkasten and homemade (because i f... up) Paints Gunze, Tamiya and Oils from various art material suppliers. Took me a looong time and since this wish started in 1995 i kept the Jolly Rogers theme. But in all grey as i am myself now. Thanks for watching.
- 30 replies
-
- 86
-
-
-
- Tamiya
- F14 Tomcat
- (and 1 more)
-
Good day, Finally I am able to post something for this year. A previous failed project consumed the first month and half of the new year so here is my first submission for 2024. This is the Tamiya F-16C displayed from the 57th Fighter Weapons Squadron at Nellis AFB, Nevada. The highlights are as follows………… 1. Paints used : A. Airframe : Vallejo Pale Brown, USAF Tan, US Forest Green, USAF Medium Gray B. Exhaust : Exterior - AK Extreme Pale Burnt Metal ( Tamiya Black Panel Line wash ), Steel. Interior - AK Buff with Tamiya Black & Brown panel line wash C. Misc : Tamiya Flat Black, Flat White, Gun Metal, Metallic Gray, Lifecolor Dark Gull Gray, Polly Scale Lt Ghost Gray ( FS36375 ), AK Deep Blue 2. Wolf Pack AN/ALQ-188 ECM pod ( centerline station ) and dual chin pods ( all three resin ), Italeri ACMI pod ( port wing rail ) 3. Twobobs decals ( Fighting Fulcrums #72-002 ) 4. Master metal pitot tube & AOA tubes 5. Washes : Vallejo black, dark gray, light gray. Tamiya black, brown Tamiya continues it`s reputation of excellence with this kit. There were no issues with the parts fitting together without major or even minor surgery. I used putty in just a couple of small sections of the kit. I decided to include the pilot figure. I used my customary plumber`s putty and small lead fishing sinkers for ballast in order to have the Viper sit right. I inserted the putty and sinkers inside the nose and just aft of the cockpit. Despite the age of the decals, ( I cannot believe just how long I had these decals for ), they adhered and settled well with solution. I chose the early release from Tamiya of the F-16C for this particular subject as it did not require anything under the wings ( although I could have as some Aggressor Vipers tote external fuel tanks and four missile launch rails ). I enjoyed this kit very much and recommend it for all skill levels. Thank you in advance. Respectfully submitted, Mike
-
 Welcome dear friends to my latest build. The Hyakushiki shitei lll Recon plane in 1/48 scale by Tamiya. This will be my first ever Japanese aeroplane and my return to aeroplanes in general after a few months off doing various group builds. It’s a subject (like most of my other builds) that I know little about but plan to learn on the job. I love the look of this beast and it’s been working its way to the top of the stash for a while. Here’s My typical starting position for now as I want to get the thread running. A tidy bench after the last build and a nice unopened box of goodies. I hope you’ll join along to keep me company and hopefully give some sage advice. More after Dinah. 😉 (Sorry) Johnny
 -
 Having bitten off way more than I could chew in a fit of enthusiasm during the Salty Sea Dog GB, I'm left with several builds still on the go. I think in the interests of not wasting mod time, I'll just continue them in new threads here. The first half of the build, along with most of the research can be found here: This one has stagnated for a while, and it actually has taken a lot of modifications to take the (initially hoped for shake and bake) Tamiya kit to convert her to her configuration at the time of sinking in April '42. Still, we've had some colour. I hope you'll forgive some comparisons, they're not intended to show off my shonky work, rather for me to see some side-by-sides to work out which guesses were right, which were wrong, and what subsequent modifications and remedial work I need to make. Bizarrely, the easiest way to do that seems to be posting them here over incessantly clicking between internet tabs and photo windows. ( /\ this photo is actually a slightly earlier configuration) Nothing like some zoomed in shots to show up how shonky your work is! Andy
- 40 replies
-
- 12
-
-
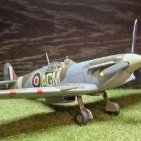
 Supermarine Spitfire Mk.Vb, EP829 T-N, 249 Squadron, Qrendi, Malta, April to May 1943. Sqn Ldr John J Lynch. Malta's 1000th victory Subject; Supermarine Spitfire Mk.Vb, non-tropicalised, clipped wings, x2 Hispano Suiza 20mm cannons and x4 Browning .303's Manufacturer; Tamiya Scale; 1/48 Kit number; 61033 Aftermarket; Eduard Zoom P.E set. Eduard decals. Paints; Exterior upper, AK Real Colour RAF Middle Stone and Dark Earth overpainted with custom mix of RAF Extra Dark Sea Grey and XF8 Flat Blue. Lower, mix of XF23 Light Blue, XF19 Sky Grey and XF2 Flat White for the AM Sky. Interior; AK Real Colour RAF Interior Grey Green and Xtreme Metal Matt Aluminium. X7 for the wing tips. Various Tamiya X, XF and LP and Posca pens for detailing. Primer; Mr Surfacer 1200 Varnish; AK Gauzy Shine Agent and Tamiya X35 Semi-Gloss. Weathering; Flory Dark Dirt and Grime wash, Abteilung oils, Ammo North Africa pigment and Tamiya weathering palettes. Extras; Prym Knitting Elastic for the antenna wires.
 -
 My first plane model in 40 years (usually it's tanks), I was inspired by the description in AK Real Colours for Night being a mix of a blue and black. Went for the Tamiya P-47M 1/48 - it's from 2005 (61096) - excellent model, any fault with the construction was mine and not due to the model! As I paint with rattle cans I got a custom filled rattle can and settled on RAL 5004 ie a very, very dark blue. I did try it out on various undercoats as testers and found it was too blue, when used on black undercoat. So finally went for a pale grey, as the final colour looked more black The weathering and inspiration for the model came from AK 56th fighter group in WW2 - the colour and weathering for the drop tanks, undercarriage doors, wheels, I lifted straight from the cover. Overall learnt an awful lot that I will carry over to my next plane, as I have the aviation bug now, including: - Pencils are harder to use than oils and scratch the base paint (I used only pencils on this) and the colour changes to a whiter look with the clear coat - The decals in the 56th FG book were awful and totally the wrong colour( great book, terrible decals), the decals in the box were (old?) difficult to get to sit on the model, even with a gloss layer for them to sit on, so I will go with spraying markings next time (as I do on tanks) -I'm sure most of you know this already, I didn't but the the Tamiya model was a masterclass in what a model should be for the way it all fitted together - I will actually be drawn to Tamiya planes first after this I have started a Loire 130 and looking to see what other aircraft I will do next.
- 15 replies
-
- 38
-
-
-
My first build for the GB will be Tamiya's venerable Mosquito FB,VI in 1/48 scale, this will be my second build of this kit as I did one in 418 Sqn RCAF several years ago, I also built an older Airfix 1/48 one for the last "Less Than A Tenner GB" which was actually a nice build. Here's a picture of this time's box and contents; I have worked for Rolls Royce for more years than I care to remember and before some idiot decided to close it I was on their Ansty site just outside Coventry which was used by Standard Motors during the war to produce around 500 FB,VI's so when I build an FB.VI I like to build one that was built on that site, which means building one from either the HP, HR, RF or TE range. Now Warwickshire (my home county) also has a Royal Auxiliary Air Force Squadron and during the later stages of WWII it flew Moqsuitos on intruder missions and bomber support missions as part of 100 Group and after a couple of months on F.II's it was equipped with FB.VI's and I have found some of their serial numbers that include aircraft built by Standard Motors at Ansty so the build would have two local connections. I have found serials as I say but as of yet no photographs and if I can't find any I will need to either just build one in it's known codes and serial in the squadron's standard camo or build another Standard Motors built aircraft that I do have both the markings for and photographic evidence. I have several options in the decal stash to choose from and also have an Eduard Brassin Look set that I picked up at Telford somewhere, I shall post pics of this and any final choice of airframe later. Off topic but important to me is the fact that this will be my first build without my modelling buddy for the last 13 years, Mabel my black lab who we had to say goodbye to on Wednesday. I tend to do a lot of my modelling in our front room sitting on the floor and she would come and lie next to me, or actually sit on me which is about as comfortable as you imagine, to keep me company. It has been difficult losing her and sitting on the floor to build something will be very strange without her, so this will be for her, Mabel's Mossie if you will. This is her towards the end; Sorry for going off topic but thanks for looking in and any help, comments or criticisms will be gratefully received. Craig.
- 129 replies
-
- 37
-
-

-
 Got this finished last month. I used the Vector wheel bays, P-47 upgrade set and M/N prop. Wheels are Ultracast ones and the 75 gallon drop tank is from Edaurd's Brassin range. K-14 gunsight from Aires. Painted with Alclad II for the NMF and Humbrol enamels for the rest. Decals are from Zotz, with the Insignias and stencils from the kit and a few Eduard stencils. I changed the seat near the end of the build to an Ultracast square type as I had incorrectly used the earlier type from the kit. (Click on the photos for a larger image).
- 29 replies
-
- 60
-
-
-
I have only been back to modeling as an adult since 2020, and I'm fairly good (so far) at finishing what I start, but I had begun this 1/72 Tamiya Il-2 back in late 2020, so pretty much three years ago, and eventually it got shelved. Honestly, I think I was a bit overwhelmed with how good the kit was! At the time I had never encountered such high quality! Anyway, I got into other kits and especially some of my projects modeling a/c in the markings of lesser seen air forces (i.e., Hawker Hurricanes around the World, Last Legs Ponies, Minor Gustavs, Sexy American Singles in South American Service, and Spitfires-by-the-Seas). Continuing that interest, some time ago I decided instead of building the IL-2 into one of the Soviet box versions I would try to obtain Mongolian air force markings, which I was successful in doing eventually by finding one of the lousy Airfix kits that includes the Mongolian decals. Here are the main pieces, most of which have already been partially painted prior to assembly (don't ask). Time to get this one done!
- 33 replies
-
- 10
-
-
After many hours of reading in this quite busy GB I figured I might have to give it a go myself. Looking through the shelves at my local store I found a Tamiya Beaufighter that I’ve been wanting to build in the past. Ever since getting back into the hobby during the pandemic though, I have had massive issues with actually finishing my builds. Usually I have a good flow until the first error, and then it just dies out. So, my main goal with this one is just to have a finished model built straight out of the box. No fancy detailing or complicated schemes. Just a “simple” gray/green. I apologize in advance for any inaccuracies. The added social pressure of all you knowing what I have started should hopefully help me keep the focus on this one and not be tempted by all the other shiny boxes in the stash. Bags will probably remain unbroken until my local groups build night this coming Tuesday. Thanks for stopping by. Hopefully I'll have an update soon.
- 14 replies
-
- 11
-
-

Tamiya Hanomag in France ( without the Krupp )
Maddoxx77 posted a topic in Work in Progress - Armour
So...... time for a much needed Tamiya build. After the Bordermodel Stug i want to start a new diorama with some Tamiya builds and some leftover bots and pieces from other kits. i think these 2 models will make an excellent scene. I still have some resin figures in the stash but i also ordered some new ones: I'm thinking France early 1940 or Operation Barbarossa. The kits itself look really good for their age. The krupp got new molds in 2003 i think and there is an excellent driver figure in there. Anyhow, i think these models are just what i need, simple oob, tamiya fit. So let's crack on shall we? Cheers guys 🍻🍻🍻- 89 replies
-
- 11
-