Search the Community
Showing results for tags 'T-34/76'.
Found 7 results
-
Battle of Kursk - July 1943 (DS3505) 1:35 ICM via Hannants The T-34 was Stalin's mainstay medium tank that was produced in incredible volume by extremely crude methods, and thrown into the fray against the numerically inferior German tanks on the Eastern Front. The designers combined a number of important advances in design such as sloped frontal armour, wide tracks to spread the load, and the ability to cope with the harsh Russian winters without grinding to a halt, which was a problem that affected the Germans badly after the successes in the summer of Operation Barbarossa. The part count and cost of the tank was continuously reduced during production, with plants turning out up to 1,300 per month at the height of WWII. The initial welded turret was replaced by a cast turret with more room, and later the 76mm gun was replaced by a more powerful 85mm main gun in the T-34/85 with an enlarged turret, giving even the Tiger pause for thought. The 7.62cm Pak 36(r) Anti-Tank gun was a converted and bored out captured Soviet Divisional Gun (F22), of which over 500 were taken during the Nazi’s initial successes of Operation Barbarossa. In typical Nazi fashion they were pressed into service after modification, and for a while were the Wehrmacht’s most powerful field artillery until superseded by other models as the game of technological leapfrog continued in the East and West. The Kit The model arrives in a top opening box with ICM's usual captive inner lid with painting of the tank and gun in a combat situation to give an impression of their use in the battle for the Kursk salient. Inside the box are seven sprues in grey styrene plus two hull parts in the same colour, four lengths of black flexible plastic rubbery tracks and two towing cables still on their sprues in the same material, a small sheet of decals and a varied group of instruction booklets that show where the three kits originate, the T-34 from 2015 under the code 35365 and the Pak 36(r) from 2010 with code 35701. Detail is good throughout, and a set of crew figures tooled in 2010 with the original code 35801 are added to improve value even further. T-34/76 - early 1943 Production (35365) Construction begins with the fitting of the engine cover onto the rear decking and the bow machine gun with its armoured fairing. The two intake covers are then assembled and also fitted to the rear deck. Four plates that are fitted to the underside of the rear decking to blank them off, with the large radiator panel fitting over the aft portion of the deck, then having the rear bulkhead detailed and attached. The drivers hatch is made up from two parts plus a couple of smaller covers before being glued into position. Inside the lower hull the eight Christie suspension boxes are fitted and the driver’s controls sit justified to the front left, whilst the rear mudguards are fitted to the rear. The final drive housings and five stub axles on their swing arms are glued to the hull sides as are the idler wheel axles at the very front of the hull. Two comfortable-looking seats for the driver and machine gunner are made up and slotted into place, then the two hull halves can be joined together. The road wheels are made up from pairs with moulded-in tyres, while the idler wheels are bare, as are the drive sprockets, all of which are fitted to their respective axles. Towing hooks are attached front and rear, then grab handles, stowage rails and smaller lifting eyes are added to the upper deck, then it’s time for the tracks. These rubbery plastic tracks are moulded in black, and are made up from two halves that are glued together with epoxy of super glue (standard liquid glue doesn't work), then draped around the road wheels to complete the run. If you are looking at making them more realistic, painting them is a great start, and you can also glue some sections to the road wheels to give them the correct sag. This isn’t an interior kit, but you get a fairly detailed breech and coax machine gun, which fits to the back of the pivot that is hidden behind the mantlet once they have been attached to the hull, leaving the pivot unglued to maintain movement after completion. The lower turret with integrated ring is glued to the upper, and if you check your references, you’ll see that some were an absolute mess, so be careful not to make things too tidy! The mantlet and tip of the coax MG fit over the front and are joined by a 3-part mantlet cover with the barrel halves glued together then threaded through. Hinges, hatches, mantlet rain-cover, vision ports, lifting eyes and stowage rails are all scattered over the surface of the turret, which incidentally has an improved cast texture moulded-in, in case you didn’t spot it. Speaking personally, I would wash it with some liquid glue to soften the texture a little and give it a more irregular height in places. Final assembly includes two boxy additional fuel tanks at the rear, spare track links, pioneer tool boxes and aerial base, plus a folded tarpaulin, headlight, horn, the two flexible towing cables and a large saw attached before the model can be sent for painting. The towing cables are suffering from a little flash, and as the instructions give you an alternative of using your own braided cable and plastic towing eyes, this is probably your best option. Markings There are six markings options in the box and although the painting guide it printed in greyscale on thin paper you are fairly safe to assume that the three dark vehicles are Russian Green, while the white ones are winter distemper. From the box you can build one of the following: T-34 1st Leningrad Front Red Banner Tank Brigade, Summer 1944 (Green) T-34 1st Leningrad Front Red Banner Tank Brigade, Winter 1943/1944 (White) T-34 “Revolutionary Mongolia” Tank Column, Winter 1943/1944 (White) T-34 “Komsomolets – Severomorerts” Tank Column, Winter 1942/1943 (White) T-34 Stalingrad Front, Winter 1942/1943 (Green) T-34 5th Guard Tank Corps, Kursk Arc, July 1943 (Green) Obviously, you’ll be doing the last option if you intend to stick with the Kursk theme, but there are plenty of other options if not. The decals are printed in-house, and of the two decals that are relevant (i.e. 2 or more colours), registration is good, as is colour density and sharpness for the whole sheet, with lots of patriotic slogans for the various options in red for the winter colours, and white for the warmer weather scheme. 7.62cm Pak 36(r) German Anti-Tank Gun (35701) The tooling for this kit dates back to 2010, and as it is a smaller artillery piece than those fielded later in the war it fits on a single sprue, and has a short instruction booklet. Detail is good, with tread on the tyres and some nice moulding throughout. Construction begins with the barrel and breech, the former being split vertically with a separate two-part flash-hider that is split horizontally. The breech section fits into the end of the barrel on a square peg, with the vertically sliding block slotted into the back along with its control lever and damper. The carriage is made up from halves with the elevation guide moulded into one side and small parts added along its length, then detailed with the support frame and recoil dampers. The sighting and aiming mechanism glue onto the left frame, after which the barrel is slid onto the recoil bed from the rear. The gun support’s cross-member has stiffeners fitted front and rear, with a top surface where the frame fits added to the top, while the splinter shield is created from two layers on the cheek panels, with a second layer at the centre fitted from the inside. There are some ejector pins on the rear of the shield that will need filling, although some may be hidden by the boxes at the rear, so check so that you spend your hobby time wisely. The gun has split trails, which are made up from two long parts to make up each one with a hinge added to the front end, and the self-entrenching parts, ground spikes, pioneer tools, hitch and trail-lock parts applied, then all the sub-assemblies are joined together with the two wheels, which as mentioned earlier have a nice tread pattern, and a hollow inner face to prevent sink-marks that is filled by a separate sidewall. You get two each High Explosive (HE) and Armour Piercing (AP) shells, plus another two fluted shell cases that have separate lids and protect the rounds from accidental detonation. Colour call-outs differentiate the type for easy ID in a hurry. Markings A separate glossy sheet gives the colour codes in Model Master and English, with three schemes shown on the rear in grey. The earliest is painted Panzer Grey 1942, while the 1942/43 option is painted dunkelgelb, then 1943/45 has olivegrun mottle over dunkelgelb across the whole gun, so you can choose from either of the dark yellow options if you’re staying true to the Kursk theme. German Artillery crew (35801) Provided on a single large sprue, this set contains five figures, all wearing the standard Wehrmacht uniform of feldgrau with stahlhelm and calf-length boots, plus the usual water bottle, entrenching tool, ammo pouches etc. Two of the figures are posed walking stooped dragging two fluted shell containers to the gun to be used, while another is opening one in a kneeling position while opening it. The fourth figure is kneeling and beckoning the shell dragging men to hurry, while the last is kneeling on both knees, holding up field-glasses to sight the next target. The instructions show the figures complete, with the parts called out by numbers and the suggested paint colours marked with red letters in a box. You can find the part number in a diagram overleaf along with a table giving paint colours in Model Master codes and English again. Conclusion Even though it’s a mix of different toolings from the ICM catalogue the whole hangs together very well, and even though it’s out of stock at Hannants presently, it represents good value, especially with a 10% backorder discount. Remember that if you want to make a little piece of Kursk, you’ll need to be selective about which decal options and paint schemes you use, then you won’t go far wrong. Highly recommended. Available in the UK from importers H G Hannants Ltd. Review sample courtesy of
-
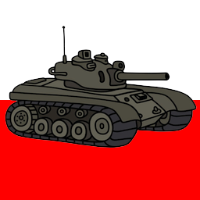
 Hello, friends! 👋 While the clear coat drying on my Hind E, I decided to start a new - and very unusual for me - build. I choose this kit just because I like the shapes of that tank! Also, my wife asked me to build something not aircraft-related and I got this box during the pre-sale from ARMA-MODELS.RU with some additional features: the brass barrels, brass wire, photo etched set, two paint jars (4BO and Whitewash), antennae, an air horn and the Fido (Sharik). So, here is the box: A lot of the stuff inside: The Runner A: The Runner B: The Runners C, D and G (ah, I noticed some ejector pin marks on the tracks): The Runner F: An instruction sheet, the color call-out and the Runner E with a clear parts along with the decals and wire: And finally, some additional aftermarket upgrades: I think I need to start from cutting the tracks off the sprues, so that’s all for today! 🐈
- 128 replies
-
- 10
-

-

-
Somewhere in the Soviet Union... This started as a build of an old Tamiya T-34 kit to test the hairspray technique. The model was left for two years before I found the inspiration to complete it again a couple of months ago. Figures are Miniart.
-
Hello, Britmodellers! 👋 This is my first armour build since the late ‘90s. It’s an excellent kit from Zvezda with a small addition of PE parts. I’m not the fan of an intensive weathering and dirt, so I limit myself to some chipping and a little amount of dust. Let’s start: The tracks and wheels were painted prior the final assembly: The small details are glued prior the painting and brush-painted with a water-based paints later: The top view: The bottom view: This time Zvezda provides us an excellent decals: The grill is from the PE kit: This time I tried the chipping (the first coat was the spirit-based Rust paint and the second is water-based 4BO chipped with a hard brush): The tarp was the weakest part of the kit and I replaced it with a DIY from the Epoxy Putty: The rear view on the tarp roll: The headlight: The closer look at the turret: The front view: I’m pretty happy with the results and have a great time building this kit! Here’s the link to the WIP section of the forum: Thanks for looking! ☺️
- 30 replies
-
- 29
-
-
Hi, This is a 1:35 model the T-34/76 medium Russian tank. This is Tamiya kit no. 35149. I made it as moving model (the film about how can it ride is at the bottom). Additional parts are the Friulmodel tracks and handmade towing cables.
- 13 replies
-
- 19
-
-
Russian T-34/76 for Academy 1:35 Eduard Eduard are really churning out the etched detail sets, trying to keep up with the number of releases that the various manufacturers are putting out, plus issuing sets for older kits. This set is for the Academy 1:35 T-34/76 Russian medium tank. The relief etched sheets are up to the usual standards as Eduard seem to have good quality control on their releases. Coming in the usual sleeve packaging with card inserts to protect the brass there is one set for the exterior and one for the interior. [36395] This set is contained on one medium sized sheet of brass. Apart from the usual brackets and clamps that most of these sets include, particularly for the pioneer tools there are also upper suspension plates, grab handles, complete replacement horn and hatch fittings. The front and rear mudguards are also completely replaced, and will require some careful folding and rolling to get the shapes right. The engine intake and exhaust grilles are replaced, along with their attachment frames. The stowage boxes are fitted with replacement lids, hinges and carrying handles. There is also a new armoured plate that covers the top of the manlet. Conclusion Even Academys T-34 can do with some extra detailing, and this set provides enough to make the difference without going overboard. It’s not a huge set, and with care and patience the parts should be ok to be used by all but the pure novice but still be slightly challenging in areas.
-
Russian T-34/76 (model 1943) 1:35 Revell The T-34 is undoubtedly the most recognised Soviet tank of WWII. The T-34 with its blend of Armour/armament/mobility was a real worry to the German forces when it first appeared on the battlefield in 1941, and it was only with the later Tiger & Panther tanks the Germans would gain superiority over the T-34, although in a numbers game the T-34 would be produced in greater numbers than any German tank. The T-34/76(model 1943) was not surprisingly produced from 1943 onwards. It had the 76mm gun of earlier tanks but ammunition storage was increased from 77 rounds to 100. A larger fuel capacity would give an extended range. In addition some of the armour was increased from 65mm to 70mm. The Kit This is a re-boxing of the new too ICM kit. The kit arrives an Upper & Lower hulls, with 5 additional sprues of parts; and rubber band tracks. Construction starts with the upper hull. The drivers hatch is completed and added to the hull. Also added at this point are the main engine hatch, and the front mounted machine gun blister. The engine intakes are made up and also added to the engine deck. The exhaust are also added to the rear part at this time. Construction then moves to the lower hull. The drivers and front gunners seats are made up and added into the hull (though there is no other detail present inside). 4 suspension boxes are added to each side of the lower hull. Rear fenders are also added at this point. Five suspension arms are added to each side of the outside of the lower hull. Mounting points for the front driver, and rear idle wheels are also added at this point. After the lower hull is complete, it and the upper hull can be joined together. Next is the tedious part of tank construction, the wheels. There are 5 pairs of driver wheels, with the front two and back two seeming to have rubber tyres, the rest do not. Also there are the drive sprockets and idler wheels to construct. The tracks are of the rubber band type and each of these consists of two parts per side. Once the tracks are on various hull fittings are made up and added. There are boxes for the rear, tool boxes for the sides, a roll of camo netting? and various items of recovery equipment to add. Construction can then move onto the turret. A complete breach and co-axial machine gun are provided for the inside of the turret. These are first made up. The mantle is made up and then attached to the turret. The breach can then be attached to the inside of the mantle, and the main gun to the outside. The hatches and various turret fittings can then be attached. The complete turret can then be mated with the completed hull. Two tow cables are provided if the modeller wishes to use them. Decals Markings are provided for two tanks. Tank 106, 30th Guards Tank Brigade, Leningrad Front 1943. Tank 17, unknown unit, Stalingrad, Winter 1942/43 Conclusion This looks to be a well moulded kit and should present no problems to the modeller. It will make up to a good looking T-34. Recommended. Revell model kits are available from all good toy and model retailers. For further information visit