Search the Community
Showing results for tags 'Stormtrooper'.
Found 3 results
-
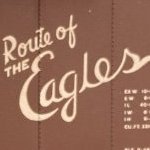
A German officer described the British tank as a "gigantic, iron dragon" so I thought that was a good name to incorporate into my title. Shown here is Takom's Mark IV Female being stalked by two stormtroopers with grenades being tossed on the roof. Ive been reading 'Deborah and the War of the Tanks 1917' by John Taylor and many tanks were lost to the extremely muddy conditions in No Man's Land. Other tanks out distanced the infantry and were subject to fending for themselves as shown here. Flirt II was built out of box and the ICM figures came from the Stormtrooper set.
- 7 replies
-
- 24
-

-
- Stormtrooper
- 1/35
- (and 1 more)
-
Afternoon Guys, Just a quick build whilst i had a couple days off from work. Bandai New Order Stormtrooper. Pete
- 2 replies
-
- 7
-
-
- bandai
- stormtrooper
- (and 2 more)
-
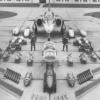
First Order Stormtrooper Bandai 1/12 This guy turned up yesterday (less than 2 weeks from Japan, not bad at all), so I thought I'd do a small wip for him. As anyone who's made any of the Bandai figures will know, they just clip together with little effort, so I'll just show the basic steps of the construction, and what ever paint and weathering I end up doing. As it stands, I'm intending to do him as one of the troopers in the attack on Maz's castle on Takodana, so I'll make some sort of forest base along the lines of the one I did for my speeder build (so I'll be breaking out the tea leaves again). If I find the time, I might try making a shoulder pauldron for him too, to spice him up a bit. Before I get going on any construction, I'll show a run through of the sprues, and some of the (pretty amazing) mouldings you get in these kits. So, two sprues in white, and two in black for the trooper, plus one sprue of vinyl joints and one for the base. Obviously, the two white ones contain the main armour The black sprues have the body parts and weaponry. The second one also has the clear tinted parts and a couple of soft plastic clips that attach to the back of the riot shield Lastly the soft plastic/vinyl sprue for the joints, and the standard figure base that comes with all the 1/12 kits As usual with Bandai the plastic is very glossy. Although that's realistic enough to the real trooper armour, I always find it make the kit look a little toy-like, so I'll probably tone this down with a light coat of satin varnish, but I won't bother actually repainting it. The dome for the helmet is one piece, which avoids the rear seam that the OT trooper kit has Nice shiny shoes (in stark contrast to the ones I'm wearing) Chest armour (upside down here). I like the fact that the little slits are actually open, so you'll see the black of the bodysuit underneath Riot shield. This has a clear tinted insert that fits in the hole at the top The grill piece on the helmet. Most of this is covered by the white panels, leaving just the textured area showing Nice tread detail on the soles Ribbed parts to cover the joints. These are inevitably going to be the awkward looking areas due to the articulation. At the moment I'm not intending to fix and fill the joints, but I'll see how they look once they're built up There's a choice of hands depending on what he's currently doing, or grabbing hold of The blaster is a two piece moulding in black. Much of this will need to end up white, so quite a bit of detail painting will be needed. I can't help thinking that it would have been better moulded in white, as it would have been easier to paint in the black areas rather than over-paint black plastic in white The original gun for comparison Despite the awkward painting required, the detailing on the gun is beautifully done, right down to the individual bolt heads The two tinted parts. One for the helmet visor, and one for the little window in the riot shield The Z6 Riot Control Baton. Again, a lot of this ends up in white, and would have been better starting out in that colour Last up we've got the usual Bandai instruction manual, and the standard option of stickers or decals for the markings Hopefully I should get to clip a few bits together over the weekend, so I'll update then Andy