Search the Community
Showing results for tags 'Star Wars'.
-
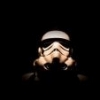
Hello again folks, I thought I'd share with you my latest project, For this I took a bandai K-2SO and decided to give him a new job, hence the name change, so may i present K-SSU, or 'K-series Stormtrooper Support Unit'. He's been tasked with assisting Sandtroopers on the planet of Tatooine, looking for hidden rebel sympathisers. I didn't feel the need to do a WIP due to it already being covered by Andy Moore with his fabulous K-2S0, but for anybody thinking about grabbing one and having a bash, then push the button, you wont be disappointed. (please excuse the mass of pics)
- 12 replies
-
- 19
-

-

-
I've just got back from the post office, having paid the usual ransom fee to claim my own property , but it does mean that I've finally got my personal Star Wars holy grail, the B-Wing. I know it's nothing new at this point, having been around in the US for a couple of months due to the SDCC exclusive, but I'll post some sprue shots for those that haven't seen it up close yet. Before I do though, a quick mention of the box art. It's a bit of a 'greatest hits' for Bandai, with X, Y and A-Wings and the Falcon all making an appearance. More importantly, though, lurking in the background you can see Home One, Ackbar's flagship from the battle of Endor. In the past, Bandai has shown subjects in the background of box artwork that have subsequently gone on to be released as kits, so I'm going to call it now. We'll be getting a box scale Mon Cal Cruiser at some point in the future. You heard it here first. Unless I'm wrong... then you definitely heard it somewhere else. I digress though, so back to the sprues. Sprue A The standard Bandai multi-colour sprue. Cockpit parts, visor, engine intake and guns Cockpit detail looks good, with the seat moulded onto the back wall. The big lug that Bandai always add to seats to secure the pilot figure is a bit ugly, but you'll need the figure in place anyway, as there's no landing gear included so no option to have it on the ground. The instrument panel looks nicely busy. As usual, Bandai gives you the option for a glazed canopy or an open frame. The guns aren't hollowed out at the ends so they'll need drilling. Sprue B The main parts for the blade aerofoil and the two smaller S foils. There's nice detailing on all the wing sections. Sprue C Fuselage sections and the cockpit outer shell. The cockpit shell isn't slide moulded, but it is a single piece so no seams to clean up. This sprue is where you'll also find Ten Numb. Nice detailing and he looks a bit better proportioned than some of Bandai's earlier pilots, particularly with the arms/hands. Sprue D (x2) Two small sprues holding the engine nozzles and other detail parts. Sprue FB-1 The clear sprue for the multi-part stand. I'm not quite sure what this is made from. It's slightly softer and more flexible than normal styrene. It could be a hard PVC or just a soft grade styrene. Sprue SWE1 Finally, you get the usual Bandai laser blast sprue that absolutely no one ever uses. Instructions are standard Bandai fare, albeit in a stapled booklet rather than the fold-out sheets they've used in the past. Also standard is the option for waterslides or stickers. I've never been that keen on Bandai's decals as the printing is often a little rough and pixilated, although they generally go down well. These look okay apart from the colour of the Hinomaru markings, which are far too yellow and should be more orange. I've got quite a bit on at the moment, but hopefully the build should begin before too long. Andy
-
So my Snowspeeder is done, and it's fair to say I'm very, very happy with this. As happy as I am with anything I've done. The Fine Molds kit is a little cracker (and I mean little). Painted with Artic White from the excellent Hataka "Orange Line" Lacquers and weathered with Flory Wash "grime", Tensocrom "smoke" and a little bit of oils. You know how I said it was small? Here it is on top of a YF-23 in the same scale....
- 2 replies
-
- 12
-
-
- Fine Molds
- 1/48
- (and 1 more)
-
Finally I have finished one of my favourite starfighters. Here is the WIP-thread: My goal is always to be as close as I can to the studio model, what is not always easy because this 1/72 model is so much smaller. I hope you like it. Thanks. Green Leader standing by.
-
Resistance A-Wing Fighter (06770) 1:44 Revell Star Wars has given us tons of memorable space ships to add to the annals of cool designs, and one that made its debut as a bit player in Return of the Jedi is the Kuat Systems A-Wing. It has been in various other Star Wars universe shows since and has been seen in the new trilogy too, although I’m yet to see the Rise of Skywalker, so no spoilers. The Kit This is a re-release and has been timed to coincide with the new film but has no Rise of Skywalker branding, just the generic Star Wars branding with Darth Vader in the top right corner of the box, which is end-opening, and has twenty five parts either suspended between two clear inserts, or in small bags to prevent loss and chaffing. The kit is in brick red and what I call “Star Wars Grey” overpaint, plus some of the innards in a darker grey. The interior of the hull contains the light and sound unit in dark grey with the batteries preinstalled, but isolated with a small clear pull-away tab, with the two yellow LEDs projecting down the exhausts to provide some illumination to the cut-away outer exhaust ports. The clear parts are painted with light grey framing, and a four-colour pilot figure is included with an olive-drab jumpsuit and red/white helmet, which would benefit greatly from a dark wash to bring out the details even if you’re not planning on detail painting. Everything snaps together as per the instructions, and detail is really quite good for the target audience, with lots of visual interest, plus a clear canopy that can be opened or closed and a pair of light diffuser inserts for the engines. Construction is fast, taking less than five minutes once I figured out that numbers AND letters were included on each part (more haste less speed), and everything clips together pretty firmly without the need for glue, although I’d recommend some for the more delicate parts such as the wingtip weapons. The landing gear is supplied and can be retracted in a rudimentary fashion by pivoting the legs into the open bays that would whistle terribly in atmosphere. The wingtip weapons have a key on their attachment pin, but be sure to mount them with the hollow “anti-sink-mark” cut-outs facing downward, or fill them and repaint. As usual with these kits there’s a grille for the speaker to render its tune, which in this case is limited to two sounds activated by a button on the right to the side of the cockpit rear. On first press it plays a take-off and shooting noise, with a similar swooping and shooting noise, repeating each one in turn on subsequent presses. As you press the button the yellow LEDs light and stay on until the sound effect has completed, which should give little Johnny or Jemima adequate time to complete their manoeuvres before going dark. Conclusion This is intended to be a toy that gets a pounding from a child of 6 or over, so it’s made of stronger plastic than your average model for longevity. It does have a good level of detail for a toy though, and at 1:44 scale it’s a good size. If you decide to give it to a child they’ll be very happy with it (if they like Star Wars), and if you build it as a model, there’s plenty of scope for repainting it and adding some details. The canopy isn’t the clearest in the world, but that’s probably due to the flexible plastic is has been moulded in that is unlikely to maim the child if it breaks during rough play. You can get the same kit in blue if you’d prefer, or you could repaint it to a scheme that suits you. Highly recommended. Revell model kits are available from all good toy and model retailers. For further information visit or
-
Ok, this probably won't be your typical Work In Progress thread. This started out as me trying out some pre-shading techniques which I've never really used before. I usually build 1/32 aircraft but thought the Falcon would be a great test subject for pre-shading and for me to see how it works (or not). The kit is the Force Awakens release of the Falcon. For AM, I've got Tyridium's lighting kit and the Green Strawberry PE. I started with the main hull sections. I used Tamiya NATO Black for the pre-shading on the bare plastic. Over this, I started to fill in the panels using Gunze H338 thinned down to about 70/30 thinner to paint. I went back and did the mandibles to match.
-
 So even though the workbench here at HQ is backing up with Group Builds, I've decided to throw my hat in with Bandai's mighty Millennium Falcon - someone had to, right??!!! How excited to see the postie finally delivering this one.....I really can't wait to get stuck in. Bandai Millennium Falcon_1 by Dermot Moriarty, on Flickr Wait...……..wha??????? Bandai Millennium Falcon_2 by Dermot Moriarty, on Flickr Why of course, it's the mighty small Bandai Millennium Falcon 🤣 - I'm still saving the cents and raiding the children's future college funds to save up for the Perfect Grade edition. Bandai Millennium Falcon_3 by Dermot Moriarty, on Flickr That's a regular-sized paint pot with it, not a five-litre tub! As the Captain himself says, she may not look like much kid, but she's got it where it counts.. 😎 Cheers and enjoy your builds. Dermot
- 15 replies
-
- 8
-
-

-
- Bandai
- Millennium Falcon
- (and 1 more)
-
After a significant period of no motivation here is my break out kit. Completed with Ginze Acrylics, artists acrylics. Happy Modelling Ian
-
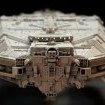
Bandai's newly released Super Star Destroyer in the slightly ridiculous scale of 1/100,000. Despite the tiny scale, the model is quite large for a release in the Vehicle Model range, measuring about 19cm long, althought the slender design makes it still feel quite small. The level of detail is almost as crazy as the scale - it's hard to believe injection moulding can achieve results like this. Painting was kept on the subtle side to avoid creating an out of scale appearence on something that's meant to be 19 km long. The build can be found here. Thanks for looking Andy
- 24 replies
-
- 42
-
-
-
I like to show my buildlog for the Zvezda Star Destroyer here too. So pictures. The bridge: Lighting the bridge: Trench-Hangar: Modding stuff, the part has a wrong height: Garbage Chute: More detailing: The hangar bay: The main guns: And more detailing: Lighting: cheers, Dirk
-
 Hi all. After some problems with the snow used in this small scene (that of AK) and changing the base for a larger one, I can show the work completely finished. For those who want to see the work done on the ships the links are: I have finished it in a month and a half, without messing with any other model in between which is a double achievement on my part. For the short time that I took to do it and because between the beginning and the end I have not taken a different model. Bandai kits related to the Star Wars saga totally and absolutely recommended. I have done some more and I have many others. From the first I can say the same and from the second I can say that the detail is equally impressive. The only but is its price. Even on the other side of the world it is high, here it is simply prohibitive for a normal pocket. Regards.
- 10 replies
-
- 38
-
-
-
- STAR WARS
- Empire Strikes Back
- (and 1 more)
-
I've just noticed from the Revell release sheet for 2020 that the company is boxing the Bandai kit of the B-Wing. I hope that will be a lot lighter on the wallet! The Bandai Death Star II + Imperial Star Destroyer also get the Revell treatment, but in 1/14.5 Million and 1/2.7 Million
-
First Order Heavy Assault Walker 1:164 Revell You might have heard of a series of films called Star Wars, and if you haven’t, why haven’t you used your internet connected device to get someone to retrieve you from under the wardrobe? The second film in the Sequel Trilogy as the three new films have become known introduced a host of new vehicles and ships, one of which was the Heavy Assault Walker with a designation AT-M6, and the nickname Gorilla Walker amongst the fandom due to its resemblance to the silverback gorilla in some ways. It is a gargantuan lumbering behemoth, dwarfing the previous AT-AT walkers by some significant margin, and is fitted with a massive forward firing cannon and heavy frontal armour, perhaps from lessons learned on Hoth? The Kit This is another of Revell’s rather good Build & Play range, and due to its size it has a fairly high part count for the range, at 46. It’s fairly close to 1:144 so wouldn’t look ridiculous next to a 1:144 AT-AT, but as our only other option for a model (note that this is a toy once complete), is a box scale offering from Bandai, it’s probably your best bet at the moment as a child AND as a modeller. It arrives in a standard B&P end-opening box with the large parts suspended within the clear packaging and the smaller parts in a number of clear bags hidden inside. It is moulded in dark grey styrene with only the cannon tip in a clear red styrene that is pre-assembled on the electronics module that fits within the body. Construction begins with the head and its lower half is detailed with a cockpit that also has two cannons moulded into its lower and has the neck detail moulded in top and bottom. The top of the head clips into the bottom and is joined by more cannons on each side above the dropped cheek armour. The lower hull is fitted with a rear bulkhead and is complete by its missing side and a smaller front bulkhead, then is topped off with one side of the upper armoured body The back-mounted large canisters halves are clipped together and inserted into the first side, then held in place by the opposite hull plate. At this stage your walker is legless, and these are the subject of the majority of the rest of the build. The front legs are highly armoured and have different feet than the rear legs, which resemble the legs of the ageing AT-ATs on a larger scale. The rear legs are made from the feet up, with the lower leg halves clamping around the foot’s pivot-point, then having the upper leg parts added that are held in place by the pivot pins at the knees and at the “hip” joints with the hull. Repeat this again, then move onto the front legs. These have a large flat foot that resembles the gorilla’s hands curled under to walk, and these too are clamped in place by the heavy lower front legs. Again the knees and hips are joined by pins that are pushed into place, and the penultimate job is to push the ball at the base of the neck into the socket in the lower front of the hull. The pre-assembled cannon unit is finally slotted into the recess in the hull over the head, and is operated by pushing down on the switch that activates the LED behind the clear red cannon tip and plays one of two samples, the first of which is the heavy clanking noise of the walker... walking, and a fusillade of cannon and blaster fire for the second sample. Both of these are well represented and seem to be direct copies from the film. Conclusion This is intended to be a toy that gets a pounding from a child of 6 or over, so it’s made of stronger plastic than your average model for longevity. It does have a good level of detail though, and at 1:164 scale it’s close(ish) enough to the kits from Bandai to mesh with their range. If you decide to give it to a child they’ll be very happy with it (if they like Star Wars), and if you build it as a model, there’s plenty of scope for repainting it and adding some additional details. Highly recommended. Revell model kits are available from all good toy and model retailers. For further information visit or 4
-
It's been a while since i last posted a completed build, you know how life gets in the way..lol So here's my Bandai 1/44 Scale Slave One from 'The Empire Strikes Back'. Your Thoughts are appreciated. .
-
Kylo Ren's TIE Fighter (06771) 1:70 Revell Kylo Ren was Supreme Leader Snokes' young(ish) apprentice and plays a substantial role in this sequel trilogy so far, with the promise of more in the upcoming Rise of Skywalker that is on release now (at time of writing), with the hope that it ends the series on a high note. Ben Solo as he was named from birth usually gets around in a large black Command Shuttle, but also has a modified/prototype TIE Fighter known as the “Silencer” which bears a family resemblance to a First Order TIE in a larger and extended shape. It is introduced in The Last Jedi, playing an important part in devastating the Resistance’s command crew, and causing some substantial upset over the demise of some much loved characters, and how one major character saves herself. As of writing I’ve not seen the closing chapter of the saga, so whether it makes a final appearance remains to be seen. The Kit This is a re-release and has been timed to coincide with the new film but has no Rise of Skywalker branding, just the generic Star Wars branding with Darth Vader (Grandad) in the top right corner of the box, which is end-opening, and has twenty parts either suspended between two clear inserts, or in small bags to prevent loss and chaffing. The kit is in dark grey styrene as befits the ship, and the black “solar” panels are pre-painted at the factory to a good standard. A large chunk of the central hull contains the light and sound unit with the batteries preinstalled, but isolated with a small clear pull-away tab. The clear parts are painted with framing, and a small Kylo Ren figure in black is one of the smallest parts, which could do with a flesh-coloured blob of paint to make him show up better (in TFA he flies helmetless). Everything snaps together as per the instructions, and detail is really quite good for the target audience, with lots of greeblies added to the wing panels and hull, plus a clear entry hatch on the top of the cockpit that can be opened and closed. I have actually built this kit before now, and it looks really good once made up. I added a little wash from the Ultimate Wash range (Dark Dirt IIRC), and that really brings out the detail with little effort. I also masked up the canopy and sprayed some clear varnish over the wash to fix it in place. The button to activate the lights and sound sits on the rear engine deck, and lights up the engines, playing three sound effects: A TIE scream A volley of fire from its weapons A TIE scream with weapons fire at the end for those swooping attacks The sound quality is good for the task in hand, and comes from a small grille under the hull that is decidedly not canon! Putting my thumb over it doesn’t seem to reduce the volume much, so if you elect to cover it over it should still be audible. The single red LED that powers the engines is spread across the whole exhaust area by the vertical prism-like vertical stripes, which makes it quite effective. The only real weak-point of the model is the moulding of the wing-tip weapons in flexible plastic to avoid any eye removal in rough play. These parts have a tendency to toe inwards slightly, making them look a little bent. If you were building this as a model, you may wish to find a solution to this by either casting your own parts, or scratch-building some new ones. I doubt little Johnny/Jemima will care a jot though, as long as they’re having fun. Conclusion This is intended to be a toy that gets a pounding from a child of 6 or over, so it’s made of stronger plastic than your average model for longevity. It does have a good level of detail though, and at 1:70 scale it’s close enough to the kits from Bandai to mesh with their range. If you decide to give it to a child they’ll be very happy with it (if they like Star Wars), and if you build it as a model, there’s plenty of scope for repainting it and adding some details. Highly recommended. Revell model kits are available from all good toy and model retailers. For further information visit or
-
Hello everyone... I present my latest build from the Sci-fi/Movie-TV Group Build. It is Red Two flown by Wedge Antilles at the Battle’s of Yavin and Endor. This is the ancient MPC kit which i think is 1/48 scale. Its close to that as i used a 1/48 cockpit from my spares and it seems to fit. I did a few things to it. I made a canopy post for open display as seen in some photo’s. It is removable so the canopy can be posed in a much lower state. Like i said the Cockpit is from my spares as the kits used dial gauges molded in to the dash. Its far from perfect but its better than stock. I also added the two launch tubes for the secondary torpedo’s used in the trench run of the 1st death star. They weren't there on the kit, just flat panels. A link to the build log in the Sci-fi group build. Questions, comments, and or thoughts ? Dennis
- 12 replies
-
- 16
-
-
Hello everyone... I built this and its sister ship in the Sci-fi/Movie-TV group build. This and its sister Y-wing are 1/144th Bandai kits. I built this to represent Blue Four from Rogue one. The paint scheme isn't authentic to the movie but i like it. Oh well i’m not the biggest talker in the world so here is my X-wing. Questions, comments, and or thoughts ? If you're interested this is the link to the build log. https://www.britmodeller.com/forums/index.php?/topic/235061108-a-little-blue-and-green/ Dennis
-
Hello everyone... This is my take on Green Twelve. This Y-wing is in a non Standard finish as its primary job would be long range scouting of Imperial yards and shipping lanes. It is a 1/144th Bandai kit and was built alongside an X-wing in the same scale. They were built for the Sci-fi/Movie-TV Group build. Questions, comments, and or thoughts ? Here is the link to the build. https://www.britmodeller.com/forums/index.php?/topic/235061108-a-little-blue-and-green/ Dennis
-
Hi all. This kit was given to me by a friend to accompany the AT-AT also from Bandai to 1/144 on the scene, diorama or vignette that I am doing about the battle of Hoth of The Empire Strikes Back. It is really simple, so much that it does not carry a passenger compartment. Like the rest of the ships at this scale produced by Bandai: Wing A, X and Y. The Staples. Normally I do not usually put pictures of them since rarely the detail of the pieces can be observed correctly in them and they only serve to see their distribution. But in this case it can be done, although it has really been to show the few pieces of which it consists. Honestly, I think they could have done something of the cabin, minimal but existing, even if it didn't look much anyway. At AT-AT, where it is virtually impossible to see I think they have solved it magnificently, as well as their pilots (considering the scale). A pity that the crystals in this model have to be painted black. I finished riding in about 30 minutes. As the coin is widely seen I have put a cigarette lighter as a reference. Anything known is worth it. As it will not be placed on the base provided by the kit I have closed the hole in the bottom. For this I have used the bumper of the black plastic piece that must go in place. Once the macro has been applied, I observe that I will have to use putty diluted in acetone to cover some small hole in the bottom where the glue has not been enough to convert the joint of pieces into a panel line and review a section in which the molten plastic has covered. Really natural almost no difference can be seen between panels. I could not resist "improving", even minimally, what the kit offers so I took the scriber and distributed some "screws" through the panel lines. I have taken more into account the logic and its possible placement than a specific reference. After all, it is about trying to visually enrich it one more point, if that is possible. The stupid thing about it is that I have not thought of having the 1/48 kit as a reference, which I also have. In search of the base color. The friend with whom I maintain this duel made me the point that although both the AT-AT and the Snowspeeder have a light gray color it is not exactly the same. Regarding this, it was clear that the AT-AT would carry the mixture proposed by Bandai, after making it and appearing appropriate. However, regarding the Snowspeeder I had doubts because it should be a light gray that differs from the AT-AT gray. Looking at the range of light gray that I have, which is quite abundant, I stayed with two: Gunze H-338 and a mixture that I made in his day for a Mirage F.1M. I have finally airbrushed the gray of the F.1M. Next, I masked to apply with Gray the identifying stripes of Luke's Snowspeeder as that of the Squad Leader, unlike the rest that are red. With a liquid mask and later with a brush I have made chunks in the ligth gray. I keep painting the gray identification bands at the bottom. In the upper one there are some marks in red that the kit brings in decals. I prefer to use Vallejo red, somewhat lowered with yellow, and paint them with a brush. As the gray color that I used for the Squad Leader marks seems a bit dark (I think I should have used Neutral Gray XF-53 or similar) I decide to “lighten it up” a bit and how to mask again I don't feel like laborious. I decide to apply the very diluted base color on the dark gray to lighten it. After the experience of the screws this time I use the instructions of the kit at 1/48 as a reference and apply the base color slightly darkened in some panels. The fouling of the model has been to apply different shades of Vallejo brown in the form of filters, some lighter and others darker. The chipping has been with a mixture of gray and black, although I usually do it with one of brown and black. As I progressed, it seemed to me that I was short. However, once finished and looking at the photos, because in person it did not give me that feeling so much, it seems to me that I have passed. It is true that these ships "had" a very neglected appearance, but I would have liked to leave it with a not-so-carried appearance. The next step has been to varnish in gloss, apply oil to highlight panel lines, place decals and varnish in matt. At this point, it is only the model left to place the harpoon launcher, which is already finished, and paint the crystals in black. I will show that in Ready for Inspection. Andrés.
-
 Millennium Falcon (06777) 1:164 Revell Build & Play The Millennium Falcon seems to have been a main stay of most of the Star Wards films to date. The Kit As part of Revell's licencing of Star Wars from Disney they are releasing a whole host of kits for modellers of all ages. This is aimed at the cross over between toys and kits in that its pre-painted and ready to go with some easy click together construction. The unit also has a sound & light modules built in complete with batteries so its ready to go. Construction is fairly simple. First of all all the parts which are fitted from the inside are added. To the top section the upper gun turret, to the lower section the landing gear, side parts and the battery module (remember to remove the plastic tab which holds the battery contacts apart). The batteries are in a screw locked compartment so cant easily be removed by children. The upper part of the cockpit section is also added. The rear engine is added and then the two sections can be closed up. The radar is added and its good to go. Conclusion There is always the debate as to are these a model or a toy. I think they are a little simple for a model but a great toll to get children interested in doing something a little more advanced, and for the right age group that only has the be encouraged (Revell recommend this for Age 6+. Recommended. Revell model kits are available from all good toy and model retailers. For further information visit or
 -
Poe's Boosted X-Wing Fighter (06777) 1:78 Revell Build & Play From Star Wars the last Jedi Poe Dameron is a resistance X Wing pilot who brings Finn and Rey into the story. As an X-Wing pilot he has his own fighter. The Kit As part of Revell's licencing of Star Wars from Disney they are releasing a whole host of kits for modellers of all ages. This is aimed at the cross over between toys and kits in that its pre-painted and ready to go with some easy click together construction. The unit also has a sound module built in complete with batteries so its ready to go. Construction is fairly simple. First the X Wings lock together, then the lower hull is added. The the cockpit and Poe figure are added along with the front landing skid and rear bulkhead. The hinged canopy is added to the top hull and this can then be joined to the lower. Parts are added to the rear of the hull. Then the engine pods and laser cannons can be added to the wings. Finally the rear landing skids are added. To activate the sound module a tape has to be pulled out. The batteries are in a screw locked compartment so cant easily be removed by children. Sounds are played by pressing the droid behind the cockpit. Conclusion There is always the debate as to are these a model or a toy. I think they are a little simple for a model but a great way to get children interested in doing something a little more advanced, and for the right age group that ony has the be encouraged (Revell recommend this for Age 6+). Recommended. Revell model kits are available from all good toy and model retailers. For further information visit or
-
 OK so I couldn't let all you 'rebel scum' have your own way in the group build I'm going to be building this: It's a Revell kit, but a rebox of a FineMolds kit, it's pretty pricey (for what you get), though I didn't pay full price for it. It's a pretty simple kit, all the parts come in a standard, pretty flimsy Revell cardboard box that opens on the ends. It includes some decals for the interior, etc. A colour instruction booklet 3 grey sprues (one entirely for the stand, other than the tiny Vader) and a clear sprue for the window/top hatch, all shoved together in a single bag (other than the clear parts in a separate bag inside). Note one of the pieces had detached in transit/storage and the handlebars/yoke has one of the very flimsy arms bent out of shape/almost about to snap off, the mouldings however seem pretty crisp with little or no flash, injector marks, etc. It seems like it'll be a pretty quick and fun build other than masking the canopy bits, I have no idea on how Revell rank their kits (this being the top level 5), I'm fairly sure I've built more complex aircraft from them before at lower ratings.
 -
Hello all... This will be one of three builds for this group build. I will use this older 1/48th MPC kit. build my Movie Red Two of Wedge Antilles in "A new Hope". My phone just got updated to IOS 13.0 last night and copy and paste is a nightmare now. Please be patient with me as answering anyone with photo's will take about 6 steps instead of one. This kit is ok for the exterior but i will completely gut it. The limited instrument panel has 6 dial gauges on it. I will be using a spare cockpit with Glass displays from an old build to update it. Dennis
- 45 replies
-
- 10
-
-
- Movie theme build
- MPC 1/48
- (and 1 more)
-
 Hello everyone... Im building the old MPC X-wing for the Sci-Fi group build as Red-Two. Im getting close to landing gear time as I'm about 1/2 way through the painting. The main gear have doors but the nose gear just hang in place with no doors ? Does the nose skid/gear double as the door or should there be doors ? Also does anyone have good photo’s or drawings of the skids ? All i have in the kit are three chintzy skids identical in size. Id like to dress them up a little at least if possible. Dennis
 -
 This is a quick build from the late nineties- back when there were only three Star Wars films released and lot of dreams about what happens in that universe. One Friday night I was having a few beers with a good friend and we got to talking about things which happned elsewhere during the fight between the Rebels and the Empire. I got a piece of paper and sketched out this design, then some sheet plastic and built the main hull as we talked. It was detailed up some and painted the following day. About the design: I wanted to show an Imperial craft which had both a utilitarian look about it but also had a bit of a mean attitude as well. Imperial shuttles (original trilogy) seem to love large dorsal wings (which I don't), two landing legs and a ventral personnel loading ramp. I also added two ball turrets because I had yet to see any unarmed Imperial craft. There is was a smaller turret above the engines but that has been damaged over the years since I built this. This model is about seven inches long and scale is about 1:200 or so. Concept behind the build: The Rebels managed to attack a small Imperial storage facility and obtained some much needed supplies. Going through the wreckage they find an Imperial cargo shuttle which, aside from a rather large hole blown through the starboard side seems to be salvageable. The technicians get the systems back up and running. It has two dorsal cargo doors and the they remove the one abocve the ruined starboard cargo bay and add a remotely controlled twin heavy laser canon. They removed the large upper wing to save weight and to allow a greater field of fire for the new turret. They weld some scrap plating cut from some other wrecked vessels over the large hole in the side and now the Rebels have a new ship to aid in their conflict.