Search the Community
Showing results for tags 'Spitfire'.
-
I n August 2022 Airfix is to re-release its 1/72nd Supermarine Spitfire F.22 kit - ref. A02033A Sources: https://uk.airfix.com/products/supermarine-spitfire-f22-a02033a https://uk.airfix.com/community/blog-and-news/workbench/spitfire-zenith-swansong-aviation-legend Scheme A - Supermarine Spitfire F Mk.22 PK596, No.613 (City of Manchester) Squadron, Royal Auxiliary Air Force, RAF Ringway, Cheshire, England, 1949. Scheme B - Supermarine Spitfire F Mk.22 PK396, No.603 (City of Edinburgh) Squadron, Royal Air Force Turnhouse, Edinburgh, Scotland, July 1950 - Aircraft took part in the Cooper Trophy race of 1950. V.P.
-
-
 Fresh from the Air Fighting Development Unit, RAF, Duxford here is Revell's Spitfire Mk.IIa. Not a bad build and I had some issues, mostly of my own making. Read the WiP thread to find out more...I have left out a lot of weathering and muck. As a non-combative aircraft, it would have avoided much of that. Most of the paints are Vallejo or Vallejo Air except for the topside which are both Tamiya--XF-81 and -82. The decals are a slight mix since the fuselage decals were so out of register. I cannibalized the roundels from a Mk.V Revell kit and they worked out fine. In any case...here it is! Thanks! --John
- 27 replies
-
- 36
-

-
- 1/72nd scale Revell Spitfire
- Spitfire Mk.IIa
- (and 1 more)
-
As I continue with my Spitfire A-Go-Go, I turn away from the foreign-based, post-war craft (all that garlic and spices!)to something more OOB and closer to home for the Spitfire. The Revell 1/72nd scale Spitfire looks good. I think it is a new tool and we have Eduard and other companies to thank for making Revell and Airfix stand up and make better kits with much better detail and accuracy. This is a good example. The kit comes with only one option, which is oddly comforting. So I will be building the Mk.IIa from the Air Fighting Development Unit, RAF, Duxford (the plans say 'Doxford'), England, April 1942. The detail looks good all around with very little flash. I have already primed the sprues. wee bit of flash on the pedals... A bit of flash around the rudder trim and I will take care removing it! Large rivets. Is this accurate on the Mk.IIa? Wing tips are supplied...I think they use this kit for their Mk.V series as well. The kit is supplied with blunt tips to attach if one wishes to build that kit. The decals look ok except for the fuselage roundels which are terribly out of register. I will have to find a replacement. They dropped the ball here, I think. I'll start in on her this evening... --John
- 54 replies
-
- 8
-
-
- Spitfire Mk.IIa
- Revell Spitfire 1/72nd
- (and 1 more)
-
 Hi guys, I've been a little quiet on the posting front of late. It seems I like building models more than photographing & commenting on them! I have however, been into the forum gleaning much useful info from knowledgeable members 👍. Since my last posting, the BoB shelf is now inhabited with this, Grumpy Unwins Mk1b 'Canon Spitfire' a Boulton Paul Defiant and I am in the 'last throws' of finishing one of Josef Frantiseks Panel wing Hurricanes with another early Mk1 Panel wing under construction 🙂 Anyway, here we go with my 1:72 scale build of Spitfire P9386 or 'Brian Lane's' Spitfire as it it seems to be called. I wonder why? It seems from what information I have gleaned that he only flew it twice. This is the Tamiya Mk1 Spitfire (60748). It is all OoB except for the Print Scale main decals and Techmod technical stencils where these were applied. Thanks go out to @Troy Smith, @wmcgill, @Graham Boak, @Mark Postlethwaite, @fishplanebeer, @Fukuryu among others for their help 👌👍 Of the Tamiya, Airfix and KP Mk1a kits (that offer no open canopy option), the Tamiya kit is the best option for an open canopy build with the canopy fairly easy to cut and make to fit over the rear section of the canopy. I cut out the cockpit access door too and have this displayed open. I was pretty happy with this effort at the end of the build but since building the others above in following weeks, it looks a tad shoddy in places to me now. A nice complaint maybe. I must be improving since my return to scale modelling? Still, it looks lovely on the BoB shelf.😁 The instrument panel had to be painted since there is no decal for the same in the kit. From this angle one can also see the 'Undercarriage down indicator' on the port wing. These were painted white with a little touch of red on the inner side to give a semblance of some red lettering (as per Brian Lane's description in his book 'Spitfire'.↙️ The Port wheel, stanchion and cover where painted 'night' as per the famous photograph which it would seem were a 'carry over' from the Sky S/Night underside colour scheme when the order to paint the undersides completely Sky Type 'S' (thanks to @Troy Smith for that heads up). ↙️ Anybody noticed the white spinner yet? I'd say there have already been a few people yelling at the screen that it is not yellow! 🤭 ↙️ Personally, judging by the famous photograph, I don't think it was yellow. The tone of the yellow on the fuselage does not seem to match the spinner where the angle to the sun is similar. It is closer to the white in the roundel and tail . ↙️ The aircraft arrived to 19th Squadron late on the 3rd September. Brian Lane was promoted to Squadron commander on the 5th September. I have gone for white in honour of Brian Lane. I am presuming it may have been painted white in recognition of his promotion just after this date. It also may have been painted Sky Type 'S'. We may never know! I took a photo on the SLR at around 60mm focal length with camera set to B&W out of interest. I used an Angle Poise Lamp that has warm white LED's for the sun in a position that I estimated was similar to the sun in the original shot. I would have to tweek the positions in another shot since the shadows aren't perfect. All good fun 😁. There seems to be less of a contrast between the yellow on my fuselage roundel and the white spinner but there is still a difference! The model is based on the original image 🙂 ↙️ Happy modelling to all. Lindsey
 -
 Supermarine Spitfire PR.Mk.XI "SEAC" (KPM0295) 1:72 Kovozávody Prostějov The Spitfire was the champion of the Battle of Britain along with the Hurricane and a few other less well-known players, and it’s an aircraft with an amazing reputation that started from a bit of a damp squib in the shape of the Supermarine Type 224. The gull-winged oddity was the grandfather of the Spitfire, and despite losing out to the biplane Gloster Gladiator, designer R J Mitchell was spurred on to go back to the drawing board and create a more modern, technologically advanced and therefore risky design. This was the Type 300, and it was an all-metal construction with an incredibly thin elliptical wing that became legendary, although it didn’t leave much space for fuel, a situation that was further worsened by the Air Ministry’s insistence that four .303 machine guns were to be installed in each wing, rather than the three originally envisaged. It was a very well-sorted aircraft from the outset, so quickly entered service with the RAF in 1938 in small numbers. With the clouds of war accumulating, the Ministry issued more orders and it became a battle to create enough to fulfil demand in time for the outbreak and early days of war from September 1939 onwards. By then, the restrictive straight sided canopy had been replaced by a “blown” hood to give the pilot more visibility, although a few with the old canopy still lingered. The title Mk.Ia was given retrospectively to differentiate between the cannon-winged Mk.Ib that was instigated after the .303s were found somewhat lacking compared to the 20mm cannon armament of their main opposition at the time, the Bf.109. As is usual in wartime, the designers could never rest on their laurels with an airframe like the Spitfire, as it had significant potential for development, a process that lasted throughout the whole of WWII, and included many changes to the Merlin engine, then the installation of the more powerful Griffon engine, as well as the removal of the spine of the fuselage and creation of a bubble canopy to improve the pilot’s situational awareness. Its immediate successor was the Mk.II with a new Mk.XII Merlin, followed by the Mk.V that had yet another more powerful Merlin fitted. With the development of new Merlin 60 powered Spitfires, both the Mk VII and VIII were to have photo-reconnaissance (PR) variants. T he Mk XI was based on a combination of features from the marks VII, VIII and IX. It was the first PR variant to have the option of using two vertically mounted F52 cameras in the fuselage behind the cockpit. Other configurations could also be fitted, depending on the mission. The Mk XIs had a deeper nose fairing to accommodate a larger 14.5 gal oil tank and used the unarmoured, wrap-around PRU windscreen. Booster pumps for the wing tanks were fitted these being covered by teardrop shaped fairings under the wings. Retractable tailwheels were fitted as standard and the majority of the Mk XIs built had the later large-area pointed rudder. 260 Mk XIs were powered by Merlin 61, 63 or 63A engines, while the remaining 211 used the high-altitude Merlin 70. All of the Merlin 70 and 198 of the Merlin 60 series aircraft were fitted with the Vokes Aero-Vee dust filter in the extended, streamlined carburettor air intake under the nose. All Merlin 60 powered aircraft featured the fuel cooler in the port leading edge wing root. Additional slipper drop tanks could be fitted under the centre-section; in common with the Mk IX these could be 30, 45 or 90 gal capacity and, for the Mk XI, a tank of 170 gal capacity was also available. The aircraft were capable of a top speed of 417 mph (671 km/h) at 24,000 ft and could cruise at 395 mph at 32,000 ft. Normally Spitfire XIs cruised between these altitudes although, in an emergency, the aircraft could climb to 44,000 ft. However, pilots could not withstand such altitudes for long in a non-pressurised cockpit.[info from Wikipedia] The Kit This is a new tool 2022 boxing in KP's line of Spitfire kits. As is usual, they have produced a number of boxings that vary in decals and parts , giving the modeller plenty of choice which one(s) to get. The kit arrives in a small end-opening box, and inside are two sprues in grey styrene, a clear sprue, decal sheet and A5 instruction booklet, with the decal options printed in colour on the back of the box. Detail is excellent for the scale. Construction begins with the cockpit, the front bulkhead gets its instrument panel, with the instruments being provided as decals. The seat back and head armour attaches to the rear bulkhead and this is fitted to the floor members. The control column is added followed by the seat. Belts are supplied as decals. At the front of each fuselage half blanking plates go in for the exhausts and then the cockpit can go in the and halves can be closed up. Moving onto the wings the left and right uppers can be added to the single part lower wing making sure the small parts for the wheels wells go in first. The radiators go on. The wing can now be fitted to the fuselage and at the rear the tail surfaces and rudder are fitted, along with the tail wheel. The main gear can be built up and added along with the chin intake and prop. On top the canopy and aerial mast is added. At the front the prop is fitted. Markings There are three decal options in the box to represent RAF Aircraft operating in South East Asian Command. Decals are printed in-house and have good registration, colour density and sharpness, with a very thin carrier film cut close to the printing. Conclusion Another great release from KP with excellent detail, and plenty of choices. Recommended. Review sample courtesy of
 -
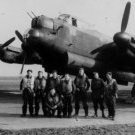
I found this on the tube. A compilation of colour films showing Groundcrews, Pilots, Aircraft and ground equipment. RAF Gravesend, 310,122 & 64 Sqns and RAF Hornchurch with an interview with Ginger Lacey running on audio. Right at the end are shots of a Lysander. Enjoy, Pete
- 1 reply
-
- 4
-
-

-
- RAF Graveend
- RAF Hornchurch
- (and 1 more)
-
Supermarine Spitfire PR.Mk.XI "RAF" (KPM0292) 1:72 Kovozávody Prostějov The Spitfire was the champion of the Battle of Britain along with the Hurricane and a few other less well-known players, and it’s an aircraft with an amazing reputation that started from a bit of a damp squib in the shape of the Supermarine Type 224. The gull-winged oddity was the grandfather of the Spitfire, and despite losing out to the biplane Gloster Gladiator, designer R J Mitchell was spurred on to go back to the drawing board and create a more modern, technologically advanced and therefore risky design. This was the Type 300, and it was an all-metal construction with an incredibly thin elliptical wing that became legendary, although it didn’t leave much space for fuel, a situation that was further worsened by the Air Ministry’s insistence that four .303 machine guns were to be installed in each wing, rather than the three originally envisaged. It was a very well-sorted aircraft from the outset, so quickly entered service with the RAF in 1938 in small numbers. With the clouds of war accumulating, the Ministry issued more orders and it became a battle to create enough to fulfil demand in time for the outbreak and early days of war from September 1939 onwards. By then, the restrictive straight sided canopy had been replaced by a “blown” hood to give the pilot more visibility, although a few with the old canopy still lingered. The title Mk.Ia was given retrospectively to differentiate between the cannon-winged Mk.Ib that was instigated after the .303s were found somewhat lacking compared to the 20mm cannon armament of their main opposition at the time, the Bf.109. As is usual in wartime, the designers could never rest on their laurels with an airframe like the Spitfire, as it had significant potential for development, a process that lasted throughout the whole of WWII, and included many changes to the Merlin engine, then the installation of the more powerful Griffon engine, as well as the removal of the spine of the fuselage and creation of a bubble canopy to improve the pilot’s situational awareness. Its immediate successor was the Mk.II with a new Mk.XII Merlin, followed by the Mk.V that had yet another more powerful Merlin fitted. With the development of new Merlin 60 powered Spitfires, both the Mk VII and VIII were to have photo-reconnaissance (PR) variants. T he Mk XI was based on a combination of features from the marks VII, VIII and IX. It was the first PR variant to have the option of using two vertically mounted F52 cameras in the fuselage behind the cockpit. Other configurations could also be fitted, depending on the mission. The Mk XIs had a deeper nose fairing to accommodate a larger 14.5 gal oil tank and used the unarmoured, wrap-around PRU windscreen. Booster pumps for the wing tanks were fitted these being covered by teardrop shaped fairings under the wings. Retractable tailwheels were fitted as standard and the majority of the Mk XIs built had the later large-area pointed rudder. 260 Mk XIs were powered by Merlin 61, 63 or 63A engines, while the remaining 211 used the high-altitude Merlin 70. All of the Merlin 70 and 198 of the Merlin 60 series aircraft were fitted with the Vokes Aero-Vee dust filter in the extended, streamlined carburettor air intake under the nose. All Merlin 60 powered aircraft featured the fuel cooler in the port leading edge wing root. Additional slipper drop tanks could be fitted under the centre-section; in common with the Mk IX these could be 30, 45 or 90 gal capacity and, for the Mk XI, a tank of 170 gal capacity was also available. The aircraft were capable of a top speed of 417 mph (671 km/h) at 24,000 ft and could cruise at 395 mph at 32,000 ft. Normally Spitfire XIs cruised between these altitudes although, in an emergency, the aircraft could climb to 44,000 ft. However, pilots could not withstand such altitudes for long in a non-pressurised cockpit.[info from Wikipedia] The Kit This is a new tool 2022 boxing in KP's line of Spitfire kits. As is usual, they have produced a number of boxings that vary in decals and parts , giving the modeller plenty of choice which one(s) to get. The kit arrives in a small end-opening box, and inside are two sprues in grey styrene, a clear sprue, decal sheet and A5 instruction booklet, with the decal options printed in colour on the back of the box. Detail is excellent for the scale. Construction begins with the cockpit, the front bulkhead gets its instrument panel, with the instruments being provided as decals. The seat back and head armour attaches to the rear bulkhead and this is fitted to the floor members. The control column is added followed by the seat. Belts are supplied as decals. At the front of each fuselage half blanking plates go in for the exhausts and then the cockpit can go in the and halves can be closed up. Moving onto the wings the left and right uppers can be added to the single part lower wing making sure the small parts for the wheels wells go in first. The radiators go on. The wing can now be fitted to the fuselage and at the rear the tail surfaces and rudder are fitted, along with the tail wheel. The main gear can be built up and added along with the chin intake and prop. On top the canopy and aerial mast is added. At the front the prop is fitted. Markings There are three decal options in the box to represent RAF Aircraft operating in Western Europe. Decals are printed in-house and have good registration, colour density and sharpness, with a very thin carrier film cut close to the printing. Conclusion Another great release from KP with excellent detail, and plenty of choices. Recommended. Review sample courtesy of
-
 Hello gents, Hope there's a Spitfire-brain out there who can help me with what seems to be a very strange error in Eduard's instructions for the markings of their Mk.IIb Profipack, specifically the scheme of Frederick Gaze, flying from Westhampnett in June 1941. In the profile, there are no upper wing roundels shown. Not a sausage – just the dark earth/green pattern and walkway stencils. I'm perplexed. I've not been able to find any reference to his specific aircraft online, but despite that, I'm almost certain it's an error on Eduard's part, as I've never, ever come across a Spit with no upper roundels, and can find no reference to support this unusual omission. Underwing absence, sure. Different theatres, sure, overpainted, different sizes, different operators...we know the drill. However, NONE? I simply can't believe it! Can anyone shed any light on this little puzzler? For what it's worth, beyond the quandary it's an outstanding kit. Thanks in advance, and happy modelling, Al
 -
 https://uk.airfix.com/products/supermarine-spitfire-mkxii-a05117a https://uk.airfix.com/products/supermarine-spitfire-mkxviii-a05140 V.P.
 -
Supermarine Spitfire Mk.XII 1:48 Airfix A05117A The Spitfire hardly needs an introduction, an iconic war machine and graceful lines satisfying the technical theory that ‘If it looks right, it flies right’! With around 6000 aircraft produced across the various sites. The Spitfire XII was essentially a Mk. VC airframe modified to take a Griffon MK.III engine, thus becoming the first Griffon Spitfire. The Griffon was actually developed pre war tat the request of the Royal Navy who were looking for a new engine for amongst other aircraft the Firefly. It was decided early on it could be developed for the Spitfire, but work was stopped to concentrate on the Merlin. The engine was only slightly larger in size than the Merlin but features a 37 Litre capacity over the Merlins 27. Then engine was made smaller in length and more reliable, and efficent by incorporating the camshaft and magneto drives into the propeller reduction gears at the front of the engine, rather than using a separate system of gears driven from the back end of the crankshaft. As the aircraft was designed to be a high performance low altitude fighter it was designed with clipped wings to improve manoeuvrability. The V wing with two cannon and four machine guns was fitted. While initial aircraft used the V airframe, letter ones would use the VIII, all models would use the VIII rudder. The Kit This is a re-boxing of Airfix's kit which was a new tool back in 2011. The kit arrives on two sprues of grey plastic and a clear sprue. The panel lines are recessed and seem finer to a degree than other kits, the plastic also seems better in that it is not as soft as previous new releases. Construction starts with the cockpit. The gunsight and compass parts mount to the instrument panel bulkhead. Next the control column is attached to it's frame and the rudder pedals go on the as well, these then fit to the instrument panel bulkhead. The seat and armour are assembled and added to the rear cockpit bulkhead, behind this is fitted a frame to which a bottle is added, A further rear frame attaches to this part. Before attaching the cockpits parts to the right fuselage side some work needs to be done to the fuselage halves. Cut outs need to be made in the rear for the retractable tail wheel of the MK.XII. If the modeller wishes to build the model with cockpit canopy and cockpit door in the open position then parts the door and other parts need to be removed from the left side. Once this is done the front cockpit parts are added to the right side, and the rear parts to the left side. A couple of smaller parts are then fitted in also. If the modeller want the prop to turn then its now assembled and fitted in before the fuselage is closed up. Next up we move to the wings. There is a single part lower wing with left and right uppers. If fitting the slipper tank then holes must be drilled in the centre part of the lower wing. The wings can then be assembled with the cannon barrels and wingtips being added. The fuselage can then be joined to the wings. The exhausts go one each side along with the distinctive blisters for the Griffon Engine. Under the nose the chin part is added. At the rear the tail surfaces and rudder are added. The moveable parts here can be set at an angle as required. To finish at the rear the tail wheel and doors are added. Returning to the main wings the ailerons are added followed by the flaps. These can be positioned up or down. The carb intake, radiator and oil cooler can then be added as well. If you drilled the holes for the slipper tank, this now goes on as well. Next up the undercarriage is added. Airfix as seems to be normal for them now offer separate parts for retracted and lowered undercarriage. If lowering this then scissor links are added to the main gear legs, the hubs are added to the wheels and they then go on followed by the outer doors. If raising the gear, half a wheel goes into the well, followed by the gear leg and the doors. A pilot is supplied if the modeller wants to use him. Otherwise to finish up the mast is added along with the canopies. Two style of main canopy are provided. The thicker one for the open style as it simulates the main canopy over the rear glazing. Decals The decal sheet is from Cartograf so should post no issues, it has two options; MB837 - No.595 Sqn RAF, Aberporth Summer 1945 MB854 - No.41 Sqn RAF, Tangmere June 1944 (invasion stripes provided as decals) Conclusion It is good to see this kit re-released. Recommended. Review sample courtesy of
-
 This is the Special Hobby 1/48 Spitfire Mk Vc done as RAAF aircraft A58-143 UP*Y using DKDecals.
 -
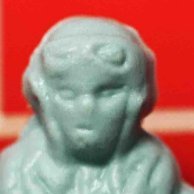
So, I finally finished my 2nd build - 1/72 Spitfire Mk Ia from Airfix. Camouflage - Type B, handpainted Off the bat, I quite like how my pilot looked. black boots and XF17 Sea blue. As for cockpit, I settled on XF71 IJN cockpit green with black head rest. painted the scribes on the fuselage halves with black. I used lemon yellow plus a drop of brown on the Mae West. Not exactly accurate but I suppose its ok for this scale. While doing this, I just can't seem to get the scenes of Fortis 1 and Fortis 2 from Dunkirk out of my head 😂 Next, comes the horrific tamiya recipe of 1:1 flat earth and red brown for dark earth from one of their spitfire instructions. I was on a hurry when I had the chance to drop by a hobby store in the next town, so i had to slowly rub off the wrong paints, and the fact that I had a long week at work means I left it too long. On the second pic, the result of a little experiment by mixing cockpit green and flat earth can be seen on the starboard wing, which is what I used in the end. Everything else afterwards went rather uneventful. Overall fit was satisfactory. I only added a little putty near the fuselage joint at the cockpit, and port wing to fuselage. Plenty of stencils in decals, I had the most difficulty with the long upper wing lines, and the red tapes at the gun ports. But its just me being clumsy. The decals were very easy to deal with, as long as the water that they were soaked in were warm, they came out soft, a drop of water on the target area greatly assist in placing them, and they'll start to really stick down after a couple of minutes. Usually after about half an hour, I applied Mr Mark Setter, the decals really conform well. I also learned it the hard way on the upper port wing roundel, that applying the setter too early, it melts away. I touched it up with sea blue. I know the cutting along panel lines technique, one of you guys commented on my last project, but I tried it on one of the smaller decals, it was a mess. I think the best way to describe how good the decals were, was that the underside port wing roundel, it has a pitot tube in the middle. I didn't realise it at first, but I simply lift the decal up, cut it with a scissors and place it back on. the fact that its round and identical makes it easy anyway. so the ring was joined, but there was still a little bit of the decal that didn't find ground to stick to, the setting solution did it for me. And oh, the canopy. I read one of the previous builds here that the canopy has a bad fit, i have the same problem. I basically cut off the rear frame, close to 2mm fit it in. The starboard fuselage roundel looked like it has a bit silvering, actually its because of the surface which had old paint on. My bad. But I like how the decals sink into the panel lines. So all in all, a rather easy build, most of the time spent was reading here and looking at photos. but i messed up the paintings, plus the horror of the reddish dark earth. Even then I'm still happy how it turned out in the end. I guess Spitfires just cannot look bad! cheers
-
Longtime reader but first time posting here, this is my first finished model in about 20 years, Airfix's Spitfire Mk.1a A01071B from 92 Squadron, France 1940 . This is also my first attempt at airbrushing, masking or varnishing anything so it was quite the learning experience for me but I'm pretty happy with how it turned out in the end, certainly better than my attempts with enamel paints and brushes all those years ago. Kit went together mostly OK but had a little trouble getting the fuselage to fit into the assembled wings, the canopy was also a poor fit, I did trim the back of the cockpit a little but still couldn't get it to fit perfectly. As I mentioned, first time airbrushing and masking, the green went on a little thick in places so you see some ridges, particularly where the line passes under decals. I wasn't sure if I'd be able to smooth this out somehow without having to respray everything so decided to leave it and just try to improve on it next time. The decals, particularly the lettering and red squares on the leading edge of the wings were a bit of a nightmare at times but I think they came out OK. In the end I decided not to attempt weathering or panel line washes on this as I just wanted to get something finished but perhaps I'll try that on my next model. Enjoyed the process a lot, nice to do something that doesn't involve a computer screen for once, now I just need to find somewhere suitably safe to put it...
- 17 replies
-
- 37
-
-
 So, Down in the depths of the vault I have found this ancient 1/32 Hasegawa Spitfire VI, missing most of the cockpit contents and without a canopy... Apart from the canopy, the circled items are missing... Also in in the vault, is this modern but flawed Revell 1/32 Spitfire Mk.IIa I was wondering whether I could use the Revell kit as an ~(imperfect but acceptable) donor of spare parts/sources for scratch building/vac-forming? My plan: 1. Build the Revell cockpit. 2. See if it fits with manageable fettling into the Hasegawa fuselage. It won't be 100% accurate, but as the Mk VI canopy is fixed close this probably won't matter. I will also add the Hasegawa pilot 3. If the cockpit does not fit, I will proceed with the Revell kit, having to accept the incorrect spinner and underwing air intake 4. If the cockpit fits, I will continue with the Hasegawa kit 5. I will then use the Revell canopy as the master to make some vac-form replicas 6. The replica will be needed as I try and work out how to modify the canopy to correspond to the Mk VI version. What could possibly go wrong? Either way, there be some sort of 1/32 Spitfire at the end of this Odyssey! Icarus
 -
A few pics of my recently finished Airfix mk1.a Spit that I built for part of a group build on another forum I frequent so no build thread on here I'm afraid. It's been built to represent N3277 originally from 234. Squadron RAF. Built as part of a September 1938 order for 200 Spitfires, N3277 was flown for the first time on 5 January 1940. After being passed to 24 Maintenance Unit on 16 January, the aircraft was assigned to squadron service on 15 April. While on patrol N3277, flown by Pilot Officer Richard Hardy, was attacked by Messerschmitt Bf 109s of Jagdgeschwader 53 and damaged while near the Isle of White. After making a forced landing near Cherbourg, France, Pilot Officer Hardy became a Prisoner of War, while N3277 was quickly repaired, repainted in Luftwaffe markings, and sent to Germany for evaluation, which included the eventual fitting of a Daimler Benz engine. The final fate of N3277 is unrecorded. It's pretty much out of the box but with the addition of Luftwaffe decals, resin wheels and rear control surfaces and a quick diorama base showing two Luftwaffe pilots "comparing notes" on the performance of the aircraft
-
 This is the old 1975 Revell kit (original edition!), finished just a few weeks ago. Built by my father, pilot sculpted by my brother, painted by all three . A huge kit, and one that still looks very nice today. One of those old kits with plenty of mechanisms everywhere. The original pilot was unable to exit his cockpit! so a new one was sculpted, with flexible compound, so he can squeeze in and out .
 -
Hobby 2000 has just re-released the Revell 1/32 Supermarine Spitfire Mk.I/V In box review: https://www.kfs-miniatures.com/1-32-supermarine-spitfire-iia-hobby-2000/ - ref. 32001 - Supermarine Spitfire Mk.Ia Sources: https://www.armahobby.pl/h2k32001-supermarine-spitfire-ia-ex-revel-cartograf-pmask-zywica.html https://ksmodel.pl/sklep/szczegoly/hobby-2000-32001-supermarine-spitfire-ia-limited-edition-1-32-24566/ - ref. 32002 - Supermarine Spitfire Mk.IIa Sources: https://www.armahobby.pl/h2k32002-supermarine-spitfire-iia-w-rotol-propeller.html https://ksmodel.pl/sklep/szczegoly/hobby-2000-32002-supermarine-spitfire-iia-w-rotol-propeller-limited-edition-1-32-24567/ - ref. 32003 - Supermarine Spitfire Mk.Va Sources: https://www.armahobby.pl/h2k32003-supermarine-spitfire-va.html https://ksmodel.pl/sklep/szczegoly/hobby-2000-32003-supermarine-spitfire-va-limited-edition-1-32-24568/ V.P.
-
As if time froze. In the early 70's, as a kid, I used to look in the window of a bookstore in a suburb of Athens, the boxes with the terrible representations of battles and starring planes and tanks. The bright colors and the realistic images, to visualize the stories of the elders, from the Greco Italian war, the victorious battles of the Greek army in the mountains of Pindos and Albania, the Nazi invasion, the collapse of the front, the Occupation, the great famine, the executions of civilians, in my grandfather's village and all the brave acts of resistance. The mystery of the contents of the boxes was soon solved when a friend opened one and tentatively built a plane. Since then, my life has literally changed. I have been involved in the hobby for over 45 years. I acquired and built several models, I destroyed more, many of them are waiting unfinished in boxes. But the acquisition and construction of those first kits that I was fooling around with as a child was repulsed. Most of them were matchboxes. [to be continued]
-
 Hello guys, I finished this plane two days ago. It was a trouble free build, with the only sizable gap being located just in front on the windscreen. Speaking of windscreens, it was too big, and had to be trimmed and sanded down for it to fit into the canopy opening.
- 6 replies
-
- 23
-
-
-
- Battle of France
- spitfire
- (and 1 more)
-
Hello guys, My newest kit has finally arrived after four days of waiting. I decided to buy this kit because I previously had bought the Airfix 72nd Ju 87B-1, and painted it as a Battle of France aircraft. This one will be the same. I'll be building this one as an out of the box aircraft. I'll upload more photos later today.
-
 Hi all and this is my latest (and longest) finish, Italeri's 1/72 Spitfire Mk. Vb. Started about 3 years ago, finally finished this week for the KUTA group build. Shortish build thread is here. The kit was a struggle for me and that's shown in the final finish - the wingtip parts fit was very iffy, as was the nose. The prop blades are far too skinny and the raised detail for the wing .303s is way too heavy. The aftermarket wing roundels are too big (or the wing is too narrow) as they shouldn't overlap the ailerons. My efforts at oil fading were very iffy. I could go on but it's a hobby after all! 😆 Aftermarket decals (which were lovely) are for Wing Cdr Brendan 'Paddy' FInucane of 154 Squadron, July 1942 just before he was KIA following a fighter sweep. Thanks for looking and happy modelling. Dermot Italeri_1_72_Spitfire_Mk5b_Finished (1) by Dermot Moriarty, on Flickr Italeri_1_72_Spitfire_Mk5b_Finished (8) by Dermot Moriarty, on Flickr Italeri_1_72_Spitfire_Mk5b_Finished (2) by Dermot Moriarty, on Flickr Italeri_1_72_Spitfire_Mk5b_Finished (3) by Dermot Moriarty, on Flickr Italeri_1_72_Spitfire_Mk5b_Finished (4) by Dermot Moriarty, on Flickr Italeri_1_72_Spitfire_Mk5b_Finished (6) by Dermot Moriarty, on Flickr
- 14 replies
-
- 29
-
-
-
- Spitfire
- Brendan Finucance
- (and 1 more)
-
So way back in 1973 when i was but 10 years old, this kit was the best Spitfire kit i was aware of, miles more accurate (as far as i knew) than the Airfix one, which had been around for ages at that time. The Matchbox Spit was soooooo good to me. So its no wonder i have returned to this particular kit for the GB. I have rustled up some reference material (the only references young Greg had) in the shape of the Commando comic "Send for Spitfires", which was first published in the same month and year i was born (1963)! TFL Cheers Greg
- 44 replies
-
- 12
-