Search the Community
Showing results for tags 'Special Hobby'.
-
Hello fellow modelers, I've just finished the Special Hobby Reggiane Re 2000 in 1/48 scale. Re 2000 was probably the best performing fighter of the Italian "0" series but for some reasons Regia Aeronautica preferred the Macchi MC 202 and the Fiat G.50. Also the name "Falco" (Hawk) was never officially accepted in Italy also because this was already the name given to the Fiat CR42 biplane. Only a squadron in Italy was equipped with this first series of Re 2000, all the others went to Sweden and Hungary. The kit is not too bad, with just all the typical issues of Special Hobby kits. I've built it basically OOB just adding Eduard seat-belts and few other scratch-built details. For painting I've used Tamiya acrylics for lower surfaces and LifeColor acrylics for the upper surfaces (good ones but not as Tamiya). Enjoy pictures and please feel free to give your comments and feedback. Cheers Andy
-
Bit late coming to the party, but now that I’ve finished the French Fancy and Highwing group builds I’d like to join the fun with this: I have a soft spot for twin boomers and this one will join my collection of SAAB’s unique looking fighters. What’s in the box: Two sprues of light grey plastic, one transparent sprue, a PE fret and some resin parts. The decals I will not be using, the blue of the national markings looks far too dark. Replacement decals from Moose Republic on order. A closer look at the typical short run parts, lots of big ejector pins, removal of which will be the first job. Time to fire up the Dremel clone to grind these away. It may take me a while to build this as there is a lot on at the moment. More to follow. AW
-
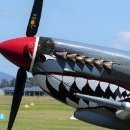
G'day all, Here are a couple of P-40Ns done up on the colours of 75SQN (Special Hobby with Eduard interior) and 1 Aircraft Performance Unit (Academy). Both markings are from DK Decals. The 1 APU aircraft is in NMF and painted with Alclad Aluminium while the 75SQN is painted with Tamiya XF-62 Olive Drab and XF-53 Neutral Grey. I went with the NMF as I have some P-51 builds in mind down the track so wanted to test out my skills, which need a fair bit of work in regards to surface preparation while the Olive Drab I found is quite difficult to photograph. The 75SQN build was A29-521 "Svengali". On 9 August 1944, 12 aircraft were on a patrol when 3 out of the 4 aircraft in yellow flight suffered a collision. Yellow 3 struck Yellow 1 (A29-521) before becoming locked in an inverted spin with Yellow 4, crashing with the loss of both pilots. The collision ripped off the aileron and 25% off the LH wing from Yellow 1, exploding the .50 cal ammunition. FlgOff Jacklin flew the 200 miles back to base and landed without incident. The aircraft was repaired and later on served with 78 SQN. Anyway on the models, hope you enjoy. JayGee. Below are some pictures of the real Svengali from the ADF Serials Newsletter, which show how tough these work horses were and the dangers faced in the mopping up faze of the war.
-
Dear fellow-modellers, let me present to you my latest completion, Special Hobby's Super Mystère in 1/72. This was actually the Sa'ar kit (the re-engined variant), but it contains all the parts for the standard Super Mystère. I could even use the kit's decals because I found photos of 909 before it was converted. The kit is well-detailed and easy to work with. However, the panel lines (as with many kits today) are too broad and soft for my taste. But I am becoming a grumpy old man in this (?) respect ("today's panel lines are not half as good as they used to be in the 1990s!" Which is true btw). The Super Mystère booklet by Isradecals was a great source of photos and additional information. I hope to add a Ouragan to this model more or less soon. And some day maybe a Mystère IV or a Vautour or ... Any comments welcome!
- 12 replies
-
- 34
-

-
- 1/72
- Special Hobby
- (and 1 more)
-
Meant as a quickie beside my B-52 these two kits costs me more effort than planned. The Special Hobby kit in 1/72 scale shows a lot of fit issues and so a lot of filling, sanding and rescriping was necessary. The little scene shows two training aircrafts from 70° Stormo in Latina, south of Rome. The two kits are almost oob built , only the flaps were lowered and some static dischargers and antennas were added. Regards Daniel
- 11 replies
-
- 40
-
-

-
- Special Hobby
- 1:72
- (and 1 more)
-
 Hi all, Hot off the bench today Blackburn Skua II L2927/A. 803 Naval Air Squadron HMS Ark Royal, Mediterranean, July 1940. Green Leader and Squadron CO Lt JM Bruen. Special Hobby 1/48 Kit, Paint - Hataka / Xtracrylics. Markings - Mix of kit, spares, generic and made. Scheme:- Ark Royal interpretation of the order to paint the undersides of the aircraft Sky (without having seen Sky Paint). I need to thank @iang for all his time and help in identifying what this aircraft probably looked like.. 803 NAS HMS Ark Royal Operation Catapult Mers-el- Kébi (French Algeria). Dakar 03.07.40. (1830) Curtis Hawk Damaged. (1910) Moraine 46 Damaged. (1930) Breguet Br.521 Damaged. 06.07.40. Shadowing flying boat Shared Destroyed 09.07.40. Air strikes against Cagliari planned. Z506B Shared Destroyed. 02.08.40. Air strikes against Cagliari. Z01 Shared Destroyed. 31.08.40. Operation HATS. 1/3 Cant Z501 Shared Destroyed, ½ S.79 Shared Destroyed, off Balearic Isles. Off now to prep for the Hellcat Group Build in which I’ll be building a Hellcat with a family connection.. Thanks for looking in..
- 18 replies
-
- 36
-
-

Special Hobby Pre-Cut Kabuki Tape Masks (for Various Kits & Scales)
Mike posted a topic in Decals & Masks
Pre-Cut Kabuki Tape Masks (for Various) Various Scales Special Mask by Special Hobby Special Hobby have begun producing their own range of kabuki tape masks that are pre-cut and patterned for specific kits, and some of them are designed with parts for both the inside and outside of the frame, which can be identified by the red text on the packaging. Each set is supplied in a clear foil resealable bag with a card liner, a set of instructions and of course the kabuki tape sheet itself, which is attached to a waxed backing paper. The compound curved areas are handled by using frame hugging masks, while the highly curved gaps are in-filled with either liquid mask or offcuts from the background tape, which are marked on the instructions in a light purple/lilac. Westland Whirlwind Mk.I 1:32 (M32004 for Special Hobby) This set is on the large side, as it covers both sides of the canopy, and also includes masks for the wheels allowing you to cut the demarcation perfectly with little effort, and lamps around the airframe. AH-1G Cobra 1:32 (M32005 for ICM) This large set covers inside and out, with solid sections on the top and the frame-hugging type on the curved side panels. Cobras don’t have wheels, so no wheel masks! Heinkel He.162A Spatz 1:72 (M72030 for Special Hobby) This exterior-only set is for the new SH kit, and includes masks for the two-part canopy, as well as the three wheels on both sides. A W Meteor NF Mk.11/12/13 (M72031 for Special Hobby) This exterior-only set will be a boon to builders of the Special Hobby kit, as this aircraft has a ton of individual panes to its canopy, which can be a pain in this scale. As a bonus you get a full set of wheel masks. D.H.100 Vampire Mk.I Early & Late (M72032 for Special Hobby) This exterior-only set includes canopy masks for both types of canopy, both two-part and three-part styles. You also get wingtip light and wheel masks into the bargain. D.H.100 Vampire Mk.3/5/9 & Export Variants (M72033 for Special Hobby) This exterior-only set includes a mask for the two-part canopy, a “nose strap” mask, and hub masks for all three wheels. Gloster Meteor Mk.3/4 (M72034 for Special Hobby) This exterior-only set includes a mask for the three-part canopy, and hub masks for all three wheels. Highly recommended. Review sample courtesy of -
Beaufighter Mk.I/VI Mainwheels Early/Smooth (4436) 1:48 CMK by Special Hobby Kit wheels are generally in two halves, which means you have the resultant joins to deal with, possible mould-slip issues on single part wheels, and sometimes less than stellar detail due to the moulding limitations of styrene injection technology, especially in the tread department. That's where replacement resin wheels come in, with their lack of seamline and superior detail making a compelling argument. They are also usually available at a reasonable price, and can be an easy introduction to aftermarket and resin handling, as they are usually a drop-in replacement. This set from CMK is suitable for the Revell kits in 1:48, but would probably work equally as well for the older Tamiya kit. The set arrives in the usual yellow-themed CMK blister pack, with the instructions sandwiched between the resin parts and the header card. Inside are six resin parts on four casting blocks, consisting of two wheels and four hub parts for each side of the wheels. The wheels are all attached to their blocks on their contact patches, with additional wisps of resin supporting the wheel further and helping to reduce the likelihood of air bubbles within the moulds. These are easily removed with a razor saw and a swipe with a sanding stick that should leave all the smooth contact surface intact. The hubs are all cast flat against their blocks, so will need to be sawn or sanded off, taking the usual precautions when handling resin. When liberated from their blocks, they slip into the sockets locating on a small nub within. They’re a much better detailed drop-in replacement for the kit parts from thereon in. Highly recommended. Review sample courtesy of
-
 SAAB AJ-37 Viggen "Strike Fighter" (SH72378) 1:72 Special Hobby The Viggen is a rugged fighter/interceptor that was designed to fulfil a need during the deep Cold War to defend Swedish airspace in the event of an incursion by the Soviet Bloc, and to continue the fight from hidden bases near roadways, which the aircraft could use as makeshift landing strips. It was to replace both the Lansen and Draken, and did so extremely well, endearing itself to aviation enthusiasts as it did so due to its unusual double-delta/canard configuration. It was fitted with a single Volvo license built P&W JT8D with an afterburner to give it the performance needed to propel this large aircraft fast enough to accomplish short take-offs. Short landings were made possible by the inclusion of a set of large thrust reversing petals that dropped into the exhaust trunking and expelled the gases forward from slots in the side of the fuselage. The initial AJ37 variant was declared operational in 1972, and required the addition of a trainer variant, dubbed the SK37, which had an additional cockpit placed high above the original, displacing some fuel tankage in the process. The final JA37 variant was brought into service in 1980 with new computer systems, improved radar and engine, as well as other systems and the strength of the airframe, which already utilised titanium to reduce weight. The FS version (Spaning Foto) replaced the radar with cameras in the nose. Additional provision was made for recce pods. They were introduced in 1973 with 28 aircraft being built. They were later upgraded to AJSF-37 before being decommissioned in 1998. This means the Swedish Air Force lost a dedicated Photo Recon Asset at this time. The last of the operational Viggens (Thunderbolt) were retired in 2005, replaced by the impressive JAS39 Gripen (Griffon). A number of Viggens are on display in museums – notably Newark in the UK, but the Swedes have retained one in flying condition that can sometimes be seen at British airshows along with a Draken, Lansen and even the Tunnan. If only every country was conscientious in preservation of its aviation history. The Kit The main tooling that this kit originated from is the collaborative effort between Special Hobby and Tarangus in 2018, which has been re-issued a few times over the past few years. In the box you get six sprues of grey styrene, one of clear parts, a sheet of decals and a glossy colour printed instruction booklet with integrated colour and markings guide at the rear. The tooling is one of the best I have seen in 1/72 there is plenty of detail with well defined but not overly deep panel lines. The only negative part on the tooling are sink marks on the top of the flaps due to the moulded on flap actuators on the underside of the mouldiing. These will be easily filled though, or can be shaded in for weathering back from the flap hinges. Construction starts shockingly enough in the cockpit. The four part ejection seat is built up followed by the cockpit tub. Instrument panel, rudder pedals, control column, and throttles are all added, the tub can then be placed inside the upper front fuselage; the ejection seat is then added in from the top. We then move to the lower front fuselage, the housing for the APU is built in. The front gear well as well can be glued in at this point. The upper and lower front fuselages can then be joined together around the full length intake trunking. The engine face is then put on the back of the intake trunking thus finishing this part of the build. Next up is the rear fuselage. and wings. First off the upper and lower wings are joined together. Above this the engine exhaust and the Viggen's unique thrust reverser are assembled and placed inside the two part (left & right) upper rear fuselage parts. These in effect only form the top two thirds of the read fuselage as they then join to the top of the main wing assembly. Its worth noting the thrust reverser can be modelled open or closed. The front and rear fuselage sections can then be joined. At the front the nose is made up and added. Once the nose is on the rather nice one part engine intakes are added. Towards the rear the vertical tail is put on. Various antenna, intakes and fairings are then added to both the upper and lower surfaces of the Viggen. On the underside the undercarriage is then built up and installed with the aircraft's unique twin tandem main wheels going into wells which are on the indie of the main wing parts. The main gear doors are added. Flipping back to the top the front control canards go on. We then flip back to the underside for the air brakes, To finish of the centre line fuel tank is added followed by the clear parts. Markings The glossy decal sheet looks to be printed in house, looks sharp and is in register. There are three decal options available from the decal sheet, which are split between NMF & splinter camouflage. From the box you can build the following; 37023/7-23 / 418 - Wing F7, Satena, Seen at the Paris Air Show in 1973. Aircraft was Zapped by RNLAF personnel of 323 Sqn at Leeuwarden on the way back to Sweden (NMF). 37029/7-29, Wing F7, Satenas July 1975 Still showing markings applied for an airshow in Germany in 1973 (NMF) 37035/6-35, Wing F6, Karlsborg, 1984 (Splinter camo). Conclusion The Viggen is a huge, impressive-looking Cold War warrior that has the unique Swedish look to it Detail is good, with excellent decals into the bargain makes this a must-have as far as I'm concerned. If you like Viggens then make sure you get one. Very highly recommended. Review sample courtesy of
 -
Gloster Meteor PR Mk.10 "High-Altitude Photo-Recce Version" 1:72 MPM / Special Hobby (72560) The twin-engined Gloster Meteor was jointly developed by Frank Whittle’s Power Jets Limited and the Gloster Aircraft Company. It was first flown in March 1943. When 616 Squadron commenced operations on the type in July 1944, it became the first jet fighter to enter operational service with the Royal Air Force. Forbidden to fly the Meteor over occupied territory, 616 Squadron used the new aircraft to combat the threat of V-1 flying bombs, eventually accounting for 14 of them. The design evolved considerably in the post-war period, spawning night fighters, reconnaissance aircraft and target tugs among other variants. The PR.10 was something of a hybrid aircraft. With the wings of the Mk.III, the tail of the Mk.IV, Fuselage of the Mk.8 and nose from the PR.9. The PR.10 was phased out in the early 1960s with the Canberra taking on the role. Special Hobby's Meteor is a tried and tested kit, having been released in multiple guises by Special Hobby themselves, Revell and (briefly) Airfix. The cockpit is well detailed for the scale, and there is a decal for the instrument panel. Nose weight is an absolute must, and there should be enough space for this in the area of the nose in front of the cockpit. The lower wing is moulded as a single span up to and including the engine nacelles, with separate outer wings, while the upper wing is split into four parts. For the Mark you will have to use the longer outer wing sections. The landing gear is nicely detailed, but joins to the landing gear bays by way of a simple butt joint, so watch out as it could be easily broken off once fitted. The canopy is pretty good, and Special Hobby have included masks for all of the different marking options provided on the decal sheet. An addition in this kit is a pair of rear wing root fairings in resin to replace the kit ones. Decals The decal sheet provides a nice 5 options covering 3 different schemes. From the box you can build; WB156/A-B No.541 Sqn RAF, RAF Buckesberg, Germany 1950 (Dark Green / Medium Sea Grey over PRU Blue) VS975/A-N No.541 Sqn RAF, RAF Buckesberg, Germany 1950 (Dark Green / Medium Sea Grey over PRU Blue) VS975/A-N No.541 Sqn RAF, RAF Buckesberg, Germany 1951-53 (Medium Sea Grey over PRU Blue) WB172/F No.13 Sqn RAF. RAF Kabrit (Egypt) 1951-53 (High Speed Silver overall) VA987 No.81 Sqn RAF, RAF Selter (Singapore) 1960 (High Speed Silver overall) Conclusion Special Hobby has the day 1/72 Meteor market pretty sewn up, but it's still good to see them using their tooling to release some of the lesser known types. The overall package is pretty complete, overall, this is a nice kit an can be highly recommended. Review sample courtesy of
-
Messerschmitt Bf 109E-1 J/88 Legion Condor (SH72443) 1:72 Special Hobby The BF 109 has inherited quite a legendary status and when you look into its service career, it's certainly obvious why. Viewing the design in retrospect, it looks just like a typical fighter of the WWII era, but it was more than that, it was the very platform that the single seat fighter format was born from. Powerful engine, monocoque airframe, all metal construction, enclosed cockpit and retractable gear this was unheard of before hand, it was radical, not typical in the 1930's. Its birth wasn't perfect however, to achieve its performance, some sacrifices were made, particularly in the landing gear arrangement and high wing loading having a negative effect on landing speeds compared to the competition at the time. This inherent design issue was never fully cured and it's estimated that at least 10% of all 109's were lost in take off accidents. Early models (A-D) were powered by the Junkers jumo engine with outputs of around 700hp. The aircraft was first used in combat during the Spanish Civil War where many lessons were learned and these would be later put to good use in battles over France and Britain. The E or Emil model broke the mould in 109 development by changing to the more powerful Daimler Benz DB 601 engine of around 1080hp, a significant step in performance and also in armament due to the introduction of 20mm cannon. By 1939, all earlier variants had been replaced in frontline service. As the variants progressed, so did the level of armour protection for the pilot. Another critical element to improve survivability was the use of twin radiators with cut off valves meaning that if one radiator was damaged, the other could be used to keep it airborne. The Emil was the primary Luftwaffe fighter until 1941 when the F model became widely available with more powerful engine although a few managed to see combat in the Battle of Britain. For an aircraft that broke the mould with fighter technology and performance in the mid 30's, it's evolution meant that whilst it's design had exhausted improvement capability towards the end of the war, it stayed in operational use until 1965 in Europe in the guise of the Spanish licence built HA 1112 using the Merlin power plant. During its 30 year career, more than 33,000 were built, a record that will probably never be beaten. The Kit This is a brand new tool for 2020 from Special Hobby, in collaboration with Eduard. The quality is first class with crisp moulding and fine engraved panel lines. Given the small size of the real aircraft, in 1/72 the model is quite diminutive, but seems well detailed. Construction starts with the cockpit. The rear bulkhead attaches to the floor with the rudder pedals going in as well. The front lower bulkhead is made up and installed onto the floor followed by the instruments panel and the coaming in front of it. The instruments being provided as decals. Into the cockpit go the flight controls and flap wheel, followed by the seat. The belts being provided as decals also. If the modeller is going to display the cover for the guns in front of the cockpit open then full guns are included, if you are doing this closed then only partial ones need to be added. Next up the engine is assembled which seems quite detailed for the scale, the bearers attached and it fitted to the firewall. Inside the main fuselage halves the exhausts are fitted along with the tail wheel and then the whole thing can be closed up. Separate engine and gun covers can be added, or left off as needed. After the tail surfaces are attached to the main fuselage then we can move onto the wings. The lower wing is a single part with left and right uppers. The wheel wells are all boxed in on the lower. To the middle of the lower wing the radiator is first added. The top wings can then go on. All the wing control surfaces are separate parts. To finish the wing the under wing radiators are added. The wing can then be joined with the fuselage. The canopy parts can then be added, with different types of head armour being provided for the different decal options. The slats can then be added to the main wing in either the open or closed position as needed. At the front the prop and spinner goes on. Last up for the main parts, the main landing gear is made up and added. A few detail parts now can be added to finish of the kit, the aerial mast, pitot tubes, balance horns,; and even an engine starting handle if you wish to install it. Markings The glossy decal sheet is printed in house and looks sharp and in register. There are three decal options available from the decal sheet; 6-123 - J/88 Legion Condor. Olbt Hans Schmoller-Haldy, Spain 1939 6-121 - J/88 Legion Condor, Lt Karl-Wolfgang Radish, Spain 1938/39 6-119 - J.88 Legion Condor, Hptm Siebelt Reents, Spain 1938/39 Conclusion It is good to see a new tool out of this most famous aircraft. I am no 109 expert but it looks to be a well detailed and engineered kit. Highly recommended. Review samples courtesy of
-
SIAI-Marchetti SF-260 Duo Pack & Book (SH72451) 1:72 Special Hobby The SF.260 was designed by Stelio Frati as a three seat aerobatic aircraft designed for the sport aircraft market. It was designed for full IFR flight and with a capability similar to some military aircraft. It was these qualities which caused it to be favoured by Air Arms as a trainer and even light attack aircraft. Production was originally by Aviamilano with the first flight in July 1964. SIAI Marchetti soon after purchased the rights to the design and production continued by them until being bought by Aermacchi in 1997. Both piston engined and turbo prop aircraft were developed. Aermacchi continued production on taking over the company. The Kit This is a brand new tool for 2020 from Special Hobby, with two kits in this box for the early, and later bulged canopy Aircraft. The quality is fist class with crisp moulding and fine engraved panel lines. Given the small size of the real aircraft, in 1/72 the model is quite diminutive. each model arrives on two main sprues and a single part canopy. There are further small sprues for different aerial configurations and weapons. In this boxing there is a small fret of PE parts and some resin parts including rocket pods. Also included are a set of masks for the bulged canopy, and two for the normal canopy. Construction starts in the cockpit. The instrument panel is first mounted to the centre console with two different panels in the kit depending on your preferred decal option. The instruments are provided as decals. The console is then fitted to the cabin floor and the flight controls added in. Next the two front seats and rear bench type seat go in. All being provided with decal belts. The rear bulkhead is fitted along with the shelf which goes behind the rear seats. The cockpit can then go into the fuselage along with the front bulkhead. No mention is made of nose weight though I would highly suspect it will be needed. The single part main wing can then be fitted to the fuselage making sure to fit the nose gear well in the front section of it first. At the front the engine face and prop can be added, and on the tips of the wing, the tip tanks. These are followed by the tail planes and the single part canopy. The landing gear and doors can now go on. Depending on your decal choice aerial are fitted where needed. Lastly if doing an armed version the pylons can be added. The kit provides rocket pods on the sprues and in resin for the aircraft. Markings The glossy decal sheet is printed in house and looks sharp and in register. There are eight decal options available from the decal sheet. Only the first scheme uses the Bulged canopy, hence why there are two of the early canopy so two versions can be built from the box. A secondary sheet provides stencils, walkways and seat belts The eight options are; ST-34 Red Devils Aerobatic Display team. No.5 Sqn Belgian Air Force, 2015 White S, No.4 Sqn Rhodesian Air Force, Thornhill 1978 FAB-184, Bolivian Air Force, 1980. 91-0779/2-779, Turkish Air Force, Izmir Cigli AFB 2011 N405FD, Sky West Aviation Inc, Trustee , USA This flew with Air Combat USA. 70-21/M.M.54437 70 Stormo, Italian Air Force, Wearing special Black & Gold Scheme to commemorate the Squadrons 50th Anniversary No.603 Free Libyan Air Force 2018 TS-TBP W41-5034, No.14 Sqn Tunisian Air Force 2008 Book Included with this package is the Duke Hawkins Aircraft in Detail Number 016 from HMH publications. This is a 90 page book printed glossy paper featuring the SF-260 in use around the world. As well as Airframe detail along with lots of action shots the book looks at the Cockpit, Landing Gear, and maintenance of the aircraft. This is a comprehensive walkaround publication and brings a great deal to this package. Conclusion It is good to see a new tool out of this much used trainer/light attack aircraft. The double boxing with the HMH book, and eight new decal options is very welcome. Very highly recommended. Review sample courtesy of
-
DH.100 Vampire Mk.3 ’European and American Operators’ 1:72 Special Hobby (72453) The distinctive de Havilland DH.100 Vampire was designed to fulfil a wartime requirement for a small, lightweight jet fighter for the Royal Air Force. Although the prototype aircraft first flew in September 1943, the production aircraft arrived too late to see service in the Second World War. In spite of this, well over 3,000 were eventually produced and the aircraft enjoyed a relatively long service life by the standards of the day. Powered by a single De Havilland Goblin turbojet, the Vampire was capable of a maximum speed of 548 mph and had a service ceiling of over 40,000 ft. In common with many other RAF fighters of the day, armament was comprised of four 20mm cannon. 1,202 Mk 3 were produced for the RAF, 86 For Canada, and 20 for Norway. The Kit the top opening box are two sprues of grey plastic and a clear one. There are no resin or photo etched parts in the box though Special Hobby do offer s a PE set through their CMK line. It should be noted that not all of the parts need to be used to build the variants catered for in this edition. The kit looks excellent on the sprue, with lots of crisp, moulded detail and surface structures made up of fine, recessed lines and fasteners (although some of the detail on the underside of the fuselage looks a little heavy). The overall impression is closer to a modern, high pressure injection moulded kit than the older MPM/Special Hobby kits in my collection. Construction starts with the well-detailed cockpit. This area is made up of the floor, rear bulkhead and head rest, the pilot's seat, the control column and the instrument panel. The instrument panel features recessed detail and a decal is provided for the instrument dials themselves, while the gun sight is moulded from clear plastic. The inside of the fuselage halves benefit from some separately moulded sidewall details. Taken together, the overall impression is of a well detailed and suitably busy cockpit. Other internal detail includes the front and rear faces of the De Havilland Ghost turbojet engine. Special Hobby have elected for a bit of a smoke and mirrors effect here, splitting the front face of the engine into two parts so each can be seen through the intake trunking (part of which is cleverly moulded to the lower half of the fuselage pod. There is no separate tail pipe for the jet exhaust, with the pipe and protruding lip being moulded as part of the upper and lower fuselage halves. The nose cone is moulded separately to the rest of the fuselage, and it follows a panel line which should reduce the need to clean up the joint when finished. It will also enable you to fit the nose weight after the main structure of the model has been completed. Once the two halves of the fuselage pod have been joined together, attention turns to the wings and the horizontal stabiliser. The wings are simply moulded in upper and lower halves, with control surfaces moulded in place. Surface details are very nicely represented, although the trailing edges are a little on the thick side (nothing that can't be sorted relatively easily though). The shallow main landing gear bays are moulded as part of the lower wing but are pretty well detailed. The engine air intakes are separately moulded, complete with vanes. Nice as they are, they look quite inaccurate as the openings are too small. The plastic looks too thin to correct the flaw, so hopefully one of the aftermarket manufacturers will have a go an producing some resin replacements. The tail booms look pretty good and, as with the wings and horizontal stabiliser, the control surfaces are moulded in place. There are a couple of nice balance weights for the underside of the horizontal stabiliser though. With the airframe together, attention turns to the undercarriage. The undercarriage itself is quite nicely moulded without being overly complex. A choice of hubs are provided for the main landing gear wheels, so you'll need to choose the right pair for the version you want to build. Ordnance is catered for by the inclusion of a pair of drop tanks. The canopy is nicely moulded and is split into two parts, so it can be finished in the open position if desired. Decals The sheet brings 4 options. These are; 067-BQ, No 438 Sqn 'City of Montreal' RCAuxAF, St Hubert, 1955. B-AG, C Flight, No. 331 Sqn RNoAF, Gardenmoen, 1948. Yellow 2, 200 Sqn FAM, Mexico City 1961-70 (Ex RCAF) VT799 No. 614 Sqn 'County of Glamorgan" RAuxAF, Llandow, 1951. Conclusion Overall this looks like a really appealing kit. The level of detail is very good indeed, and provided there are no surprises in terms of fit and finish, it should build up into a nice model, My only real gripe is the undersized engine air intakes, but hopefully these can be sorted with aftermarket parts. Overall though, this is a nice kit which I am looking forward to building. Recommended. Review sample courtesy of
-
CMK IA-58A Pucará Wheels (4435 for Kinetic) 1:48
Mike posted a topic in Aftermarket (updates/conversions)
IA-58A Pucará Wheels (4435 for Kinetic) 1:48 CMK by Special Hobby Kit wheels are generally in two halves, which means you have the resultant joins to deal with, possible mould-slip issues on single part wheels, and sometimes less than stellar detail due to the moulding limitations of styrene injection technology, especially in the tread department. That's where replacement resin wheels come in, with their lack of seamline and superior detail making a compelling argument. They are also usually available at a reasonable price, and can be an easy introduction to aftermarket and resin handling, as they are usually a drop-in replacement. This set is patterned for the Kinetic kit in 1:48, and arrives in CMK’s familiar clear clamshell box with card header and a small instruction sheet within. There are five wheels and ten hubs on ten casting blocks, and on the face of it all the wheels look the same, but one is for the nose wheel and has a very thin flashed over centre and no vertical mark on the pour block, but if you look carefully, you can see a ‘4x’ written on the blocks in a transparent gloss pen. Construction is simple, and the nose wheel should have its flash removed before assembly to allow the two hub parts to meet in the centre, whilst aligning with their location pips. The main wheels are different, having brake details moulded into the axle end, inserting into the shallower side of the wheel and locating by two pips with the box shape at the bottom. The other side accepts the outer hub with its lightening holes all around, and you should take care to centralise them before the glue cures by inserting the axle side with a cocktail stick in the hole, or a pair of tweezers. There are two wheels per each main strut, while the nose wheel is alone on its leg, and all five offer excellent detail. Highly recommended. Review sample courtesy of -
 Special Hobby is to rebox (?) the MPM (? - link) 1/72nd Focke-Wulf Fw.189B Uhu kit - ref. SH72430 Source: https://www.specialhobby.net/2020/10/na-cem-pracujeme-pri-patku.html?m=1 V.P.
- 7 replies
-
- 4
-
-
- Uhu
- Special Hobby
- (and 1 more)
-
Special Hobby is to re-re-release (Original thread link) its 1/72nd de Havilland DH.100 Vampire F.Mk.3 kit - "European and American Users" - ref. SH72453 Source: https://www.specialhobby.net/2021/07/sh72453-dh100-vampire-mkiii-european.html Box art V.P.
- 27 replies
-
- 6
-
-
- Special Hobby
- Vampire
- (and 1 more)
-
Reggiane Re.2005 Sagittario (SH48206) The Ultimate Italian WWII Fighter 1:48 Special Hobby Although the Sagittario follows on from the Re.2000 in terms of numbering, it was a wholly different project that began with a clean sheet of paper to incorporate the German Mercedes Benz DB605 engine that was either crated in from Germany, or built under license by FIAT. It was a complex design that was exceptionally manoeuvrable, fast and agile in battle, although it was comparatively short on ammunition. Its gestation was surprisingly short given the brand-new design, but damage from a few heavy landings slowed down its entry into production, with an initial order of 750 airframes that was unlikely to be achievable. It saw service in the last days of Mussolini’s administration, and a number were taken by the Germans and used in defence of Berlin, where it gave a good account of itself and earned the respect of those opposing it, who considered it to be a highly competent fighter. In earlier Axis service it was compared to the G.55 as a fighter, and although it was excellent, it was extremely expensive and difficult to produce in large numbers, so the G.55 was given priority. The Luftwaffe were so impressed with the type that they requested and received an example that was to be assessed and converted to suit their tastes with the name Re.2005LW. A further development with a more powerful DB603 engine was prototyped under the designation Re.2006, but never saw service, and some more fanciful designs such as a twin fuselage development stayed on the drawing board. Another stalled development was the Re.2005R, which used a technological dead-end engine technology called the Motorjet, but it drank fuel at such an accelerated rate that it was considered impractical. The Kit This is a re-release of Special Hobby’s 2020 new tool of this elegant Italian aircraft. It arrives in a sensible-sized top-opening box, and inside are four sprues of grey styrene, a small sprue of clear parts in its own Ziploc bag, a decal sheet and the instruction booklet with spot colour throughout and colour profiles in the rear pages, plus an advert on the back page for some of the aftermarket that CMK have produced, and few of their other WWII Italian fighter kits. It’s a well-detailed model and must have sold well if they’re re-releasing it so quickly after the initial release. Construction begins with the cockpit, starting with the instrument panel, which glues to the horse-shoe shaped frame and has a decal to depict the dials and other details. The floor has the rudder pedals, control column and seat base added, then the sidewalls are detailed with more parts and fixed in place. The seat of the Re.2005 was made of 8mm tempered steel that wrapped around the pilot, and this is moulded in two parts with a separate seat cushion in the base. The rear bulkhead has the head armour installed as it is joined with the cockpit floor behind the seat, and the instrument panel is joined by a pair of boxes just behind, with the majority of the interior painted green. The tail wheel bay is required before the fuselage can be closed up, and it is assembled from three sections with the strut placed inside along with the wheel that is trapped in place by the separate yoke part. The fuselage halves have a rib removed from inside before the cockpit is glued into the starboard side along with the tail wheel bay, then the fuselage is closed up, the cannon troughs are inserted into the gap in the nose, the single-part elevators slipped into slots in the tail, and the two-part intake filter trunking is located within the shield-shaped panel line on the port side, just behind the exhaust slot. Those are next, with the surround wrapped around the stacks, while three little fairing ‘bumps’ are placed within their own marks on the top cowling in front of the cockpit, which is great because it keeps them out of harm’s way while you deal with the fuselage seams. The single-part canopy is glued down, and if you’re particularly brave or foolhardy and cut the windscreen free, the canopy hinges to the right. The nose of the beast is very Bf.109-like because of the engine within, and so is the prop, although it is built by an Italian company, Piaggio. The rear boss receives three individual keyed blades, over which the front boss fits, then the front and back spinner parts are glued over it and the short stub axle on the back of the spinner inserts into the hole in the fuselage front. Preparing the wings involves making up the main gear bays, starting with the heavily corrugated roof of the bay, which has sides and ribs added to the grooves, followed by the gear leg and machine gun barrel before the front wall is fitted to hold them in place. Three retraction jacks are installed within the bay, and a scrap diagram shows their location with each part coloured differently to aid placement. With the bays completed, they are fixed into the full-width lower wing, which is closed over with the two upper wing skins, after which the fuselage is mated with the wings with barrel stubs and optional pair of pitot probes, one of which is left off for some markings options, leaving you to fill the hole in the starboard wing. The Sagittario had a large ventral radiator bath mounted under the belly, which is made up from a three-part bath, front and rear strakes, and the single U-shaped aerodynamic fairing that encloses it. The main gear is finished off with a pair of wheels that are smooth treaded and unweighted, but adding weighting is simply a matter of sanding a flat onto each one. Each gear bay has three doors, two being captive to the strut, while the third is hinged at the outer edge of the gear bay. Now for some paint. Markings There are four decal options on the sheet, and all four have the same basic green over blue-grey underside, differing only in their markings and operators. From the box you can build one of the following: MM.0923xx, 362-8, 362a Squadriglia, 22o Gruppo, 42o Stormo Intercettori, Littoria, June 1943 MM.092351, 362-2, 362a Squadriglia, 22o Gruppo, 42o Stormo Intercettori, Capua, Summer 1943 MM.092352, Red 4, Reparto Aereo Collegamenti, Aeronautica Nazionale Repubblicana, Milan-Bresso, March 1944 MM.096109, Converted to German standards at the factory. Issues to pilots of II./JG77 at Lonate Pozzolo, October 1943 The decals are printed in Czechia with good registration, sharpness and colour density, with a thin gloss carrier film cut close to the printed areas. Conclusion A nice rendition of an elegant aircraft that saw limited service in various hands. Nice detail out of the box, and a ready supply of aftermarket from CMK if you wanted to take the detail a little further. Highly recommended. Review sample courtesy of
-
 Recently completed this... 1/72 Special Hobby Mirage F1. Hasegawa decals which were printed way too dark. Added scrap plastic antennas to the tail fin, everything else out of the box from a donor Special Hobby kit. Xtracrylic XA1138 ADC Grey, Hataka blue grey for the upper part of the fuel tanks. All metal areas using Vallejo Metal Colour. Custom thinned Klear gloss coat, then used Ammo Mig Blue/Black PLW, & a final coat of Xtracrylic matt. Thanks for looking! Martin
- 26 replies
-
- 42
-
-
- Mirage F1
- Special Hobby
- (and 1 more)
-
 What would be the best way to eliminate the gaps (seen HERE) between the fuselage and the wings WITHOUT using putty? I was thinking on two options: 1) Add a spreader bar in the middle of the fuselage in order to push the halves outwards, with the consequence of making the gap smaller (may also throw off the fit of the nose). Or, 2) Test fit the upper wings to the lower wing constantly, while also sanding down slowly the lower wing until the gap disappears. I somehow think the second option would work better. Here's a photo taken from @sunray 's excellent build of his Pucará. Cheers!
 -
F-4B Phantom Correction/Update sets (For Tamiya) 1:48 CMK by Special Hobby The new Tamiya F-4B kit was a welcome addition to their line of new tool aircraft. CMK now bring us some update sets for this kit. All are cast to their usual high standards. Early Fin Tip (4431) This set brings us the early style F-4B fin tip not offered in the Tamiya kit. The set also provides a separate pose able rudder, again not available in the kit; PE hinges are included for the rudder.. Boarding ladder (4430) This set provides the drop down boarding ladder for the aircraft. A small recess will need to be cut in the kit to accept this. As it is cast flat a great deal of care will be needed to remove this part. In Flight Re-fuelling Probe (4429) If you want to open up some panels on your F-4B at the front this set offers the modeller the chance to put in the extendable in flight refueling probe. Obviously a hole will need to be cut in the kit to accept this. Review samples courtesy of
-
 Hello As I was struggling against my Mirage 4000 for the French Fancy GB, I was working on three Special Hobby Messerschmitt Bf 109 E. These kits were produced this year and here they are. First the Bf 109 E1 "Yellow 14" from 6.(J)/Trägergruppe 186 during Winter 1939/1940 Next is the Bf 109 E3 "White 13" from 1./JG51 during summer 1940. I chose to open everything around the engine as it is made possible in this kit. Further I opened the radio access hatch to see with a magnifier those equipments. and finally the Bf 109 E4 "Yellow 8" from III./JG52 in Rumania in May 1941. I can say that these kits are easy but long to assemble due to the number of tiny details and parts. The engines are inside the cowlings ! I could have opened the canopies which are in three parts but I am too lazy to get thinner the edges. It was a great pleasure to build them. All the schemes came from the boxes. Patrick
 -
F-16MLU Fighting Falcon Correction/Update sets (For Revell) 1:72 CMK by Special Hobby The Revell 1.72 F-16 kits are the best out there. Now CMK now bring us some update sets for this kit. All are cast to their usual high standards. Gun Bay (7472) Despite the name this does not bring us the main gun bay, but the bay behind where the ammunition drum is housed. As well as the bay, and the drum the outer cover panel is provided. The kit will have to be cut in this asrea. Wheel Bays (7471) This set brings us shockingly enough the main, and front wheel bays. These are direct replacements for the kit parts, just with more detail, the main bay will need to be built up before adding in. Review samples courtesy of
-
Special Hobby is to release a new tool 1/72nd FMA (Fábrica Militar de Aviones) IA-58A Pucarà kit - ref. SH72389 Source: http://kitchecker.com/unterwegs_2018_1/toy_fair_2018_1.htm V.P.
- 15 replies
-
- 6
-
-
- Special Hobby
- Pucara
- (and 1 more)
-
F-18E/F Hornet Control Surfaces Set (7477 for Academy Kit) 1:72 CMK by Special Hobby This set allows all the wing control surfaces and the rudders to be positioned as the modeller wants. These jets are often seen on carrier decks with everything extended. All of the kit control surfaces will need to be cut off to use these. This set arrives in CMKs normal plastic/card box. The parts require minimal clean up from the casting blocks all on the edges that attach to the airframe, and all look to be top quality. This will add something extra to your kit Highly recommended. Review sample courtesy of
-
P-40K/M/N Warhawk Late fishtail Exhausts (Q72396 for Special Hobby Kits) 1:72 CMK Quick & Easy by Special Hobby Exhausts are one of the things which look a great deal better in resin than injected plastic. Here the exhaust stubs are in pairs and must be added to their manifolds, a little fiddly in this scale but well worth the effort. The parts are very well cast. This set arrives in CMK’s Quick and Easy green backed envelope. it requires minimal clean up from the small casting blocks. This will add something extra to your Warhawk. Review sample courtesy of

Wedge-TailedEaglePortraitRaptorDomains.thumb.jpg.41a306d3445a68f0f2df773e01776ea6.jpg)