Search the Community
Showing results for tags 'STAR WARS'.
-
Sci-fi is not really my thing but I've always been somewhat attracted to the fighters used in Star Wars. This is my take on Luke's Red 5. I deviated slightly from the painting instructions provided by Fine Molds and painted the spine area and engine pods in a metallic colour. Could have done a little more weathering though. Anyway, enjoy the photos. Feedback is most welcome. I have a Bandai T-70 in the stash as well as another Fine Molds T-65 but in 1/48 and could use some input as to how I can make them better. Cheers! Mark
-
 Evening all, Maintaining my addiction to these superb Bandai kits, here's another two completions hot off the bench. The first is Darth Vader's advanced TIE from A New Hope, whilst the second is the Special Forces TIE from The Force Awakens. Both were impeccable to build as is to be expected and great fun once again. As before, the bases are custom made using a laser engraver, although I've made life easier for myself this time using straight matt black acrylic to eliminate the need for routing required of the aluminium bases I used previously. Bandai 1/72 TIE Advanced x1 by Shaun Schofield, on Flickr Bandai 1/72 TIE Advanced x1 by Shaun Schofield, on Flickr Bandai 1/72 TIE Advanced x1 by Shaun Schofield, on Flickr Bandai 1/72 TIE Advanced x1 by Shaun Schofield, on Flickr Bandai 1/72 First Order Special Forces TIE Fighter by Shaun Schofield, on Flickr Bandai 1/72 First Order Special Forces TIE Fighter by Shaun Schofield, on Flickr Bandai 1/72 First Order Special Forces TIE Fighter by Shaun Schofield, on Flickr Bandai 1/72 First Order Special Forces TIE Fighter by Shaun Schofield, on Flickr Thanks for looking, comments welcomed Cheers, Shaun
 -
 So here is the first of my Bandai Star Wars kits. I'm very impressed with the kit engineering, especially at this scale. You could put it together without glue, it's that accurate. The colour moulding also means you could avoid painting too, but this time (unlike the Revell kits I did) I have given it a full paint job. Main colour was Tamiya Nato Black with Aeromaster Light Mod Eagle Grey for the fins. Rest was panel washing with Tamiya Panel Line and silver dry brushing followed by a coat of semi-gloss varnish. I've also got the SF version plus T-70 waiting as well as a pair of OT TIEs and Vader's TIE advanced for a Black Squadron diorama Comments welcome as always.
- 6 replies
-
- 3
-

-
- bandai
- TIE Fighter
- (and 1 more)
-
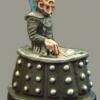
1374 This is my very first WIP post I've ever attempted so please forgive any and all errors. Also I can't seem to get Flickr working here so I've opened a photobucket account as the instructions are very clear (they need to be for me!) in the FAQ section. I've had this vinyl figure sitting in its box for ages but as I've just seen Ep VII and I don't have any of the nice shiny new Bandai kits I thought I give him a go. Now I've never worked with vinyl before but I jumped straight in and after a bath (for him) I started trimming the excess away. Using heat (a hair dryer) really softens the material and speeds up the cutting, in fact there is so little resistance when its hot I found I had to be ever so careful so I didn't go crazy and chop the entire arm off! Here he is taped together (without the capes) just to see how he looks The level of detail has really blown me away. The only blemish in the entire kit is that the cape chain and lightsaber have done a runner Now the chain should be a straight forward replacement but it looks like I may have to scratch build the lightsaber and I've never done anything like that before. The idea is a bit intimidating but I am looking forward to the challenge That's all for this evening, I hope you all had a splendid Christmas Davros aka Mechanised Dwarf
-
 Hey there guys this is another Bandai Falcon I'm working on,....just taking a wee break to work on other Falcon projects,...at the minute I still have the side-walls to do.....but this is how I got to where I am: Some small thinning of pipes & greeblies: The detailed area that runs along the top of cockpit walkway looks a bit too high: Carving out the area from the inside to minimise the damage of details on the outside: Re-positioned lower in the walkway: Blast marks: Carving out the framework for the new rectangular radar: Underside blast marks: As TFA Falcon is a CG model for the movie,...it now has glass in the window frames....(the models used in the original trilogy were frames only to help with blue screen filming),...so I've gone with the window option: Masking: Sorry that it's such a long post,...but thats it brought up to where I am with the model Thanks for looking John
 -
All done! My first completed model in several years, and the first I've ever weathered up! Took nearly three months of restocking paints and whatnot, but I think it turned out quite nicely Did my best to match the griminess of the movie model Gaz.
-
BB-8 Astromech Droid Bandai 1/12 BB-8's all finished now, and he was a great kit to build. Probably Bandai's best droid to put together, and some of their best engineering in the way the parts connect. I'll definitely be getting another to do in different colours (presumably there are other BB units knocking about in a galaxy far, far away) The weathering was primarily done with enamels, with no adverse effects, although he'd had a clear coat first. The wip is here Thanks for looking Andy
- 15 replies
-
- 21
-
-
Hi all, Posted my Snowspeeder earlier and it was quite a painless experience so thought I would post this. I'm new to the hobby and still learning but this is probably my favourite build so far. It was painted with Vallejo paints and weathered with acrylics as the Bandai plastic does not like oils and enamels. However oils were used to create the rust stains. Hope you like! Thanks for the look, sorry about photo quality, they were taken on my phone!
-
Hi this is my first post after taking the hobby back up about 18months ago. Before then I haven't finished a model since my teens! This is a great kit and needs hardly any glue, however after seeing these images on the pc I will be going back and fixing a few pieces to ensure the gaps close. I have also finished the 1:48 ATST from Bandai so if this post goes well and I don't get mauled to much I will try and get that posted to. This forum has really helped with my learning curve! Sorry about the photos they are done on my phone. Thanks for looking!
- 6 replies
-
- 5
-
-
- Star wars
- Snow speeder
- (and 1 more)
-
Revell Star Wars T-70 X-Wing 1/51
fernwood79 posted a topic in Ready for Inspection - SF & RealSpace
Here as promised is the companion T-70 kit to the FO SF TIE I did at Christmas. Just to remind you, the challenge here was to see what I could do with just panel wash and dry-brushing, keeping the rest of the original kit paint scheme. I left out the BB-8 astromech because the ship is Snap Wexley's which should have an R5 unit. The kit is pretty good for a snap-fix one and I think it captures the sleek look well. -
 There tend to be too much blue'ish light in my kitchen this early in the day, but I suppressed the blue a little as a post effect on the images, and hopefully the photos should look ok. Edit: Hrm, nope. Too much blueish lighting here. Have to go take some new photos. This model was airbrushed with Vallejo Air colors (USAF Light Gray and Nato Black). I used Humbrol Clear for the gloss coats (psi should ideally be at 5-6 I think). The four layers of gloss coat is ofc "hidden" by the final layer of Vallejo Matte varnish (diluted 50/50 with thinner). I'll post some more images later showing the stand that was painted with Vallejo's metallic 'Gunmetal Gray', once the battery on my digital camera has been recharged. I really like this kit, though the kit seem to have one subtle flaw at the front and to the side a bit, where you can see the seams from the two big pieces that doesn't get covered by the parts on the side. I used some photo etch and it was ok, though I had to mask the photo etch to paint the big parts both gray and black. I think ideally, the PE should have been made differently because of that. The WIP thread is here.
 -
Here is my Revell First Order Special Forces TIE Fighter. It's 1/51 and the smaller of the two on offer from Revell with just 15 parts! OOB it looks a bit toy-like. I got it for Christmas and had limited modelling stuff with me, so I decided what I could do with just panel wash and dry brushing over the existing paintwork. In the end it turned out better than I had expected! It's amazing how much difference it makes
-
Hello! Here is my Revell 1/50 Resistance T-70 X-Wing Fighter. A nice easy build, only mods were the droid and pilot. I painted the model as a fictional "Blue III" callsign as I will build Dameron's Black T-70 to fly in formation with this one in the future.
- 13 replies
-
- 10
-
-
 First Order TIE fighter Bandai 1/72 scale All-in-all, I think it turned out okay. When painting this I remembered how difficult black is to pull off on a model and how annoying it can be to photograph properly. Speaking of which, I think I'm going to invest in some new photo backdrops because this felt-like one I have now pisses me off!
- 15 replies
-
- 14
-
-
Evening all, It's taken longer than I had hoped, but I've finally completed my X-Wing to go the TIE Fighter I finished last month. It's another Bandai kit, and goes together beautifully, although it a bit more of an involved build compared to the TIE. I found it easiest to leave the main components disassembled for painting and weathering, not that this is a problem given the incredible fit. All markings were masked and painted in place of the supplied decals so that I could chip the paint more effectively- although I might have gone a touch overboard in that respect- in fact, the only decals used are on R2-D2 and Luke's helmet. All colours were Xtracolor, and were matched as close as I could with the shades I have available to the colours of the decals. In all, I've used fifteen or more colours on all the various panels, so plenty of masking for minimal airbrushing, hence the protracted build time. Up close, the finish is a little rougher than I'd have liked but doesn't look too bad from a few feet. As before, the base is a piece of Aluminium/Acrylic composite routed to shape before the rebel logo was laser engraved into it. All in all, another brilliantly fun build Bandai 1/72 T-65 X-Wing Starfighter by Shaun Schofield, on Flickr Bandai 1/72 T-65 X-Wing Starfighter by Shaun Schofield, on Flickr Bandai 1/72 T-65 X-Wing Starfighter by Shaun Schofield, on Flickr Bandai 1/72 T-65 X-Wing Starfighter by Shaun Schofield, on Flickr Bandai 1/72 T-65 X-Wing Starfighter by Shaun Schofield, on Flickr Bandai 1/72 T-65 X-Wing Starfighter by Shaun Schofield, on Flickr Of course, I had to take a shot or two with it's adversary... Bandai 1/72 T-65 X-Wing Starfighter by Shaun Schofield, on Flickr Bandai 1/72 T-65 X-Wing Starfighter by Shaun Schofield, on Flickr Thanks for looking, comments welcomed as ever, Cheers, Shaun
-
This model is almost finished,....just the base to do & final photos to be taken: I primed the figures with white,...then masked the areas I wanted to keep white with liquid latex with a drop of Vallejo colour: So....decals,...base & photos,....& that should be Wedge & Wes done Thanks for looking John
-
TIE Interceptor 1:90 Revell The TIE Interceptor was introduced as a sister ship to the general purpose TIE Interceptor, I guess to add a little diversity to the chase and battle scenes of Empire. It has cranked "wings" like Vader's TIE Fighter, and a long sloped forward wing section that mounts some large cannons. It looks like it's speeding when standing still, which gives the impression of its function. The type didn't see major use other than as background cannon fodder in the existing films, but maybe it'll see some action in the new one. We shall wait and see. The Kit This is one of the Level 3 range, and as such is more of a traditional kit than any of the Level 1 and 2 snap-together offerings as it requires glue and paint, and it is quite small too, thanks to the scale, which doesn't seem at all consistent throughout the five kits released so far for no apparent reason. That gripe aside, it arrives in a small red themed box with Kylo Ren (the new baddie) menacing us with a light sabre at the top. Inside are three sprues in a TIE Fighter grey/blue styrene, a clear sprue and instruction booklet, which is printed in full colour on matt stock. The first thing that strikes you other than the colour of the styrene and size, is that the detail isn't half bad. It's a fairly simple kit in terms of part-count, but it has been designed in such a way to maximise detail in the process. The instructions are of a new style, having plenty of colour, which looks almost inkjet printed on the thin stock they have used. Some of the symbols are carried over from previous Revell offerings, but the overall impression is much less cluttered. Construction begins with the pilot, which the instructions show to be a seated Kylo Ren, but the styrene provides only a standard TIE Pilot. His chunky chair has large arm-rests with controls embedded, and this sits in the faceted tray that will be familiar to Star Wars kit builders. The side walls are similarly faceted, and the rear wall also has the engine exhausts attached to the rear. The front "instrument panel" finalises the interior. It is placed in the lower hull on three pegs, and the windscreen (vacuumscreen?) has a grey decal applied to the frames, and slots into two grooves in the lower hull. The upper hull and clear roof hatch hold everything in place, and with a little glue, it should all stay put, although the pegs and their receptacles look very much like they originate from a friction-fit kit. The wings have three big ejector pin marks on the inner surface, but other than sanding them flush to allow the detail panel that covers them to fit properly, they shouldn't cause any frustration. Another panel sits on top of the first, and on the outer face a central boss is added, after which the wings can be glued in place, and you're done. Markings Having just the one decal for the windscreen framing, it's mostly about the paint, which Revell as usual give you details of in their own brand. Fortunately, they have Matt Blue-grey in their range, so there's no mixing as often happens when using Revell's limited range of paints. How easy the decal will be to lay down remains to be seen, but there is no carrier film in the clear areas, so it won't be too difficult with the help of some setting solution. Conclusion If these kits had been produced to a consistent scale, they would have appealed to more serious modellers, but they still have some appeal. I would say that they are targeted at the teenager, or the casual modeller, but I'm sure that any modeller would enjoy them. Highly recommended for what it is. Revell model kits are available from all good toy and model retailers. For further information visit
-
BB-8 Resistance pilot Poe Dameron's loyal astromech droid Bandai 1/12 My first model kit of 2016 is done! It was a nice way to jump-start the modeling juices after I spend most of December horribly burnt out. The only weathering I did was to give him a gunk wash of 502 Abteilung Starship Filth; this was done on top a satin coat of Future. I opted to keep that finish because it is accurate to the filming puppet. I might add some pigments here and there, but I'm going to leave the weathering as is for now.
- 11 replies
-
- 17
-
-
I finally finished this little guy, after languishing in the bottom of a display case for around two years.. I painted it with Vallejo silver grey over a Tamiya German grey preshade. Weathering was done using citadel and oil paint washes, oil paint streaks and oil paint shading and toning.. If that's a word?
- 5 replies
-
- 9
-
-
- Star Wars
- millennium falcon
- (and 2 more)
-
new Bandai STAR WARS kits coming soon Already released: some new kits: AT-AT still not confirmed. Maybe display only model: 1/72 Y-Wing coming soon: 1/72 Stormtroopers ??? Need this army! Scout Trooper and Speeder 1/12: new 1/12 Sandtrooper: But still no 1/72 A-Wing, B-Wing, Snowspeeder nor TIE Bomber
-
Afternoon all, As a massive Star Wars fan, and having been firmly caught up in all the hype of The Force Awakens, I just had to get involved in building some of the fantastic Bandai kits. My first venture into this area has been the 1/72 TIE Fighter. A joy to build from start to finish, and completed in a little over a week- must be my quickest build since I was a child! I've finished it as a TIE from a New Hope in the lighter grey, for which I used Xtracolor ADC Grey. Maybe not a 100% match, but it looks close enough to my eye. Details were picked out in various other greys before a dark grey pastel wash wash applied to pop out all that lovely detail. I wasn't too keen on the section od Death Star Bandai provide as a base, so made my own at work using Di-Bond, acrylic sandwiched between two veneers of painted aluminium, into which I laser engraved the Imperial logo. A short length of 3mm acrylic rod provides the mount, a bit floppy, but it does the job. All in all, this has been just about the most fun I've had building a kit in a long time Bandai 1/72 TIE Fighter by Shaun Schofield, on Flickr Bandai 1/72 TIE Fighter by Shaun Schofield, on Flickr Bandai 1/72 TIE Fighter by Shaun Schofield, on Flickr Bandai 1/72 TIE Fighter by Shaun Schofield, on Flickr Bandai 1/72 TIE Fighter by Shaun Schofield, on Flickr Thanks for looking, comments welcomed Shaun
- 5 replies
-
- 5
-
-
- 1/72
- TIE Fighter
- (and 2 more)
-
 <<SKIP THIS IF YOU WANT TO GET STRAIGHT TO THE MODEL BUILD>> So a little bit of back story before I get to the fun stuff. So this build took place over the space of 48hrs and was a mad rush of a Christmas present for a friend of mine who is quite possibly the worst person to buy for in history. So it has now become apparent that I must make stuff for him stat h cant get anywhere else, so this x-wing is a one of a kind because even if I painted it again, it would not be exactly the same. <<END OF BACK STORY>> So I opened this Revel easy kit with the understanding that I would need to re-paint the whole thing from scratch and in my opinion that's exactly what has to be done. The paintwork is passable for your younglings if they wish to build their first model and put it on their shelf. They could eveN practice their detailing, washes and dry brushing on it to make it really pop. But for those modellers that need to make an impact on everyone who sees their work you will need a blank canvas. So below are some photos of the unboxed pieces. Pretty bland paintwork. The initial paintwork has been put directly onto the black plastic and gives a very unrealistic glossy finish to what should be the metal armour of a starfighter so this is my main issue with the original pieces. So first things first, masking, because unless you have the steadiest hand ever, achieving the pin width lines on the nose of the x-wing will be a hell of a lot easier. I would go over the orange and grey panels that revel painted on later with my own orange and grey mix. I then went straight into vallejo black surface primer (2-3 coats) this was essential in order to ensure adhesion of the paint and then 2 coats of Tamiya flat black all airbrushed. Once the black and the primer were done the rest was achieved using brushes. I focussed mainly on the s-foils to begin with, applying the orange detailing first. This was very nearly a disaster, as I first used Humbrol enamel orange which went well and truly wrong. It ended with me wiping it all off and starting from scratch with some custom mixed orange from red Vallejo and yellow Yamiya acrylic paints. It was a close call though so in my opinion be very careful with Humbrol paints. The s-foils and their additional panels and air intakes were then washed and dry brushed (before being assembled with the main body of the starfighter. Parallel to all of the s-foil painting I was applying detailing to all of the cockpit and the mechanical parts of the fighter. The easy kit is surprisingly detailed and has plenty of opportunities to experiment and include as much detail as you want. Once I was happy with the detail of the cockpit and the s-foil mechanics I was happy to assemble the model. Make sure you are absolutely happy before putting any of the pieces together. Easy kit means snap kit so once snapped together there is no going back without potentially destroying the model, YE HAVE BEEN WARNED. The following lot of pic's are of the final completed model which had undergone vallejo washing and dry brushing. I also added some scorch marks to the exhaust nozzle to show wear an tear and some additional detailing to the panelling once I had seen the movie again (perfect excuse ) So that's the full story, I hope you enjoyed this post as its my first any feedback is very welcome.
- 3 replies
-
- 3
-
-
- str wars episode 7
- poes x-wing
- (and 4 more)
-
I recently picked up the new R2-D2/BB-8 combo kit. The Artoo is just a repackaging of the released in the spring of last year, which is nice to have multiples of, but obviously the main draw is BB-8! As people who have seen The Force Awakens know, BB-8 is the new ridiculously adorable droid that pals around with Poe Dameron (and later Rey) and like Artoo before him, is key to the plot of the movie. I went back and forth on whether or not I wanted to paint this kit. I was leaning towards "not" because I wanted this build to be the thing to break the modeling funk that I've been in the entire month of December. After thinking about for the better part of a day, I decided that I would paint the entire kit. Color matching his orange will probably be tricky as I don't have the widest selection of orange paints on hand and I don't really feel like ordering the paints to match. Other than that, it will be an easy build because everything else is either white or silver. So in order to prep for painting, I removed all of the parts from the sprue tree and made a BB-8 forest on my hard Styrofoam blocks with the pieces organized by the part of the body that they belong too. Everything will get a coat of Alclad II grey primer before I move on to the painting. Like Artoo, BB-8 comes with all of the gadgets you see in the film: the 'disk drive,' the arc welder, and the blowtorch. I haven't decided if I will use any of these extras, but I'm leaning towards painting the blowtorch just because that scene in the which he uses it is pretty amusing!
-
Hi I recently got the bandai Slave 1 kit for Christmas and I'm im not sure what colours to paint it.. I've seen some really good techniques for painting the weathering but I don't know what colours to actually use. Can anyone help?
-
Had this for about a month now and have left it until I finished the Stormtrooper, I posted recently. This is not going to be anywhere as good as Andy RM101's posting from last month which was absolutely stunning so won't elaborate to much on the kit and preparation as Andy's has it all and more some. I will be using a number of techniques new to me and to be honest I know this time I have gone over the top on weathering once again, this something I still haven't learned when to stop. Anyway, started the build and didn't want the bodywork in 'Endor brown' so decided on imperial grey, I wanted to try some chipping so primed cowling and sprayed with Humbrol silver and satin varnish. Once dried and Youtubeing for a couple of hour I decided on using the masking fluid method to create the chipping effect. The chipping went way to far and after weathering the grey is beginning to resemble more of an olive, that being said I thoroughly enjoyed doing it this way and will use it again. As far as I'm concerned if an Evil Imperial Empire cant even supply blasters that shot straight, what makes you think they can supply a decent primer! Regards John
- 14 replies
-
- 5
-
-
- Star Wars
- Speederbike
- (and 1 more)