Search the Community
Showing results for tags 'Revell'.
-
Hi everyone I wasn't going to post a WIP here because of late, my WIP's have lead to an unfinished status, and also, it's a PITA trying to maintain 4-5 different postings, but I now figure why not? I know I'm supposed to be doing the Gatlantis carrier, but I need a break from that This is my second attempt at super detailing Revell's Venator class Attack Cruiser. My first one was OK, but it was my very first ever attempt at detailing and there were a lot of mistakes made. However, that was 4 years ago and since then, I reckon I have come a long way in making things look like they work as opposed to just being stuck on. These kits are now quite rare online and go for stupid money, but I was lucky and was sold to very very cheaply. I can also see why to as this was the Pre-painted version. Now, I don;t know who "paints" these but I swear, they must be like 4 or 5 years old because that is the skill level of who ever does it. Shockingly bad! So, I had to strip it all back to bare plastic before I could start. Ii have no idea what Revell use as paint on these but man - it's hard to get off. It would have gone a lot quicker had I had some ELO, but alas, I didn't. So I tried out Strip Magic and I'll be honest, I found that it's no where near as good as they advertise it to be. It might work well on acrylic but not on anything else. Moaning aside, here is where I am up to currently First up are the engine nozzles. I made the first one with the idea to cast resin replicas to ensure uniformity, but that did not work out so well as they had a lot of air bubbles and the PE parts came off the base part when I removed it from the mold, so it looks like I'm going to have to do all 4 separately. Casting could work well if I was able to pressure cast them, but I just don't have the equipment for that. I also had to change out the PE parts I was using as they were not big enough to fill the spaces. They work much better now. Mine Versus Revell's: I have also made a start on Engine #1. So far, I have done 2 sides, with another 2 to do and another 3 engines on top of that - trying to keep each one the same. This'll be interesting! Anyways, that's where I am up to and will be back again with another update once I have actually done something Thanks for looking MH
-
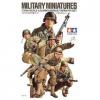
Matchbox / Revell 1/76 Half track, T34, Krupp
combat posted a topic in Ready for Inspection - Armour
Hope all you BMers are having a good winter. My modelling room is just making 5 degrees C, so it's a little tough on the old fingers. Building up energy to start a new build thread. For now here are some classic Matchbox / Revell 1/76. There are 3 kinds of kits I really appreciate - with figures, with dioramas, with interiors. A lot of fun with these kits! -
My first SciFi subject.....A real pleasure ! Cheers Pierre
- 7 replies
-
- 13
-

-
- Revell
- tie fighter
- (and 1 more)
-
So what Revell prepared for tanks in gentlemen scale? Source: http://www.kitreviewsonline.de/revell-neuheiten-fuer-das-jahr-2017/ My German is even worse then my English, but if I'm correct, we are getting those: Reissues with new camouflages: 1) LKW gmil 5t in May 2017* 2) TPz Fuchs in July 2017 3) Leopard 1A1 in July 2017 New variant: T-55 AM/AM2B in October 2017 * And the most interesting, a new tool: M109G howitzer in September 2017 (cat. no. 03305) * Update: according to official informations, posted on Britmodeller here: Link All above mentioned AFV, except a M109G, are in in 1/35 scale
-
Hi All Here is my recently completed Revell U-wing transport from 'Rogue One'. This ship is in my top 5 favorite Star Wars ships (the Republic Gunship, aka LAAT/i, is my favorite all-time) as I have thing for helicopter gunships like the Vietnam War era Huey in the real world. The same individual who 3D-milled the center drive section for my AT-ACT also milled the replacement engine nozzles and rear radiator panel for this kit as it was missing altogether (Revell received the U-wing profiles/plans for production from Lucasfilm before the ship's design was finalized for the movie). Instead of doing a total repaint, I concentrated on the areas around the seams and just touched those spots up after filling them in. The markings on the fuselage were distressed with a sanding stick or hobby knife (except the gray panel on the right side- it was airbrushed over some sprinkled salt for the chipping effect). The entire ship then received a pastel chalk wash. A little heavier than I intended, especially around the engines, so we'll just chalk it up to heavy interstellar abuse. Thanks for looking. Cheers, Albert
-
 Hi guys, I will be building a box from Revell with four 1/48 F-16A's in them. They will be build in flight. I will use some Hasegawa pilots for this as well. It will be build straight out of the box. Here is a link to the box. https://www.scalemates.com/kits/163676-revell-4749-general-dynamics-f-16 I will post some pictures later. Cheers,
 -
 With a week off, I've been making the most of time at home and started on the latest build. I've had the Aeroclub engines for a while now, but just got round to putting them to good use. Having been inspired by the excellent Merrick book - Halifax 'From Hell to Victory & Beyond', I thought I would do HR686 which was tragically lost after being hit by gun fire from the ship Amisia which ironically is the ship that rescued the survivors. You can find out more about the fateful mission HERE. I've started with the conversion bits to get the hard stuff out of the way. The Aeroclub engines are nicely shaped, but not shake & bake. The beautifully formed resin radiator intakes are a couple of mm narrower than the nacelles at the top rear, so some sanding and filling is necessary. As such, I've had to rescribe the panel lines, but they are a good fit to the wing. Given this aircraft will be white rather than black, imperfections will be more visible, so I'm spending plenty of time getting the nacelles smooth. I've added new radiator doors underneath out of plasticard due to the zealous sanding and used the Quickboost carb intakes on the sides of each nacelle. It's taken a day of fettling to get them to this point, but look at the photo's next to the kit parts and make your own mind up whether it's worth it, I'm happy about the replacements. I've had to scrape away the nacelle interior at the front to allow the undercarriage mounts to fit, but this was fairly straight forwards. Aeroclub provide modified front & rear bulkheads due to the new nacelles being narrower than the kit parts, but you can trim the kit bulkheads down as another option. The undercarriage assembly doesn't need any modifications, it will drop straight in. I've ordered some replacement Quickboost exhausts although the kit parts aren't too bad. Given the individual fitments of this aircraft, Freightdog provide the parts necessary - Tollerton nose (which is available too in the Mk.III kit) and the raised fairing. The mid upper turret on this aircraft is a BP Type A Mk.VIII left over from Defiant production and sat slightly higher than the later Type E resulting in more drag. It also had the shroud fitted, again supplied by Freightdog...
- 129 replies
-
- 23
-
-
Is this too many blades?
-
I am currently working up to starting my first kit in a great number of years, and I've noticed a lot of talk about how good/bad the paints are these days. I used to use Humbrol enamel tins back in the day (1990s), but it seems from some comments that they've changed the recipe and gone downhill. As my first model I'm looking to build an ADV Tornado in 1:72, so lots of shades of grey. I don't have an airbrush so the paint will be manually brushed on. Has anyone got any good recommendations - I am prepared to ditch Humbrol forever if there is a decent alternative.
-
 Wanting to do something simple and purely OOB for a change, concentrating on paint and weather effects I dug this out of my stash. For the size the detail looks quite nice on the sprues Standard old-school Revell instructions I know the rails etc. are overscale but having attempted, and failed, to produce something more in scale with fine brass tube I decided it was beyond my feeble soldering skills to produce anything tidy. I would not be buying any after market items for it, not when I have it's bigger 1/144th scale buddy in the stash On to the build. Steps 1 and 2 were perfectly simple and before I knew it I arrived here.. I have to say that the fit on this was really good, only the tiniest smears of filler needed here and there throughout the entire build, nice one Revell I have to say that I got the bit between the teeth and ended up here in very quick time Closeup of the screws, rear planes and rudder assembly, yes I know aftermarket would be finer but I think it's perfectly adequate for the scale and keeping in the spirit of a nice, quick, easy build for relaxation after the Luchs. Last bits in place and we are now ready to paint. All the above was completed last night in the space of a couple of hours Thanks for looking Phil
- 12 replies
-
- 8
-
-
- Revell
- 1/350 U-Boat
- (and 1 more)
-
Good evening everyone! This build was finished before Christmas but I left the photos languishing on my computer for a few weeks. But nevertheless, here it is- in all its glory! -Although getting an email today saying that I've been called for an interview for medicine did go some way to encourage me to finally upload them. Kit: Revell 1:72 Tornado Gr.1 Paints: Vallejo Model Air and Metal Color Decals: Xtradecal Panavia Tornado Update 1989 (1:1 scale thumb-weathering might be a tad overdone ) Well, as always- thanks for having a look! Kind regards, Sam
- 13 replies
-
- 31
-
-
 Picked up this kit in a shop when I was stocking up on paints. Cost me £6 and was stashed away for a bit of a fun, mojo restorer when things got a bit intense. A noticed it had been built/review in a magazine this month and tbh, I was less than impressed by the effort put in. So, it was out of the stash and onto the workbench. By no means a perfect kit but a really enjoyable and straight forward build.
 -
Hi guys Thanks to Mike's amazing Infiltrator build up recently, I went out ant bought the Revell Easy kit and also a Bandai TIE Interceptor kit. Taking the things I liked from both ships to make my own alternative Star Wars ship - in this case the obvious name for it being the Sith Interceptor. I went with metallics for a color choice because I think they look good. It was Alclad, Tamiya and Gunze as thew choice of paint. Some scratch building on the wings, gun barrels and mechanics went on as well - nothing too fancy I even made a clear cast of the engines in case I was going to light it: And here it is: That's enough pictures I think but as always, thanks for looking Si
-
About to start the Revell 1/48 single seat Bronze Tiger Eurofighter. I have been reading about the intakes and they are meant to be nightmares. Is it work buying the Heritage resin intakes. Seen them for £14 online (plus £6 postage!!!) or just go ahead with the current ones. I've also read opening up the vent in the side and using a straw to make the pipe. How much do I open it up? One last thing! I bought a scriber as ther eneeds to be a panel on the side. Does anyone have a diagram of this or shall I just look at photos cheers Adrian
-
Good afternoon, just got back from a week of holidays in Paris. Beautiful weather, by the way! And now, time to start with the Mustang. It's the famous kit from Revell, this time with the Malcom hood and decals for two RAF versions in the Dark sea grey/Ocean grey/Dark green scheme. It should be a rather quick build, which I will do along the Airfix Tiffie. They are both the same colours, so I will improve efficiency in painting two aircrafts with one mix of colours. So, don't be alarmed if you spot some parts which don't belong to a Mustang! Just some minor questions, the interiour of the mustang was the usual RAF interior green/grey, correct? Alex
-
Hello, I’m a new member of this community and I’ve decided to start my first “in progress” topic. Honestly this decision was boosted by the very nice feedback I’ve received after posting one of my models here. The subject is “a Swedish Draken”. I have to admit that I’m not an expert neither on this flying machine nor on Swedish aviation but the memories of my early beginnings in plastic kits are strongly connected to the 1/100 scale Plastikart Draken. That was a different era, today the hobby looks more like OEM work but I do not regret it (I’m old, with job wife and kid and free time should be used efficiently, isn’t it? Too much talk, what do we have? The Revell/ Hasegawa kit (as you can see in the picture) and few “supporting” products: photoetched set and canopy masks from Eduard and turned brass Pitot tubes from Maestromodels. I do not want to spend a fortune on this subject so apart from the listed above, paints and stuff only my limited abilities will improve the model. What do I want to do? … the perfect Draken, of course. Honestly, a lot less. Just a Swedish version in “grey colours and bright orange numbers” As I said I’m not an expert so your support is highly appreciated. If you know something please say it here. I’ll try to transfer all that info into my model. Let’s start with my (first) questions: 1. Any know issues regarding the geometry of the kit? 2. My experience with Revell decals is mixed – are the decals in this boxing of any use? Do they respond to the “setting stuff” or I have to consider aftermarket decals? The big number on the upper wings is not an issue as I’ve already decided to replace it with masks and paints. 3. I’m considering Vallejo Model Air paints for this; any known recipes for the two grey shades out of Vallejo Model Air range? Venceremos, mack NB: for the moderators; considering the documentation component of this build thank you for moving the topic to a different category if you consider necessary.
-
I started this one in June of this year, but it went on the back-burner for a while for whatever reason (I can't honestly remember!), but after a bit of paint lifted off the P-40 I picked it up and started masking for the main camo... camo? pattern. Yeah - pattern. It's a snap-together kit that I detailed up with some styrene bits to closer resemble the filming miniature, and gave it the same scheme as close as I could. I also tinkered about with the details on the wings amongst other things, all of which had to be scratch-built. You can see the WIP here if you're bored Now to see if I can get the P-40 finished before the hammer falls on the year
-
Eurofighter Typhoon- Revell 1:72 (New-tool) WIP: http://www.britmodeller.com/forums/index.php?/topic/235013684-172-eurofighter-typhoon-operation-shader/ Good afternoon everyone! I picked this kit up at my local model sho, it is the new Eurofighter Typhoon 1:72 kit from Revell. I had already done a 29 squadron anniversary Typhoon so I wanted to do something a bit more beaten up As for the kit itself, it was definitely a joy to put together- much better than the "old"-tool kit from Revell: the panel lines are crisp, there is no flash present and the fit of the parts made it a doddle to build. I used Paveway guided bombs from an Airfix Harrier GR7/9 and decals were sourced from an Xtradecals set and some pylon/weapons decals from a Revell Tornado GR1. Disclaimer: I essentially used random serials and a scattering of assorted decals to create this model, it does not represent a specific Typhoon. -Also, note how at the sides of the fuselage roundel, the squadron makrings have been painted over- that's what i've attempted to represent. I based this build on a particular photo of a Eurofighter involved in Operation Shader (the RAF's action against IS): Credits:USAF Staff Sgt. Corey Hook Now, for the build: (I quite like this image....) That's it for now, thanks for dropping by! Kind regards, Sam
-
Happy New Year everyone and this is my first finish for 2017 though I did start it back in November, Revell's Jaguar GR1A 'Debbie' in Gulf War finish. Built OOB except for the seat belts from tape. The full WIP is here but to recap.. Kit: Revell Jaguar GR1A Box 04351 Scale: 1/72 Paints: Halfords Primer from a can. Revell Acrylics, Klear, Flory Models Wash, W&N Flat Coat all by brush. The pink was a 60/40 mix of Revell Flesh and Ochre. Decals: From kit Extras: Bombs from spares box Revell_1_72_Jaguar_GR1A_04351 Done_L by Dermot Moriarty, on Flickr Revell_1_72_Jaguar_GR1A_04351 Done (6)_s by Dermot Moriarty, on Flickr Revell_1_72_Jaguar_GR1A_04351 Done (7)_s by Dermot Moriarty, on Flickr Revell_1_72_Jaguar_GR1A_04351 Done (9) by Dermot Moriarty, on Flickr Revell_1_72_Jaguar_GR1A_04351 Done (3)s by Dermot Moriarty, on Flickr Thanks for looking! Dermot
- 8 replies
-
- 18
-
-
- Debbie
- Jaguar GR1A
- (and 1 more)
-
Hi All! Been a while since my last post - hope you all had an awesome Christmas and New Year. Managed to find some time to get back into a bit of modelling recently Please check out this video and let me know what you think of the build I quite like building planes at this scale, but feel that this one was a bit dated. Not bad build though in my opinion. What do you guys think? Thanks in advance for your criticisms
-
 Revell is to release in November 2016 a new tool (simplified new kit) 1/72nd Eurofighter/Typhoon kit - ref. 03952 Source: http://www.plastik-modellbau.org/blog/revell-neuheiten-2016/2016/ V.P.
 -
This is my last full build of 2016 and to be truthful it wasn't the best of kits to put together. Was quite pleased with the rigging though although I found out thet NMF and rigging don't go together well(for me anyway) finish is mainly Vallejo Metal with some bits of brush painted 'true metal'. engine 'ring' is vallejo copper. The rigging was done by drilling half-way through the upper wing, supergleing some fishing line on then passing these through fully drilled holes in the bottom wing and tensioning then whilst gluing, again with CA(hench the messy finish near the rigging points) Anyway here it is warts and all............hope the airfix kit in the stash goes together better !!!
-
I had a bad feeling at the end of 2016 that I did not finish so much, so I have decide to finish this small F-14 from Revell in 1:144. It is OOB, colours Revell aqua.
- 14 replies
-
- 22
-
-
 Decided it's time to clear out some of my old stash, instead of selling perhaps i should build thes as that was what i originally intended......I think? So here goes: BF-109 G6 will be the late variant. He-111 H6 will be KG26 1H+GP ? JU88 will be a C-2 perhaps 4D+FH ? My problem for the outset is going to be finding RLM paints. I have all the required Luftwaffe RLM colours: 65, 70, 71, 74, 75, 76, 81 and even 02 but these are all MM enamels. I really would like to use acrylic even if its lacquer based like tamiya and Mr Hobby Colour (gunze). But i am skeptical on using MIG or Mr Hobby Aqueous. although they do RLM colour ranges. Vallejo is a non starter as i think there colours for RLM especially the model Air range are not that accurate. also i want paint that is tough after 24hr of curing like Tamiya. Open to suggestions.... Is the Mr Hobby Colour the way to go as it's probably tough and durable like tamiya?
 -
 Hello BM's. Now for me, something completely different. My wonderful modelling supporting Wife bought me a Millennium Falcon in 1/241 scale for Christmas and I've had great fun completing this over the last few days. I'm normally a 1/72 WW2/Cold War aircraft modeller so some different techniques and approaches were used to create the effect I wanted: Tamiya Acrylics used, XF-20 and lots of XF:2 to get the colour Painted the different panels using the starter set acrylics that came with it I only used the kit decals on the gun turret view port For a quick, fun build, I can't recommend this enough. Enjoy!
- 7 replies
-
- 10
-
-
- Millennium Falcon
- Revell
- (and 1 more)