Search the Community
Showing results for tags 'Revell'.
-
 These 2 kits are the Revell offerings of the Boeing 737-800. Revell were the first to offer the -800 Series,first release in 1999. Its a nice kit that goes together easily but suffers from some errors. Too low cabin windows,wrong shaped engines ( more of the -300 to -500 types) and on later releases,completely off shaped winglets. I tried to adress these issues on my Revell 737s as good as possible. What was not possible to be corrected on those 2 were the cabin windows,because of the design of the decals.Otherwise they wouldnt fit.But its not so noticeable,so i oversee that matter. What I spent the most work on were the engines. I found a very helpful guide here on BM regarding the Revell 737s flaws. So the engines were mostly corrected by the ways described in that BM thread. The winglets were cut and sanded to shape. TUI FLY is well known for their many different Logo Jets and the Haribo liveries are among the most popular. Revell issued both of those liveries in 2010 with superb decal sets by NAZCA. I planned to go with the open window option but as no silver frames were included in those sets,the windows tended to disappear,esp. on the blue one. So in the end I used the provided cabin window decals. All painted with Revell enamels. The blue one with Revell blue 54 and the golden one with Revell copper as the gold paint was way too bright. Thanks for looking Alex
 -
A bit later than expected,more of my finished builds since 2022. I had a rather busy schedule in modelling,so a large number of kits got finished.Most of them are now ready to be shown here,some others are still missing a few parts. On we go with the Revell A340. Back in november 1992,Lufthansa presented their first A340-200 in Zurich. I was on there and also was able to take some pics. My camera back then was not the best,I was still a kid,so my parents didnt spend too much on a camera.Hence the pics are not that good,but I still have them. I played with the idea for a long time,shortening the Revell A340-300 down to a -200 and build the first LH A340. The decal set from Revell even has the correct registration for the type. Lack of skill stopped me from doing such a task for many years but last year I thought I was ready for it and gave it a go. While at it,I also took the opportunity to improve the kits engines by adding the vortex generators and rework the inner engines,so they sit higher.The engine mounts of the kit are too large,so if not corrected,they will hang too low. Shortening the fuselage was not that difficult.Some diagrams and pictures found on the www ,showed where to make the cuts. After all was set and ready,reassambly began. Some filling and sanding was required at the fuselage but nothing too distracting,so the paintjob could start. Painted with Gunze and Revell enamels. The grey for the belly and the wings is a mix of Revell 374 with a few drops Revell white 04. The white for the fuselage is Gunze Primer 1500,clear coated with Future. The decals come from the original Lufthansa boxing.Luckily I had a few decal sets ,so I could use bits and parts from the other sheets as one of them was quite yellow and brittle. Some details come from the spares box and other Revell A330/340 kits. It took 30+ years from the idea to the finished product,so I am very happy to finally have this Airbus in my collection. Thanks for looking Alex
-
To celebrate its 50th birthday,Lufthabsa painted one of their A321s in this very attractive retro livery. Revell was of course to the service and provided a reissue of their A321 kit with the retro decal set. They even served both modelling fractions,those who want window decals and those who like open windows,by providing 2 sets of cheatlines. I went for the open window version,I only had to use a decal for the cockpit as I cracked the clear part while installing it. The build is straight forward,everything fits nicely. For the paints,a mix of Revell enamels,Testors and Gunze was used. The underbelly is a mix of Revell aluminium with Revell grey 374. Its a bit tricky to get it right. Revell tells you to paint it entirely aluminium but as the Airbus is more compisite material than metal,its completely wrong. The decals fit very well,only around the nose a few touch ups are required. Another airliner with a special livery can ve added to the collection.😊 Thanks for looking Alex
-
This is the original Revell boxing with the colourful Aer Lingus decals. The kit is now quite hard to find and on some well known sites sold for astronomic prices. I had it in my stash for many years but cant remember where I got it from. As I went through my A330/A340 serial build,this was build simultaneously with the others. Despite its age,the kit is very nicely detailed and the decal set is superb as well. Lots of details and very nicely printed.If I remember correctly,it was done by NAZCA. The top of the fuselage was painted with Revell emerald green,unfortunately the pictures show it much darker as it really is. The white is my well proven Gunze primer 1500. Aer Lingus has/had obe of the most attractive liveries,so this is a nice addition to my Airbus fleet. Thanks for looking Alex
-
Another great release from Revell is the A321 in the special livery of Austrian Airlines,celebrating the 1000th anniversary of the Austrian republic in 1996. The A321 wears the faces of the most iconic persons of Austria from the past to present (1996) The kit is well known and needs no further introduction. The highlight of the kit is clearly the decal set,which is top quality and fits on the kit like a treat. Painting is straight forward,all white fuselage (Gunze primer 1500) The wings are painted with Testors aircraft grey mixed with white,corogard panels are Revell 374 grey mixed with a few drops aluminium. The cockpit window is a decal from a PAS decal set,the cabin windows and all the rest are from the kit. Thanks for looking Alex
-
Another one of Revell's "Special Liveries". The Wiener Philharmoniker A340-300. Its a real eye catcher and the kit was frequently reviewed upon its release but its hardly seen built. I wonder why... The most difficult part of the build is the paintjob,esp. the blue belly and the bright blue on the engines. To find the correct demarcation line on the belly is a bit iffy. The instructions are absolutely no help,so intense research on the net is required. The light blue for the engines need to be mixed. I used Revell white 04 and skyblue 52 . The belly blue needs to be mixed as well skyblue 52 with a few drops white 04,here one can use the decal set as a matching pattern. Once this is achieved,the most complicated part is done. The decals are superbly printed and fit wonderful. The only downside to them are that there are no windowholes or windows printed on. I decided to have clear windows,so after application and clear coating,every window was cut out with a new sharp blade.To find all of the windows was time consuming. Then from another decal set,the silver frames were applied and clear coated as,well. The end result is one of the most spectacular liveries ever worn by a A340. As with the other A340s,I also corrected and enhanced the engines. Thanks for looking Alex
-
 Star Wars The Mandalorian – Razor Crest (06788) Platinum Edition 1:72 Carrera Revell We’ve all heard of Star Wars, the three trilogies, the spin-off films and now under the auspices of the massive Disney corporation, we are being treated to some television series on their streaming service Disney+ that are bringing back some of the magic that perhaps had been lost, or at least dulled over the years under the helmsmanship of J J Abrams. The Mandalorian reached our screens in 2019, right around the time the Covid-19 pandemic first hit, and it has helped keep us Star Wars fans entertained for three seasons now, with a fourth in the offing for 2024, hopefully. It has brought us new characters into the much-loved Star Wars universe such as the Mandalorian, Din Djarin himself, Grogu the baby Yoda, and it has reintroduced the previously reviled but nevertheless popular Boba Fett, who seems to have mellowed and become more well-rounded during his short time being digested in the Sarlacc Pit, and has now got his own series on the strength of his cameo performance in season 2. Even Luke Skywalker has made a brief appearance at the end of season 2, heavily de-aged using CGI to fit in with the show’s timeline of being set just after Return of the Jedi. The Razor Crest is an ST-70 Assault Ship that has seen better days since its service with the Republic, having survived the rise and fall of the Empire, to become The Mandalorian’s transport around the Outer Rim of the Star Wars galaxy catching bad guys for bounty. It was originally a scout ship, but is armed with a pair of laser cannon in the nose, and is capable of faster than light travel thanks to hyperspace engines that are presumably hidden inside the same twin nacelles that house the sub-light engines. Inside the ship is an extensively glazed cockpit and a large hold with a well-stocked weapons locker and a carbonite freezer chamber to store recalcitrant criminals that he’s taking back for bounty. Yes, it’s a Mandalorian thing, apparently. She survived several space battles, being stripped down to a bare chassis by Jawas, and a drowning on Trask, only to be thoroughly atomised by a blast from Moff Gideon’s cruiser at the end of season 2, much to my disappointment. I really liked that ship, although the retro-fitted hot-rod Naboo fighter is starting to grow on me. The Kit Revell have the license for Star Wars model kits in Europe, and have released a mixed bag in unusual scales, some toy-like kits for the younger audience and reboxes of a few of the Bandai kits. This kit is none of the above, as it is firstly a kit in a recognised scale of 1:72 so will sit perfectly next to your more “serious” Star Wars kits, it is well-detailed, and most definitely not snap-together. The initial release appeared at the end of 2021, and has now been reboxed as a Platinum Edition with additional resin and Photo-Etch (PE) parts from our friends at GreenStrawberry, which is clear from the style of the additional instructions included for the new parts. Detail is good, and with the extra parts in the box it should be even better, while the size of the model gives a true sense of the real scale of this medium-sized ship, which will tower over an X-Wing in the same scale. The kit arrives in a deep end-opening box with an appropriately dramatic painting of the Razor Crest banking to one side with an X-Wing following behind, presumably from the episode they were chased down onto an ice planet by a new Republic patrol, crashlanding and coming face-to-face with a load of horrific alien spider-things before escaping. A Beskar helmeted Mando is looking on from the top right, and there is the usual Skill Level slider on the left that that has been moved firmly to the right at 5 due to the new parts, with an increased part count from 101 to 143 that make up a model that will be just over 33cm (13”) in length once complete. Opening the box reveals a cardboard insert that holds the hull, instruction booklet and the extra parts in half-moon cut-outs. Underneath are five large sprues in their usual light grey styrene, a clear sprue with some crisp thin parts, a decal sheet and the instruction booklet with colour profiles to the rear. The new parts consist of a sheet of PE brass protected by a card insert, plus four resin parts in a separate bag to detail up the cockpit. https://www.britmodeller.com/reviews/revell/starwars/mandalorian/06788-razorcrest.platinum/details.jpg As already mentioned, detail is good, and a small stand is included in case you want to pose your ship in flight, but there is also a full set of landing gear; newly improved cockpit and Mando figure; rear interior; pivoting laser cannons, plus opening side and rear hatches with ramps. I guarantee there will be some people creating 1:72 figures of Jawas, Grogu, Kuiil on his Bluurg lizard, and maybe even some of the other characters that make an appearance, such as IG-11, Cara Dune and others. The original instruction booklet has been provided unchanged, with two extra double-sided sheets catering for the new parts, many of which are used in the cockpit, which is first to be made. Interior construction begins with the cockpit on the top level, and there are copious colour call-outs all the way through to help you get it right without freeze-framing too much of the show. The floor is full length and slightly wider than the eventual cockpit space, which is marked off by the side walls after they have been detail painted, with the interior separated into two compartments by a pair of bulkheads with closed doorways moulded into one. Three seats are glued onto boxes moulded into the floor, then Mando is made up into a full seated figure by adding arms and a small insert in the middle of his back that has a peg moulded into it to fix him to the more comfortable looking pilot seat. The front of the cockpit is blocked off by the addition of a single part making up the instrument panel and side consoles, which might sound disappointing, but the detail there is excellent and there are decals to spruce it up even further. All of that said, the Platinum parts will replace most of this detail, starting with the front bulkhead, to which Mando’s rifle, an equipment box and overhead trio of circular details in PE are added. The kit seats are replaced, cutting the resin ones from their casting blocks and adding boxes from PE underneath, a support for Mando’s pilot seat, and seatbelts for the two rear seats. These are all mounted on the new PE floor, which has tons of detail etched-in, and has the edges folded vertically to raise it from the kit floor. Before installing it in the kit cockpit, the three kit seat boxes are cut off, and three extra PE controls are fixed to the side consoles. The fuselage sides receive a button box next to the side door frame, and a pair of circular detail parts are glued to the side ramp edges later. There is another compartment under the cockpit, which is built up on the lower floor around what looks a bit like a toilet, which I have since learned that it is. A front bulkhead with moulded-in netting and a rear bulkhead with doorway and central wall are added along with some paint, then the side walls are also painted up and decaled before they are mated to the lower floor, which is painted in blue/black/metallic panels, making for a pretty drab interior. The upper floor/ceiling is detailed with shackles (for frozen criminals?), paint, and a ladder is fixed to the wall between the levels. Inside the hull tub, the rear access door and frame are fitted, with the ability to leave it mobile if you wish, a task that is repeated with the side hatches, which have C-shaped hinges that are locked in place by the interior in the next step. Oddly, Revell have chosen to emboss the product name, code and manufacturer on the rear door as you can see above, which seems a bit of a retrograde step, but is easily remedied with a sharp blade and some light but careful sanding. With the interior ostensibly complete, the two laser cannons are made up from two halves each for the breech and barrel, and an angled outer cover for each one, which receive additional detail parts, adding a raised panel on the angled baffles, plus a more detailed PE link part that replaces the kit section, which you must cut off first. Extra PE detail is fixed to the rear of the gun, and the breech is improved by adding a pair of small PE parts. The guns can be fixed in place with a plastic washer to remain movable, or glued in place, which would appear to be the most sensible option to prevent them dangling straight down once complete. With that, the top of the hull can be glued in place, securing on a series of five turrets moulded into both sides of the lower hull. Speaking of the lower hull, the detail here is excellent, but there are two small sink-marks and a little mould-slippage on the original example on the nose detail panel due to the thickness of the plastic there. Happily, these can be rendered invisible by careful application of putty and equally cautious sanding once dry. I decided to see how hard it was to fix the mould slip on the original issue, and it really wasn’t. Happily, the new pressing seems to have improved alignment slightly, so less work will be required. Here’s a quick shot of the original kit hull after 5 minutes of work, so the new one should be 2 or 3 minutes Please excuse the dust - it was a spur-of-the-moment thing in response to someone labelling it "unbuildable". The next step is to make up the twin engines, which also have a short internal section of the stubby wings incorporated. The three detail inserts per engine that represent the internals are painted up first, after which they are trapped between the two nacelle halves. The wing lower is covered with a detail panel that fits on a pair of turrets, and a short sponson fairing for the main gear is added to the bottom of the lower hull in a shallow recess on each side, then the two engines are affixed to the top of the wing on another two turrets that slot into holes in the top of the wing for a strong join. The engines are both top-and-tailed with intake lip and exhaust petals, and the connection with the wings is hidden by the detail moulded into the topside. The canopy is multi-part with thick frames between curved panes, each fitted separately with a suitable adhesive that won’t fog the clear parts. There is another detail insert in the belly of the hull between the main gear, and you then have the choice of closing the bays with their doors and placing it on the stand for an in-flight pose, or continuing with the landing gear. A stand is included on the sprues, which is made from three parts, and attaches via two pegs to holes under the hull. The front landing gear reuses the bay door as the foot of the leg, with a two-part set of struts and tiny front door attached to the edge of the bay. The main gear each have a three-part strut with a foot that has an additional “ankle” part and the bay door captive over the leg. These both fix into substantial slots in the bay, and should hold the legs at the correct angle once the glue is set, but it might be as well to tape them both to a light straight-edge while the glue sets up. The two side hatches can be opened and have additional lengths of walkway added, plus two retraction jacks on the sides, which is a job best done with the model flat to the ground to ensure they sit true once dry. The aft hatch has a short end lip added, and just one retraction jack on the left side as you inspect the ship from behind, and as well as the two circular detail parts on the ramp, there are two extra detail inserts in a pair of nacelles either side of the bottom of the door. There are small recesses moulded into the door frame and ramp, so it should be obvious where to put the jack, but scrap diagrams walk you through the process. That’s it. Time to take it for a fly round the room with some suitable Star Wars noises! Markings The Razor Crest belongs to the same visual school of design as the Millennium Falcon, the “What a Piece of Junk!” School of ship design, but rather than starting as off-white, it began life as a beautiful shiny natural metal finish, which can still be seen in places, along with some yellow markings on the sides of the hull around the doors. The heat discolouration of the engine exhausts and the general wear and tear of the ship will be key to creating a realistic (a silly word for an imaginary vehicle) finish, so check your references for streaks, grime, scuffs and general grime to smear around the surface. Whether you start the process from a base of shiny silver or not is up to you, but it will certainly need several layers of dirtying down to look the part. There was only one Razor Crest (may she rest in atoms), so from the box you can build her uniqueness, unless you wanted to go all whiffy and give vent to your creative process. The decals have been re-printed by Cartograf, which is a guarantee of good registration, sharpness and colour density, with a thin matt carrier film cut close to the printed areas. Conclusion Revell made me very happy when they released this kit in 2021, and now I’m just a bit happier because the new Platinum boxing includes GreenStrawberry goodies, and I’m a big fan of their products. It’s a great-looking model, and should build up into an impressive replica of this already iconic Star Wars ship in a recognised scale. Buy one. It is the way. Now when is season four due? Spoiler Alert: It has been delayed by the writers’ strike in the US, so is likely to arrive near the end of 2024. Highly recommended. Carrera Revell model kits are available from all good toy and model retailers. For further information visit or
 -
So this one was a real struggle and the end result is not really what I hoped for. Managed to loose one of the winglets but found one in an unstarted A320 box. I messed up the markings on the horizontal stabilisers, putting the markings on the bottom side after painting and before mounting. Whilst trying to mount them I broke the locator tabs, both of them! Super glued them on and the right one managed to fall down at least 4 times. Paint was a bit messy, not sure why, maybe too much dust in my appartement... Decals from 26 Decals, lovely as usual but still I was able to screw some things up causing me to get a second set. Anyway, I mostly build aircraft I actually have seen/photographed and this one I saw early July in Funchal, Madeira and I made this photo: And then the finished model: Hope the next one on the bench comes out a bit better - Peter
-
Hi all, I'm a very occasional AFV builder but since I built a Swedish S-tank a couple of years ago, I thought it would be worth following that with a Swedish Leopard 2. Kit was kindly sourced by my sister-in-law in Europe Revell_Strv_122_box by Dermot Moriarty, on Flickr Revell_Strv_122_manual by Dermot Moriarty, on Flickr Box crammed with sprues.. Revell_Strv_122_parts by Dermot Moriarty, on Flickr And will go with this winter scheme Revell_Strv_122_scheme by Dermot Moriarty, on Flickr Thanks for looking, good luck with your builds and happy modelling. All the best, Dermot
-
The Revell etype is now finished. I made a small WIP thread with some WIP photos also if anyone is interested. Painted in Ammo Mig polished metal and clear coated with Mr. Super Clear. Interior painted in Mr Hobby Russett. Silver/red in my opinion is a colour scheme that always comes out well. It’s a new tooled kit so everything fitted well for the most part. Plenty of details out of the box for the engine bay and a lot of decals to dress it all up. Recommend this kit for anyone else wanting to build a 60’s classic.
-
Hi, Here are some WIP pictures from the etype I'm building at the moment. It is actually near completion but I thought I would put the WIP photos separate from when I upload the finished kit. A great kit, with a lot of parts and decals and it fits together really nice. I went for Ammo Mig polished metal and clear coated with Mr Clear glossy. Interior was painted in Mr Hobby Russet. Some of the potential problems I found are the chrome pieces which are actually a bit fragile, i broke the rear view mirror support piece just by handling it. I also broke one of the rear bumpers in half although it was superglued when i pulled it off because it didn't fit right. Only fit problem I really had was the dashboard, I had to sand down the pedal attachment which goes on the back of it so it could click into place. These are niggling problems however, overall goes together very well generally. Apologies if some of these pictures are not showing the right way, I think the image hosting is setting them all in one fixed ratio.
-
Well..... I´m going to my first GB I think the model does not need any presentation. IMG_20230527_114636820 by Shaky962, en Flickr IMG_20230527_114627740 by Shaky962, en Flickr
- 20 replies
-
- 7
-

-
- revell
- Mosquito Mk.IV
- (and 1 more)
-
Hi all, I'm not normally an AFV builder but try to build at least one a year as a break from cockpits and wing stuff. This is my braille scale Leopard for the STGB here. The short build thread is here but to recap: Kit: Revell 03199 Strv 122A/B Build: OOB Decals: From the kit for Swedish Norrbotten Regiment I19, Exercise 'Cold Response 2006' Paints: Mr Hobby, Tamiya Acrylics with an airbrush Klear, Oil wash and pastels. W&N Matt Varnish Extras: None! The plastic tracks were a bit of a faff. Thanks for looking and happy modelling! Cheers, Dermot Revell_Strv_122A_ (13) by Dermot Moriarty, on Flickr Revell_Strv_122A_ (14) by Dermot Moriarty, on Flickr Revell_Strv_122A_ (15) by Dermot Moriarty, on Flickr Revell_Strv_122A_ (16) by Dermot Moriarty, on Flickr Revell_Strv_122A_ (7) by Dermot Moriarty, on Flickr Revell_Strv_122A_ (6) by Dermot Moriarty, on Flickr Revell_Strv_122A_ (8) by Dermot Moriarty, on Flickr With a Trumpeter Strv-103 I built a couple of years back.. Revell_Strv_122A_ (11) by Dermot Moriarty, on Flickr Revell_Strv_122A_ (10) by Dermot Moriarty, on Flickr Revell_Strv_122A_ (12) by Dermot Moriarty, on Flickr
-
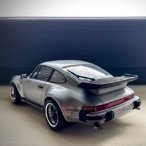
My just completed car kit, a diversion from the usual aircraft with the challenge of a gloss finish. No clear coat, just polishing. Quite nice details and definitely recommend it. Only the side windows cut out as a deviation from the instructions. My knowledge of Porsches and the 911 was pretty much zero before this build.
-
Hi all, I finished this lovely 1/48 O-2A Skymaster last night. It's the ICM kit, from a Revell box. I used AOA Decals, a Yahu instrument panel, Aerocraft Models landing gear legs and New Ware masks for the clear parts. Painted with MRP. Not much to complain about with this kit. Enough detail OOB, and mostly excellent fit. Just two pics this time, as it's not terribly interesting from the rear quarters. Thanks for watching, Pete
-
Rejoining with this kit, bought on a trip to Weymouth in June. Parts Instructions. This model the same colours, scheme and techniques as yesterday's Messerschmitt. Decals Cockpit Fuselage and wings being formed And airframe.
-
Imperial Shuttle Tydirium (05657) 1:106 Carrera Revell Star Wars. If you’ve never heard of it, you must have been stuck behind a wardrobe for the last 40 plus years, so go and catch up while we all roll our eyes at you. The original trilogy of films was a ground-breaking trio of films that combined fun story-telling with leading-edge special effects, and most importantly, a great range of characters on both sides of the good/bad divide. By the time the third film of the trilogy, Return of the Jedi reached the screen, the marketing machine was well-and-truly up and running, and many new ships and characters were shown on screen for the first time. One such ship was the shuttle Tydirium, a Lambda-class T-4a shuttle that was stolen from the Empire by some enterprising and brave scallywags, to be used to breach the security at the perimeter of the exclusion zone around the planet Endor, where the new-and-improved Death Star 2.0 was being built. The immortal words “It’s an older code, but it checks out” were uttered, and Chewie ‘flew casually’ down to Endor to commence their operation to destroy the shield generator that was confusingly installed on the planet, protecting a fully operational battle-station that would have presumably had its own shield generators like the first one did before they had to claim on the warranty. Anyway, it’s best not to think too hard about any of the Star Wars stories, and just enjoy them for the fun, innocent hokum that they are, or were. Another shuttle was seen landing, or taking off from a platform as Luke hands himself over to his dad’s tender mercies, showing off its folding wings as it does – a series of design cues that have been continued in other similar shuttles and ships in the Star Wars universe. The Kit This is a re-release of a kit that was first tooled in 2006, and is quite a bit smaller than the original kit from another manufacturer that appeared around the time of the film’s original release. It is moulded in a peculiar scale of 1:106, as has been Revell’s habit for many of their Star Wars offerings, and this kit was initially an EasyKit, with push-fit location turrets and pegs still visible on the insides of the parts. The kit arrives in a shallow end-opening box with the usual black theme and all the standard Star Wars logos, plus a badge that marks this as a 40th Anniversary of Return of the Jedi (RoJ) release. Inside are eight sprues in a chewing-gum white styrene that could be left unpainted by a novice to depict that off-white shade that is typical of original trilogy ships, a clear sprue containing the windscreen, and in my example at least, two sprues of vinyl crew figures consisting of a Stormtrooper and Imperial Officer figure in seated positions. A decal sheet and instruction booklet complete the model side of thing, but there are also six thumb-pots of acrylic paint in various shades from white through various greys to black in the box, plus a #2 paint brush and a small bottle of Revell Contacta Professional model glue, with a fine applicator for precision gluing. I made the mistake of dropping the black pot of paint, which caused the lid to come adrift briefly due to the impact, scattering a small amount of thick paint everywhere. We all know that a little liquid goes a long way, so don’t do that. Detail is pretty good considering the model’s original intent, and apart from the windscreen being transparent rather than darkened, it looks like a Lambda Class shuttle, although there is some conjecture about the size and shape of the “head” of the shuttle, as the model and the full-size studio replica had differing dimensions for whatever reasons, and that has been picked up upon by the purists. This boxing includes a poster that is rolled up into a narrow tube within the box and held in place by an elastic band, which left the poster rather curled up. Rather than show a photo of an extremely curled up poster, we refer you to the photo on the front of the box, which shows many of the main characters in front of an exploding Death Star that has the logo beneath the faces, and “Return to a Galaxy Far Far Away” at the top of the poster in a non-canon serif font. Construction begins with the vertical fin, which is in two halves and the instructions would have you paint the inner lips of the halves black, which is at variance with any photos of the filming miniatures, and is probably to hide the fact that there are no greeblies (small and meaningless details) moulded into the recess between the skins, so whether you do this or stick some tiny bits of styrene into the space to detail it, is entirely up to you. The exterior has raised panels that can be painted a darker grey, or you could use the decals that are provided instead. The same process happens with the wings, although these have no gaps between the skins, so no black paint is needed. The wings are cranked, and at the forward root there is a blaster in a hemispherical turret, one gun per side of the wing, making up a pair. Each wing has a pair push-fitted through a hole, and they should remain mobile if paint or glue doesn’t intervene. The lower hull is a flat panel with curved sides that also has slots for the wing hinges cut into these curves. It has main gear bay depressions moulded into it, although there are no details within other than a hexagonal hole in a rectangular depression, into which the two-part landing legs fit along with their flat landing pads, adding bay doors forward and aft of the bay. If you are posing the model in flight however, closed bay doors are also supplied. The rear bulkhead is inserted into a space inside the back of the lower hull, and you are told to add 20g of weight to balance the model so that it doesn’t topple forward, and apply the white decals with blue surrounds into the depressions for the engine exhausts, to give the impression of hot plasma glaring from the apertures. The top of the fuselage has the same curved sides and cut-outs for the hinges, with a raised area in the centre that supports the fin and gives the people in the rear compartment room to stand up straight. A front bulkhead is inserted after placing the fixed twin blasters on pegs in the upper, then the upper hull is glued over the lower, mounting the wings in their slots as you do, leaving the glue to dry thoroughly before trying to pivot the wings, to avoid putting unnecessary stress on the hull. The nose and crew cab is next, starting with the neck that has the cockpit moulded into the front, and detailed instructions are given on painting this single-part moulding to add a little life to it. The neck is mated with the underside, and the upper portion with glazing clipped into position is brought down to complete the nose. As already mentioned, the windscreen is a glossy black in the movie to hide the interior, and you are incited to paint the inside of the part black, applying grey frame decals to the sides, unless you intend painting them instead. You could instead add layers of a clear smoke colour to the inside that could be left translucent to show an impression of the detail of the cockpit within, especially if you intend using the two figures, which have their own painting guides from various angles. Finally, the nose and fin are joined to the hull to complete the model of one of my favourite Star Wars ships. Markings There was only one Tydirium and that is Star Wars grey, therefore most of the decals are supplied to avoid painting the accent panels that add some visual interest and alleviate the monotony of a white ship, but there are some provided to detail the crew figures, a dashboard decal, plus the two engine and window frame decals that we already discussed. Decals are by Cartograf, which is a guarantee of good registration, sharpness and colour density, with a thin matt carrier film cut close to the printed areas. Conclusion It’s not a highly detailed studio quality replica, but it’s a decent rendition of this appealing space craft, and a little more shelf-friendly than the other mainstream kit of the type, which is now a long time out of production. Recommended. Carrera Revell model kits are available from all good toy and model retailers. For further information visit or
-
I've got hold of the Revell 1/32 Scale He 162 A2 and plan to finish it as flown by "Winkle" Brown in September 1945. Brown said he flew Wkr Nr 120 098, but does not give any other information. A 2015 post on this forum states that this aircraft was Air Min 67 VH513, but so far no photo. There is one, Copyright, photo of Wkr Nr 120 072 in RAF Markings as Air Min 62, but with no RAF Serial. Although flowin from Farnborough it looks as if it is un repainted, in that the German Wkr Nr and part of the unit markings are still clear. The German paint would have been pale blue undersurface. We know that some, but not all German A/C were partly re-painted with trainer yellow under surfaces, but it looks as though this A/C was not. It crashed on 9 November, killing the pilot Flt Lt R A Marks. So perhaps there wasn't time to re-paint it. So, any suggestions as to the most probable undersurface colour?
-
Whoops, forgot to start this thread a while ago 😅 Heard Ukraine was getting Leopards, saw a Leopard Group Build, so I bought a Leopard. I've never built a tank before, so I went with a smaller one (easier to hide the mistakes). Box stuffs Started with basic turret assembly This build will really get going once I finish up my M2 Bradley, which is getting close.
-
Hi all - this is the old Revell/Dragon Focke Wulf Ta 154 kit. Quite a nice kit to build with no major issues and just the right amount of filler to make it interesting Painted to represent an aircraft photographed at an Me262 base at the end of the war - airfield uncertain but I have seen reference to both Lage and Oerlinghausen. (If anyone knows for sure, I'd be interested to hear). Although intended as a nightfighter, this particular a/c (supposedly the third production A-1, identified as 320003) was not put to use in that role and had no radar fitted - and no tactical markings either, which suggests it might not have been used for combat operations. It is thought to have been used as a twin-engine conversion trainer for single-engine fighter pilots making the transition to the Me262. Pictures appear to show the a/c finished in a standard 74/75/76 scheme, but with a very tight mottle (possibly in RLM70) applied over the top of the upper surfaces. Markings applied with some spare paint masks, decals for the hakenkreuz. Hope you like the pics..
- 15 replies
-
- 43
-
-
 After the German IDS boxing, Revell is to release in 2015 a 1/48th MRCA Tornado GR.Mk.4 kit - ref.04924 Source: http://www.britmodeller.com/forums/index.php?/topic/234973128-revell-172-shackelton-aew-2/ V.P.
 -
 Well, as Craig points out, it's the start date, so here's the start of my build of Revell's version of Italeri's classic Leopard 1A4 (Revell H-2126) I'm actually in the Go Large or Go home build, but I'll put that on hold for this build which (I hope) won't take too long…. I want this to be the early all green Bundeswehr scheme, which brings up the first question, what colour should it be? Tamiya's own version calls for olive drab, but some pictures of newer, cleaner machines look more olive green. Was this something similar to the B-17? The colour faded a lot? Onto the unboxing: Box itself I like that arwork- I'll probably aim to build to look something like that No false starts (seriously if I had the tracks to build I would have done those earlier) Box contents - looks complete, except instructions - not bad for 12.99 on eXXy The parts look really nice, hard to believe this is from 1977, I reckon it will be more or less an oob build, I may make my own antennae No track assembly - they're already done!!!! Whoops, Scalemates doesn't have the instructions, but it does for the Italeri version, phew! Off to the wash...
 -
Hi Everyone Again, Thought i'd also post my Revell 1/32 He-111 H6 - Built a couple of years ago Excellent model design by Revell. Shame these are hard to find now. Only a few fit issues but excellent to build. Maybe HKM may do one. Revell's BF-110 is also a great kit. Got that on the bench to finish soon. I'm doing a C-7 Night Fighter variant One downside of a 1/32 He-111 though...... They're huge!
- 11 replies
-
- 50
-
-

-
One of my older models, built during the pandemic at the end of 2020. Even though the registration is 10+03, the aircraft was actually the first of three A350-900s delivered from Airbus to Lufthansa Technik for VIP conversion. At the time of building the kit, the aircraft was not yet delivered to the Luftwaffe, hence no christian name. This is the only A350 in the 'old' livery also seen on the A340s and A320 family fleet, 10+01 and 10+02 have a revised livery with more modern titles and the winglets completely painted in Germanys national colours. I used the Revell A350-900 kit, decals from 8A Decs and added some fine metal mesh into the engine inlets. Since it was brand new at the time, I did not apply any weathering.
-
Bell OH-58 Kiowa (03871) 1:35 Revell Based upon the successful Bell 206A Jetranger civilian helicopter, the Kiowa was an observation and fire support helo made for the US Army that served from the late 60s until 2017 when it was replaced by the much more attack focused AH-64 Apache. It was also used by some foreign operators, some of which are still in service. Its role began as a scout helo, but through successive upgrades the focus expanded to a more combative remit. The OH-58D was the variant that introduced a more powerful engine with a four-bladed rotor that was much quieter than the old 2-bladed unit, and this was topped by the new Mast Mounted Sight (MMS) that allowed the operator to sneak a peak over terrain without exposing the entire aircraft to enemy fire. The cockpit was also updated with Multi-Functional Displays (MFDs), although the old analogue instruments were retained for backup purposes. Later upgrades added two hardpoints for weapons carriage, one on each side of the airframe that could be fitted with modular Hellfire racks, .50cal machineguns, rocket pods or Stinger missiles. This is referred to as a Kiowa Warrior and has an unofficial designation of AH-58D. An upgrade programme was begun for the successor F model with substantial sensor and avionics upgrades, but this was cancelled in 2017 as the Army was trying to reduce the number of types in service in order to save costs. The Kit This is a re-release of a reboxed MRC/Academy tooling that dates from around 1995, and the MRC logo is still to be found on the sprues. Despite its age the detail is good, and the tooling hasn’t suffered from any noticeable wear over the years either. The kit arrives in the usual Revell end-opening box (yay!) and has a painting of a Desert Storm airframe passing over an Allied convoy near a town. Inside the box are four sprues in a greenish grey styrene, a clear sprue, a black flexible part for the gun pod, large decal sheet and instruction booklet with colour painting guide on the rear pages. Construction begins predictably with the cockpit with dual controls for the pilots, and showing the upgraded glass screens of the improved instruments. They both have rudder pedals, collective and cyclic sticks, with a decal for the instrument panel and centre console, plus a large equipment rack directly behind their seats that makes other helicopters look spacious. There are a couple of pilot figures included, and they’re made up from separate legs, torsos, arms and heads, with different poses for each of them and their hands on the controls. This should allow you some leeway to customise them as you see fit. The engine compartment is also built up with a number of parts portraying the basics, but as always with these things there will be more needed if you’re going to go for accuracy. With the two main internal assemblies complete, the fuselage will need painting with colours suggested in the instructions, after which you can close the fuselage, remembering to drill the holes for the additional sensors carried by the KFOR decal option. Doors for the crew and equipment access are added next with clear parts provided for the crew, and more holes for sensors needed for the KFOR option, then the main canopy is painted internally, has a centre roof console added, and is fixed in place with some suitable glue to enclose the cockpit. The clear roof panels will need to be tinted with a green shade beforehand, but that’s easily done with some clear green acrylic. The last glazed panel is the lower ground-view windows under the nose with a decal added at the front. Inside the fuselage are access panels to more equipment racks on the port side, which can be left open or closed, and the engine compartments that can be propped open using the supplied stays, and at this stage the skids are also added to the underside and the stabilising winglets are applied to the tail boom around the half way mark. The tail fin, two-blade tail rotor, IR detection turret, various antennae, cable cutters, lights and probes are fitted around the airframe, plus the sensors previously drilled out for the KFOR option if appropriate, then the rotor is made up. This begins with the rotor-head, which has a pass-through axle, actuators for pitch control, vibration reduction, then the four blades, on top of which the MMS with two clear lenses is fitted on a tapered base. With the majority of the airframe complete if not assembled, the weapons pods are begun, starting with the mounting brackets that take up a good number of parts for each side. Two twin launch rails are constructed with four hellfire missiles that have clear seeker heads, and the .50cal machinegun with its framework pod and large ammo canister are also built. Both options are shown on the port station, with the ammo box mounted on the side of the airframe and linked to the gun by the black flexible ammo guide. With these in place the rotor and MMS are installed to complete the build. Markings There are two decal options in the box with different schemes. The Desert Storm option is of course painted in Sand with the inverted V worn by Allied forces on each side, plus a Knight chess piece on the side doors. The KFOR option is painted Bronze Green with a white KFOR logo on its sides. Each airframe has a substantial number of stencils dotted over its exterior, all of which adds to the visual interest. The instrument decals consist of white details plus green for the MFDs that each pilot has in front of him. Decals are by Cartograf, which is a guarantee of good registration, sharpness and colour density, with a thin matt/gloss carrier film cut close to the printed areas. Conclusion This may be an older kit, but it still holds up against modern standards pretty well with nice raised and engraved detail on the fuselage, plenty of parts devoted to the interior and decent clear parts. Highly recommended. Revell model kits are available from all good toy and model retailers. For further information visit or