Search the Community
Showing results for tags 'Revell 1/72'.
-
I have had a shed-load of irritation with Revell link and length tracks on a Revell Tiger 1 Ausf H and a Revell Tiger 1 Ausf E that I have been working on for months. My various disasters can be found in @M3talpig's Tiger Superthread at Page 92 Page 98 Page 146 Page 147 and Page 151 (With a bit more success on Page 166) @Sgt.Squarehead suggested building the Revell Pz.Kpfw III Ausf L which has much simpler and more straightforward L&L tracks. So I will take a short break from Tiger I running gear and attempt a simpler Panzer. So here goes. The destructions for construction are here. The plan is to build detachable track runs which can be painted after construction in order to avoid the complications of paint on the surfaces where cement needs to hold the parts and poorly fitting track links.
- 65 replies
-
- 11
-

-
- Link and Length Tracks
- Detachable Track Runs
- (and 1 more)
-
 Done it again! Started another one. (When will I learn?) Here's some pix of the box, destructions and sprues. Lower hull constructed. Liking the idea of the cross-members to support the sides and hull roof which comes in four sections. Hull roof dry fitted. It took quite a bit of adjustment to get it to fit ready for cementing. The turret comes in six main parts that do not fit very well and there are no locating pins to guide components into place. The hollow inside the mantlet is too narrow to sit on the front of the turret over the triangular gun pivot supports So I attempted to grind the extra plastic way - and slipped. You probably heard the yell from where you are.................. So out came the filler Juries out on what it'll look like after "tidying". Might have to re-wire the turret top with fusewire. Likewise the turret needed a lot of filling - hope this tidies too. Destructions for the suspension units implied a certain position for the springs. But the springs are much too short......................... To be continued?
 -
As with my T-80BV WIP and RFI please limit comments to the modelling aspect, so no politics here please to avoid the potential for controversy - or the Mods will be forced to shut this down. I'm planning to build a 1/72 Revell Panzerhaubitz 2000 and T-90 in Ukrainian cam and markings. I have not found much information other than a few pics. With regard to national markings I think I caught a glimpse on TV of some (I think) captured Russian armour with white crosses side and front but it was only momentary so I'm not entirely sure. Does anyone know a source of info on the current markings that would be used on a Ukrainian captured T-90, and the cam colours, likewise, for the Ukrainian Panzerhaubitz 2000s as provided by the various NATO nations? Thanks in anticipation
-
 There have been some very nice renditions of Revell's 1/72 Razor Crest posted recently. Let me add my own attempt, which includes a fair amount of internal & external lighting, plus some aftermarket detailing items. Here is the kit: and, here are the aftermarket items I added: Instrument & control console, by 308 Bits. This came pre-drilled for fiber-optics: Mando and his little green companion, also from 308 Bits: Resin and photoetch cannons, by Green Strawberry: LED mounts for the engine, by 308 Bits: More refined engine exhaust nozzles, from Scale Mark Models: and, last & least, more detailed landing gear hydraulics, also from Scale Mark Models: The 308 Bits and Scale Mark Models items are 3D-printed and available on Shapeways. The Green Strawberry cannon (plus a lot of other Razor Crest & science fiction aftermarket) were bought from their website, greenstrawberry.cz . As mentioned in the title, my focus for this build was to add internal and external lighting to the Razor Crest. This was my lighting plan: LEDs, photo-optics, and associated items came from Evan Designs ( https://evandesigns.com/ ) and Lighthouse LEDs ( https://lighthouseleds.com/ ). This is the control console with approx. 50 fiber-optics in place: The fiber-optics were routed under the flight deck and behind the cockpit, where I attached their LED light source: Each engine pod has two synchronized, flashing LEDs for the red strobe (top and bottom), plus seven 5mm LEDs for the exhaust. In the center is a steady yellow LED. This is surrounded by six "flicker" type orange LEDs. The result is a nice, subtle effect suggestive of the engines being at idle, which is appropriate since my Razor Crest will be sitting on the ground. My build approach was to treat the Razor Crest as three separate assemblies: 1) the lower fuselage, including the cockpit, 2) the upper fuselage, and 3) the engine pods. This allowed me to install the lighting and paint & weather each assembly individually. To facilitate this, I added electrical connectors to each assembly and the power button & switch (in the lower fuselage cargo bay): The above is a quick overview of my build progress, for more details, see my WIP here: https://www.britmodeller.com/forums/index.php?/topic/235113049-lighting-revells-razor-crest/ Enough with the preliminaries! Let me show you how she turned out! Overall finish is Alclad Duraluminum with a clear coat of Alclad "Light Sheen". Weathering of the main body consists of a dark gray panel line wash, plus an overall coat of Flory "grime". The engine pods also got a fairly extensive weathering with oil paints: Now for some detail shots: I modified/detailed the side cargo doors as described in Andy Moore 's most excellent build ( https://www.britmodeller.com/forums/index.php?/topic/235103157-mandalorian-razor-crest/ ) : I also added cabling to the landing gear. The arrow in the second photo points to the 3D-printed hydraulic assembly from Scale Mark Models. It is well hidden beneath the bay door and you have to search to find it! You've probably noticed this guy in my pics! It's a 3D-printed Tusken raider, with Bantha, that I found on ETSY. Normally, it comes in 1/47 scale for Star Wars Legions. Happily, the seller (Jan Kowalski from GetOfFenris) agreed to downscale it to 1/72, and it turned out nicely after some detail painting! Next, let me show you my lighting effects! Cockpit and instruments/control console: "Chin" lights and landing lights (looking up into the nose gear bay) Engine pod strobes and exhaust nozzle: Finally, links to a few short videos (~10 seconds) showing the lighting in action (click on photos to view videos): That's all, folks!!! Thanks for viewing, and please feel free to post comments and/or to ask questions. - Bill
 -
I thought I'd do a quick build of a T-80 BV. It didn't work out that way (almost 12 weeks start to finish but quick for me - my JP took almost 4 years! ) but , the build eventually came to this.... It's a T-80 BV abandoned in Ukraine, towed away and added to the defenders inventory. I realise the potential for controversy here so no politics please - just talk about the model, or the Mods will be forced to shut this down. Thanks in anticipation..... The WIP is here. As ever, comments (non-political) and feedback welcome.
-
Revell 1/72 chinook HC.3 ,A quick lockdown build ,i used a bit of spare pe grill for the engine cones, and some spare raf centenery decals, the slimmer sponsons were cut out and the bigger ones glued in and some blade antennae, and other bits and bobs were cobbled together, everything else was oob
-
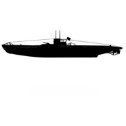 It’s time to start another U-boat build. Revell 1/72 U-boat (Atlantic version). This kit gives you several build options, decals to support those U-boats, and information pertaining to those boats such as when the hull was laid, commission dates, commanders, successes, and when, where, and how it was sunk. I am still deciding on which boat to represent. I do like the box art color paint scheme. If I’m not mistaken that boat was the U-997. Laid down: Dec. 7, 1942. commissioned: September 23, 1943. Commander: Oblt. Hans Lehmann. Successes: 7 patrols, 2 ships sunk, 1 ship damaged. Sunk on December 13, 1945 by aircraft in Operation Deadlight.
 -
Hello all. On this fine Forum there is a Group Build running which is concentrating on Classic Matchbox kits. It is quite a success as at the moment there are 9 pages of builds running, and it is certainly bringing out the nostalgia! My contribution was a Twin Otter (Matchbox ref PK-127) although it was a Revell re-issue. I like to do my Twin Otters in unusual markings, and this Yeti Airlines fits that bill. I got the transfers from Parkes682Decals (in the Manufacturer section on BM). I made a few modifications to the kit, left a few modifications off, and generally had fun. It was sprayed with Halfords Appliance White, but the green was brush-painted with Humbrol 101 mid green and 2 Emerald enamels, thinned with Colourcoats Naphtha Thinners. The gold was three coats of brush-painted Humbrol 16 Gold acrylic. I had a lot of fun, so why not pop over to the GB and have a go! The build thread (aka catalogue of errors!) is here if you want to see what was done: Any, here are some piccies: Oh yes, I was also daft enough to make some 1/72 scale luggage - a rucksack and a travel bag based on kit I have taken there in the past! That is it for now, thanks for looking, Ray
-
 The postie dropped this off yesterday, but due to shielding requirements, and with Mrs N, being the responsible adult out of the two of us, suggesting that the safer option would be to refrain from opening the box for 24 hours, I have managed to keep my grubby mitts off the package until this afternoon. But now the genie is out of the bottle. Anyway, enough of all that nonsense, this is my first entry for the group build, and the plan is to finish it as either one of the KG.30 aircraft that targeted Driffield airfield on August 15th 1940 (fortunately some KG30 markings are included in the box), or as the Ju.88 shot down by three Hurricanes of 312 squadron when based at Speke on the 8th October 1940, but I would have to see if I can source some unit markings for that aircraft. by John L, on Flickr by John L, on Flickr With both aircraft coming under fire from Hurricanes, I hope to add a second build of one of the other aircraft involved, if time permits.
 -
Hello Folks! My first completed model for a while, and it took a lot more effort than I thought it would. Loads of flash on the mouldings which was really surprising, and fit of parts that needed a bit more work than I anticipated. Built completely OOB to portray a No. 3 Squadron airframe using the excellent decal sheet, which is worth the price of the kit alone! It contains markings for 4 RAF examples, plus Italian, Spanish, Luftwaffe and Austrian. I experimented with some pre shading to try and break up the monotone grey scheme plus a little panel wash to finish. Paints were Mr Hobby Aqueous... but instead of their own version of Barley/Camouflage Grey I used H325 (FS26440) which seemed like a better match. Not one of my best efforts but it will do. Comments much appreciated. Cheers 👍 And next to 1950s machines from No. 3 Squadron ....
-
This is Revell's 1/72 OV-10A Bronco, VAL-4 US Navy South Vietnam 1969.
-
This is Revell's F/A-18C with Academy decals representing a Hornet of VFA-192 Golden Dragons
-
Morning All, A few photos of my recently-completed Hunter FR10 in 1/72. It's the well-known but sometimes hard-to-get Revell kit, which goes together very easily and looks pretty accurate too, with good fit and excellent surface detailing. This one started off with the intention of being an FGA9/F6A, but I quite like investigating the less numerous variants and it turns out that the FR 10 was very successful at what it did, so I changed tack and went down the conversion route. I liked the 2 Squadron markings too. Not huge surgery required but as well as the nose job it meant rejigging the cockpit a bit to move the gunsight to the right and reprofile the coaming to incorporate a camera control box on the left. I didn't reorganise the instrument panel which by rights one should, as the kit panel is pretty good and whatever I would have done would not have been an improvement. Other than that I used a set of SBS resin wheels which are great, and a Master brass pitot. I bought a Rob Taurus canopy but in the end didn't use it, as the shape is the same as that of the kit and in fact the thicker frames look better. The seat is the kit part, embellished with plastic card and wire and has come out quite nicely. I also quarried some other great BM Hunter builds e.g that of https://www.britmodeller.com/forums/index.php?/profile/16207-tomoshenko/, as sources of guidance and strength in the detailing/scratchbuilding department. So thanks to them. Pictures: And here's the original, taken in 1970, as the 2 Sqn Hunters were about to give way to Phantoms: There's a build thread (though not a very thorough one I'm afraid) at: Thanks for looking, and take good care in these strange times. Justin
-
Hi to all, A few shots of a slowly ongoing project, Revell Fortress in 1/72 scale. Despite well known shortcomings, I think it’s a good kit and a good starting point for recreating an accurate early production G model, with some limited scratch building and aftermarket additions. My model will represent a Boeing Seattle built camouflaged machine, from the 15th Air Force based in Italy. The kit’s interior is quite detailed, however there’s a space for improvements. Not much I added to the radio room, as almost everything needed is already there. The seats on the right side are removed and the rubber like panel is added to the floor. Also, the radio operator seat is scratched up a little bit. The interior colours used should be as accurate as possible, the result of extensive research I did over the years. I’m using Vallejo acrylics, along with their varnishes and wash. The large gaps on the radio room sidewalls are neatly closed with a thin styrene panels. Sadly, it will be difficult to clearly see all the details once the fuselage is closed, but that's what these photos are for. The next task is to finish the front nose area and the interior sidewalls. More to come soon.
-
Another Mustang... This time "Hot Pants" an P-51B that emergency landed in Sweden during the war. Decals from Moose Republic Decals and painting done with Tamiya AS paint. Sad to say the bad Revell canopy spoiled this modell. It looked good untill I took the masking tape of the canopy. Cheers / André
-
- 1
-
-
- P-51B
- Revell 1/72
- (and 1 more)
-
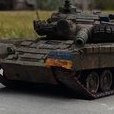
Some days ago @BillS called backdating the Revell #03115 Leopard 1A5 to the early Leopard 1 standard a "relatively straightforward conversion". Has anybody done this already? Or could somebody just outline the scope of work necessary to build an early 1970s Bundeswehr Leo 1 from the outstanding Revell kit mentioned above? Cheers Michael
-
Well after finishing my first group build on time Starfighter F-104, the timing of this he start of the Hawker group build is just right. I have long planed lanes to build a 4 SQN Hunter FR.10 (I have a longer term aim to produce a model of all the combat types that 4 SQN have operated since the end of WW 2), so now is the time to start this one. Yes plus I have plans to use some of the unused parts in a upcoming Mirage F1 build. So so the plan is to build XJ633 of 4 SQN in June 1969. I will I’ll be using the Revell Hawker Hunter FGA.9 kit: Decals will be Xtradecal sheet X047-72 - RAF Hunter FGA.9 & FR.10. And a Quickboost Hawker Hunter reconnaissance nose looking forward to the start.
-
This is an older build but I don't think I've posted these photos before. I did re-scribe the model and added a few bits from the Airfix B-26. MicroScale decals.
- 9 replies
-
- 29
-
-
- Revell 1/72
- Classic
- (and 1 more)
-
Ok here we go, after much talking and boasting in the WhatIf III GB chat, I’ve finally plastic where my mouth is and started building “The Beast!” As we all know the WhatIf III GB didn’t get up, missed by that much, but I just couldn’t let such a good idea go unbuilt.........ask me latter next year as to how much of a good idea it was! This will be the first of two grand builds using the He-177 as a base, the second WILL be the “Amerika” bomber! For those that hadn’t seen the chat, this was a “Zwilling” version of the Heinkel He-177 Grief, a three (tripe DB-810 or six DB-605’s) engine monster designed for long range anti-shipping duties. Fitted out with advanced attack radars (nose and tail), guided munitions, and for the up close and personnel stuff a pair of 50mm cannons! Due to my very limited free time this will probably be quite a slow build and build updates only once a month, so please be patient. There will be a full story to go with this, as per all WhatIf’s and will be included in the final build photo.......or earlier if I’m too bored on shift. Ok lets go..... 1, do some crazy mock-up drawings so at least we have a plan to work to.... 2, then take two plain ordinary Revell He-177’s 3, measure up and cut (measure multiple times, cut, find unexpected gap, add filler and plastic plug,......figure out latter there was a better way to have done this the required no filler!! ) So the centre section is done but there will be quite a bit more added. I need a radiator for this engine, plus want to add a weapons pylon. So I’ll be adding a section behind the engine where the radiator will be housed, plus a “special weapons” pylon! Possible “mini nuclear carrier killer” missile or a heavier anti-shipping missile.......to be decided on and sourced. Have modified the rudders so I can fit the gun turret and radar radome, plus started putting together the control cockpit, will start the radar/weapons control cockpit once Santa has left! 4, admire handwork....and wonder what have I gotten myself into!! Just a couple of photos to show how big she will be.........rather large I think!!! Oh and there will be a couple of Junkers Jumo 004's to be mounted in the insides on the lower sections on the cockpit area, just for more power!
- 131 replies
-
- 9
-
-
- WhatIf
- Heinkel He-177
- (and 3 more)
-
Hi everyone, This is my very first post at the britmodeller's forum! I'm very excited to show you guys my work and learn a lot. Well, my name is Fernando and I'm a brazilian plastic modeller focused in 1/72 Aircraft & AFV on my free time. When I'm home I try to do my best to finish the models waiting on my stash. But when I'm not home, I'm at the sea. (I'm a 3rd Mate trading at the brazilian coast) Today I'll show you my recent started build: PzKpfw III Ausf. L from Revell. It's my second AFV model. Excellent kit with awesome details. REV-03251 by Fernando Costa, no Flickr Hope you enjoy: Cheers! Here the hull and turret painted with Hobby Color H401 and highlitghts made with few drops of white on the base color. I'm using this model to train the color modulation technique. Sem título by Fernando Costa, no Flickr Sem título by Fernando Costa, no Flickr Sem título by Fernando Costa, no Flickr Sem título by Fernando Costa, no Flickr Now the details painted with wood and ready for the glossy coat: Sem título by Fernando Costa, no Flickr Sem título by Fernando Costa, no Flickr Sem título by Fernando Costa, no Flickr Well, that's it folks! Hope you liked and look forward for your comments. Cheers! Fernando
-
Brazilian P-47D-25. Transfer decals from FCM.
-
Hi everyone A refugee from the P-47 STB has the rather dubious distinction of being the first in an unbroken chain of abandoned 2016 builds, and so it seems only right that I should at least make an effort to finish it by the end of the year. Despite being casually tossed into an open top box all those months ago, it has, remarkably, emerged undamaged and with all the odds and ends present and correct, so it looks like a reasonably simple finish. Images to follow once I figure out how to share photos from Flickr because Photobucket is being even more of a PITA than usual tonight! Craig
-
Hi Guys Crazy as it may sound, starting a second project before I have hardly made a dent in the first, stick with me because there is method to my apparent madness! There will be a need to add 'shiny', 'silvery', 'metallicy' paint, which really isn't my thing, to at least part of at least one project later this year, so it makes sense to start R&D into the technique sooner, rather than later. No prizes for guessing that it means this will be finished in the classic USAAF bmf - or as close as I can get it! I'm quite looking forward to this! Cheers for now, Craig
-
Hi guys, Here my first Tiger Meet model, I hope you like: Cheers, Pierre.
-
Finished today without the cat destroying it although she did come close at times. Photos not that good as the light inside and out wasn't that good today. Went for a recon scheme as worn by some DDR machines later in their service. Although it doesn't really show up in the phots I decided to do a well worn finish. Took some colour out of the decals (some of which silvered on Klear but didn't show up until a matt finish was sprayed over, oh well) with a rub of white spirit. Anyway, it's a model with some paint on it and I've had manthrax since yesterday.

.thumb.jpg.ba34a9f6ddce411193946dbdcc7b5fe8.jpg)