Search the Community
Showing results for tags 'Resin'.
-
Designed for vertical take-off using four lift engines in the centre fuselage, the SC1 originally flew with just the single propulsion engine to check the airframe first. A very small model so saves some display space! Painted with Alclad and finished with home printed decals. With the later version fitted with the lift engines. Thanks for looking. Steve
- 5 replies
-
- 19
-

-
- Project-X/Maintrack
- 1/72
- (and 1 more)
-
Despite the small size the Short SC1 had 5 engines, 4 to provide vertical lift and 1 for forward flight. Painted with Alclad and finished with home made decals. With the early single engine version. Thanks for looking. Steve
- 3 replies
-
- 15
-
-

-
- Project-X/Maintrack
- 1/72
- (and 1 more)
-
Here is my latest kit, finished earlier this week. It's Kami de Korokoro's 1:144 Brewster F2A-3P Buffalo finished as "MF-17", BuNo 01521, flown by 2nd Lt Charles M. Kunz, of VMF-221, USMC, on June 4th, 1942, during the Battle of Midway. He shot down two Japanese aircraft and was one of only three F2A-3s to return to base, despite being wounded and with the aircraft damaged from enemy fire. This was a poorly-moulded resin kit. I opened up the cockpit and corrected the rear shelf, adding scratchbuilt details. I removed the framing from the middle of the main canopy as this variant didn't have it. The engine cowling, propeller and tail wheel were lost causes and I replaced them with spare parts from a Mark I Buffalo kit. I had to modify the propeller since this variant didn't use a spinner. The radio masts and wires and the wing pitot were made from stretched sprue. The kit was fully painted and varnished with brush. The kit's decals were useless and anyhow I wanted a Midway machine so I used the markings from a Warbird Decals sheet and the code, minus the "M" which was painted, from one of the Mark I Buffalo boxings. Although far from perfect, I am pleased I managed to make something rather decent from what came in the bag. Thanks for looking and all comments are welcome. Miguel
- 9 replies
-
- 23
-
-
- 1:144
- Kami de Korokoro
- (and 1 more)
-
I’m calling this finished! The yellow was difficult to work with, but the kit itself was a decent fit, especially considering it’s resin. I was surprised to read that over 1,000 of these were built between 1940 and 1943, mostly for use in the paratroop training role. Towed to a height of 6,000 metres, the glider had a range of around 140 miles. This example was based at RAF Weston on the Green in Oxfordshire in the early 1940s.
- 10 replies
-
- 20
-
-
- 1/48
- Planet Models
- (and 1 more)
-
Hi to all of you.I had great trouble building this one.Such a challenging kit to work on.But it is to be expected from a resin kit.Otherwise I really like this airframe.reminds me of james bond goldfinger.
- 12 replies
-
- 48
-
-
HI viewers, Here is my latest after languishing on the shelf for 9 months, an AEC Matador (early) by Milicast in /76. Built mainly OOB, doors wee reworked as I wanted them to be posed open and glazing was also added. Painted using Tamiya and AK paints, decals from spares as Milicast kits don't come with any, go figure. Weathered slightly with a couple of washes. Conjured up a simple base and a couple of figures et voila. WiP here: Thanks for looking. Stuart
- 18 replies
-
- 26
-
-
-
Long before I was came on and lowered the tone, I think there was a GB for anything that wasn't injection molded plastic. I'm proposing Vol II, maybe the No PIMP GB that's No Injection Molded Plastic. Or to be more positive about it, wood, etch, white metal card, vac-form ... Having just started on a resin car in the 10th Anniversary GB, I've discovered a whole new world, and I was inspired and awed by what @pheonix did with wood and metal in the floatplane GB. Plus all the amazing vac-form work. And I do have to card buildings that I have no reason to build unless a GB comes along. What I'm thinking is.. Any model you like, so wiffy, sci-fi, fantasy even more conventional subjects, no holds barred in any medium you like but the injection molded element can't be more than 25%. I'm putting that in because in the my case, I'd replace the rainwater goods with AM injection molded and to allow for raiding the scrap box for similar fiddly details for others. Then standard GB rules apply and fun to be had along with new experiences; after all why should New Media always mean Twitter etc? Any takers/ thoughts etc? Hosts/ co-hosts/ founts of wisdom are offering their services and I've found an emoji with a tenuous link to host/ hospitality in 🏘️, having first rejected the hospital one; though that might be needed later So far Me (I suppose I should) 🏘️ Exdraken Mottlemaster Philp Black Knight BritJet CliffB Jb65rams dud_gan_ainm bootneck zebra sleeperservice Robert Stuart Angus Tura Tom Probert Kallisti Romeo Alpha Yankee Jockney Gorby helios16v rafalbert Heather Kay torbjorn Arniec DaveyGair RayS Panther II Tim R-T-C dnl42 Trickyrich 🏘️ Pin 🏘️ Jinxman Tzulscha malpaso Mr T
- 707 replies
-
- 2
-
-
- white metal
- vac-form
- (and 1 more)
-
Here is my latest kit, finished this past weekend after just over 2 months. It's Anigrand Craftswork's 1:144 Blohm & Voss Bv 222 V7 Wiking. This was the seventh prototype but the first of the C-series with diesel-powered Jumo 207C inline engines. It's first flight was on 1 April, 1943 and it was scuttled by its crew at the end of the war. This resin kit was built mostly OOB. I opened up the porthole-type windows which were represented as panel lines and filled them with Kristal Klear. I strengthened the join at the wing roots making a spar through the fuselage in front of the tab and using screws as rods behind. I also added some details in the cockpit, correcting the seats and making the steering wheels, although little can be seen! Other details added were the wingtip lights (Kristal Klear drops) and the radio wires (stretched sprue). The base/cradle was made from bits and rods of wood I had. The kit was fully painted and varnished with brush. Thanks for looking and, as usual, all comments are welcome. Miguel
- 25 replies
-
- 56
-
-
- 1:144
- Anigrand Craftswork
- (and 1 more)
-
I have set sail on a themed collection of 1/32 Hawker single engined piston fighters, started because I enjoyed Special Hobby's Tempest V so much, and because of Lukgraph, Fly, Paul Fisher and Special Hobby (again) providing the raw materials. The Typhoon is a lovely piece of casting. Here it is. It is an entirely fictional representation of a 1B equipped with rockets wearing the early 1A identification stripes, ie *not* the invasion stripes we all know and love. The windscreen and canopy are Special Hobby spares that I acquired after borking several vacforms. Ham fisted? Moi? The very few decals I used (most of the major stuff is masked) silvered. Grr. And I did gloss it up first, too. General overview... Plan view... The tummy. The apparently kinky stripe on the starboard flap is an optical illusion. It's straight, really... Cockpit detail showing virtually nothing! But the SH windscreen blended in well... Nicely cast bits of undercarriage... Hope you like. I am currently working on Fly's Hurricane. The cockpit frame is tortuous, but I'll get there! Mike
- 10 replies
-
- 28
-
-
-
Morning people. With the Challenger and Humber at home awaiting painting and accessories, I need another build for the lunchtimes while at work. I purchased this and loads of other afv's from a club member who wants to see this Matador built, so here goes. Nice sturdy box and a pic of what it should look like. What the heck am I supposed to do with this? It's got an inventory list if you know what things are. The pictures are very dark and not useful at all but I suppose I'll muddle through. The resin but whether it's all there... I'll only know when i check it against the inventory and/ or during build. I have started cleaning things up, a long, tedious and careful job indeed. Already thinking ahead with this as I want it presented slightly different. The idea is to have the tail gate open with the rear cargo tarp removed, so exposing the cargo within a loading/ unloading scene. Stuart
-
-For the newcomers...I made a W.I.P of this kit lost somewhere in the depth of this forum....I m afraid the photos have desapeared
-
Hi all. I've gone and done the unthinkable by doing a few commission builds for a work colleague. There are a lot of first (and lasts) with this build. I'll try to explain that in a bit. The kit has already been removed on numerous sites so I'll keep the summary brief. The kit is by Special Hobby that was released in association with Red Roo banner in 2016. Included are vacform canopies, photoetch details, white metal gear and a selection of five schemes./ Indications from other builds are the RAAF roundels are partly transparent. I might end up masking and painting theme. A CD with a comprehensive gallery of flying warbirds, museum and historical period images tops off the extras. First up it's build the interior resin components on the floor of the pit. The floor is integral with the top of the wing centre section. Very handy. The suggested green is very vibrant and doesn't match the provided reference photos. I've ended up mixing a 50:50 brew of the suggested green with Gunze interior green. It look much better than the first attempt. The fire bottle is the integrally molded part painted up in red. The same colour for the floor and section members was applied to the side walls followed with detail painting using Vallejo's acrylics and some enamel washes. Once done, I shot the lot of it with Mr Color flat clear which gives it a nice dull finish. When it comes to assembling the parts I found that joining the rear fuselage seams was the best method. I came back 24 hours later and cleaned up the seam with a mix of CA and talc. By taking this assembly route I could position the fuselage around the lugs on the floor and then join the forward seam across the firewall and small forward fuselage section ahead of the windscreen. I didn't get a photo of it but I put a section of square tube behind the instrument panel to reinforce this area as it was only strength in the CA tha twas holding the part together. In the meantime I made a start on the engine, prop and separating the vac canopy. I managed to separate it cleanly without needing to revert to the second one. This was one of my firsts...ie playing with vac canopies. This isn't something I want to do regularly!!! That'll do for now. I should be along in a few days with the next round of updates. Cheers, Mick
- 17 replies
-
- 14
-
-
Finally got my hands on a 1/350 HMS Brave which I've been wanting since I got back in to modelling. This project is another of personal significance as my Dad was posted to Brave when I was born and I was the first person christened on the ship. Life at the minute means this one is probably going to sit on the shelf for a little while longer, but I'm so excited to have my return to modelling lined up after a bit of a hiatus starting a business.
- 6 replies
-
- 13
-
-
- royal navy
- atlantic models
- (and 1 more)
-
 Years ago, the Hawkeye Designs 1/72 Me-109G-10 was considered by some as the definitive Me-109 kit in that scale. I have little interest in the 109 so I can't comment on the accuracy of the kit. I don't build 109's so take it easy on me. This project was begun so long ago that I have only a film record of the beginning. I thought this multi-media kit would be an interesting challenge. This project is one of those plagued by mistakes and misfortune, many repairs of broken parts, lost parts, bad paint job, splashed with CA, badly warped wings when left in a hot car, and more. The model was stored for a long time. I am determined to finish the model, hopefully with good luck. Don
 -
I started this project in a Group Build of French aircraft in a German Flugzeugforum and today it is finished. The Nord 262 is a small commuter Aircraft which entered service in 1964. The kit is a typical Resin kit by F-RSIN with not much detail and some sanding and filling work required. Antennae, rudder levers and the typical pitot tubes had to be scratch built. Two Decal versions are provided and as I found both of them attractive, I attached both. In reality these are TWO aircraft. I hope you like this little french aircraft in service with a french airline. Thanks for watching! Norbert
-
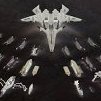
a.thumb.jpg.58d92d116b0315dc55d352fd191d65e4.jpg) I would like to show you my recently finished model. The XB-70 was capable of flying Mach 3. Only two were built, one was destroyed after a collision with a Chase F-104. The other one is on exhibit in the USAF Museum in Dayton. The kit is qualitywise on the lower part of the scale. It is a has a lot of air bubbles, some of them on the edges, so it is hard to correct them. But it is the only game in town. Typical for the XB-70 on the ground is the position of the ailerons. The are not aligned but all in a different position hanging down. Also the colour of the tyres is unique, as they have to withstand the high temperatures at high speeds. The landing gear doors were too thick and I replaced them with thin plastic sheet. No big deal. hope you enjoy this white beauty!
I would like to show you my recently finished model. The XB-70 was capable of flying Mach 3. Only two were built, one was destroyed after a collision with a Chase F-104. The other one is on exhibit in the USAF Museum in Dayton. The kit is qualitywise on the lower part of the scale. It is a has a lot of air bubbles, some of them on the edges, so it is hard to correct them. But it is the only game in town. Typical for the XB-70 on the ground is the position of the ailerons. The are not aligned but all in a different position hanging down. Also the colour of the tyres is unique, as they have to withstand the high temperatures at high speeds. The landing gear doors were too thick and I replaced them with thin plastic sheet. No big deal. hope you enjoy this white beauty!- 10 replies
-
- 20
-
-
I would like to show you my recently finished model. The XB-70 was capable of flying Mach 3. Only two were built, one was destroyed after a collision with a Chase F-104. The other one is on exhibit in the USAF Museum in Dayton. The kit is qualitywise on the lower part of the scale. It is a has a lot of air bubbles, some of them on the edges, so it is hard to correct them. But it is the only game in town. Typical for the XB-70 on the ground is the position of the ailerons. The are not aligned but all in a different position hanging down. Also the colour of the tyres is unique, as they have to withstand the high temperatures at high speeds. The landing gear doors were too thick and I replaced them with thin plastic sheet. No big deal. hope you enjoy this white beauty!
-
 F-4B Phantom II Wheels (4423 for Tamiya) 1:48 CMK by Special Hobby Kit wheels are generally in two halves, which means you have the resultant joins to deal with, possible mould-slip issues on single part wheels, and sometimes less than stellar detail due to the moulding limitations of styrene injection technology, especially in the tread department. That's where replacement resin wheels come in, with their lack of seamline and superior detail making a compelling argument. They are also usually available at a reasonable price, and can be an easy introduction to aftermarket and resin handling, as they are usually a drop-in replacement. This set arrives in CMK’s usual yellow-themed clamshell box, and contains four wheels on two casting blocks that join the parts at the bottom contact patch of each tyre. They are a drop-in replacement for the kit parts once you have removed them from their pouring block, and all the wheels have a fine circumferential thread, while the main wheels also have brake detail on the rear face. There are no manufacturer’s details or tyre specification detail found on the sidewalls but the detail on the hubs more than makes up for it, with a extremely subtle weighting to the bottom of the tyres to give the impression of the airframe pressing down on the highly compressed air in the tyres. Highly recommended. Review sample courtesy of
 -
Piaggio PC.7 Pegna, resin miniature by SBS Model. Painted with Gunze Super Italian Red and Vallejo Liquid Gold. It was my first purchase from this company and I am positively surprised by the quality. The cast is sharp with amazing detail and excellent fit, on part with Tamiya and Finemolds plastic sets. The crude wooden trestle is scratch built, as they didn't have the SBS ones at my usual hobby shop
-
Westland Whirlwind Mk.I Gun Barrels (Q32395 for Special Hobby) 1:32 CMK by Special Hobby There were lots of happy faces when the new Special Hobby 1:32 Westland Whirlwind arrived, although a few people might have been sad that it wasn’t a helicopter. We reviewed the kit here, and some nice resin wheels & canopy masks here. Now we have the gun barrels to look at, which were well-detailed in the kit, but could always do with a little more crispness that resin offers. The set arrives in a green-themed CMK Quick & Easy shallow clamshell box, with simple instructions between the resin and backing card. Inside are two pairs of resin gun barrels on their own casting blocks, which are drop-in replacements for the kit parts once you’ve liberated them from their blocks. There’s an advert for the CMK razor saw on the instructions, and one of those is the ideal solution to getting them separated, so consider picking one up if you don’t already have one. The detail is better than the styrene parts when compared against each other, and the muzzles are hollow, so you don’t need to drill anything out. Highly recommended. Review sample courtesy of
-
Not wishing to go the expense of buying a 3d printer what is a cheap alternative to produce replacement parts like wheels and simple items like axles/railings etc thanks
-
 Hi all. My entry will be this Accurate Armour, Hotspur Armoured Land Rover. A resin kit with a good smattering of PE. I've always known that the RUC use armoured Land Rovers to police Northern Ireland, but I hadn't really appreciated that there have been various iterations, with each new design providing enhanced protection. The Hotspur version saw service in the 1980s and incorporated additional armour plate fitted within the cabin (in order to maintain the civilian appearance as far as possible). EDIT: Please ignore all that follows - I'll now be building this as an RUC vehicle Their retirement from service corresponded with the start of the 1990s Yugoslav Wars, and one retired vehicle at least was purchased to provide protective transport for the ITN news crew that was covering the conflict in Bosnia. Accurate Armour provide decals for this version (but unfortunately not much infomation on how to use them). I'm still trying to find online images of the ITN vehicle and the only thing I've found so far is a fleeting glimpse of it on its side in a ditch in this YouTube video on similar BBC vehicles. It appears at 40 seconds and you may be surprised by the choice of colour.... Cheers
 -
AGM-114 Hellfire (BRL32037) 1:32 Brengun The AGM-114 Hellfire missile is an air-launched missile for destroying ground-based targets with a high level of precision. They are carried most famously by the AH-64 Apache as well as drones and other slow-moving aircraft, and are used extensively for destroying enemy bunkers and compounds in the Middle East, despite its original mission as a tank buster. They are fire-and-forget and because of their relatively low explosive yield when compared to a standard JDAM they have a lower collateral damage likelihood. They are frequently carried in "packs" of four on one pylon because of their light weight, giving any aircraft a substantial capacity to inflict damage. The Kit The set arrives in a cardboard box that is sealed by the label, and inside is a ziplok bag of resin parts, a sheet of stencil decals, a small fret of Photo-Etch (PE) and an instruction sheet with five steps plus painting guide. There are ten casting blocks, the majority of which are in grey resin, but two are in clear resin and hold the clear seeker heads for each of the eight missiles included in the set. Each missile has the choice of a protective yellow FOD guard or the clear seeker head, PE fins front and aft, a toroidal exhaust port and a separate resin attachment lug. The launch rails are made up from a pre-moulded pair that have the pylon attachment points moulded into the centre, two stanchions that project downward and two more rails for the lower level. To these are added command umbilicals, PE locking arms and rear skin, plus resin attachment lugs. When the launch rails are completed, you can attach up to four missiles to each one, allowing you to house the full complement on the two rails supplied. Some of the decals are called out during construction, but the balance are shown in the final section of the instructions, and the overall colour is mentioned briefly at the beginning as black. Conclusion This set is excellent value for money, highly detailed, and you get everything you need barring paint and glue. Either missiles and two rail packs for your large scale project for a very reasonable price. Very highly recommended. Review sample courtesy of
-
I'm going to build a CA-28 Ceres. This was a development of the Wirraway, built using some Wirraway components (although not a lot was used without modification), and saw quite extensive use as a crop duster in Australia. I've been wanting to build one of these since I first saw the one at the Moorabbin air museum near Melbourne, finally got round to buying one - this is the LiftHere! resin kit in 1/72. Here's what you get in the box: Nicely cast resin, vacform canopy (and a spare), and a simple but good-looking decal sheet for the one option shown on the box. I'll probably make a start on this tomorrow. In the meantime here's my photo from the Moorabbin air museum: cheers Julian
- 26 replies
-
- 14
-
-
With the mail dragging its feet I felt like something quick to build while waiting, and luckily I had this in the stash. I doubt I would have ever even thought about buying two if it was only one to the pack, but since it wasn't I didn't exactly get much choice. But now that I have them I may as well build both, one in everyday puttering about mode and the other one stripped down and buttoned up for stealth. As for the specific ships K31 HMS Visby has a bit more potentially going on, so that'll be the "bells and whistles one", and for the sneaky one I'll go with K32 HMS Härnösand, large because that completes the pair that I happened to stumble on while out for a walk downtown back in '18.
- 7 replies
-
- 13
-
-
- 1/700
- Orange Hobby
- (and 1 more)