Search the Community
Showing results for tags 'Raf'.
-
 Hi All, My latest completion is Airfix lovely Beaufort, completed as a Mk.Ia, LR906 of No.2 Torpedo Training Unit, based at RAF Castle Kennedy, Scotland, in September 1943. I cannot find any photos of LR906, but here is a Beaufort in a similar scheme: Now I built a Mk.I late last year, but fancied something a little different. The Mk.Ia differs from the Mk.I in the turret (the Mk.Ia uses a Bristol-manufactured turret), addition of a DF loop on the fuselage - I believe they also used a different version of the Bristol Taurus engine. The kit contains components for the DF loop and turret, although they are not mentioned in the instructions. Here's the WIP if anybody is interested: Here's the photos! Here's a family shot with the aforementioned Mk.I: And just for scale here's one with another rather effective torpedo bomber: I've very much enjoyed this build, and I think the scheme rather suits the Beaufort. I've surely got a couple more in me - perhaps a Malta-based aircraft, and I'll have to do a DAP RAAF version! Thanks for looking, Roger
- 31 replies
-
- 89
-

-

-
Hi All, My next build will be Airfix' lovely little Beaufort. Now some of you may have a rather alarming sense of deja vu, as I only completed one of these kits in November 2022 (itself a repeat build of an earlier failure), but fear not dear reader - this will be completed as a Mk.Ia!! I enjoyed the last build, and fancied a different scheme for this project. A bit of light browsing bought up this: I am planning to complete as the bottom left scheme, which is LR906 of No.2 Torpedo Training Unit, based at RAF Castle Kennedy, Scotland, in September 1943. I cannot find any photos of this aircraft, but the scheme appears repeatedly on various decal sheets. As you can see it is finished in white with EDSG upper surfaces, with DSG aircraft codes - until I hear different I shall go with this. I shan't bother with sprue shots as I've already built this kit - here's the WIP if anybody wishes to see it: Now if you look at the above schematics, you may note that the major difference between the MkI.a and the Mk.I is the turret (I think the Mk.Ia also used a later version of the Bristol Taurus). Now I dimly recalled that there had been some discussion on @Rabbit Leader's lovely build a couple of years back, and indeed a search through Dave's most entertaining WIP unearthed that the kit does contain the required turret components. Here's the thread: You will find the turret information on page 4 (thanks also to @AdrianMF for his significant contribution). Here is the clear sprue which shows the two turret types: You can see the glazing for the Mk.Ia Bristol turret bottom left, with the original Mk.I Daimler turret top right (I think that's the right way round?). Rather curiously, the sprues do not appear to contain the twin Brownings required for the Bristol turret, so some scratch-building may be required. The other interesting thing for this build will be the torpedo - my understanding is that training versions of the torpedo had a red or yellow nose, which will surely brighten up the scheme! Anyway, it should prove to be an interesting build! Thanks for looking, Roger
-
Hi All, My latest completion is Eduard's relatively new-tool Spitfire Mk.IIa, completed as P7840 of 340 (Free French) Sqn, based at RAF Turnhouse, Ayr in December 1941. P7840 was the thirteenth of seventeen Spitfires donated by the Belfast Evening Telegraph Spitfire Fund, and was titled 'Mountains o' Mourne'. Here's a couple of photos of the aircraft and the squadron (kindly provided by @Troy Smith - images for discussion only and will be removed on request). The scheme attracted me as it unusually has the aircraft in DFS with the earlier Rotol spinner and type A.1 roundels. In addition my Father-in-Law hails from Dromara which sits at the foot of the aforementioned mountains. 340 Sqn was formed in November 1941 as part of Le Groupe de Chasse IV/2 (Fighter Group 4-2) "Île-de-France", flying defensive patrols from Turnhouse until moving further south in 1942, at which point they re-equipped with Mk.Vbs. The scheme was therefore only applied to the aircraft for a relatively short time, and my light weathering of the model reflects this. Here's the WIP if anybody is interested: The model was completed mostly OOB (as it was Profipack that adds a few extras!), although with the national markings (mostly) with home-cut stencils. Like most Eduard kits the detail is superb, but with some unnecessarily fiddly elements - as an example the radiator assembly consists of 12 pieces including 2 PE radiator grills (a bit much for 1:48?). Anyway, on with the photos: Finally, a couple of group shots to show the evolution of the beast (from R-L Airfix Mk.Ia, Eduard Mk.IIa, Tamiya Mk.Vc, Airfix FR Mk.XIVe - all have their own WIPs and RFIs if anyone is interested, and still plenty of gaps to fill in the collection, although these have all been completed in the last year or so): I've very much enjoyed learning more about this interim mark of the Spitfire, and bringing this unusual scheme to life. Thanks for all who have added kind words and encouragement along the way - it has been much appreciated! Thanks for looking, Roger
- 27 replies
-
- 43
-
-
Maybe of interest Happy modelling
-
 Hi all, Well, it's been quite a busy year with work, which has meant another slow year at the bench. It's been quite difficult with lots of distractions to keep the modelling mojo flowing this year. I've recently started my Christmas holidays, and I've felt the need to do a quick and simple build, to get said mojo flowing again, and to kick off the new year on a good modelling foot. I recently asked my 85 year old father in law (who is still an avid modeller) what I should build. Being an ex-pat Brit, and a young lad when the Battle of Britain was raging over his home in London, he suggested a Hurricane ("the Spitfire is a beau'y and awl, but the 'urricane was the real work-'orse", he said). I had the 1/48 Airfix Mk 1 in my stash, and promptly dusted it off. It's the 'trop' boxing, but all of the parts for a standard Mk 1 is in the box. Somewhere along the line i'd also added an ultracast seat with moulded harnesses, and exhausts into the box. Now, I know very little about Hurricanes, which is perfect (as I won't get bogged down in details or accuracy related rabbit holes, as I often do). My deadline for completion is 16 January, when I start back at work. "The game is afoot"! So far, I have completed the interior. In keeping with the the simple theme of this build, I kept the cockpit essentially out of box, save the aforementioned seat. I did have to add belts to the top of the seat, to slot through the bulkhead behind the pilot. The Airfix interior is complex yet simple to build, and looks very nice (especially when compared to their earlier 1970s/80s rendition of the Mk1). I followed the Airfix instructions for the interior colours. Thankfully, most of the cockpit and interior is silver, with some RAF interior green to add colour. I decided to avoid the complexities of using the kit decal for the instrument panel; the panel is buried quite far inside the cockpit so not much will be seen. A simple dry brushing and picking out the dials with Future will suffice. Here's some pics so far: I also painted the wheels (one of my least favourite parts of any build, so best to get those out of the way early). The wheels and hubs are quite nice out of the box. I don't intend on showing off the gun bays (again, a complexity I don't need, so I'll likely trim the spars away, just in case they muck with the wing fit, which looks a little tricky. We'll see how we go with that when we get there. So far, so good! All feedback welcomed. I also welcome any tips from anyone who has built this kit before as to what I should keep an eye out for during construction. Cheers! BC
 -
Hello all, This is the first time I've posted a WIP to Britmodeller. I happen to have 3 copies of the 1/48 scale Revell Ventura kit, one being the early PV-1, the other two being the RAF Ventura II boxing. Originally, I wanted to build a South African Air Force Maritime patrol Ventura, but this soon mushroomed into the RAF Venturas, one of which would have a 4-gun Boulton – Paul turret. The desired outcome is one RAAF Ventura with a 4 -gun turret in the Temperate Land Scheme, a RAF special duties Ventura with Dark Earth / Light Stone / Night scheme, and a SAAF PV-1 in Dark Sea Grey / PR Blue or Sky paint, and Vokes filters. Differences between the versions: Type Operator Nose turret Engines Other Scheme PV-1 SAAF solid none Vokes Filters External racks DSG / Sky / PR Blue Ventura II RAAF glass 4-gun BP DE / DG /Sky grey Ventura II RAF glass 2-gun BP DE / LS / Night Project plan: Source new decal sheets (castle and springbok) for SAAF Ventura. Obtain an additional set of propellers to replace the incorrect ones in the PV-1 boxing. Swap PV-1 upper turret mount with one of the RAF Venturas, and blank this off for SAAF build. Convert the bomber versions to single pilot operation, add detail to the W/Op compartment on all three. Add details to the bomber version noses. Correct the engine nacelle fronts, add Vokes filters to the SAAF build nacelles. Install the Boulton – Paul turret in the PV-1 upper turret mount, add to the Aussie Ventura. Source an ADF football for the SAAF Ventura. Plunge mould some teardrop bubbles for the Bomber Venturas. First, an overview of the kit(s) Decals sourced from MAVdecal in South Africa. I don't necessarily adhere to the build process in the instructions. It's a man thing, so bear with me! I re-profiled the Nacelle fronts , just to see what they looked like! The one on the right has been re-worked.
- 17 replies
-
- 11
-
-
- Revell 1/48
- RAF
- (and 1 more)
-
 On December 29, 2021, I contacted a friend and fellow model builder Jack Geratic in Ontario, Canada regarding my desire to build a Consolidated PBY-5 Catalina. From experience on previous projects, I knew that Jack was very good at research and knew his way around scale modeling better than I did. At the time we found there were only a few Monogram #5609 and Revell #04520 kits in 1/48 scale on eBay. The kits were introduced in 1995 and had been out of production for some time. Then Revell reintroduced the PBY kit in 2014 but as a PBY-5A which is the amphibious version (with landing gear), otherwise the aircraft was the same as a PBY-5. My thinking at the time was if we use an amphibious version which was readily available it would require major body work to cover the retractable landing gear on the side of the hull. What we found out later in reviews is that both Monogram and Revell kits had a design issue called 'tail bloat', the tail section was not to scale. It was 9.5mm (3/8-inch) too wide at the root of the vertical stabilizer which negatively affected its overall appearance. Jack located a detailed cross-section drawing of the actual aircraft and we found that Monogram had a flatter cross-section which we believe is what caused the tail bloat issue. However, there was a good solution, Belcher Bits in Canada offered a resin tail conversion kit that required removing the entire tail of the model. When you see the finished tail conversion below, I think you will agree it looks right. In my opinion the Belcher Bits solution was a lot of work, but Mike Belcher captured in resin the graceful elegance of the Catalina tail. And by the way the name Catalina was given to the Consolidated PBY by RAF, RCAF and RAAF crews because the early versions were manufactured in California. The name was adopted by Consolidated and used for the remaining production years. Harold Reference Photographs: Modification Phase: Completed Model:
- 56 replies
-
- 104
-
-
-
Hallo During getting order in our apartment, my wife found pictures from her father. This photo is taken in May 1940 in Charleville in France. No more information. Maybe it is an idea for a model? Happy modelling
-
 Dear fellow modellers. Here is my most recent creation. The rather excellent recently released Bristol BeaufortMk1 in 1:72 scale. Built OOB with a slight departure from the kit decals. This is a sort of 22 Squadron aircraft. I've done it without the torpedo fit but as a land based medium bomber. A What If of sorts. I did find a reference to 22 Squadron being in the North African desert from early 1942. With this in mind I elected to do it in RAF Desert colours. I liked this kit very much. I believe it's a very recent moulding? There is a ICM offering in 1:48 this might be one for me to buy in the near future too. I hope you like it posed on my desert diorama base, which I made for a previous 1:48 Hurricane Trop . Paints are AK with some MIG silvers where necessary. Sorry I didn't do a WIP for this one. Did most of the work between meetings at work ! Well that's my story and I'm sticking to it! I hand painted the underside Azure blue. The top cammo pattern was using my airbrush and I used the blue tack sausage method to deliniate the two colours. I used the painting guide from the kit instructions and lightly ma4ked with pencil the pattern. I'm quite astounded this has received some many likes so far. Thank You all so much. Since i took the pics i've tidied up the paint on the glazing bars on the cockpit. So i'm a bit happier with the end final result now Regards, Andy A few of the requisite 'Vintage' shots.. Underside - i do like the RAF Azure Blue.
- 31 replies
-
- 74
-
-
-
- desert colours
- Bristol Beaufort
- (and 1 more)
-
RAF Beechcraft Texan T.1 cockpit interior color ? Light grey. Any FS or BS reference for this grey color? Best paint or color reference ? Thanks in advance. V.P.
-
Browsing through the serials of aircraft ordered by the RAF in 1935-45, I came across a strange item: 50 Lockheed 2B14s with serial numbers from P5571 to P5620. Of course, the number 14 next to the manufacturer's name is automatically associated with Super Electra and Hudson, but the only Hudsons in the block of numbers starting with P are a few months earlier series of 50 a/c from P5116 to P5165. Moreover this was not the first batch of Hudsons for the RAF, as this honour went to a block of 200 from N7205 to N7404. Would anyone be able to shed some light on what the UK-ordered Lockheed 2B14 was? Cheers Michael
-
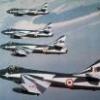
Hi All, My latest completion is Tamiya's 1:48 Mosquito FB Mk.VI, which is oft shown on this site (unsurprisingly, because it's still a great kit despite getting a little long in the tooth). I have chosen to model this as HR405 of 143 Sqn RAF, which was part of the Banff Strike wing formed in late 1944, tasked with striking shipping and land targets along the Norwegian coast. It's a fascinating campaign during the latter part of the war of which I was blissfully ignorant before I read this book: Highly recommended if you get the chance. Now there are a number of commonly modelled Banff subjects, but HR405 was the sometime mount of 143 Sqn's CO, Wg Cdr (later Air Chief Marshall) Christopher Foxley-Norris DSO MiD. Whilst reading up on Foxley-Norris I discovered that he was born in Birkenhead, as was I! There are a number of photos of HR405, which were taken in January 1945 as part of a photoshoot for Illustrated magazine (images for discussion only and will be removed on request): The aircraft was also involved in many of the 143 Sqn sorties, and was mentioned itself in the book a couple of times. The aircraft survived the war and was later sold (to Turkey, I think?) There are a few things worthy of note from the photos: 1. The level of staining on the Sky undersurfaces, as well as the repair patches on the port stabiliser 2. The spinners, which I believe to be white rather than yellow as usually presented in schemes 3. The RP rails were of the earlier standard, rather than the duplex rails later developed by the Banff Strike Wing (these were only fitted to all aircraft in March 1945) 4. Most unusually, the distinct 'saddle' of lighter paint ahead of the tail, which I believe is to do with the overpainting of the invasion stripes Now my theory is that when the upper portions of the stripes were overpainted, no EDSG was available, so the next best thing was used - I chose the next best thing to be Dark Slate Grey. Then, when the lower portions of the stripes were painted out, fresh coats of Sky and the now available EDSG were applied to the relevant areas. This would explain why the EDSG portion is darker than the rest of the upper surfaces, which would have worn and faded. The 'DSG' portion corresponds well to the position of the stripes, so I think it's a viable proposition. I also applied the DSG treatment to the upper wings, which would have been overpainted at the same time as the upper fuselage. As you can see there is no discernible difference in tone to the Sky undersides, so I chose not to portray any difference in shade. Here's the WIP if anybody is interested: Now onto the pics: Here's a final B&W shot along with the original to test my theory: I reckon that's close enough for me! I've very much enjoyed this build, and I'm more than tempted to supplement it with a Dallachy Beaufighter and perhaps a Mustang too! Thanks for all who have followed along and provided encouragement and advice - it has been sincerely appreciated. Thanks for looking, Roger
- 32 replies
-
- 57
-
-
-
Hi All, My next project is Tamiya's lovely Mosquito. Now I have built this kit a couple of times in my pre-BM days, but this is my first build in a few years. I know therefore that it is a lovely kit to build. Although much modelled, here is the box art: Here's the sprue shots: I've got a few extras for this build: I've just finished re-reading this in preparation for the build: If you get a chance to read it, it is an excellent account of the actions of the Banff Strike wing. I am still debating which aircraft to model - the mount of the Wing's C/O, Group Captain Max Aitken DSO DFC is currently the favoured option. There's a few photos of this aircraft: And this one in B/W with half invasion stripes: Other elements of note are the red spinners, the group captain's pennant and the bare metal auxiliary fuel tanks. Now although I know that the aircraft serial number is HR366, I confess that I do not currently know the squadron code for 235 Sqn ('KK'?) or the aircraft code - I'm sure someone will have this information! None of this stops me from getting on with the build, so off we jolly we trot! Thanks for looking, Roger
- 83 replies
-
- 12
-
-
Hi All, With my other current WIP (1:32 Spitfire Mk.IXc) on hold pending some decals arriving *drums fingers*, I thought I'd get another project going. Although 1:48 is my normal stomping ground I couldn't resist straying into the gentleman's scale in order to build a Beaufort, which I've been lusting after it since its release. I've been unable to order this kit anywhere locally, so after seeing @tonyot and @Rabbit Leader's inspirational joint build (wonderful work gents), I could contain myself no longer and ordered one from the big H at exorbitant cost (including shipping of course). A few short weeks later this lovely little box landed at the portcullis of Dunny Towers: Beautiful box art showing the enormous danger that these brave crews flew into. Although there are many interesting schemes for the Beaufort (including some lovely Aussie versions!), the combination of DSG/EDSG over Night is an irresistible one, so I'm going to complete this as the lower scheme, L9866 of 217 Sqn, based at St Eval in Cornwall in Feb 1941. This aircraft was flown by Sgt John Rutherford (pilot), Sgt Thomas O'Byrne (navigator), Sgt William Browning (W/Op), and Sgt John Wood (AG). The crew were all lost in the 1st Feb attack on the German cruiser Admiral Hipper whilst she was moored in Brest Harbour - the aircraft was thought to have been shot down by a Bf109-E4 of II./JG77. Brave men indeed. I can't find any photos of L9866, but I have found some lovely colour pics of other 217 Sqn aircraft (both copyright World War Photos) Here's another one, showing that both TSS and TLS were applied to aircraft from the same unit: All these shots show some interesting details such as the EDSG spinners, aircraft ID letter on the glazing, as well as the general wear & tear on the airframe which I shall do my best to replicate. On to the kit! Here's the sprue shots: The detail looks lovely, and the mouldings are nice & crisp. I know that everybody has raved about how well this kit fits together, so I hope it will be a pleasure to build. Here's the decals, which look lovely, along with an obligatory set of Eduard masks - the build will otherwise be OOB. I'm looking forward to this one! Thanks for looking, Roger
- 70 replies
-
- 14
-
-
Hi All, My latest completion is Airfix' lovely 1:72 Beaufort Mk.I. I originally started building this last year but binned it after a rather disastrous weathering incident. It niggled me to the extent that I purchased another kit and recently had another crack at the same scheme, albeit using masks cut on my new cutter, which has been a great learning experience. The aircraft I've chosen to model is L9866 of 217 Sqn, based at St Eval in Cornwall in Feb 1941. This aircraft was flown by Sgt John Rutherford (pilot), Sgt Thomas O'Byrne (navigator), Sgt William Browning (W/Op), and Sgt John Wood (AG). The crew were all lost in the 1st Feb attack on the German cruiser Admiral Hipper whilst she was moored in Brest Harbour - the aircraft was thought to have been shot down by a Bf109-E4 of II./JG77. Brave men indeed. I could not find any photos of L9866, but there are some nice colour photos of other 217 Sqn Beauforts (images for discussion only and will be removed on request): Some nice details in there, such as the absence of a chin turret, the EDSG spinners, and general wear on the airframe. Here's the WIP if anyone is interested: Anyway, here's the photos: Finally here's a couple of shots with my recently completed 'other' Bristol aircraft (different scale, obvs): Both beautiful kits and schemes! I've really enjoyed this build and am glad to have got it over the line. Thanks to all who have offered kind words and encouragement along the way - it has been much appreciated! Thanks for looking, Roger
- 25 replies
-
- 59
-
-
-
On December 29, 2021, I contacted a friend and fellow model builder Jack Geratic in Ontario, Canada regarding my desire to build a Consolidated PBY-5 Catalina. From experience on previous projects, I knew that Jack was very good at research and knew his way around scale modeling better than I did. At the time we found there were only a few Monogram #5609 and Revell #04520 kits in 1/48 scale on eBay. The kits were introduced in 1996 and had been out of production for some time. The kit was reintroduced by Revell as late as 2014 but in PBY-5A format which is the amphibious version. My thinking was if I use an amphibious version which was readily available it would require major body work to cover the retractable landing gear on the side of the hull. What we found out later in reviews is the Monogram and Revell kits had a design issue called 'tail bloat', the tail section was not to scale. It was 9.5mm (3/8-inch) too wide at the point where the vertical stabilizer begins which negatively affected its overall appearance. However, there was a solution, Belcher Bits in Canada offered a resin tail conversion kit that required removing the entire tail section of the model. With hindsight, we should have gone with a PBY-5A. When you see the finished tail conversion below, I think you will agree it looks right. In my opinion the Belcher Bits solution was a lot of work, but Mike Belcher captured in resin the graceful elegance of the Catalina tail. And by the way the name Catalina was given to the Consolidated PBY by RAF, RCAF and RAAF crews because it was manufactured in California. The name was adopted by Consolidated and used for the remaining production years.
- 119 replies
-
- 17
-
-
Hi All, My latest completion is Airfix lovely 1:48 Blenheim. Now I did build the Mk.IF boxing of this kit a few years ago, so I did know what to expect, which is a superb, vice-free kit. The build was mostly OOB, albeit with the addition of an Eduard mask set and harnesses. I did scratch build a Wimperis bomb sight, which is a rather curious omission given the quality of the rest of the kit. The subject I chose to model is one of the box schemes, L6670 of 211 Sqn RAF, based at Menidi, Greece in 1941. This aircraft was flown by the squadron's CO, Sqn Ldr JR Gordon-Finlayson (known as 'The Bish'). This aircraft was involved in several raids on Italian forces deep into Albania. Here's quite a nice link to 211 Squadron's history, including a mention of L6670: http://www.211squadron.org/bristol_blenheim_i.html This aircraft is relatively well photographed - here's a selection (all copyright IWM - images for discussion only and will be removed on request: There is much speculation on the correct colour scheme - a pertinent link to the discussion here: For what it's worth I chose to go with Light Earth and Dark Earth over a considerably lightened Azure Bule, which I felt was the most likely combination. Here's a link to the WIP if anybody is interested: And so to the pictures. Here's a WIP shot showing that lovely cockpit detail: You can see the bomb sight on the floor - it should be located further forward but the fuselage was buttoned up before I discovered this! Here's the finished article: Here's a couple of shots along with a DAF Hurricane to show the variance from the later 'standard' Desert Scheme of Mid-Stone & Dark Earth over Azure Blue: You can see that I've simulated a fading effect by adding a couple of drops of light grey to the flat coat on the Blenheim - I'm not displeased with the overall effect. Finally here's a shot with a Bristol stablemate, from the other side of the Mediterranean (the mighty 'Slippery Ship II'): I think this shot shows just how far aircraft design evolved so quickly in the early years of the war. Thanks very much to all those who offered words of encouragement along the way - I'm quite pleased with the result, and it's nice to have this unusual scheme in the display cabinet! Thanks for looking, Roger
- 37 replies
-
- 74
-
-
-
Does anybody ever corrected frames? Cockpits have usually external and internal frames. Mostly all kits the cockpit clear parts show just external frames. Even if there is just an internal frame. No matter which type. Ju-88, Ju-87, Me-110, Helifax,. I think about removing the external frame, and just spraying inside. Has anyone experience on this matter? Happy modelling
-
 Here's my attempt at Revell's 1/72 Eurofighter Typhoon from the "British Legends" kit. I'd heard that the Revell kits don't have the full set of weapons pylons to accurately represent the RAF versions, so these were part of the modifications (new pylon set from Air-Graphics models), along with some Brassin weapons and Eduard etch set. Assorted other ground support bits were from Flightpath, LP, and ReedOak figures, for the 'night shoot' pics. Airbrushed in Hataka acrylics and weathered with oils. Decals were another aftermarket eBay buy (from an Airfix kit) to represent the Coningsby aircraft I wanted. I also modified the etch FOD covers (adding plasticard strengthening and guide vanes) so they could be added / removed as required. The whole thing isn't perfect but it's been fun [mostly!] and good photography practise too. Thanks for looking.
- 45 replies
-
- 92
-
-
-
- Eurofighter
- RAF
- (and 1 more)
-
Hi All, My next project will be Airfix' lovely Bristol Blenheim Mk.I. Now I have actually built another version of this kit a couple of years back - here's the RFI: That was right at the start of my BM career, but I remember that it is a lovely kit. This time around I'm tackling the 'other' boxing (i.e. not the fighter version). Here's the box art: Here's the lovely sprue shots: Decals are of the usual high standard we expect of Auntie: This will be mostly OOB, albeit with the addition of an Eduard mask set and seatbelts. The subject I have chosen to model is one of the box schemes, L6670 of 211 Sqn RAF, based at Menidi, Greece in 1941 (see what I did there?). This aircraft was flown by the squadron's CO, Sqn Ldr JR Gordon-Finlayson (known as 'The Bish'). This aircraft was involved in several raids on Italian forces deep into Albania. Here's quite a nice link to 211 Squadron's history, including a mention of L6670: http://www.211squadron.org/bristol_blenheim_i.html There are a few lovely photos of this airframe (all copyright IWM - images are for discussion only and will be removed on request): Some lovely detail in those bottom two photos, such as the bare aluminium filter housings, and the undercarriage colour. Here's the scheme as presented by Airfix: There is some debate around the accuracy of this scheme, as shown in the below link: So it is likely that the camouflage is probably a combination of Dark and Light Earth, over a lightened version of Azure Blue - an opportunity for some fading and weathering too, methinks. To my eye the codes are probably red (they are a good match for the roundel centres), so I'll stick with the kit decals. Rather bizarrely for such a well-engineered kit Airfix do not provide a bomb sight, so I shall look at a bit of scratch building for that. Other than that, I'm hoping that this should be a relatively trouble free build, and not the Greek Tragedy of the title! Thanks for looking, Roger
-
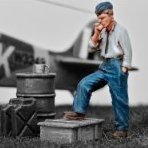 The Spitfire MK.VB in 1/72 scale by Směr (old Heller form) with a small vignette depicting Karel Pošta taking a cigarette break during flights. The build was quite fun as well as the sculpt. I had to fix the rudder, which was badly pressed (see last photo). The figure is a modified German tanker from Orion set. This is my return to modeling after 10 years or so. Photos are taken by a mobile phone, so I am sorry for the lower quality. Cheers, Thomas Vintage filter: Original photos of Karel Pošta and Ladislav Světlík, who flew on the aircraft in contrast with the model in the lower right corner. Correction of the rudder:
- 17 replies
-
- 33
-
-
- RAF
- Czech Spitfire
- (and 1 more)
-
A very rare find, that I've never actually seen on sale previously. Bought at Avon Show in Aug this year, and completed with Model Alliance decals as an HS125 CC3 of 32(TR) Sqdn RAF.
-
Hi all. I've found myself dragging out the recent 1/48 Airfix Sabre F.4 with the dim hope of a CA-27 Sabre being released by a mainstream manufacturer...though I might be barking up the wrong tree there. The kit has already been reviewed here and elsewhere so I won't be reviewing anything but I'll makes some observations on the build so far. It's fully optioned to give you everything that opens and closes bar the flaps, though that wouldn't be an onerous job to do. I've opted for the canopy and airbrakes open and that left me the fun job of fitting the gun bay panels. Mine don't sit flush with the fuselage surface which correlates with a few builds I've seen online. I've prioritised a good fit on three corners which has left one corner sitting recessed. I've have an inkling that this might have to do with a slight warp in the fuselage plastic...did someone say Buccaneer! (no, not that bad). I would have preferred to have it sit proud as it's easier to take material away rather than add material to have it sit flush. Old school sprue glue was applied in two sessions with a bout of sanding between each. The results are fine and the next part will be checking with primer and then reinstating the panel edges and access latches. I removed the gusset from around the gun bay steps as the fit is much better when they were removed The intake lips and tunnel align well and the same treatment of sprue glue was used to erase the seam. Some sanding 48 hours later and all was sorted. The exhaust tube is fine though devoid of any internal details. A note here though, the tube is handed. The rear rib that prevents it from wobbling about has a lobe on it that needs to be at the top. Do this and you'll get a snug fit. The main gear legs are nothing spectacular and there is an error on them, likely from when they studied the subject. Between each of the torque links there is some sort of strut that would prevent the gear compressing. No doubt from a museum piece that they don't want sitting on pressurised gear legs. They're present on both sides of the gear legs for both sides. And I've bagged up the undercarriage parts so I know what part belongs to what side. The 6x .50 cal guns have been drilled out. There are a few scoops and panels inserts that need to be addressed on the. With some attention paid at the clean-up stage they fit snuggly. The wings a clever assembly as the upper and lowers are designed to follow panel lines rather that a seam on the leading and trailing edge. The wing tips are separate pieces which no doubt are designed for the longer F40 winged kit that's on the way. A bit of filler is needed to fill the sink marks...no idea why they'd be in this location. So will all of this work construction of the fuselage is progressing though it's going to have to be in parts due to the slight warp that's in my fuselage pieces. At the moment the cockpit tub/nose wheel well has been glued at the seam behind the intake and the frame at the front of the cockpit tub. Next will be the rear peg that holds the compressor face to the left side of the fuselage and the edge that attaches the rear turtle deck to the fuselage. This will leave the cockpit tub secure so I can proceed with attaching the right side. There have been a few other items completed such as the drop tanks but this is enough for an update. Until the next one, thanks for stopping by. Mick
-
Hi All, My latest completion is Airfix relatively new Spitfire FR Mk.XIVe. It's a lovely kit, which was completed as part of an informal group build with @mark.au, @bigbadbadge, @AdrianMF, @Winded Penguin and @Biggles87. I chose to complete as SM888 of 28 Sqn RAF, which was part of SEAC in India in July 1945. I used Xtradecals scheme, although as depicted the aircraft was based at RAF Kuala Lumpur in 1946. I had a photo of the aircraft in India in 1945: There are a couple of interesting elements to this photo - the non-standard camouflage pattern, and the white spinner (the scheme shows a red spinner). Here's the WIP if anyone is interested: The kit is lovely, but a few niggling errors spoilt my enjoyment of the finish. Anyway, on to the photos: Finally, here's a shot with a few other recent Spit builds (a Mk.I from the opening of the war, and a brace of Malta Mk.Vbs). Thanks for all those who offered kind words and encouragement along the way - it is much appreciated! Thanks for looking, Roger
- 27 replies
-
- 51
-
-
-
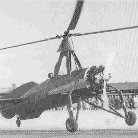 Hi Everyone, For the last few years, I’ve been researching my grandfather’s Cierva C.30a autogiro and I would really like your help to model it accurately. During the time it took to set up my Britmodeller account, I’ve enjoyed reading the forum archives and it seems that @petetasker is a bit of a C.30/Rota expert – so it would be great to get your thoughts. I am full of admiration for @pierre Giustiniani's model of G-ACUU as HM580 – it was fantastic to see. And another incredible find was @Fastcat's story of sneaking into Elmdon hangar to see G-ACUU in the 60s. Wonderful stuff! The time now seems perfect to model G-ACUU given the availability of the Mini-Art 1:35 kits, which look great to my untrained eyes but as they come in so many flavours, I'm not sure which one to start with (or are all the kits the same, just with variation in the decals?). I want to model G-ACUU as it was in 1950 when my grandfather bought it. It was also in the same scheme when it flew at Hendon’s 50 years of flying display 1951. My grandfather loaned the aircraft to Norman Hill (who was a F/O in No.529 Squadron) to fly the display. My grandfather was an RAF signals F/L involved in radar development during the war and I have his service record but have been unable to tie it to the autogiros so far, despite my best efforts. The liveries pre- and post-war look very similar in the images from “Aeroplane Monthly” magazine (below) but the longitudinal stripe is different widths. The colours are a complete mystery though because all the images I have seen to date are black-and-white. The aircraft has been well photographed since the 1960s when, following the birth of my father, my grandmother forced Guy to stop flying and it was loaned to the Skyfame collection and has latterly found a prominent home at the IWM Duxford next to their glorious Spits. The IWM have returned to G-ACUU to a wartime scheme, so I would really like to commemorate its civilian life. Some have linked the nickname “Billy Boy” to G-ACUU but nobody in my family has ever heard this name and so we don’t know where it came from. In the book “Spitfires and Autogiros: A history of Upper Culham Farm, RAF Henley-on-Thames”, the author Darren J. Pitcher claims the following which I have not been able to verify: - G-ACUU/HM580 was crashed on the 18th October 1943 whilst returning to Thornaby in bad weather flown by P/O Gillies. I’m hoping there might be a photo of this somewhere. - G-ACUU was the last autogiro to fly with the RAF. This is a sad footnote to the story but I haven’t heard this before and it would give the aircraft extra importance. Sorry, that’s a bit of a full-on first post - hope it's interesting to some and starts a conversation. Cheers, Simon