Search the Community
Showing results for tags 'RAF'.
-
I wish to make a RAF HC2 Wessex to go with the Whirlwind I did so have decied to use the old Novo kit and the matchbox offering to produce the HC2 which differs in the HU5 in many different ways but as people who know me will realise that I dont go to far into accuracy just looking right to me is good enough. I used the Novo because it has the smaller cabin windows and the matchbox because it has the nose cockpit is representative not an accuret reproduction. Nose seperated from Matchbox kit Novo marked ready for cutting The nose was to thin at the bottom so a pirece of plastic as inserted to widen it and then filed to shape. Nose fits very well very little filler is going to be required Rodders
-
http://www.bbc.co.uk/news/world-28763911 Recon only
-
Hi everyone, I am just wondering what the most famous RAF and Luftwaffe aircraft are from World War 1 ? I think i am wanting to build a WWI aircraft as I have already built 2 WW2 aircraft with at least one more to go. If anyone can let me know I would be grateful, especially who makes a kit of them. Cheers, Rick
-
Hello friends, I have started my new project and it is old Harrier from Monogram kit. I really like these early Harriers so after this one, the another waits for me in my closet (Airfix, 1/72). I started with brushng the positive lines, then I polished the surface and started to scribing the negative lines. I have the right half already and the left one will be in short time I hope. I this kit are many problems waiting for me, but it does not matter - it´s only for enjoyment and filling my display case. I hope you will enjoy this build and thank you for your comments and advices. Regards, Andrew S. Czech Republic ( http://i120.photobucket.com/albums/o163/deMichu/HarrierStPancras.jpg )
-
 Build 15 OK, first surprise with this kit... It's NOT made by Sweet Anyone who's ever made a Sweet kit knows how good the mouldings are and how beautiful the surface details look. So imagine my confusion when I opened the bag the kit comes in and find "soft" surface details, flash, seam gaps and cloudy glazing! It turns out that the kit is actually the F-Toys "ready made" Sea King but in "snap-together" kit form. The only involvement from Sweet is an extra sprue to turn it into a rescue chopper and the beautiful decals. Despite this, the kit looks like it should turn out OK and I'll have a nice bright yellow helicopter to add to my collection. Price: £4.75 from HobbyLink Japan
 -
Build 14 I picked this up cheap on eBay and was going to give it a quick repaint and US markings but then I bought Sweet's Sea King and found that the decal sheet has two sets of RAF SAR markings. So I've decided to do it as a Whif RAF rescue aircraft instead. I'm hoping to be able to separate a few parts to make things easier to paint and I have a few repairs to do as a couple of blades are bent and the nose probe is broken. Unfortunately there's not much I can do to improve surface detail as the fuselage and wings are die-cast but I will be fitting a few SAR bits and bobs as I go. Price: £1.50 from eBay
-
My effort: Airfix Bedford MW 15cwt Tender, painted to represent a home-based RAF vehicle from mid-1942. Using Mike Starmer's guides the colours are Khaki-Green No3 base colour, with Nobels Tarmac No4 disruptive pattern to MTP20. Tyres were painted with a mix of Humbrol no21 satin black and Revel no67 tank grey. After a coat of Microscale gloss to put the decals on, I finished with mattcote, then weathered, lightly, with artists pastels. I added wing mirrors using brass wire and plasticard.
-
Hi! Finally got this finished last week. I think the upload affects the colours a bit so I've done my best to get it displaying correctly but you get the idea... The official blurb... The Royal Air Force 2013 Tucano Display aircraft is ZF239 based at RAF Linton–on-Ouse in North Yorkshire and will this season be flown by Flt Lt Andrew Fyvie-Rae, supported by Display Manager, Flt Lt Dave Kirby. The display this year is provided by 72 (Reserve) Squadron, which trains future fast jet aircrew for the Royal Air Force and Royal Navy under the banner of No.1 Flying Training School and ZF239 has been painted to honour the Spitfires of 72 Squadron which fought in the 1943 Mediterranean campaign during World War II. In 2013 the team flies in support of the Royal Air Forces Association, the Royal Air Force Benevolent Fund, Candlelighters Trust and Leonard Cheshire Disability and all fundraising proceeds will be passed on to these charities. The official print will be available to buy from early June and will be launched at the RAF Cosford Air Show on 9th June 2013. Prints can be ordered via the team's website at: www.raf.mod.uk/tucanodisplayteam Only unsigned prints will be available via mail order, priced at £5 (plus £5 P&P). The entire range of merchandise, including signed prints will be available to buy from the Tucano Display Team stand at selected air shows throughout the 2013 season and a full listing of scheduled displays can be found on the team's website. Thank you for supporting the 2013 Tucano Solo Display. Print & Artwork Copyright A J Donovan, 2013
-
About time I start this. This is the kit: And here's proof of purchase: The picture links to the record of the original purchase on eBay, which won't remain there for much longer. You can also see the nice box, before it was shipped in a padded envelope... Good thing I'm not a hardcore collector. So what do we have here: The plastic is the well known Modela model that was sold under a few other brands as well. Detail is rather indistinctive and of the raised lines variety (The funny shape at the cockpit wall is supposed to depict a pouch...). Some improvisation will be called for here. Especially so as the cockpit of a glider is about the only opportunity to show some detail and the large canopy gives a clear insight. (The new AZ / Admiral model is much nicer here. But that would have been more than a Tenner...) This edition differs from the Modela offering in the marking options. Decals are printed by Propagteam. There is a quite nice white variant in blue and red trim (the Czech national colours), and two more Czech markings in more standard livery (one of those with the top-mounted engine; only three of these were ever built). And then there is the variant I intend to build: A natural metal bird (most Blaníks were NMF for the most part) of the British Air Training Corps. Looking at the Instructions you can see that there is not a lot to be built on such a glider. Main points are detailing a nice cockpit and duplicating the smooth skin that you try to maintain on these birds. I first thought about giving the Blaník a few dents and dings, but looking at pictures online I found that most of them are kept in pristine condition. On the lower side of the fuselage and the outer lower wing panels some wear and tear probably can't be avoided, but other than that they usually look spotless. This already brings me to a cry for help from the nice folk on this board: Have any of you been in Air Cadet training? I have no information whatsoever on the inside of this plane. I can make it fictious, but I'd rather stay close to the original. Questions in detail: Colour of the textile paneling an flooring? Colour of the seat cushions? Colour and style of seat harness? Colour and style of parachute used? Would an air cadet during flight training wear a uniform? Standard glider-issue pot-hat or Air Cadet beret? Thanks for any help you might be able to offer. Also entered in the Training Types GB
-
Just bought this at WH Smiths. It is full of photos and squadron/aircraft marking details. I like the layout as the publishers have made separate chapters for the various elements pertaining to D-Day, namely: - The invasion stripes - Fighters and fighter bombers - RAF units and aircraft (with order of battle) and colour profiles - 'Jammers' and 'Spoofers' - Ghost invasion fleets - Operation 'Titanic' - Air medical evacuation -The heavies -Tactical reconnaissance and the 'Air Spotting Pool' Could be a useful resource for the upcoming D-Day group build? Mike
-
 WWII RAF Bomber Re-supply Set 1:72 Airfix As Bomber Command increased the air campaign against the Axis forces in WWII, the demand to handle logistics on the airfields grew both technically and in activity. The four engine bombers in comparison to the earlier twins carried more fuel, more bombs, more ammunition and more crew and stood higher off the ground, so re-supplying them needed more dedicated equipment. The ‘Tilly’, derived from the name ‘utility’ vehicle became familiar for moving crew around the airfields early in the war. When you think that a Lancaster fully fueled needed over 2000 gallons of fuel, bowsers had to be sufficiently large to make them practical for readying a squadron with short turnaround. Also needed with the Merlins was oil. Unlike modern engines, these drunk fuel at a hefty rate, so the Brockhouse bowser with a 450 gallon capacity became a common sight topping up the oil tanks between missions. The Bedford truck came in different guises utilising the same chassis. The MWC carried a water tank for topping up radiators on the bombers, where as the MWD was used for ferrying crews around the bases. It’s easy to forget the shear amount of effort required on an airfield to fuel, bomb, maintain and crew a squadron of four engined ‘heavies’, but without these men and machines, the bombers would never have achieved their goals. The kit Airfix have produced airfield sets in the past so there’s nothing new there, but this is the first set that delivers such a wide array of equipment found on a bomber airfield whilst delivering on the quality standards that they’ve now set themselves. Within the end opening box, wrapped in fantastic artwork, you get 5 light grey sprues, 1 clear sprue, a decal sheet, comprehensive A4 instruction booklet and a colour painting & decaling guide. The instructions are broken down by equipment type for ease of following. First impressions are excellent. Crisp moulding with stunning detail leave you in no doubt that you’re looking at a 21st century kit. So what do you get in the kit? Standard Light Utility Vehicle - Standard 12hp 4x2 'Tilly' Bedford Truck built as either MWC or MWD David Brown VIG1 Tractor/Tug Motorcycle - 500CC Maintenance Tower Bowser - 450 Gallon Bomb Trolley - Type C (x2) Bomb Trolley - Type F Small Bomb Containers (SBC) - with 4lb incendiaries (x6) 1000lb Bombs (x6) 500lb Bombs (x6) 8000lb Cookie 4000lb Cookie Ladder Bike Chocks Fuel Cans Oil drum The Bedford trucks... The two trucks share a common build guide to create the chassis with no less than 23 parts making it up. Unfortunately, you can only make the MWD or the MWC, you can’t make both. The MWD has a wood / canvas rear end. The wooden panels are superbly reproduced with recessed butt lines. The MWC has an equally well produced rear end for the water container. Clear doors eliminate the need for gluing windows in so there’s no risk of getting white glue lines around the window. The doors can be mounted in the open position. A clever touch is the use of rounded hubs to mount the front wheels on. This allows them to be positioned in any turning direction. These small details have been well thought out and go along way to adding realism and life into a diorama. The Tilly... A combination of wood and steel panels with a canvas top are well replicated on the Tilly. Protruding rivets are visible on the steel panels. A useful touch is that the canvas roof for the front cabin is made from clear plastic due to the small windows integrated into them behind the doors. This will eliminate any risk of glue marks from inserting tiny windows. Whilst the construction is quite simple, the detail in the parts make an impressive model. As with the Bedfords, the doors are made from clear plastic and the front wheels can be positioned at any angle. Tractor... Whilst we’ve seen an earlier tractor in the Stirling kit, this is a TRACTOR! The detail is so much better and again benefits from positionable front wheels. Oil bowser... This comes with an articulated front bogie and independent chassis. There’s a toolbox moulded into the front end which is then hidden by doors, so it might be worth considering to cut these doors and have them in the open position. I find it a little strange that the instructions don’t show this option and a lack of cut line or detail on the reverse side of the doors indicates that wasn’t planned. Trestle.. A common site in airfield photographs is trestles butted up around the engines with ground crew beavering away under the hoods! I made one of these years ago out of soldered steel rod and thin wood. Having these parts available saves a lot of work. The parts are quite delicate but finely moulded, again with superbly replicated wooden planks. As with all the vehicles, the wheels are stunningly realistic. Bombs & bomb trolleys... No airfield is complete without the very reason Bomber Command existed. The sole purpose was to deliver an unwelcome payload to the enemy. A great selection of finely detailed bombs are included in the set from the 8000lb Cookie right down to the 500lb and SBC's. There's going to be some left over for other kits here as well as giving your display it's purpose. The fins on the small bombs are a little thick if one looks for a criticism, so you may want to thin them out using a scalpel or cut them off and scratch them if it concerns you. Two type C trolleys are included for the 500/1000lb bombs and a type F for the Cookies. The motorbike is a little work of art, formed in three pieces and positionable front forks, this is a great extra. A decal sheet adds the important detail markings to the vehicles and bombs. I’ve never been a fan nor any good at painting the coloured rings on bombs, so these are rather welcome! Conclusion It would of been nice to have two complete Bedford trucks rather than being forced into a choice. Apart from that, this really is a stunning set at a great price. The detail and clever design adds great realism in a small scale. If this and the recent Lancaster B.II is a sign of the direction that Airfix are going, the next few years are going to be rather exciting for anyone interested in the Bomber Command era. I’ve just started work on an airfield base so the timing of this set is perfect to bring it to life around the aircraft display. Review sample courtesy of
 -
In my attempt to determine which RCAF Hampden to model (using the old Airfix kit along with the old/re-stocked Airwaves PE) I was curious about the size of the squadron codes that would/could be placed on the fuselage. I did find info on RAF Web which states: 48" sounds a bit large for the Hampden's rather slim rear however I also recognize that the article above does state that smaller letters can/could/were used accordingly. As such, in the case of the Hampden, would the 36" or 30" letters apply? Also, was there any particular rule of thumb when it came to squadron code letter sizes or serial number sizes which could not "fit" on particular fuselages? More a curiosity than a necessity but all input is welcome. Thank you and cheers, Dave
-
Just came across this which might also be useful to others: http://www.blackburn-buccaneer.co.uk/0_Contents.html credits to the authors for all the effort here!
-
OK, so here goes: This is the kit: What do we have here: The plastic is the well known Modela model that was sold under a few other brands as well. Detail is rather indistinctive and of the raised lines variety (The funny shape at the cockpit wall is supposed to depict a pouch...). Some improvisation will be called for here. Especially so as the cockpit of a glider is about the only opportunity to show some detail and the large canopy gives a clear insight. (The new AZ / Admiral model is much nicer here. ) This edition differs from the Modela offering in the marking options. Decals are printed by Propagteam. There is a quite nice white variant in blue and red trim (the Czech national colours), and two more Czech markings in more standard livery (one of those with the top-mounted engine; only three of these were ever built). And then there is the variant I intend to build: A natural metal bird (most Blaníks were NMF for the most part) of the British Air Training Corps. Looking at the Instructions you can see that there is not a lot to be built on such a glider. Main points are detailing a nice cockpit and duplicating the smooth skin that you try to maintain on these birds. I first thought about giving the Blaník a few dents and dings, but looking at pictures online I found that most of them are kept in pristine condition. On the lower side of the fuselage and the outer lower wing panels some wear and tear probably can't be avoided, but other than that they usually look spotless. This already brings me to a cry for help from the nice folk on this board: Have any of you been in Air Cadet training? I have no information whatsoever on the inside of this plane. I can make it fictious, but I'd rather stay close to the original. Questions in detail: Colour of the textile paneling an flooring? Colour of the seat cushions? Colour and style of seat harness? Colour and style of parachute used? Would an air cadet during flight training wear an uniform? Standard glider-issue pot-hat or Air Cadet beret? Thanks for any help you might be able to offer. The build is also entered in the Less than a Tenner GB.
-
I'm building an Academy Tomahawk IIb in the African Aces scheme, and putting a very strongly faded look into the paintwork. The decals, of course, look factory-fresh... I've got two thoughts at the moment about toning them down: a. A misted coat of white/very light grey paint over everything - bit concerned about this as the potential to ruin the whole plane could be quite high... b. White pastel/Tamiya weathering stuff on the decals - which would give, I think, a more uneven 'fading' Or, of course, both... Any thoughts on which has worked best for you at any point, or other suggestions? Cheers!
-
 Evening Britmodellers Today I have made a start on my RAF Mustang Mk III, as with my Spitfire it will be 95% OOB. I have used bits of Eduard photo etch for the cockpit and HGW seat belts. Thanks for looking and as ever critique is always welcome. Yours aye Iain
 -
Hi gang, A very Happy New Year to all. I hope your Christmas hols are going (went?) well. Here's my question: Can any of you more experienced 48th scale modellers point me in the direction of some WWII RAF groundcrew figures please? I've seen the Revell set and the ICM one plus another one too (can't recall exactly who, Eduard perhaps? ). I'm hoping for a couple of blokes to sit on the wings of a Spitfire or possibly a fellow about to pull the chocks for a small diorama I'm attempting. Any help is much appreciated, cheers.
-
http://www.panoramio.com/user/7396952?comment_page=1&photo_page=1 9 Pages of RAN, RAAF, RAF, RN, RMAF. Something for everyone. I found the link on hyperscale.com. Enjoy Pete
-
Hi guys! Just finished this one, and what a lovely kit this turned out to be! Everything fitted perfectly, with no filler, just a bit of seam filling tippex needed due to builder error... Dare I say it, but up there with Tamiya in terms of precision fit?! I have wanted to build AE479 ever since I saw a grainy air-to-air photo of her in an old book belonging to my late grandfather when I was a boy. Thank you Airfix for the chance to do so! Here she is- I went for a slightly more weathered appearance- all of my reference photos show her absolutely filthy, so I have tried to replicate this as much as possible. Another thread on here proved invaluable! Thanks for looking! C&C welcome!
-
 Hi all, I used to do a bit of modelling 5+ years ago when I was a bit younger with mixed results, I still have some stuff half built that now might get finished. I have loads of kits knocking about that I've bought over the years and have recently really wanted to get back into it. To start off, I went for brush painting (although I have an airbrush, I am just bedding myself back in). My first three models are all of my favourite type, the Hawker Hurricane, they all happen to be the MkIIc varient too although I do have the latest Airfix MkI ready to go at some point. Sorry about the photos, they didn't come out too good but I do intend to sort out a proper scene to photograph stuff in. They are in 'build order', so the first one was my first build and the one at the bottom was the latest! 1. Revell - Hawker Hurricane MkIIc (Trop) - 336 Squadron (Greek) A really nice straightforward build, the only real problem I had with this was the cannons, which naturally snapped off and had to be glued together again. The fit seemed pretty nice although one wing could have done with some filler. Decals went on nice although my positioning of the tail markings could be better. Brush painted with freehand camo so might not look the best, the bottom colour was Humbrol "RAF Blue" as their Azure Blue seemed way off, it's not perfect but seemed closer. The spinner was painted black because I messed up with the red paint which seemed really watery! 2. Hobby Boss - Hawker Hurricane MkIIc - 87 Squadron This was the easiest of the three to build, although it did need gluing together and a fair bit of sanding down to get the fuselage to fit into the wings, also the elevators needed filing to fit into the slots also. Decals went on nicely but they seem too bright compared with the Revell/Airfix offerings. Paint was again freehand, although not sure on the colours, I'm sure they could be better. 3. Airfix - Hawker Sea Hurricane MkIIc - 835 NAS This was largely nice to build but had a few issues, the gear struts were really fiddly to get off the sprue and both snapped, one bit I could not actually find but isn't too noticeable. The propellor looks too small compared with the other two kits and the aerial mast seemed too short, so I cut one off an old Hurricane I made some years ago and filed it down to size to match it. This took a few coats of white, yet only one coat of the underside paint was needed. The decals went on nicely, this was the scheme I wanted to do the most. Again, sorry for the photos, I'll have something better next time I have something to post. I'm happy enough with how they came out, I know they could have been better (defintely with the airbrush) but I find the process of it all very relaxing. Thanks!
 -
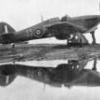
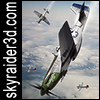 I originally posted this in the Aviation Art section, but I'd really like some feedback as I go along so please treat this as any other work-in-progress build Here's my current project, a digital 3D model of the famous "wooden wonder": the De Havilland Mosquito. This is actually my first British WW2 project since I started doing 3D some fifteen years ago! About time too, as I lived in the UK for the better part of a decade! I've started with the most common version, the FB Mk VI. The Mosquito served in no less than two dozen countries and about 60(!) pilots made ace on the Mosquito, so it's a nice and versatile subject! Some more images of its current state: Still some modelling left to do, but it's starting to look like a Mosquito! As per usual there were no "perfect" drawings available, so it's a combination of known dimensional data, scale plans, engineering drawings, manual drawings, DH fuselage lofting data generously supplied by Mark Gauntlett (many thanks Mark!), AAEE reports, NACA reports and hundreds of photographs. I.e. plenty of research! Mark's drawings are the most accurate around, by the way, and form the basis of this model, though especially on the tail, wing and engine nacelles I've deviated from them were necessary. My goal is to make this an absolutely accurate 3D Mosquito. The Mosquito will go well with the Junkers Ju 88 I made last year. These two aircraft are perfect adversaries and during the course of WW2 they fought eachother around the clock, over sea and over land, in all bomber, fighter and recce roles. Interestingly the battle between the Ju 88 and the Mosquito started even before the prototype was finished! On 3 October 1940 a well-aimed attack by a single Ju 88 flying at just 60 ft destroyed most of the jigs and killed 21 De Havilland staff, while injuring another 70. The prototype escaped major harm luckily, and as a sign of things to come, the Ju 88 was shot down by small arms fire... I should be rounding this up this month, so stay tuned!
- 37 replies
-
- 4
-

-
- De Havilland
- Mosquito
- (and 8 more)
-
Hi, everybody! (Aircraft by which Frederick Forsyth flied during service to RAF?) In discussion of the Vampire to scalemodels.ru http://scalemodels.ru/modules/forum/viewtopic.php?t=2320&start=280 novella by Frederick Forsyth http://en.wikipedia.org/wiki/Frederick_Forsyth was mentioned "The Shepherd". http://en.wikipedia.org/wiki/The_Shepherd In passing it became clear that Frederick Forsyth joined the RAF and was a jet fighter pilot according to English Wikipedia According to the Russian Wikipedia http://ru.wikipedia.org/wiki/%D0%A4%D0%BE%D1%80%D1%81%D0%B0%D0%B9%D1%82,_%D0%A4%D1%80%D0%B5%D0%B4%D0%B5%D1%80%D0%B8%D0%BA dates of its service 1956-1958 are mentioned. Interestingly by what plane Frederick Forsyte and in what squadron flied? Somebody can explain something? Probably someone has photos of planes in which it flied? B.R. Serge P.S. I looked for search in a forum all mentions of Forsyte. I read this topic: http://www.britmodeller.com/forums/index.php?/topic/234932052-vampire-in-forsyths-the-shepherd/?hl=forsyth Everywhere mentions of the novell, but words on what Forsyte flied during service to RAF
-
RAF Trainers - Volume 2 : 1945 - 2012 Book by AIRfile AIRfile AIRfile produces a very nice range of illustrated guides which are, in their own words "covering camouflage and markings, full of well-researched, clear and unambiguous full colour illustrations, with detailed informative captions, produced by a cooperative of well-known aviation enthusiasts, authors and illustrators, designed to provide comprehensive camouflage scheme and markings coverage culled from a variety of areas including previously published material, official and private documents and photo collections, and primary sources". The author and illustrator, Peter Freeman, along with co-author Tim Walsh have obviously worked hard to get as much detail and information together for this, the second volume on the subject of trainer aircraft used by the Royal Air Force, and that effort shows in the range, diversity and colours of aircraft types covered in this volume. Additional expert help has been provided by such esteemed contributors as Mike Starmer, Paul Lister and Peter's son Jon Freeman. The Book This is the second volume in a two-volume set in which Volume 1 covered RAF Trainers of the period 1918 to 1945. As before, this new book covers the aircraft types used by the RAF for the purposes of all types of training; including basic, conversion, continuation, advanced and cross-training for their pilots and aircrews; plus operational evaluation of new aircraft types. A fairly general consensus is that trainer aircraft are viewed as typically yellow or red/white coloured aircraft however this book shows just how diversified the colour schemes are for the various training elements within the Royal Air Force, including some of the civilian subsidiaries involved with this training. This 84 page book, including card covers, is produced in A4 softback format and starts with a one page introduction/preamble on the history of training aircraft requirements, the constraints under post-war austerity and the issues concerned with the advancements of fast and ever changing technology. The rest of the book is wonderfully illustrated with 77 actual pages of aircraft views and includes 169 views of different aircraft in full colour. Of these, 123 illustrations are of side profiles, usually showing four aircraft to a page, however some of those are supplemented with plan views to highlight markings/colours on or under the wings as necessary to assist the modeller with details. The remaining 46 views, which are virtually every second page, show full page 4-aspect views of each aircraft (top and bottom plans plus left and right profiles) and these full page views take up over half of the book's contents. Each illustrated aircraft has a narrative; as shown in the above image, comprising of a title depicting aircraft builder and type; version; serial and marking; Squadron and location; and date when these markings were in use/applied to the relevant airframe. The narrative itself gives historical information as to where and when the aircraft was built, plus a chronological listing of stations and squadrons this aircraft was attached during its service life etc. The descriptions go on to give examples and details about the colour schemes used; any interesting or unique uses of the aircraft codes and also lists the ultimate fate of the depicted airframe. The narrative also provides a source reference on where the data for this illustration and narrative has been derived. The 4-view illustrations can be really useful to the modeller in that all four sides of the aircraft are shown, as in the above Lightning T4 of 226 OCU in 1963. The colours are sharp and even show tone changes where the fuselage shape changes etc. There is no evidence of colour-bleed or alignment issues to be seen throughout the book. Some of the pages are in the four aircraft to a page format and the range of aircraft covers rotary wing as well as fixed wing, plus there is even a remote UAV illustrated on one of the pages in the form of the MQ-9 Reaper. While these side profile views only show one aspect of the aircraft described, there are occasions when the specific placement of special markings or colours on or under the wings need to be shown for effect. These views are included as additional inserts alongside the relevant aircraft image as in the views of the Meteor, Gnat and Canberra above. Further elaborations on the markings are the squadron badges and motifs, many of which are also included as small inserts alongside the particular aircraft. Not all trainer aircraft are bright and colourful, some of the tactical training units and squadrons adorn the current camouflage pattern in use at that time, although they look to be enhanced with squadron motifs and, in the case of the Typhoon above, has a Wing Commander's rank emblem shown in detail. The aircraft covered are not just the standard British aircraft but also some foreign types as well, as depicted above by the SAAB Gripen, on loan to the Empire Test Pilot School in 2008, which was used to train pilots on 4th generation jets. Other aircraft types to be seen in this book are gliders as seen by the example above belonging to the Air Cadets. There are also shared military/civilian contract aircraft described within these excellent pages as can be seen by the Squirrel, of Defence Helicopter Flying School, above as depicted in 2009. There is also the Harrier T4, belonging to QinetiQ, illustrated as it looked in 2008. Incidently it is one of these aircraft which achieved the first unmanned approach and landing aboard an aircraft carrier while underway. Conclusion AIRfile continues to produce informative and colourful publications for the modeller and this looks to be no exception. The full colour images have been researched and produced in a well laid out format and includes a short, but fully informative, narrative with each aircraft illustration. They have been excellently illustrated by Peter Freeman and Tim Walsh, both well known in the field of aviation research. The illustrations contained in this book should be of great value for the modeller who may be looking for inspiration on the subject of RAF trainer aircraft or to enhance their model builds with specific colours, markings and details. Add to this the very informative narratives which accompany each illustration and again we have a winning publication. This is one book which I will keep handy as a guide to modern trainer aircraft colours and markings and I am sure it will become an essential reference for aircraft modellers of all scales. Highly recommended. Review sample courtesy of Buy it Now Kindly mention Britmodeller.com to the supplier when making enquiries or placing orders
-
 Hi, Here is my latest project. I have given the whole kit a spray coat of grey primer. I will be getting some photos later. This project is a simple build but has quite an interesting decal scheme. Progress later. Rick
 -
Here is my greek Fairey Battle, the last model I've made. I hope the chipping hasn't been too excessive! I think it is the most realistic 1/72 aircraft I've completed. I started this model by Christmas, but lack of paints delayed it's finishing until very recently. More pics and a full review here; http://toysoldierchest.blogspot.com/2013/09/airfix-fairey-battle-172-ao3032-raf.html
- 15 replies
-
- 6
-
-
- airfix
- fairey battle
- (and 8 more)