Search the Community
Showing results for tags 'RAAF'.
-
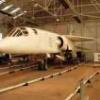
Hi All, I've managed to squeeze in one final build in this most unusual of years! This is my effort at Special Hobby's 1:48 CAC CA-13 Boomerang. I knew nothing of this aircraft, so it was a good education process as part of the build. The evolution of the aircraft is interesting, as it was the first fighter aircraft designed and manufactured by the Commonwealth Aircraft Corporation in Fisherman's Bend, VIC. The design of the aircraft was derivative of the Wirraway trainer aircraft, itself a locally-manufactured variant of the NA-16 Harvard. The design used the R-1830 Twin Wasp, which was manufactured locally to power Australian-made Beauforts. The first prototype flew within 3 months of receiving an order to proceed, a real testament to Aussie ingenuity and agility. The type was produced from 1942-5, and although underpowered and slower than contemporaries acquitted itself well in the ground attack and close support roles, and was well liked by its pilots. I have modelled as A46-199 'Home James' of 4 Sqn RAAF, based in New Guinea in 1944, flown by Fl Lt Jack Archer. Here's a couple of shots of the aircraft: There are a few unusual elements to this scheme which I've tried to incorporate: - The patch under the starboard side of the cockpit, which from research on other forums (particularly Aussie Modeller) I have decided to complete as a bare plywood finish - The significant exhaust scorching of the paint - A single section of the empennage finished in foliage gree, as opposed to white as per the rest of the area The model was finished in Life Color's RAAF paint colours of Earth Brown and Foliage Green over Sky Blue, and I used a set of Montex masks for the canopy and national insignia. Here is the WIP if anyone is interested: This was typical SH fare with good detail, but vague fit and engineering. The kit has fought me all the way and nearly ended up on the bin several times. However I'm glad I persisted and I'm not displeased with the final outcome. Anyway, on to the photos ( @Troy Smith take note - I have finally upgraded my studio setting at your suggestion - thank you sir!): And a final shot with her RAAF stablemates: I'll also add this final build to my 2020 yearbook, which you can find here if you are interested: I'd like to wish everybody on this great site a Happy New Year - thanks in particular to @corsaircorp, @bigbadbadge and @Corsairfoxfourunclefor their support throughout this build. Thanks for looking, Roger
- 24 replies
-
- 40
-

-

-
- Special Hobby.
- RAAF
- (and 1 more)
-
Hi All Encouraged challenged when I'd had too much red wine by the Naughty Corner ( @corsaircorp @bigbadbadge you should be ashamed of yourselves), I'm adding another RAAF type to my current Airacobra build, which you can see here: Soooo, diving headlong into my first multi-build, the same week I start a new job - what could possibly go wrong? I'm going to be building Special Hobby's 1:48 Boomerang. I have to admit much ignorance when it comes to this type, so I look forward to learning more as the build progresses. I have no doubt that my Aussie brethren will know much more than I on this interesting subject and I will surely draw on their collective knowledge. The evolution of the aircraft is interesting, as it was the first fighter aircraft designed and manufactured by the Commonwealth Aircraft Corporation in Fisherman's Bend, VIC. The design of the aircraft was derivative of the Wirraway trainer aircraft, itself a locally-manufactured variant of the NA-16 Harvard. The design used the R-1830 Twin Wasp, which was manufactured locally to power Australian-made Beauforts. The first prototype flew within 3 months of receiving an order to proceed, a real testament to Aussie ingenuity and agility. The type was produced from 1942-5, and although underpowered and slower than contemporaries acquitted itself well in the ground attack and close support roles, and was well liked by its pilots. Anyway, on to the kit. Here's the box art: I'm going to be building mostly OOB, with the exception of a set of Montex masks for the insignia and national markings: As I've found with most SH kits, a bit of scratch-building here and there can enhance, so I'll se what crops up. Here's the sprue shots: A bit of flash on the sprues, but the detail looks good, and transparencies are nice and thin. There's also a lovely bag of resin parts: There's some lovely detail in here - the wheels, pilot's seat and radiator cooling gills are all beautifully cast. I'm going to be modelling the cover scheme, A46-199 'Home James' of 4 Sqn RAAF, based in New Guinea in 1944, flown by Fl Lt Jack Archer. Here's a couple of shots of the aircraft: You can see in the second shot that there's some significant wear around the wing root, so it looks like the wife's hairspray's going to take another battering! 🤣 There is also a patch of what the instructions say is interior green just below the sliding section of the canopy (this is also shown in the instructions and I'm guessing is a locally-effected paint repair). Here's the colour scheme - Earth Brown and Foliage Green over Sky Blue (at least the blue will be in common with the Airacobra!!) I'll be using the excellent Lifecolor RAAF WW2 paint set, which was almost made for this very build! Anyway, that's all for now - we've got a family barbeque this afternoon to celebrate my new job (yours truly cooking, of course)! Thanks for looking, Roger
- 63 replies
-
- 11
-
-
- Special Hobby
- RAAF
- (and 1 more)
-
Dear All, I'm hoping that an erudite fellow BM-er may be able to tell me whether there are any externally visible differences between the Australian DAP-built Beaufighter XXI and the UK-built TF.X? As you may be able to guess, I'm interested in doing a 1/72 XXI using the Airfix kit, and as far as I can make out, the two variants used the same engine (Hercules XVII), and the only differences are the lack of a dorsal gun, and the XXI having two 0.50cal machine guns in each wing. Are there any other differences that I need to take into account? Many thanks for any help Happy New Year, Mark
-

Special Hobby 1/48 Spitfire Mk Vc A58-143 UP*Y
Harvs73 posted a topic in Work in Progress - Aircraft
I started this kit earlier this year and have finally managed to get some paint on plastic. I have used Pollyscale RAAF Sky Blue for the undersides, Aeromaster RAAF Red Brown and Humbrol Hu149 for the foliage green. I need to touch up the undersides where the tape pulled a little of the blue off as well as paint the white tail and wing leading edges.- 2 replies
-
- 4
-
-
- Special Hobby
- 1/48
- (and 1 more)
-
Next cab of the KUTA rank is a C-130J to be finished as a RAAF machine. I started with an AC-130H kit and stretch it and filled the 'AC' specific holes. This was an original AMT mould that Italeri reissued with some updated parts a little while ago. It also had the advantage of having recess detailed compared to the standard Italeri E/H/J kit, so I did not have to rescribe it. I have added J specific antennas and configured it as one of 2 RAAF aircraft currently fitted with a satellite WiFi receiving antenna and long range tanks. Some more masking and painting left to do and adding the decals to get it over the line.
-
 Hello all, this is an OOB Revell Halifax Mk.I/II completed as a 462 Sqn RAAF Halifax based in Tunisia in 1943. Can't afford replacement cowls and props so it comes with all the inherent errors of the kit. Happy to take questions if needed. Happy Modelling all Ian
- 26 replies
-
- 66
-
-
-
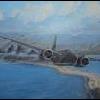
Hi All, Here is my take on Eduard's lovely Bell Airacobra. This was the Profipack edition, so everything was pretty much OOB, with the exception of some Red Roo decals to complete the aircraft as an RAAF version. Here is the (rather truncated) WIP if anyone is interested: I chose to complete as A53-6, belonging to 82 Sqn RAAF, based at RAAF Bankstown, Sydney in August 1943. Prior to this build I was not even aware that the RAAF had flown Airacobras, so it was all a journey of discovery. Only 22 Airacobras made it into RAAF service at a time when they were desperate to procure combat-ready aircraft. Here's a photo of the actual aircraft, which force-landed following engine failure: The Red Roo scheme has the aircraft finished in Olive Drab and Extra Dark Sea Grey over RAAF Sky Blue. Although there is some speculation over the accuracy of this scheme, I thought it would look pretty cool so followed Red Roos' robust research! The cockpit was finished in Bronze Green, with the remaining internals in Zinc Chromate Yellow (based on @Dana Bell's sage advice). I've chosen to do minimal weathering, as I'm not sure the aircraft even saw combat. Following its crash the aircraft was repaired and returned to the US Army's 5th Airforce, from whence it originally came. I thought I'd packed sufficient lead into the forward u/c bay, but she ended up being a tail sitter - the eagle-eyed amongst you may detect the presence of a large lump of lead visible in said bay - ho hum. The kit itself is lovely and vice-free, and I would highly recommend it. Despite the reckless encouragement of @corsaircorp and @bigbadbadge, I've decided I'm definitely better as a serial builder, although I'll now be straight back onto the CAC Boomerang. Anyways, on to the pics: All in all a very enjoyable build, and an interesting addition to the collection of a very unusual and innovative aircraft! Thanks for looking, Roger
- 29 replies
-
- 34
-
-
Hi All, I'm straight into my next project (making the most of gardening leave before I start a new job next week!) I'm going to build Eduard's 1:48 Airacobra. Here's the box artwork: Here's the sprue shots: And a nice PE fret: The kit contains markings for 5 US aircraft (including no less than 3 with sharkmouths - @corsaircorp take note!!)🦈 However I've decided to complete this as an RAAF machine, so I've sourced a set of the excellent Red Roo transfers: I'm going to complete as the machine shown, A53-6 of 82 Sqn RAAF, based at RAAF Bankstown NSW in 1943. This is the only picture I could find of the aircraft, which crashed due to engine failure in August 1943. The aircraft was subsequently repaired and returned to the US 5th Air Force. A quick check of the aircraft serial revealed that this was a P39F: http://www.adf-serials.com.au/2a53.htm This meant that the aircraft had a 3-bladed Aeroproducts constant-speed propeller and 12-stack exhausts, both of which are provided in the kit. There has been some discussion on this forum regarding the colours of RAAF aircraft: The scheme as presented by Red Roo shows the aircraft in US Olive Drab and Extra Dark Sea Grey over RAAF Sky Blue. I have no reason to doubt this combination, and it will make for an unusual colour scheme, so I'm going to go with it, dammit!! Anyway, on with the build! Thanks for looking, Roger
- 56 replies
-
- 10
-
-
Hi all, The Australian Capital Territory Scale Model Society (ACTSMS) here in Canberra runs an annual competition called "The Kittyhawk Cup", where all participants must build the same kit, out of the box. This year, the kit selected is the series of Airfix 1/48 Mustangs (any of the boxings). Kits must be built OOB, with the option to utilise other decals. I haven't entered the competition for a very long time, and have no real idea about Mustangs (being mainly a WW1 aircraft guy), but I decided to enter anyways. Not only that, but I also foolishly decided to build not one, but two Mustangs, both at the same time.... eek! I selected their P-51D and Mustang IV. The Airfix kit really is lovely, with few vices. The cockpit and wheels wells are a treat out of the box. The complex fuselage / inserts presented no problems. I had some problems with the fit of the undercarriage bay, which messed with the fit of the under-nose / inboard lower leading edge piece; this was probably my fault, but it did necessitate the use of some filler, some sanding and some re-scribing. The let down with this kit are the wheels – the diamond tread stops well short of the centre of the wheel halves, and this area requires a bit of clean up and re-scribing (which I did a rubbish job on). The only other slightly odd thing in this kit is the canopy – no amount of mucking about could get it to sit right, so I settled for “good enough”. Anyway, the two ponies are now across the line! Onto the final results… The P-51D was originally going to be an OD / Grey camouflaged machine, but eventually was built to represent “Contrary Mary”, 44-474251, flown by Lt.Col Roy Blair Caviness, Commander of the 78th Fighter Group, Duxford, England, August 1945. The decals came from the Lifelike Decals set 48-052. These decals were fantastic, conforming nicely and responding very positively to decal softener. All of the checkerboard markings were masked and sprayed… though I now have a new-found appreciation for compound curves, the result was less than perfect, but it’ll do. The NMF was attempted by using Alclads (6 or 7 different shades in total), which looked lovely, but various clear coats dulled them down a little so it all now just looks ‘silver’. Oh well. There is only one known photograph of this machine, and it wasn’t heavily weathered, so I kept it relatively clean. The Mustang IV was built to represent KH745 “BAE”, flown by Group Captain Brian A Eaton, previously of 3SQN, Royal Australian Air Force. This was his personal aircraft while the head of Number 239 Wing, based in Cervia, Italy, April 1945. He flew this aircraft frequently with 3SQN, RAAF. This machine carried the perforated engine grills, similar to US machines. The decals came from the Freightdog Models “Keeping the Peace Pt.I” set, FSD48009. Again, these decals were lovely. NMF was again Alclads. The pictures of this machine also show relatively little weathering, so I dirtied her up a little, but not too much. So, the two ponies are done. Apologies to all of the Mustang aficionados out there – I know very little about Mustangs so there is no doubt I mucked up plenty of things. I feel the need to paint something drab now…! Thanks for looking, and all feedback welcomed! Cheers, BC
- 29 replies
-
- 45
-
-
-
 Hi, This is what is said already in topic name: a scratch conversion of Airfix (1/72) Sunderland III using @AdrianMF home made vacu fuselage and Red Roo Models conversion set for RAAF military Empire (dedicated originally to CMR resin kit). The WIP thread is here: The model presents Short Empire S.33 A18-14 (No S.1025) somewhere between April and August 1942, when she wore already "red free" style of RAAF roundels but still have installed armament and served wit 33 Squadron RAAF in Townsville. Here she is: The most characteristic bull nose of Empire On shelve with her sistership - the Sunderland Again many thanks for AndrianMF gift of his jome made vacu fuselage and for really great support with photos, infos and RedRoo conversion set from EdRussell. One can say that the model has three fathers, but what then to say about its mother? ... Comments welcome Regards Jerzy-Wojtek
 -
Hi all - thought I'd start a build log on this one. I've always wanted to tackle building a 1/48 Royal Australian Air Force (RAAF) Bulldog. The RAAF operated twelve Bulldogs in the early to mid 1930s; these aircraft represented the forefront of the RAAFs fighting force during this time. From their introduction into RAAF service until 1935 the Bulldogs were considered almost sacrosanct; a pilot had to be of Instructor rating before being allowed to fly one. I've always liked the Bulldog because of its important inter-war role in the RAAF, plus I've always thought it looks pretty mean For a 1/48 Bulldog, there are only two options. One is the terrible SMER kit (not worth a look), or the old Lindberg kit. I happened to pick up the latter reasonably cheaply. This kit is a re-boxing of the old Inpact kit from around 1968, which makes these moulds over 50 years old! On the positive front, the basic lines of the kit are quite accurate, save a couple of minor exceptions. On the down side, the kit is of its time; that is, it has some very basic, chunky details, and no cockpit to speak of. It has raised panel lines throughout, has a difficult 'fillited three piece' upper wing construction and is severely marred by 'fabric texture' all over the fabric surfaces (wings, tail, and fuselage), which looks like someone attacked the mould with a blunt hobby knife: All of the builds I have seen of this kit have left this effect "as is". As these aircraft were silver, these surface traits really show up, and detract from the look of the model. So my first task was to tackle the fabric surfaces. Some severe filling and sanding was needed to get the upper wing together without seams (as the joints do not fall on any natural lines on the underside). The rest of the fabric surfaces then needed to be tackled to remove the fabric texture. This took lots of time, and lots of sandpaper, but the end effect is a smooth surface with subtle hints of ribs, much more like the actual aircraft in my view. These should look good under careful painting. I also added the fuel tank panel lines on both the upper and lower surfaces of the top wing. I also separated the elevators and rudder, which will be re-positioned. The vertical stabiliser also needed re-shaping on its leading edge (the kit stabiliser is too long in chord and doesn't have the characteristic fillet at the bottom). I then re-scribed the fuselage panels. The kit has erroneous panels around the nose, but these are easily dealt with. I hollowed out the panels for the gun barrells, but the troughs themselves needed to be completely replaced, which I did with shaped sheet plastic. All of the extra details (vents, rivets / fasteners, panels) will be added once the fuselage halves are together. RAAF machines also seemed to not have the forward set of grab handles on the rear fuselage, so these were also filled in. With these adjustments, the kit looks quite a bit less 'toy-like', and should provide a sound basis for the rest of the build. The very chunky cockpit locator tabs have also been removed, in preparation for a scratch built cockpit, which is the next challenge now that the hard part is over! All feedback welcomed. Cheers, BC
- 99 replies
-
- 23
-
-
 Hi all. I’m on a bit of a roll with Phantoms at the moment so here’s my second one for 2020 and fourth completion for the year so far. This is the 1/72 Hasegawa F-4EJ Phantom built as 69-0307 while it served with 1 and 6 squadrons during its time with the RAAF. It was returned to US service in 1973 where it was converted into an F-4G and operated in the Wild Weasel role. It met its demise when it was shot down as a QF-4G in 1997 :(. There’s a photo of 07 in the Wilson book lined up as a four ship departing with full bags and 6 500 pounders. I also like this jet because it had received the strip lighting but hadn’t received the Midas 4 gun muzzle change yet. The build was straight forward with decals coming from various sources including Hawkeye Decals, Xtradecals for the roundels and Airfix for the stencils. The crew are from the Hasegawa and are both wearing yellow 1 squadron undershirts and their helmets have yellow stripes on them. The Mk.82’s are from the Hasegawa weapon sets. I’m pretty happy with the build but there is one thing that might prove to be difficult to fix. I’ll leave that for another time! I think the in flight pose certainly shows off the lines of the Phantom quite well, you also don’t see images of an armed RAAF Phantom hence the ordnance. Almost forgot to mention it's my second effort at a freehand camo scheme. Hope you like it . Mick
 -
Hi all, Here is my latest build, the 1/48 Bristol Bulldog kit from Lindberg. This kit traces its lineage right back to 1968, which makes the moulds 52 years old…! Extensive modifications were made to the kit, including reworking all of the external surfaces (the kit comes with horrible textured fabric surfaces all over and raised panel lines), scratchbuilding the cockpit (the kit cockpit is non-existent), correcting the underside of the nose, correcting all of the nose panels, adding the chin radiator, adding the under-belly panel and circular under-fuselage fairing, replacing and detailing the engine cylinders, pushrods, sparkplugs and other details, scratchbuilding the windscreen, adding gun sights, bomb racks, navigation lights, and a whole bunch of other changes too numerous to list here. I painted the machine in the (rather boring) markings of a Royal Australian Air Force (RAAF) machine, using Red Roo decals for serial numbers. The national markings were spray painted. RAAF machines did not appear to be fitted with radio equipment. No photographic evidence found to show that RAAF Bulldogs sported antenna wires, nor do any photos show that RAAF machines sport lower starboard wing mounted air-driven generators (though the fittings for said generators remained). RAAF machines could be seen with various combinations of bomb racks, upper wing navigation lights and lower wing flare racks. Any combination can be seen. The combination I chose was bomb racks and upper wing navigation lights. The build took me just under four months all up. It was a fun build, but it fought me most of the way. It’s good to finally have something off the bench for the year… Anyway, here are some pics: Build progress and more detail shots are here - All comments, criticism and feedback welcomed. Cheers, BC
- 63 replies
-
- 80
-
-
-
 After too long lurking around the forum I've finally taken the plunge and shown my face! I returned to this great hobby recently after a 30-odd year hiatus, and with the help of much advice from this august body I'm finally getting to a stage where I'm happy to show the results of my toils. Sooooo... Airfix's excellent newish tool 1:48 Mustang IV finished OOB (except for Eduard PE interior set) as CV@A of 3 SQN RAAF, based in Italy, July 1945. Airbrushed with a mixture of Tamiya and AK Interactive acrylics (both excellent), finished with Micro Gloss coat for decal coat, Flory wash and Tamiya matt coat from a rattle can. Because the camo pattern was relatively simple I freehanded the Dark Green and I'm quite pleased with the outcome. I loved the engineering of the kit, and the decals were mostly excellent (albeit with some disappointing silvering on the signature Southern Cross - doh). I'm mostly pretty happy with the final result, despite the usual plethora of minor niggles & errors. Happy to receive any feedback - please be kind! Cheers, Roger
 -
After too long lurking around the forum I've finally taken the plunge and shown my face! I returned to this great hobby recently after a 30-odd year hiatus, and with the help of much advice from this august body I'm finally getting to a stage where I'm happy to show the results of my toils. Sooooo... Airfix's excellent newish tool 1:48 Mustang IV finished OOB (except for Eduard PE interior set) as CV@A of 3 SQN RAAF, based in Italy, July 1945. Airbrushed with a mixture of Tamiya and AK Interactive acrylics (both excellent), finished with Micro Gloss coat for decal coat, Flory wash and Tamiya matt coat from a rattle can. Because the camo pattern was relatively simple I freehanded the Dark Green and I'm quite pleased with the outcome. I loved the engineering of the kit, and the decals were mostly excellent (albeit with some disappointing silvering on the signature Southern Cross - doh). I'm mostly pretty happy with the final result, despite the usual plethora of minor niggles & errors. Happy to receive any feedback - please be kind! (I've only managed to upload the one photo - schoolboy error no doubt) 😉 Cheers, Roger
-
Good evening, ladies and gentlemen. I present you my next model. It's typical "shortrun" without any navigation and headlights.
-
http://www.1999.co.jp/eng/10337464 Hasegawa are reboxing their F-35A Lightning II again in another limited release boxing, this time with markings for the first Australian and Dutch aircraft markigs. (Pity they haven't yet done an F-35B )
-

Red Roo Models MiG Killers Part 2 RAAF Korean War Meteor F.8 -
Julien posted a topic in Decals & Masks
MiG Killers Part 2 RAAF Korean War Meteor F.8 1:48 Red Roo Models At the start of the Korean war Number 77 Sqn RAAF were flying the CAC Mustang based in Japan as the last RAAF Fighter unit of the British Commonwealth Occupation Forces. They then deployed to Korea where they continued to fly the Mustang for nine months of hazardous combat operations. The Sqn returned to Japan in 1951 to re-equip with and train on the new Gloster Meteor F.8. They then returned in July 1951. Initially they carried out Fighter Operations, however the straight winged Meteor proved a poor match to the MiG-15 in combat, and the Meteors went on to excel in ground attack with its four 20mm cannon and eight rocket rails firing British 60lb or US 5" HVARs. On 29th August 1951 the aircraft of the RAAF were attacked by a large flight of MiG-15s while escorting American B-29 bombers. Warrant Officer Guthrie engaged and shot down a MiG-15 before then being shot down himself. W/O Guthrie would then spend 2 years as a POW in Korea. As well as W/O Guthrie's aircraft 3 other serial numbers are provided for this action. As usual with Red Rood there are comprehensive instructions, with 3 double sided A4 pages with information on these aircraft. Conclusion This decal sheet will provide you with the serial numbers for 77 Sqn Aircraft from the Korean War. Recommended. Review sample courtesy of -
 I have to say first of all this was one of the nicest models I've built for a while, it really was Hasegawa (Eduard re-box) at their very best. Now the sad bit is that they are (the P-40N) no longer in production and what few that are out there command frightening sums! She was built for the Curtiss P-36/-70/-40 STGB and I thought it would be a slowish build but once started I couldn't help myself. So in little over 2 weeks she was done, a real testament to just how nice this model was and how well she goes together. The only extras were Eduard's new Zoom Instrument Panel and Master Model's Gun Barrel set. The decals were from Ventura and are easily some of the best out there, they were just some nice to use. Thanks for looking and lease enjoy. Model: Eduard 1/32nd Curtiss P-40N Warhawk Paint: Mr Paint Lacquers plus Tamiya & Mr Hobby Acrylics, Model Master Metalizer Lacquer Extras: Eduard Zoom Instrument Panel Master Model P-40E-N detail set Ventura decals – AVG & RAAF P-40M & N’s The build is dedicated to the pilots and ground crew of 78 Squadron RAAF.
- 18 replies
-
- 54
-
-
-
RAAF Gloster Meteor Mk.8 Detail Set (for Airfix) 1:48 Red Roo Models The Meteor F.8 was a later mark of the original aircraft developed as Britain’s first Jet Fighter during the war. The F.8 featured a stretched fuselage to overcome centre of gravity issues, and more powerful Derwent engines. It first flew in 1948 and by the 1950s had become the mainstay of RAF Fighter command despite the fact it was obvious by then that straight winged aircraft were obsolete compared to the swept wing fighters then coming on stream. In a strange twist some RAF Fighter Squadrons would transition from the North American Sabre back to the Meteor while waiting for Hawker Hunters to be delivered. The RAF retired its last target tug machines in the 1980s, with a couple surviving F.8s converted to drones with the MOD at Llanbedr being retired in the 1990s. Like many aircraft they were also delivered to commonwealth nations. The RAAF ordered 94. The RAAF would go on to use these aircraft in combat in the Korean War with No. 77 Squadron transitioning from P-51Ds onto Meteors. It was soon apparent that the straight winged Meteor was no match for the swept-wing MiG-15, although in 1953 Sergeant John Hale did score a MiG kill. The RAAF reverted to ground attack where it was found the Meteor was an excellent stable attack platform with its four 20mm cannon. The aircraft was also armed with British 60Lb rockets, and could also use US 5” HVAR rockets if needed. 77 Sqn flew over 4,800 combat missions in Korea with the loss of 30 aircraft mainly due to AA fire. One of the last RAAF units to operate the Meteor, 78 Sqn was probably the most well-known, flying the Aircraft as “The Meteorites” Aerobatic display team. The Meteor was replaced in RAAF service by the CAC Sabre, a locally modified re-design of the F-86. One of the main distinguishing features of the RAAF meteors was the addition of a spine ADF aerial fitting not carried by British airframes. The Set Red Roo are masters of improving kits that were used by their home country, and this set is intended to do just that to the new Airfix kit, which although a step up from what was previously available, still has a few faults and niggles that might annoy the detail-aficionado. We're reliably informed in the opening dialogue of the instructions that these issues are pretty easy to fix with the assistance of the contents of this set and a little modelling skill. The set arrives in a small flat box with the product details sticker pasted to the lid. Inside are two bags of parts, one containing resin, the other holding the metal parts. Another ziplok bag is full of three decal sheets of differing sizes that will further assist in the accuracy department. The instruction booklet doubles as packing material, and is quite verbose, offering many hints and tips to make your Meatbox as accurate as possible in a conversational style, accompanied by plenty of pictures of the real thing for reference. In the box you get the following: Resin Parts 8 x rocket bodies 8 x rocket tails 2 x main wheels 1 x nose wheel 1 x air compressor cowling 2 x nacelle vents Metal Parts 8 x brass rocket rails 1 x 23G hypodermic needle 4 x v-shaped 0.4mm brass wire 1 x 20mm 0.5mm brass wire 1 x 4mm 1mm brass tube Other Parts 1 x 7 x 14mm 0.4mm plastic strip 2 x stencil decal sheets for external tanks 1 x airframe stencil decals As you can see that's quite a list, and why the instructions extend to eight sheets of A4 that are printed on both sides. As well as providing you with a full and concise description of how to install all the parts, it also gives you lots of hints and tips on how to further improve your model interspersed with the instructions, which are of course optional, but as you're currently looking at an update set, you're probably enticed by this extra work already. Most of the "mandatory" updates (well, you did pay for them!) are simple changes that just require a little effort, but those freebies even extend to how to improve the fit of the wing roots, canopy etc., as well as repairing a few errors that Airfix made with a couple of boo-boos that arose due to them scanning a museum example, which is kind of understandable really. Markings The stencils are a replacement set for the kit decals, some of which are inaccurate, so just replace the whole lot with the new ones, the instructions for which are spread over four sides of the instructions, along with the various additional fuel tanks that the Meteor often carried. Conclusion This is a very comprehensive set that will be of use to builders of any Meatbox F.8, although not all the parts would be used. The stencils are a boon, and I find that they're an easy way to easily add to boost the perception of detail, especially if you hide the edges of the carrier film with a few layers of clear and some careful sanding. Highly recommended. Review sample courtesy of
-
Ok after the Beaufighter thread with the minefield of schemes I thought I would do something a bit more definite, Boston's are my favourite subject and have been researching them for years, much is written about the early Boston III's but little is written about the A-20G's they were only used on ops for about 4 months before most were written off in a night bombing raid by Japanese aircraft on Morotai on 22/23 Nov 44 destroyed over half the Sqn which then converted to Aust build Mk 21 Beaufighter's, The Sqn did not want to convert to Beaufighter's as they much preferred the Boston ( many of the pilots in the Sqn had flown Beaufighter's and wanted to keep Boston's) and the US 5th AF was willing to supply more Boston's but the RAAF HQ decided to go with an all Beaufighter strike fleet. Unlike the earlier DB-7B Boston III's and A-20A's and A-20C's which were on RAAF strength , the A-20G's were on "Loan" from US 5th AF stock and all serviceable A-20G's were returned to 5th AF after withdrawal from service. In the 4 months of service with 22 Sqn they flew more missions then the previous 20 mths combined with the earlier model Boston's and build up an excellent reputation with A-20 units with the 5th AF, 22 Sqn operated side by side with the 417th BG for 3 months on Noemfoor Island and got most of there spares from the group , all serviceable A-20G's were assigned to the 417th after use with 22 Sqn. All RAAF A-20G's were brand new aircraft either straight from the US or from US stock held at Finschafen (not second hand as some sources quote)(except for 6 x early A-20G-10's used as training a/c) and as they were new aircraft and on loan from the US operated in Std US scheme of Olive Drab with Medium Green Blotches over neutral Grey, they were not repainted in any RAAF paint schemes but did have repairs painted Foliage Green or new Olive Drab paint. The 29 x A-20G's were delivered in 5 batches and this is were the markings changed with each batch. Sqn code letters were issued alphabetically on delivery or when an A-20G replaced one of the older DB-7B's or A-20C's. DB-7B's A28-11 DU-L , A28-18 DU-Y and A-20C's A28-23 DU-O, A28-28 DU-U and A28-30 DU-W stayed on strength at 22 Sqn when the A-20G's arrived so these Sqn code letters were not used on the A-20G's. Batch #1 A28-50 to 60 and 64 This first batch of A-20G's were new delivery -40 aircraft direct from the US to 3AD Amberley in Jun 44, these 12 aircraft were modified to RAAF spec and also had a RAAF designed strike camera fitted to the rear of the R/H engine nacelle, the rear cone of the nacelle was truncated and a strike camera fitted into the empty area in the back of the Nacelle, this was operated by the pilot on his strike run and took photo's of the bomb damage , it also allowed the lower .50 to be used during low level bomb runs something std US A-20's could not do if the rear crewman was using a camera for bomb damage assessment thru the lower hatch. These aircraft were marked exactly as per the RAAF instruction AGP Pt 3 issued 26/5/44, which we will see caused problems, "Bomber" roundels were to be of the 5/2 ration 48" in diameter, serials were to be 8" Medium Sea Grey on fuselage side fwd of leading edge of Horizontal stab and Sqn codes to be 36" high on each side of fuselage, 34 wide x 24 high fin flash and all US markings painted over. well the Boston fuselage was not big enough to take 48" roundels and 36" Sqn codes and with the serial fwd of the Horizontal stab the Sqn codes covered the serials, when the aircraft got to 22 Sqn and coded were applied , 24 " was as big as could be applied and on some aircraft the code letter even partially covered the fuselage roundel , the last two aircraft of this batch had unofficial 40" roundels applied to try and fit the fuselage better. Roundels in 6 places on these machines. A28-50 DU-A, A28-51 DU-B , A28-52 DU-C, A28-53 DU-D, A28-54 DU-E, A28-55 DU-F, A28-56 ?, A28-57 DU-J, A28-58 DU-K, A28-59 DU-M (DU-M applied both sides not the usual reverse on R/H side), A28-60 DU-P and A28-64 DU-N. Batch #2 A28-61 to 63. This second batch were also new delivery -40 aircraft from the US to 1AD Laverton in Jul 44, after 3AD tried to follow the official instructions 1AD interpreted them differently, the serials were applied under the horizontal stab on the fuselage side and 32" "fighter" roundels were applied which better suited the space on the Boston fuselage side, no fin flash was applied and all US markings over painted. The strike camera mod was not fitted. Roundels in 6 places on these machines A28-61 DU-R, A28-62 DU-S, A28-63 DU-T. serials in White not Medium Sea Grey, all later delivery batches also had all serials and Sqn codes in White. Batch #3 A28-65 to 68 This third batch came from US stock at Finschafen and were new delivery -45 aircraft in Aug/Sept 44, markings start to get rough now despite being new aircraft the US markings are just brushed over and 32" roundels applied , no fin flash is applied and the A28 is dropped from 65 onward only had two digit serials. Roundels in 6 positions on these machines. A28-65 DU-G, A28-66 DU-H, A28-67 DU-V ( DU-V was also the same both sides), A28-68 DU-X (also DU-X both sides) Batch #4 A28-69 to 74 This batch were the second hand A-20G-10's from the 417th BG only used as training aircraft not used on ops and never had Sqn markings applied Batch #5 A28-75 to 78 These last 4 Bostons were later model -45's (some of the last A-20G's built) straight from the US to 22 Sqn On Noemfoor island in Oct 44, these Boston's were unique as they ran mixed markings , the US stars and Bars were retained on the wings and the US serial retained on the tail with RAAF roundel applied to fuselage sides with Sqn codes and 2 digit RAAF serial under horizontal stab, why the mixed marking no one is sure, some of the reasons mentioned were friendly fire incidents from US troops (unless it had Stars and Bars they shot at it ), also these were Loan aircraft so maybe the MU became lazy and just applied RAAF markings to Fuselage sides ( I have seen RAAF P-40's and C-47's that retained the Stars and Bars on wings).Roundels only on fuselage on these machines. A28-75 DU-A, A28-76 DU-?, A28-77 DU-? , A28-78 DU-R. The CO of 22 Sqn did not like art work or individual markings so personalisation was rare, the CO's aircraft A28-60 DU-P had a May 44 Vargus pin up on his aircraft and was called "Hilda Shane" , after his Wife and Son and had approx. 20 mission marks on it ( ground crew applied the artwork one night , the CO relented and said it could stay but no other art work was to be applied it also had polished spinners as the CO's aircraft, A28-55 had 9 mission marks unusually on the R/H side not the normal L/H side and A28-78 was called "Topsy" also unusually marked on the R/H side, these are the only individual markings I can find on RAAF A-20G's. A28-52 DU-C, note large 48" roundel , Sqn codes (C) covering serials , note strike camera mod rear of R/H engine nacelle A28-54 DU-E, note 48" roundel , fin flash, Sqn code (E) covering serial, also in background A28-67 DU-V - reversed Sqn code on R/H side and 32 " "fighter" roundels and no fin flash applied and two digit serials to later batches.. A28-60 DU-P undergoing repair post raid on Ambon 05 Oct 44, note reduced 40" roundel , fin flash, Sqn codes covering serial and strike camera position A28-59 DU-M post raid on Morotai late Nov44 (Aircraft written off), note 48" roundel , reversed Sqn codes on R/H side, removal of modified aft R/H nacelle fairing for strike camera , fin flash and covered serials. A28-63 DU-T post crash landing Noemfoor 06 Sept 44, note serial under tail not covered by Sqn Code , 32" roundels. A28-67 DU-V L/H side. A28-78 DU-R, "Topsy" note mixed markings, US Stars and Bars under wing and serial retained on tail, overpainting of nose cone and around US star and bar on fuselage side , may be Foliage Green (note semi gloss finish), 32" roundel
-
RAAF Avro Ansons 71 Sqn & 1 Air Observers School 1/48 Red Roo Models This provides decals for 3 Avro Anson aircraft used by the RAAF. The RAAF would use over 1000 of these aircraft mainly as trainers but also as Maritime Patrol aircraft in the days where they had little else. The three decal options on the sheet are; 1. AW665 code PP-B used by 71 Sqn from Lowood (QLD) in October 1943 used for Coastal Command camouflage trials. This aircraft featured Foliage Green/Earth Brown top sides, Gloss white undersides, and the fuselage sides in matt white. 2. JD287 code PP-K used by 71 Sqn Md War. In RAF Camo of Dark Green/ Dark Brown and Sky undersides. 3. W2598 code 98 used by 1 Air Observation School Evans Head NSW late 1943. In RAF Camo of Dark Green/ Dark Brown and Sky undersides. Conclusion This is a great sheet if you fancy something different or antipodean for your Anson. The decals are great and the supporting 8 pages of documentation is first rate. Highly Recommended. Review sample courtesy of
-
Hi all, a new one onto the workbench...a RAAFie this time. Since Steve Evans from Ronin decals released these decals earlier in the year, I've been eager to build this kit. I did however have one small problem, I didn't have the kit I needed in the stash. Fast forward to a few weeks ago and I managed to score the kit with the right bits and pieces in it from a store here in the middle of Brisbane. So the plan is to turn this... into this…though just a smaller version in 72nd scale. The original kit of the 1/72 Hasegawa F/A-18F family has been around for a while now with releases seeming to come out of Japan at a steady rate of either the latest CAG jet or aircraft that adorn colourful artwork. This release which was released in early 2016 fortunately has all that's needed for a RAAF jet. The only real draw back is the lack of ordnance supplied. You need to supply your own and in my case I'll be loading it with two GBU-38 and two GBU-54 ype bombs, both 500lb class bombs. The correct bard stacks are also moulded in place which is correct for our Rhinos. I recently found some excellent photos of this jet on the Defence Media site while it was deployed on combat operations overseas which is where I got the one above. It's an interesting load out in the fact that it's asymmetric. The tanks are loaded in the 'goofy gas' configuration which allows a greater field of view for the designator pod on the left shoulder station. The port wing carries two GBU-38 bombs on the inner two pylons and a single GBU-54 on the outer. Turning to the starboard side we can see the drop tank and then a single GBU-54 on the middle pylon with an empty outer pylon. Both wing tips are carrying AIM-9X Sidewinders and the right shoulder station carries a lone AIM-120 AMRAAM. As mentioned the ATFLIR is being carried on the port shoulder station. With regards to the kit, it does have the correct ACS coaming that the later Lot jets have, however the rear instrument decal IP represents the earlier style of rear cockpit. I'm not too fussed on this as the model will have the canopy closed. I have ordered a set of Quickboost resin seats to add some visual interest to the closed cockpit as the kit seats are quite simple one piece items. I’ve also got the GBU’s covered with some Attack Squadron products. Construction is fairly straight forward however there are a few spots that need some attention. The kit intakes are extremely short and have an obvious seam in the roof of the intake. There's not much to do about the short intakes unless some major plastic surgery is undertaken. The seam however can be easily dealt with. It had a touch of Tamiya grey putty mixed with some Tamiya lacquer thinner to make it into slurry, kind of like the texture of soft butter. This has been applied and I've started to smooth it in as you can see in the photo. I'll sand it back and apply some primer to see how it looks. The cockpit tub has been installed on the lower forward fuselage half and has had paint applied along with a gloss coat ready for the decals. The same thing goes for the front and rear IP. The engine exhausts are a simple affair and in hindsight I wish I'd gone for some aftermarket items. I might get away with sleeving they outlet with some tube with the right OD, we'll see. The basic representation of the flame holder has been painted Burnt Iron from the Mr Color Metallics range. The great thing about this stuff is that it can be polished. You can see the results in the picture of the differences between a polished and non-polished paint. I hit the polished parts (on both sides) with a micro q-tip and it looks the part. Sealing this stuff is a bit of a grey area for me at the moment as any form of lacquer or hot thinner in the gloss will cause the grey to change shade, not exactly something I'm interested in achieving. If you have any info on how you go about sealing these paints I'd be interested to hear. An upper and lower half capture the polycaps for the elevators which in turn also holds the flame holder. This part is installed in the rear of the fuselage. I’ve added a splash of the same Burnt Iron in the bare plastic after i took these photos. The upper and lower half of the fuselage are one piece items. I’ve applied some Gunze FS36231 on those. [PIC] The fuselage join is pretty good. The dark grey paint is the Burnt Iron after it hit it with some Humbrol poly. I’ve used this on the fuselage seams as I’ve heard it’s a bit more forgiving with regards to ghost seams than Tamiya Extra Thin. The fit of the LERX is very good too. The first pic shows the fit of the parts held in place by gravity. The second two images shows it buttoned up with glue applied. And this is where I’m at with the build; I’ve also assembled the two drop tanks. More to come soon. Mick
- 15 replies
-
- 3
-
-
- RAAF
- Super Hornet
- (and 1 more)
-
 Hello everyone, Further to my "Three Spitfires against Japan" post from December I present another KP 1/72 Spitfire Vc Trop! This time the model depicts BS201 ZP-Q of 457 Squadron RAAF as based at Livingstone Strip south of Darwin in 1943. This particular aircaft had a long career with 457 from the end of 1942 until early 1944 when it was damaged in a landing accident and subsequently converted to components. Flight Sergeant John R. Jenkins was flying BS201 when he scored one of his two confirmed victories on the 28th of May 1943 over the advanced airstrip at Milingimbi 270 miles (440km) east of Darwin. Paints are Humbrol throughout, the markings were assembled from various DK Decals sheets with the stencils by Techmod with a few kit items substituted, cannon barrels are by Master and the DH prop came from an Airfix Spitfire Mk I kit. A group shot representing the three Squadron of No. 1 Fighter Wing RAAF: Comments welcome! Mike.
 -
Well I wasn’t going to build another model for the GB as I have quite a few on the go already, but everything is where it should be, so why not. This is one I have wanted to build but haven’t found a build for her. She’s a bit of a rarity in RAAF service, we only had 8 of the Reconnaissance models , 4 B models and 4 D models, 6 arriving in August 1942 (2xB & 4xD). The only difference between the standard P-43A model and the B’s & D’s were the addition of side mounted cameras, the B’s were Ex-Lend-lease aircraft and the D’s were Ex USAAF stock. They were already considered “restricted for combat use” when the RAAF received them. They underwent extensive testing at 1AD and 1 PRU and for a while the D models were considered for ground attack aircraft and were fitted with wing pylons for tanks and bombs. But they suffered problems, besides being a bit underpowered and their brakes had a habit of failing. They were only in RAAF colours for less than a year after which the survivors were returned to the US in June 1943, they ended up being scrapped! The base model is a Classic Airframes model which is becoming very hard to find and expensive when and if you do. And it is Classic Airframes at their greatest.......or should I say worst! This is one to really scare the kids, and some adults as well! It’s quite basic... ...even has some niceish resin bits, though most of the small parts were broken off. The decals are toast, but I’m not using them, I’ll be using the leftovers from the P-39D. I’ll be doing her in a 1 PRU scheme of Olive Drab over Neutral Grey with blanks over the camera ports. Ok the issues...... I’ve seen less flash on some really nasty resin stuff! The moulds for this must well and truly be dead, but you can’t complain when it’s the only game in town! As you can see I’ve made a start on her cleaning up the parts. The U/c legs were really bad. The prop blades not much better. This should be a fairly quick build, I’ve been all over her and there doesn’t seem to be any nasty surprises, she’s just like a resin model, only just made in plastic instead.
- 33 replies
-
- 11
-
-
- P-43 Lancer
- Classic Airframes
- (and 1 more)