Search the Community
Showing results for tags 'Prowler'.
Found 12 results
-
 Not really new, but quoted as such in the brand new Trumpeter catalogue 2015-2016, a 1/72nd Grumman A-6 Intruder/Prowler family. - ref. 01640 - Grumman A-6A Intruder - ref. 01641 - Grumman A-6E Intruder - ref. 01642 - Grumman A-6E TRAM Intruder - ref. 01643 - Grumman EA-6B Prowler Sources: http://tieba.baidu.com/p/3494587466 https://tieba.baidu.com/p/8249037080 V.P.
 -
Here’s one I built earlier 🤪. I remember building this kit as a kid. Never painted it but as a kid you didn’t care with Matchbox’s multi coloured plastic. Fast forward 30+ years and a guy at work gives me a large box with kits he say he will never build, this kit was right on the top. So, first thing as I went through the kit, the rear cockpit canopy was not formed properly meaning only half of it was there. No contacting Matchbox for a replacement 🤦♂️. A little interweb search for a solution and I did my first ever plastic coke bottle repair.
- 33 replies
-
- 103
-

-

-
Kinetic is to re-release its 1/48th Grumman EA-6B Prowler kit with new wings under ref.48044 The original kit ref.48022 In box review: http://www.cybermodeler.com/hobby/kits/kin/kit_kin_48022.shtml The box art of the "new" Prowler kit ref.48044 Source: https://www.facebook.com/Kineticmodel V.P.
-
I enjoyed this build from Kinetic. A challenge in places, and the Aires cockpit made a big difference to the overall finish.
- 23 replies
-
- 57
-
-
-
 EA-6B Prowler Exhaust Set (HMR48025) 1:48 Hypersonic Models This from our friends at Hypersonic are aimed squarely at the new(ish) EA-6 Intruders from Hobby Boss, which are pretty well detailed out of the box, but not up to Jeffrey's high standards, which has resulted in the set to both increase the detail and ease the build process of the exhausts a little. The set arrives in ziplok bag, with the comprehensive instructions on glossy paper stapled to the rear. Any delicate parts such as Photo-Etch (PE) is protected by a small slip of thick cards to prevent damage during transit/storage. The EA-6B has a different nozzle and upgraded engine from the rest of the A-6 family. The kit exhausts are split along their length around the curved section, and replicated by cylinder-shaped sections on the straight, with a separate engine rear face that is… well, shockingly poor compared to the rest of the kit. This resin replacement throws all those parts out, opting for a series of five cylindrical sections that remove the need for any sanding of seams, but also allows the parts to be moulded at a more scale thickness to improve realism. The difference between the resin and kit is akin to chalk and cheese, with lovely engine face detail with stator-blades, central bullet fairing and a delicate PE insert that fits between the two parts that make up this area. The two curved sections are added next, kinking outboard to the straight section that is the highly detailed tip of the exhaust. Each part is keyed with small blocks and cut-outs, so getting things lined up should be easy enough, and each part has a small raise number preceded by L or R so that you don't get the parts mixed up once the casting blocks are removed. When you have glued all the parts together, the casting numbers can be sanded off before painting the outside. Painting of the interior is probably best done before construction, and take care to remove any mould release residue in warm soapy water (or isopropanol) before you start painting. To install these corrected nozzles in the kit, you will need to thin the area of the fuselage into which they are fitted, which has been pointed out in two diagrams showing the inside and outside views, with shading where the work needs to be done. Another diagram highlights a tooling mistake on one of the kit parts, and how to remedy it by reducing the corner to a curve. Conclusion This set will lift the detail nicely with very little effort, while the improvement to the exhausts is massive, giving a much better scale appearance and detail to the area once fitted. Jeffrey's attention to detail is legendary, and it shows in every set he makes. Highly recommended. It is a also worth noting that Jeffrey has gone through the time consuming process to register for UK VAT so there are no issues for UK modellers ordering direct. Review sample courtesy of
 -
EA-6B Prowler VMAQ-2 Playboys (K48112) 1:48 Kinetic Model via Lucky Model In the 1960s the US Marine Corps was looking for a replacement for its EF-10B Skyknights. The EA-6A was developed from the existing A-6 Airframe with the addition of the electronics, the most noticeable difference being the enlarged tail. 27 EA-6As were produced, 15 of which were newly manufactured. However this was in reality nothing more than an interim solution. A larger airframe was needed in part to also replace the EKA-3B Skywarriors as well. The EA-6B again was a development of the A-6 designed for commonality with the A-6. The fuselage of the new aircraft was lengthened to fit in a larger 4 seater cockpit; this housed a pilot and three electronic countermeasures officers. The forward section of the cockpit accommodates the pilot on the port side and one ECM officer station equipped with the communications, navigation systems, and the defensive electronic countermeasures including the decoy dispensers. The rear cockpit accommodates two ECM officers. 124 Aircraft were built and served with the USN and USMC. As well as ECM pods the aircraft could carry external fuel tanks and the AGM-88 HARM missile. Like any platform and more so with electronics the EA-6B underwent different upgrade programmes over the years. The Advanced Capability or (ADVCAP) programme in the 80s improved the aircraft flying characteristics and the electronics, however this was cancelled. Then much later on the Improved Capability (ICAP) programme was instigated by Northrop Grumman to improve electronic countermeasures with the installation of an ALQ-218 receiver, this with new software provided more precise and elective-reactive radar jamming and deception and threat location. After combat operations over Iraq, Afghanistan and Syria the aircraft was retired in 2019 to be replaced by the F/A-18G Growler. The Kit This is a reboxing of Kinetic's new tool from 2011 which was an ICAP aircraft direct from the box. This new boxing has decals for VMAQ-2 in an earlier configuration, all parts are crisp and well moulded, the kit comes with all the parts in box to fold the main wings. The sprue shots in the instructions show two small sprues CC for the Harm missiles but in fact these are contained on larger sprues which contain cluster bombs from the A-6 kit, these will be a welcome addition to the spares box. Construction starts in the cockpit, to the ain tub are added the pilots rudder controls and control column. A front and rear instrument panel goes in as well as front and rear bulkheads. For the seats four GRU-7 Ejection seats are supplied, these have separate firing handles, and a separate ejection gun behind the seat, however no belts are provided. Next it time for the main fuselage. Here there are left and right sides and a large underside insert for the middle of the fuselage. To this insert, the top of which at the front provides the top of the nose wheel bay, the side of the bay are first added. Now the main fuselage can be closed up around the cockpit tub and including the underside part. To the rear of the main fuselage the arrestor hook area also goes in at this time. The later slime lights must be removed from the fuselage sides for this boxing. At the front of the complete fuselage the three part intakes can go on, and at the rear the rear engine parts and exhausts tubes are fitted. Next up its time for the wings. Here the choice between folded or straight must be made before starting as some of the parts namely the wings, flaps and slats must be cut for folded wings. The wing fold parts are all in the box. Full flaps and slats are provided for either option with the wings being split conventionally left/right and upper/lower. For the ends of the wings the speed brakes can either be modelled in the open or closed positions. The pylons are fitted to the wings at this stage. If folding the wings then the wing stays are also included in the kit. The complete wings (or inner wings of going folded) can then be fitted to the fuselage. The nose can now be added with a recommended 50g of nose weight being fitted. Staying at the front of the aircraft the nose gear can be built up with its twin wheels and added into the nose gear bay. the front door holding the landing light is then fitted. Next up the main gears and its wheels can be built up and installed. The main gear doors can now also go on. Despite an earlier stage showing the wing pylons being attached, they are shown again now being attached? Depending on what they are carrying there appear to be different types of additional pylons available though there is nothing in the instructions to help the modeller here. At the rear the tail planes are fitted. If the wings are to be fitted folded then the instructions now show how to attach them with various fittings going on to help. To finished off various small aerial go on, and at the front the canopies go on along with the refueling probe. The front windscreen is one part, but the two main canopies are slit so care will be needed to get these right. Integral boarding ladders are provided for both sides of the cockpit. For things to hang under the wings the kit comes with three ALQ-99 pods, two fuel tanks and two HARM missiles. Though as this kit has markings for 1978 the HARM is not appropriate. Markings The kit gives markings only for 160432 from VMAQ-2 "The Playboys" from 1978. The decals are designed by Fightertown Decals and printed by Cartograf so should offer no issues. Deck Tractor The kit also includes a USN NC-2A EPU Tractor. For this all 4 sides are fitted to the base with the drivers seat on the front left going in. The drivers controls are fitted, and then the topdeck goes on. To finish off the four wheels go on. Decals are provided on the main sheet for the tugs markings. Conclusion It is good to see this kit re-released but it will need a bit of work to make into the version on the decal sheet, or source decals for a later aircraft. Still highly recommended as a kit though. Review sample courtesy of
-
Hi, the first model completed in 2021. A well-known Prowler kit from Hasegawa. Old model, but easy to build. Main camouflage painted with Gunze and TAmiya paints. Moreover, AK RK, AK Xtreme meal, details painted with Vallejo paints. I added Aires ejection seat, the decals are Microscale.
-
Evening folks! So, after almost 3 months of messing around, I have finally finished Kinetics 1/48 EA-6B Prowler and.....I am really glad to see the back of this one! I had read that this was a decent kit, but I had a lot of trouble with basically everything. But, anyway, here's the finished project: I used a decent amount of AM stuff on this one: Ares cockpit Quickboost small intakes Eduard pods Eduard wheels Superscale decals The Ares cockpit required a lot of cutting & sanding to fit, and even with all that done it changed the shape of the front fuselage section which led to a lot sanding to fit the front canopy, which was a little nerve-wracking! After a lot of very clean builds, I wanted to build a really dirty, weathered bird, and the Prowler was the perfect choice - so many of my references showed that not only do these things get really dirty (especially where the wings fold), but they also have a lot panel fading & variation, which I tried to replicate here. The decals were interesting.... Even though they were Cartograf printings, they behaved very differently to other decals from the same company. They had a long working time which I was not used to, but after realising this, I left them for ~1 hour and they had settled into the panels really well. Lots of weathering & dirt! The kit lights were undersized (somehow?!) so I replaced them with clear sprue, sanded to shape and polished - much better! Given all the cockpit details, canopies up was the only option Although it's subtle, the orange/gold/metallic tinting is present on the canopies - this was a difficult thing to get right and I kept spraying the canopies and removing the coating as I wasn't happy with it. I eventually settled on a light coat of Tamiya XF-6 Copper. I think I didn't use enough but at this point I didn't want to risk damaging the canopies so I left them as is. Overall, I am happy with how this one turned out, but it was a lot of work, and the kit was a disappointment (not sure I'd build another any time soon). That said, it builds into a decent Prowler so, can't complain too much! Some WIP photos - these were on my phone so not as nice: Here you can see all the tape and rubber bands needed to get the fuselage to conform to the resin cockpit - even still, I needed a lot of filler/superglue to get a decent finish. The kit was just not that good - the lighter grey parts had a weird, rough texture and very soft detail, so not sure what happened there? A lot of filler was also needed between the wing roots and the fuselage. After a lot of work, the kit was ready for paint! I used the black basing method to simulate the uneven fading - this was accentuated with more fading work once the camo colours had been sprayed. I used MRP lacquers for nearly everything on this build - no complaints, and highly recommended!
- 18 replies
-
- 41
-
-
-
It was about time for this to begin. I have been gathering information and photos for so long... Practically have been just postponing the inevitable :-) The project is about building an ICAP II prowler with as much detail as possible. This will also include the two engines exposed. The build will include the following detail sets: EDUARD - EA-6B undercarriege EDUARD - EA-6B Electronic Equipments EDUARD - EA-6B Exterior EDUARD - EA-6B Interior (just bits and pieces) EDUARD - EA-6B Wing Fold (also bits and pieces) EDUARD - EA-6B Cockpit Set (just the seats) WOLFPACK - EA-6B Radar and Avionics Set WOLFPACK - EA-6B Wheel Bay Set AMS Resin - EA-6B Seamless Intakes (maybe) CAM - Jammin' Prowlers, VAQ-130 Zappers To that will be added my scratch built J52 engine in two copies. So, the project started with the engines: Here is the first out of 4 seats: A very long way to go...
- 30 replies
-
- 4
-
-
- Prowler
- Kinetic 1/48
- (and 2 more)
-
Hello one and all, I have been meaning to join a GB for a while now. I was going to enter the P-51 STGB, but typically I couldn't find my decals for the aircraft... anyhow, I was looking at this one thinking that I don't own anything that I could use - yeah, I was a wee bit wrong there. A quick check of the stash proves I have about 15 x F-15's, a few Intruders, a few Prowlers, a Hawkeye and a Greyhound. After checking with Tempestmk5, I know what can and can't be entered into this GB. So lets go! So I can not build the F-14's I have for Ace Combat, however I can build an F-14 from a film as it actually flew! No not THAT film, I'm starting with an F-14 from "The Final Countdown", never seen this film. Has anyone else? Is it worth watching? As far as I understand it, the F-14 on the cover is based on an VF-84 F-14 and not the one from the film as they have *MUCH* larger stars and bars beacuse - film plot? I also have the below... Now the Dragon F-14 is complete and utter garbage, but the F-18F is pretty decent. So I will replace the F-14 in this kit with an extra F-14 I have from Revell, which I have built before and loved the kit. See below... Please excuse how terrible the finish is, I built this on my return to the hobby 6-7 years ago. I remember enjoying building this kit then however. Depending how far I get I also have these to add.... You can see the decal option for "The Final Countdown" there as well. Now this is where the fun happens... the "others" I will bring to the table. I said I also have a Hawkeye and Greyhound to add to the party. However I can only build one, I know Enzo will come straight in and say "Build Both!" but unforunately that isn't possible as the Greyhound kit is a conversion for the Hawkeye and I only have one Hawkeye (for now). Pictures below... Now the same as the F-14A/D, I have also built the Hawkeye before. This was also upon my return to the hobby, but I am still pretty happy with the end result. Ignore the dirty black line, I was playing around with preshading with a sharpie. It didn't work... Then we have the Prowler and Intruder... I recon these two will have the most interest... Just trust me, there is two Prowlers and two Intruders in that box... infact there is alot of plastic in that box. Now the eagle eyed amoung you will have spotted the goodies next to the box... yes I have lots of goodies for these birds. See below! I do have a thing for Domi's stuff over at Retrowings - his stuff is sooo good! I only have enough for one Prowler but three for the Intruder (I have a single kit laying around somewhere). The ALQ-99's where purchased for a Growler kit, but i can use them here as well. Strange question - are the Prowlers wings the same as the Intruders? I mean for the wing fold bits. So while I am build at least 2 F-14's... not sure what else to add next... Hawkeye, Greyhound, Prowler or Intruder? Hopefully I can get at least one of these ladies finished as my record in GB's isn't fantastic. 🤣 Oh forgot to add that I also have two Dragon carrier decks to add *IF* I get the time. Now that I think about it, I have about 5 boxes of the Wildcat from Sweet... Kind Regards, Dazz
-
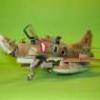
I'd like to present my Prowler, 1:48 scale from Italeri box. I added some PE of Eduard and modified one wing.
- 28 replies
-
- 50
-
-
Hi fellow modelers, I am currently building a Kinetic 1/48 Prowler. One of the areas I am pretty much interested is the avionics bay at the tail of this beautiful bird, also known as "birdcage". There is a lot of material out there for the birdcage itself, but I am more interested in the inside the fuselage area corresponding to it. This area is omitted by most modelers, as once the Birdcage is posed open, it prohibits eye contact to it. My intention is to add as much internal detail as possible. Since I do not want to build it based on Star Trek plans and blueprints, I wonder if any of you have any photos, plans or any other material that could help and that you are willing to share, for this area. Copyrights will be taken into account very seriously, so in case that you prefer, instead of posting here, sent me a pm or an e-mail. Any help will be most appreciated. Thank you in advance, DIO