
Search the Community
Showing results for tags 'Pangolin'.
Found 3 results
-
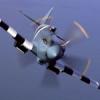 The Mosquito B.IX is finally done. The kit is Tamiya's ubiquitous B.IV in 1/48, converted to a B.IX using my nacelles and some other small changes, namely: filled camera windows on the bomb doors and rear fuselage. re-positioned the downward identification lights scratchbuilt Gee boxes in the cockpit the TI's and Oboe antenna were both designed in TinkerCAD and printed at Shapeways. painted over the nose transparencies - a common feature of Oboe aircraft Camouflage colours were Mr. Color lacquers, and the national markings and codes were masked and painted. Serials were from an Aviaeology sheet, and the stencils were HGW 'wet transfers'. WIP here. This build was originally inspired by coming into possession of the log book of my grandfather's cousin, who served in the RCAF as a navigator with 109 Squadron as part of the Pathfinder Force (PFF). He flew 84 operations in total (including nine on Halifaxes and one in Wellingtons) between 1942 and 1944. I've posted some more details about his wartime career in the build thread here. The aircraft that Flt. Lt. Simpson and his pilot flew most often was Mosquito B.IX serial LR511, hence the subject for the build. The desire to build this particular aircraft was the reason I created my own two-stage nacelles, (and eventually had them cast up in some quantity!). The aircraft is depicted sometime between April and August 1944, during which time she carried the individual aircraft letter 'N'. During this period, according to Simpson’s log book, the squadron flew many operations over northern France in preparation for, and in support of, the Normandy landings. Targets appear to have included gun batteries, rail targets, and ports. It's fairly well known that the Mosquito Pathfinder squadrons made great use of the Oboe navigation system to mark targets for the main force of Bomber Command, (and to bomb point targets directly). What was much harder to pin down was what the external Oboe installation on a B.IX actually looked like. The lack of photographic references is perhaps not so surprising given the secret nature of the system. After a couple of trips to the National Archives at Kew and finding a single grainy image online, I had enough to model the antenna for the Mark II Oboe that the B.IX likely carried. In brief, Oboe Mark I operated on a 1.5m wavelength and the antenna was entirely within the rear fuselage of the Mosquito. The Mark II system operated on a 10cm wavelength, and the antenna was housed under the fuselage in an aerodynamic fairing. When the build was quite far progressed, I found a selection of additional Oboe photos in 'Mosquito Thunder', a history of 105 Squadron. Beyond that, I've also depicted LR511 carrying two 250lb target indicator (TI) bombs. These contained a number of pyrotechnic candles which burnt for several minutes upon hitting the ground. Although long range tanks seem to feature more often on Pathfinder Mosquitos, my (unsupported!) supposition is that TI's may have been carried on the wing stations for shorter range missions, as indeed LR511 was flying in mid-1944. The camouflage is somewhat speculative as I know of no existing photos showing LR511 during her time with the squadron. The upper colours of Dark Green and Ocean Grey are straightforward, but at some point 109 Squadron Mosquitos transitioned from having mainly Night undersurfaces to Medium Sea Grey. Most images of B.IV's show the earlier scheme, and those of B.XVI's the latter. With the B.IX sitting in between I opted for that late scheme, for no other reason than I prefer it. Similarly there is evidence for both narrow and paddle bladed props on B.IX's. Again with the preference. There are eleven mission markings on the nose to represent the number of operations that Simpson flew in this aircraft, although no doubt it flew many more. Any comments very welcome, and if someone comes up with a photo of LR511 - I will hunt you down. 😁 cheers, Jason
 -
 It's to my shame that it's taken me so long, but we are now very pleased to announce that we have, exclusive to Sovereign Hobbies, a healthy supply of 2 stage engine nacelle resin conversion sets for your 1/48 scale Tamiya de Havilland Mosquito kits by Pangolin Models (JasonC, as you may know him). https://www.sovereignhobbies.co.uk/collections/1-48/products/pangolin-two-stage-mosquito-nacelles-1-48 Everything is now ready except for the little cardboard folder-over thingimabobs with the label to go on the packaging, which we'll have ready within a week. These are available to order now and dispatches will begin by the 9th June 2017. These sets are professionally cast in high quality resin, and come complete with separate cast resin 6-stack exhausts and optional photo etched brass grilles evident on the sides of some carburettor intakes. They are designed to be simple to fit and to remove the anxiety in cutting up perfectly good injection moulded kits by utilising existing panel lines on the Tamiya kit parts to locate the straight saw cuts.
 -
I am really hoping for a quick result this time, because this has to be finished by Thursday night. I've taken it so far, and now it requires Stew's non-judgemental judgement. This is about not giving Stew the satisfaction of not mentioning the fact that he was right and I haven't finished yet another thing! So, Tamiya Mossie with resin bits. The purpose is to bring to the Scottish National Scale Model Show a model built using the Pangolin two-stage engines, plus some Ultracast bits because they make things better than not having them. Obviously all paints are Colourcoats with ACRN07 Ocean Grey, ACRN09 Dark Green, ACRN17 Night and ACRN28 Interior Grey Green featuring most predominantly. Fearing running out of time, I didn't use the control surfaces in the end, and on closer inspection the canopy masks from the drawer were for the Revell one I have in the stash so I ended up doing it by hand which angered me because I hate masking. So first of all it needs propeller bosses. These aren't on the engine castings as they'd be too weak. Normally I'd try to use brass for this sort of thing but didn't have any the right diameter and definitely didn't have time to faff about waiting on mail order so I cut out the kit ones and superglued them in. Next the engines need cut from the Tamiya kit. It's pretty easy - straight cuts along kit panel lines are all that is required: The fit is much better than when I tried this using Paragon castings (not because there's anything wrong with Paragon castings, only that they were explicitly designed for the Airfix kit and hence don't fit the Tamiya kit very well!) The cockpit was roughly painted - no fancy work here - and everything is OOB save for the Ultracast seats which are better and have seatbelts which are visible through Tamiya glazings. The Tamiya decal seatbelts don't cut the mustard: That done, it was closed up, given what little seam work Tamiya kits usually need (which did include a thin scraping to blend in the nacelles to my liking, but nothing major). It was then airbrushed straight onto bare plastic/resin/filler without priming, black basing, preshading or any of that caper: The grey and green were airbrushed freehand. Not my best work, but still learning the new airbrush. It'll be ok though. These colours were minimally masked in strategic places (fuselage demarcation, wing roots, tailplane roots, cowling demarcations) and the rest was sprayed Night. It currently has a gloss enamel clearcoat curing and I hope to get the decals on tonight: Two or three weekends ago, when Stew was last here helping with paint tinning, I came downstairs and confessed that I had cut the single piece bomb door moulding in half to show them open. Stew looked as alarmed as he did disgusted with my stupidity - because now I had given myself a Bombay interior to paint as well! The propeller tips were painted yellow last night, and will get the rest painted black tonight. Unlike my usual habits, the undercarriage is completely painted and assembled already so can get plugged right in once the decals are on. I haven't painted the 6-stack exhausts yet but should hopefully be able to fit that in before Thursday night!
- 25 replies
-
- 12
-

