Search the Community
Showing results for tags 'P-47D'.
-
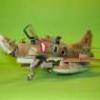
After asking the BM community for painting suggestions about two years ago, this Razorback is now done. Probably could have improved it a bit more, but I'm calling this one finished. Cheers, Luka
-
Hi All, My recently completed model Academy 1:48th scale (kit number 12222) flown by Lt. Col Francis Gabreski of the 61st Fighting Squadron, Boxted, England June 20, 1944. For more about the Francis Gabreski here https://en.wikipedia.org/wiki/Gabby_Gabreski It was a love and hate approach with this model. It started very well, but did not end up so well. The Academy kit included decals that needed to be rubbed off from the transfer sheet on to the surface of a model and they didn't transfer very well. Although they have been printed by the Cartograf. I have added photo etched seat belts, wiring on the engine I have used a copper wire and some plastic to add some details on the engine and inside cockpit to look more busy. The round bracket that keeps the engine I cut out from plastic sheet and added to the model. The kit has been painted with Tamiya acrylic paints, camouflage and cockpit gauges painted freehand, invasion stripes on the wings painted as well except invasion stripes on the fuselage. I have not painted included in the kit figurine of the pilot because my modelling mojo left me... All comments are welcome Thanks Seb IMG_4402 by PilotPL PilotPL, on Flickr IMG_4401 by PilotPL PilotPL, on Flickr IMG_4400 by PilotPL PilotPL, on Flickr IMG_4399 by PilotPL PilotPL, on Flickr IMG_4398 by PilotPL PilotPL, on Flickr IMG_4396 by PilotPL PilotPL, on Flickr IMG_4395 by PilotPL PilotPL, on Flickr IMG_4414 by PilotPL PilotPL, on Flickr IMG_4413 by PilotPL PilotPL, on Flickr IMG_4412 by PilotPL PilotPL, on Flickr IMG_4411 by PilotPL PilotPL, on Flickr IMG_4410 by PilotPL PilotPL, on Flickr IMG_4409 by PilotPL PilotPL, on Flickr IMG_4408 by PilotPL PilotPL, on Flickr IMG_4407 by PilotPL PilotPL, on Flickr IMG_4416 by PilotPL PilotPL, on Flickr IMG_4417 by PilotPL PilotPL, on Flickr IMG_4418 by PilotPL PilotPL, on Flickr
-
 Republic P-47D Thunderbolt - WZ-P - No.226551 As flown by Lt.Col. Benjamin Mayo, 84th FS, 78th FG, Duxford Air Base, 1944 Kit: 1/48 Tamiya "Bubbletop" Paints: Citadel, Humbrol and Revell - all applied by brush. Built mostly OOB apart from a few bits of scratch-built plastic and wire in the cockpit and wheel wells. This was built as part of the Republic P-47 Thunderbolt STGB Work In Progress: Here This build represents a number of firsts for me. It's the first non-Spitfire aircraft build since getting back into making kits again a few years back (I'm not counting the Captain Scarlet Angel's Interceptor here!). I'm pretty sure I only made one American aircraft when I was a child which, I think, was a Hellcat. This is also the first time I have attempted a brush painted NMF on such a large area. With regards the NMF paint - I got a lot of advice from fellow Britmodellers, thank you, and did some practicing on some scrap bits before deciding to use Citadel's Runefang Steel - I've not really used much Citadel paint in the past either. I have to say I thoroughly enjoyed building this kit - it is a well detailed kit and the fit is excellent. Some photos: The detail in the cockpit was excellent but I couldn't get any decent photos yesterday so here are a few from during the build: Photos of the undersides added 04/04/16: Edit 04/04/16: I have now added some photos of the detail on the undersides (above). I'll also do some more B&W versions when I get chance. Edit - B&W photos added 09/04/16 As always: comments and suggestions welcome. Kind regards, Stix
- 67 replies
-
- 74
-

-
- Brush painted
- Thunderbolt
- (and 2 more)
-
 Hi All; Here's my recently completed P-47. I was quite happy with how it turned out though I did bugger up a couple of things, and to be honest I lost my nerve in the end on going all out on the weathering. Critiques are always welcome, cheers; Mark.
 -
If you're not fans of the FG- you should be! Here is a neat collection of P-47 and P-51 photos with nose art from the 4th FG website. You can sure see the pride the ground crew had in their charges on their faces in the photos. I hope you enjoy looking at them. Mike http://www.4thfightergroupassociation.org/nose-art-gallery.html
-
Hi all - here's my latest - The Tamiya 1/72 P-47D bubbletop. Like the razorback version, it's a very nice kit and gave hardly any trouble construction wise. I used a decal set from Lifelike decals to portray this lovely example of the jug - Beside wanting to build another Jug, this was an experiment in using Alclad metal paints - as I have quite a few NMF kits in the stash. This will be the first of many if all goes to plan. I think it came out okay - pretty much the finish I was after but still far from my ideal - I learned alot on this build so I'm hoping the next will be better. I used an eduard pe set on the cockpit, I used a Falcon clear vax canopy after I accidentally stood on the kit one . Tamiya Acrylics were used for the non-metal surface bits, AK enamel washes, pigments and oil paints for the weathering. The WIP is here: Thanks for looking...! Comments are welcome. Cheers John
- 21 replies
-
- 50
-
-
Another one for the shiny corner: The lovely Revell 1/72 Jug. Finished in Alclad and Mr Hobby as usual with decals from a Skys Models sheet. A quickish build with no issues, maybe 3-4 hours total at a gentle pace. The pilot came from the excellent Revell RAF pilots set. Got a really mean angle on the stand and looky, for all those folks who keep making the same comments about drones, a pilot! And not because of your complaining either, next batch of paid for builds all requested pilots so its market forces Most pleased with how "box art" this looks- each to his own but, boy, do overweathered planes squatting forlornly on their wheels look boring to me, what is the point of making a fast, sleek (ish) airplane and turning it into a three wheeled ground vehicle? I suppose it's mostly to do with the fact I'm up in something two or three times a week these days and parked planes excite me as much as parked tricycles WIP: And onto the beauty shots... 2019 is shaping up nicely with 8 builds done. Well back to the bench, its getting an equally shiny P-51D playmate that isn't going to build itself. Cheery byes Anil
- 22 replies
-
- 36
-
-
Finally - what feels like forever I have something to post. I seem to have been constantly doing bits and pieces in the background but haven't managed to get anything completed for months. The model I've managed to get finished is Revell's 1/72 P-47 D-30 Thunderbolt. There were 2 options in the box so I opted for P-47 - 28 - RE GC II/5 Lafayette, Armee de L'air, Amberien, France 1944 - I thought it would be good to do something a bit different from the usual American schemes. The model itself was excellent and went together without any hassles - the only real issue being the silvery plastic the model is moulded in which becomes annoying when you have to sand it as you end up with two different coloured plastics making it difficult to check seam lines etc. For a 1/72 model - there is plenty of detail which shows up nicely with washes and weathering. I've probably gone a bit overboard with photos so apologies in advance. Feedback is always welcome so please let me know what you think.
- 20 replies
-
- 23
-
-
Hello all; Here's my finished Jug for your perusal. I made about as many mistakes and miscalculations as it's possible to make in painting and marking this one. The full story and many more pictures of the debacle(!) can be found within the build article on my website. It's build as a workhorse of the 365th Fighter Bomber Group and was intended to be weathered as such. Overall I think it turned out ok as a reasonable representation of my subject and my ability. Some of it I'm really happy with and some of it I just decided I would have live with because I couldn't face the third, fourth, fifth [seventh!] touch-up or re-paint. Among a lot of things, the eagle-eye among you will spot the missing pitot tube - it has been installed, just not before I took the pics! Anyway, I did start (but failed to keep up with) a WIP thread, so here's the result.
- 14 replies
-
- 38
-
-
- Tamiya 1/48
- P-47D
- (and 1 more)
-
Hi all, I really shouldn't be adding another model to the production line when there are so many already there, but I can't let a P-47 group build go by without trying to contribute something. However, between the other builds and the unfortunate timing (by far my busiest period at work starts now), I'm not going to stretch myself. So I've opted to buy a simple kit in the form of Academy's P-47D Razorback: I've never built a Razorback before in any scale but I have recently built this kit's sibling via the Special Hobby P-47M boxing and found the build to be pretty painless, so I don't anticipate any difficulties with this. My preference is to build "Miss Behave" of the 355FG, but I can't find decals in 1/72, so I'm going for "Kansas Tornado II" using decals from Kagero: Never done a NMF finish with invasion stripes before, could be interesting. I believe there's some uncertainty over the cowling colour, but I rather like the idea of a black or blue-black colour as shown in the Kagero profile, rather than the more blue finish sometimes seen. I hope I can do it justice!
-
I used Tamiya (No:70) kit. Actually it is a D-25 variant. I modified the fuselage to convert it to D-30 which was used in Turkish Air Force service. Decals are from Tigerhead Decals. I build this for the son of a P-47 pilot. The base is not completed yet. All comments are ok. Thanks for looking. Çetin
- 19 replies
-
- 16
-
-
- P-47
- Turkish Airforce
- (and 1 more)
-
 Dear fellow Britmodellers, here's my 1/72 Tamiya P-47D in markings of 509th Fighter Squadron, 405th Fighter Group, Belgium 1945, flown by Lt. James R. Hopkins. Built from the box with addition of Montex decals (K72008), painted with Tamiya & Gunze acrylics. Photographs by Wolfgang Rabel. Thanks for your interest! Best greetings from Vienna, Austria. Roman
- 13 replies
-
- 34
-
-
Hi all,I started on the 1/48th P-47D Thunderbolt just over a week ago and I've managed to get a fair way with it. There's enough superfluities around for this kit as it has been around for almost twenty years. It's going to be built as 'The Reamer' as flown by Captain Jack H. Reams of the 347th FS, 350th FG.This is what I've managed to get done. Additions so far are the Eduard Super fabric seatbelt and the Quickboost engine. Main paints are painted in Mr Color zinc chromate for the cockpit and yellow chromate for the wheel bays. Once the seams are sorted and the fin is installed it'll be onto priming, hopefully today. Cheers, Mick
-
Greetings from Texas, y'all! Just stumbled upon this very neat photo collection that shows the 5th Emergency Rescue Squadron and its P-47's. They flew war-weary, time-expired Jugs that were fitted with dinghy packs and smoke float markers either under the rear fuselage or under one inner wing section. All carried the red-white-blue cowling bands, yellow ID bands on the fin, stabilizers and on the inner wings and wingtips, and many had' WW' painted above the serial on the fin; no two were identical, it seems- some had 4, 6, or 8 guns; some had the standard or asymmetrical paddle-blade prop; some had Malcolm hoods; some had an ADF mount behind the canopy, and at least one was stripped of paint to bare metal. Right before D-Day, they received their invasion stripes, which covered all or a portion of the inner yellow band. Lots of variety possible here for modeling subjects, and if you were lucky, you were able to get the 1/48 resin set of smoke markers and dinghy packs from Loon Models. I have also included the link to 5th ERS Jugs from the 8th AF Little Friends website. Hoping you haven't seen these before or will enjoy looking at them. Cheers! Mike http://www.americanairmuseum.com/unit/1281 http://www.littlefriends.co.uk/gallery.php?Group=5ers
-
Hello friends, here's another completed models this year. The plane used in the Yugoslav Air Force after World War II, until the beginning of the 60s.
-
All done!
- 11 replies
-
- 15
-
-
REPUBLIC P-47D THUNDERBOLT Hello! This is my 1/48 Tamiya P-47D Thunderbolt finished in the markings of 1st Lt. Raymond Knight, 346th FS/350th FG,USAAF. This airframe was based in Pisa, Italy in 1945. You can see the WIP posts and more pics of the finished build on my blog: http://thescalemodelhangar.blogspot.co.uk Happy Modelling! Darren.
- 23 replies
-
- 24
-
-
- P-47D
- Thunderbolt
- (and 3 more)
-
 Just finished this 1/48 P-47D which is an Eduard re-boxing of an Academy kit with resin wheels, resin prop and a resin cockpit. I used Mr Paint paints for most of it, apart from the dark blue of the US insignia which is Mr Color Thunderbirds blue. The USAAF markings and the red/white stripes on the tail I painted, the USAAF markings using Maketar masks. Most of the stencils are from the HGW P-47 wet transfer decal set, and I really liked how well they went on, plus how there is no carrier film for most of the stencils (I used the kit ones in a few places when the HGW ones folded up when wet and had to be binned). No major complaints overall apart from some fit issues of the wings to the fuselage, plus the resin propeller blades were hard to fit to the hub (I snapped one and had to carefully reglue it), plus the floor of the resin cockpit has a massive pouring block under it which was a pain to remove. A nice reboxing by Eduard! Here is a link to the build thread: http://www.britmodeller.com/forums/index.php?/topic/234995016-eduard-republic-p-47d-jugs-over-italy-148/
- 15 replies
-
- 18
-
-
I wasn't sure what I was going to build next after my recently finished Hasegawa A-7D, but seeing a number of planned builds of the Jugs over Germany Eduard set in this GB I thought I'd join in with my Jugs over Italy version. The plastic is by Academy and it comes with a Brassin cockpit and wheels, plus a mask and photoetch. The only addition to the project I made was a set of Master gun barrels for the P-47. The marking options are all really nice, but the one I think I'm going to go for is the one with the red and white striped tail. There is a decal for this on the sheet, but I may well try to paint it instead. Looking forward to getting stuck in on this one, I'm just finishing up a Red Arrows 1/48th Hawk for my daughter and then it's all attention focused on the P-47!
-
 Hi guys, as you can see in the title I will do the 1/32 Hasegawa P-47D Thunderbolt II. It will be build most out of the box. Pictures of the box content will follow later. cheers,
 -
 Ok as host of this GB I guess I had better build something! Well I had it all planned before I went on holidays and I had hoped to buy stuff while I was away but couldn't find what I wanted so just ordered online. My cunning plan fell to pieces once I got home and started looking at the references I had, I wanted to build a Latin American P-47D. The decals I got were for D-30s and higher, where as the model I was building was a D-25. I then though about modifying the model I had to suit (not a really hard mod to do) until I found the perfect decal set! So now I’m building Brazilian P-47D-25 of 1°GAvCA used in Italy from October 1944. The decals are from a super rare AeroMaster Thunderbolts Galore set. Plus I will be throwing in a bit of AM stuff as well. I only have the model at the moment, the AM stuff is stock photos. no need for sprue shots for this one... Aires Wheel Wells…I know the Tamiya ones are nice but these are resin…….. Eduard detail set (plus canopy masking set too) Master gun barrel set… I blame Arnold for this…. AeroMaster decal…rare as hens teeth…..hope I don’t stuff them up! And this is what I’ll be building….have already found an issue with the decals, the a/c serial number is wrong for the aircraft ID number! Will sort that out when I get to it. I won’t get a chance to start this now until next week, go back to work on Wednesday, plus the AM bits haven’t arrived yet. In the mean time I’m working on “Gold Member”.
- 107 replies
-
- 7
-
-
- P-47D
- Thunderbolt
- (and 4 more)
-
Hi all, These are some pictures of my new OOB (or not so OOB) project: Thanks for coming by :-)
- 17 replies
-
- 8
-
-
- P-47D
- thunderbolt
- (and 5 more)
-
Hello all. This will be my contribution to this group build. Republic P-47D-15-RA Thunderbolt of 58FG, 69FS serial 42-23224 - "A23" in 1944, flown by Lt. Herbert B. Emrich The kit: The subject: I'm planning to do it OOB at this point. Cheers Jimmy
- 57 replies
-
- 5
-
-
- P-47D
- Thunderbolt
- (and 1 more)
-
Republic P-47D Thunderbolt Kinetic 1:24 The Republic P-47 Thunderbolt is one of the largest and heaviest fighter aircraft in history to be powered by a single piston engine. It was built from 1941–1945, and was heavily armed with eight .50-caliber machine guns, four per wing. When fully loaded, the P-47 weighed up to eight tons, and in the fighter-bomber ground-attack roles could carry five-inch rockets or a significant bomb load of 2,500 pounds; it could carry more than half the payload of the B-17 bomber on long-range missions (although the B-17 had a far greater range). The P-47 was designed around the powerful Pratt & Whitney R-2800 Double Wasp engine—the same engine used by two very successful U.S. Navy fighters, the Grumman F6F Hellcat and Vought F4U Corsair, the latter of which was the first to fly with Double Wasp power in late May 1940—and was to be very effective as a short-to-medium range escort fighter in high-altitude air-to-air combat. When deployed as a fighter-bomber with its usual "double quartet" of heavy-calibre M2 Browning machine guns, it proved especially adept at ground attack in both the World War II European and Pacific Theatres. The P-47 was one of the main United States Army Air Forces (USAAF) fighters of World War II, and served with other Allied air forces, notably those of France, Britain, and Russia. Mexican and Brazilian squadrons fighting alongside the U.S. were equipped with the P-47. The armoured cockpit was roomy inside, comfortable for the pilot, and offered good visibility. A modern-day U.S. ground-attack aircraft, the Fairchild Republic A-10 Thunderbolt II, takes its name from the P-47. Throughout its career the Thunderbolt was almost continually updated and refined, leading to the P-47D, (the subject of this review), which was the most produced version with 12,602 built. The "D" model actually consisted of a series of evolving production blocks, the last of which were visibly different from the first. The first P-47Ds were actually the same as P-47Cs. Republic could not produce Thunderbolts fast enough at its Farmingdale plant on Long Island, so a new plant was built at Evansville, Indiana. The Evansville plant built a total of 110 P-47Ds, which were completely identical to P-47C-2s. Farmingdale aircraft were identified by the "-RE" suffix after the block number, while Evansville aircraft were given the "-RA" suffix. The P-47D-1 through P-47D-6, the P-47D-10, and the P-47D-11 successively incorporated changes such as the addition of more engine cooling flaps around the back of the cowl to reduce the engine overheating problems that had been seen in the field. Engines and engine subsystems saw refinement, as did the fuel, oil and hydraulic systems. Additional armour protection was also added for the pilot. The P-47D-15 was produced in response to requests by combat units for increased range. Underwing "wet" (equipped with fuel plumbing) bomb racks were introduced to allow a jettisonable drop tank pressurized by vented exhaust air to be carried under each wing, in addition to the belly tank. Seven different auxiliary tanks were fitted to the Thunderbolt during its career. The tanks made of plastic-impregnated (laminated) paper could not store fuel for an extended period of time, but they worked quite well for the time it took to fly a single mission. These tanks were cheaper, lighter, and were useless to the enemy if recovered after being dropped—not only did they break apart, but they did not provide the enemy with any reusable materials that could be scavenged for their own war effort. With the increased fuel capacity, the P-47 was now able to perform escort missions deep into enemy territory. A drawback to their use was that fighters could not land with the tanks in place because of the hazard of rupture and explosion. Fighters recalled from a mission or that did not jettison their paper tanks for some reason were required to drop them into a designated "dump" area at their respective fields, resulting in substantial losses of aviation fuel. The P-47D-16, D-20, D-22 and D-23 were similar to the P-47D-15 with minor improvements in the fuel system, engine subsystems, a jettisonable canopy, and a bulletproof windshield. Beginning with the block 22 aircraft, the original narrow-chorded Curtiss propeller was replaced by propellers with larger blades, the Evansville plant switching to a new Curtiss propeller with a diameter of 13 ft. (3.96 m) and the Long Island plant using a Hamilton Standard propeller with a diameter of 13 ft. 2 in (4.01 m). With the bigger propellers having barely 6 in (152 mm) of ground clearance, Thunderbolt pilots had to learn to be careful on take-offs to keep the tail down until they obtained adequate ground clearance, and on landings to flare the aircraft properly. Failure to do so damaged both the propeller and the runway. A modification to the main gear legs was installed to extend the legs via an electric motor (un-extending before retraction) to accommodate the larger propeller diameter. The Model Kinetics new kit of the P-47D is an update of their 2014 release, with the razorback fuselage replacing the cut down, bubble canopied example, which in turn was originally released by Vintage Fighter Series. The kit comes in a pretty standard sized box, only, very, very deep. The boxart shows a P-47 just leaving the runway on a mission, inside the box is pretty much packed full to the gunwhales with styrene. In total there are twenty four sprues of mid grey styrene, with the wings and fuselage halves separate, there are two sprues of clear styrene, two rubber tyres and a large decal sheet. The parts are beautifully moulded, with no sign of flash or other major imperfections, although there are some flow marks on the wings, which will easily be covered by primer and paint. Whilst the main parts are large, the detail is well reproduced with recessed and raised detail where appropriate. The kit doesn’t look particularly complicated, although the instructions parts placement indications could be better, and whilst it is well detailed it does appear to have some scope for the modeller to add even more, particularly on the engine and in the cockpit. Talking of the cockpit, that’s exactly where the build begins, nothing out of the ordinary there I here you say. The cockpit consists of the floor, front bulkhead, rear bulkhead, three piece seat, joystick, beautifully detailed sidewalls, with separate throttle quadrant, and instrument panel, which is fitted with separate rudder pedals and gunsight. The engine is built up form two banks of cylinders, each moulded as one piece. Each bank is fitted with their respective push rods, whilst the front bank is fitted with the cowl mounting ring. The exhaust manifold is assembled, with each of the exhaust pipes being separate parts and fitted to the engine bulkhead. The gearbox cover comes in three parts and is detailed with separate magnetos before being fitted to the front cylinder bank. The firewall is then detailed with the five piece oil cooler section to the front and the two piece channel to the rear. The engine is then fitted to the bulkhead along with the two oil cooler ducts. The area between the engine bulkhead and the firewall is filled with pipework, oil tanks the turbo-supercharger, and engine mounting stays to which the engine assembly is attached. The cockpit assembly, wing spars and turbo-supercharger outlet are glued to one half of the fuselage before it can be closed up. The engine assembly, with cowling front now attached is then fitted to the front of the fuselage. The rest of the cowling can then be attached, of left off as per the modellers wishes. If attached, the clear cowling sides can be left unpainted if desired. The horizontal tailplanes are now glued into place, followed by the two gills on the mid fuselage sides, either in the open or closed positions. The tail wheel is made up from eight parts and fitted to the rear fuselage, along with the tail wheel bay doors. The fuselage mounted, five piece flattened drop tank is fitted into position, as are the inner main wheel bay doors and supercharger outlet duct. Each wing consist of upper and lower halves, with separate ailerons, flaps and navigation lights. Before gluing the wing halves together, the quad 50 cal gun bays are assembled from seventeen and fitted to the lower wing and any holes required, to be opened up. Each gun bay comes with a separate cover which can be left off if required. Only the port side gun bays is further enhanced with the ammunition belt bay, also with separate, poseable covers. Each of the completed wings are then glued to the fuselage. The underwing stores options include:- • 108 U.S. gallon (409 l) drop tank • 110 U.S. gallon drop tank • 500lb GP Bomb • Triple Bazooka tube launchers Each with their respective pylons and fittings. Each of the main undercarriage assemblies are built up from seven parts, with separate scissor link, inner hub, and outer bay doors. The relevant stores and undercarriage are glued to their respective positions. The flaps can be posed retracted or extended, with the relevant parts required to show off the fully extended flaps. The kit is finished off with the fitting of the two leading edge gun panels, pitot probe and a choice of four different propellers depending on the type you are building. Decals The decal sheet is suitably large, as it should be given the scale, yet there are only two schemes provided, both in olive drab over neutral grey, although one has an off white tailplane. The decals are well printed and really quite vibrant, given the subjects provided. The carrier fill is quite thin, so care should be taken when manoeuvring the decals into position. Conclusion Another one of my favourite aircraft, mainly as it’s one heck of a brute and goes against grain of the dainty fighters of the period. This kit will build into one large model, yet, whilst the size will be quite impressive the parts count isn’t that great. This means that even a fairly novice modeller could have a huge P-47 in their collection. That said, it is quite expensive for what you get, (yes, I know the moulds will be large and the company will need to get their money back on the investment), but it just seems to lack that je ne sais quoi detail one would expect. It’s still a great looking kit and I can quite happily recommend it, as it will give hours of fun, especially with the detail painting, although, if you don’t own an airbrush, you may need a large brush for the exterior paint job. Review sample courtesy of
- 7 replies
-
- 4
-
-
- Lucky Model
- P-47D
- (and 2 more)
-
Afternoon All, A bit late for this particular party, but I've decided to weigh in with these two from Tamiya in 1/72. I hummed and hawed about joining in with this STGB as I've a number of other things on the go at the mo and had wanted to concentrate on getting some of them finished, but I've decided a quick hassle free project is just the tonic for an ailing mojo! A quick delve into the stash came up with these two from Tamiya that will be finished as a couple of aircraft from 73 OTU in Fayid, Egypt. This will be finished as a Mk.I in ANA equivalent paints using Freightdog decals. And this one will be finished as a Mk.II, however I'll decide a bit closer to the finish which one I'll be doing. A couple of mask sets to save time as well as some resin and metal details to build upon the rather nice plastic Tamiya have provided. I'll be starting shortly, but since I'm on nights this weekend it probably won't be before Mon/Tues. Regards, Mark.