Search the Community
Showing results for tags 'P-400'.
Found 9 results
-
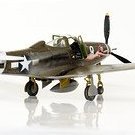
1/48th Eduard P-400 Air-a-Cutie Hello all, After much procrastinating, I've finally finished my first P-400. It goes without saying that the decals were the reason why I wanted to build this kit. Would've loved to find the original Eduard/Hasegawa kits, but these seem to have vanished off the surface of the earth, so I had to settle with some aftermarket decals for the pin-ups, serial numbers and insignias, at a rather expensive price, but excellent quality nonetheless... The other decals were provided from the original Eduard Kit, which means I'll have lots of other options if I ever get my hands on some other P-400 sprues. Overall, kit assembly, engineering and fit was very good, with some lovely PE parts for extra details in the cockpit. The usual high quality from Eduard. However the masking sheet was unusually inaccurate, with everything 10-20% too big, which made masking the cockpit (inside and out) rather challenging. Painting took some time, and finding the accurate colours mixes took a long time. I ended up with XF-19 on the lower surface (meh?), and a mix of XF-67, 55, 4 in 9:2:2 ratios for the top surface, which should in theory be OD-41. I used the 12-per-side exhaust, because I liked the look of it better than the classic 6-per-side, but I think I could've used any one really, as it looks the internet couldn't settle on which one was the original one. If anyone wishes to build this kit, be very careful that you have enough weight in the nose (half a gram less and my kit would have been a nose sitter), and beware of the gear assembly: it's very easy to end up with gear struts pointing sideways. I would also recommend some resin exhausts and wheels if you are willing to go the extra mile. Any criticism you have is welcome. I'm still scared of oil paints, so maybe one day I'll have enough courage to take 'em on. Hopefully the pictures are good enough when it comes to the colour balance, as I've don't have the best of track records in that department. The most eagle eyed of you will also notice that patience got the better of me, and I still need to assemble antennas, rigging, a pitot tube, and a part or two on the nose gear. But no one will notice anyways! 😁 Enough rambling, have some pictures. You deserve them for reading until the end: Mat B. Wow you still here? Here, have a cookie 🍪
-
When I got back into the hobby I was amazed by a lot of things. Forums and other internet resources for one. Reading through a lot of forums I was shocked with some of the behaviors demonstrated by avid modelers: Endless talks about tens of different shades of gray or green or blue or whatever. Discussions on what fits which scheme and color chip references and paint make and type and exact matches and sophisticated 3-type paint mixes. Me - if it says green then pick a green, if it says gray pick a gray - how complicated can that be? The notorious AMS - people super detailing interiors no one will EVER see. Me - what is detailing? People raving about different schemes and how they bought 2,3,4 boxes of the same kit so they can build the different paint schemes. Me - If I have one in my stash - no need to buy another one. Well, time have passed and I'm now building kit #40. So what is the prognosis: I do have 32 different shades of gray in my paint cabinet. I have 13 different blacks. I have almost 24 different greens. I can even tell the difference. You get my drift. I've been infected by AMS - mild so far but limited only by my capabilities. You can check out this or this to see how bad it is. So far - I did not have any double kits in my (large) stash, except a double Ta-154 I get when I bought one and got shipped two. I like the P-39/P-400 configuration from an engineering perspective. Putting the engine near the center of gravity makes so much more sense. The monogram kit was on my list and when Eduard released their version in became part of the list as well. This P-400 was eventually bought on a sale at 48ers website. I got the box and did not have time yet to put it in the stash so I just hanged loose near the bench. When the A-90 was finished and I decided to start the Mosquito, I also looked for another kit to build concurrently, as I do for a while now. My eye fell on the P-400 and the die was cast. Reading through the beautiful instruction booklet I started to review the paint schemes. Eduard adds 4-6 lines of text with some background so its not just the imagery but also some history. This Profipack comes with 5 different schemes. After reading the histories I really dig the 67 FS 13 The Resurrection / Tokyo Bound | Guadalcanal with its paint scheme telling the story of its resurrection. But on the other hand - how can I skip the chance to build a shark-mouthed P-400. Going back and forth I finally decided to ..... lo and behold ..... get another kit. The 48ers site had again the lowest price and after 4-5 days the package arrived. I decided this will be a double build - which is sort of new for me (the closest I came to this was the Spitfires - The Mk. XVI and Mk. V). So - I now boost two kits of the same a/c bought just to build two different paint schemes of the same model as well as a double build. The transition to a lunatic model builder is complete! Here's some photos of the box and frets: Let the build begin Ran
-
Right then, despite not having finished my F-105 (nowhere near finished!) I am going to commit myself with my entry to this STGB with an example of Eduards excellent P-39 range of kits, but not actually a P-39, no I'm going to build a P-400. Now I'm sure you all already know that that P-400 is the designation given to P-39's which were built for export to Britain but were subsequently taken over by the USAAF as they needed everything they could get their hands on to help stem the tide of the Japanese advance across the Pacific, but if you didn't you do now! Still not 100% sure which airframe to go with as the option I would really like to do (from the 67th FS with a big shark mouth design) isn't included in the options for this boxing so I'm not sure whether to go aftermarket for decals or masks or just build one of the ones from the kit, and then get another with the correct markings, anyway here are the ubiquitous box and contents shots.... As you can see everything is still sealed tightly in it's original packing, and has a masking set on the other side of the bag with the clear sprue in it. Here are the two marking options given in this boxing; My second choice is the one on the right which is also the subject of the box art, still wearing it's RAF camouflage scheme but with US Army markings and a nice shark mouth design. Now I know that the P-400's retained a lot of British equipment but does anyone know if they still had RAF Sutton harness' or if they used American ones? Thanks for looking in and as usual all comments and criticisms are gratefully received. Craig.
-
My first work in this, New Year, I hope that you like it.
-
Dear fellow Britmodellers, I just got my 1/72 RS Models P-400 Airacobra (#92181). There is one Russian option(Red 60) provided. The caption below reads "Winter 1942/1943". RS instructions quote "Silver" overall for the colors. Shouldn't this be actually White - as it did operate during Winter time? Suggestions are most welcome. Thanks in advance, Roman
-
 P-39 Wheels Early & Late - For Eduard Kit 1:48 Eduard These sets are intended for Eduard's own kit in 1.48. Both sets contain a nose wheel, two main wheels with separate hubs, and a small fret of Photo etch. Also included is a set of painting masks. Early Wheels Late Wheels Conclusion These will no doubt enhance your P-39/P-400 model. Overall recommended. Review samples courtesy of
 -
P-39/P-400 Landing Flaps 1:48 Eduard This set is one sheet of brass photo etch for dropping the landing flaps on Eduard's P-30/P-400 series of kits. The kits them selves are good but the flaps are moulded in the raised position. Conclusion The flap area is substantial for the P-39/P-400 and this set will no doubt enhance an already good kit. Recommended. Review sample courtesy of
-
P-400 Air A Cutie 1:48 Eduard Weekend Edition The P-39 was developed to meet a proposal in 1937 for a single engine high altitude interceptor having the tactical mission of interception and attack of hostile aircraft at high altitude. Specifications called for a level airspeed of 360mph at altitude, and a climb to 20,000 feet in under 6 minutes. Armament was to be heavy including a cannon, the engine was to be liquid cooled, and the aircraft was to feature a tricycle undercarriage. Bell had previously designed the YFM-1 Aracuda featuring a mid-fuselage mounted engine to free up space for a large calibre 37mm cannon which would fire through the propeller hub. This was unusual as fighters were normally designed around an engine, not a weapons system. The Bell XP-39 would make its maiden flight in April of 1938 reaching 20000 feet in 5 minutes and maintain 390 mph. However it was found that top speed at 20000 feet was lower than the original proposed 400 mph. Bell would change the aircraft configuration for production to remove the turbo charger so production aircraft were only fitted with a single-stage, single-speed supercharger. Its been argued that Bell did this to save money, though its been said that testing showed aerodynamic issues with it. As a result production aircraft performance declined above 12000 feet and it was never able to serve as a medium level let alone high level aircraft. The RAF ordered the aircraft based on the XP-39 specifications however limitations of the "new" aircraft became apparent, and despite modifications it never was deemed acceptable. Only one Squadron No. 601 would use the aircraft operationally. All UK based aircraft would be sent to Russia, along with aircraft being built under contract in the US. In contrast to the UK, the USSR appreciated the P-39, although they would use it primarily in the ground attack role. The tactical environment of the Eastern front suited a low speed, low altitude aircraft much better. As well as in ground attack the USSR developed successful group aerial fighting tactics for the aircraft. 5 out of the 10 high scoring Soviet aces scored a majority of kills flying P-39's. Contrary to popular myth the Soviets did not use the aircraft for Tank Busting as the US did not supply any armour piercing rounds for the aircraft. The US requisitioned 200 aircraft from an order based for the UK, they called these aircraft the P-400 as they were advertised with a top speed to 400mph. Following the attack on Pearl Harbour these aircraft were deployed to the South West Pacific. Despite being out classed by Japanese aircraft the aircraft excelled in the ground attack. Pilots would fight Zeros and the aircraft were fairly even in the low level environment. By the end of 1942 over 80 Japanese aircraft were credited. These aircraft would go onto fly from Aleutian Islands, and serve in the Panama Canal Zone. The 81st & 350th Fighter Groups would fly in the Mediterranean TO but mainly on maritime patrol missions. Later the 81st would transfer to the Burma TO. The Kit The Eduard Cobra kit has been with us for a while now but it is still up to their excellent standards. It is being re-issued here in a dual combo boxing with added photo etch and resin parts. The kit comes on 3 sprues each of olive drab plastic, and a clear sprue. Construction starts shockingly enough with the cockpit area. The prominent radio area behind the cockpit is the first area to be built up, and the radios installed. The bulkhead behind the pilots seat is then installed. The seat is then installed along with the instrument panel. The front gear well is attached to the front of the cockpit along with the propeller shaft. Weight is indicated to be needed in this area due to the tricycle undercarriage, however there is no indication of exactly how much is recommended! Once the cockpit/wheel well assembly is completed it can added to the fuselage, and the two parts closed up around it. Construction then moves onto the main wing. This is of a conventional single part lower with to which top left & right wings are added. The insides of the main wheel wells are added along with the oil coolers which are in the wing leading edge. The right inserts will need to be added depending on the armament of your chosen option. If the modeller is going to add underwing tanks or bombs, then the holes will need to be opened up at this point. Once the wings are completed they can be added to the main fuselage along with the tail planes. The last job on the wings is to complete the underside cooling vents. Construction then moves to the main landing gear. As mentioned at the start of the review two sets of brassin wheels are included in the kit. Once the wheels have been added to the model along with the multipart main gear doors and their actuators. Once the main wheels are completed the nose gear can also be constructed. The nose wheel and its gear doors are also added. If bombs or fuel tanks are to be fitted (and the modeller remembered to open up the locating holes before!) then these can be added at this point. The main canopy is then added (full canopy masks being provided) along with the engine exhausts and cockpit side doors. The final touches are to add the pitot probe, wing guns, and lastly to assemble the propeller. Different bosses are provided for the different armament options. Decals As seems to be the norm with their weekend kits these days two decal options are provided. P-400 AP287 "AIR A CUTIE" 36th FS, 8 FG, New Guinea, Nov 1943. P-400 91st FS / 81st FG, Tunisia, Feb 1942. Conclusion The Eduard Cobra has been a round for a while now and its good to see it has been released in a Weekend boxing. It is also good to see that the slightly forgotten use of these aircraft in the New Guimea and Mediterranean TO's are getting some attention. Some people might be offended by the nose art, but its what the aircraft flew with. Recommended. Review sample courtesy of
- 1 reply
-
- 2
-

-
- P-400
- Air A Cutie
- (and 2 more)
-
Bell P-400 Airacobra Hasegawa 1:48 The Bell P-400/ Airacobra I was the export version of the P-39 Airacobra, originally developed in response to a French order of 30 March 1940 for 170 aircraft. Unfortunately delivery of these aircraft was not due to start until October 1940, after the fall of France. The original order was taken over by Great Britain, and was later expanded to a total of 675 aircraft by orders for 205 and then 300 extra aircraft. Only after these orders had been placed did Christopher Clarkson become the first British pilot to fly the Airacobra (30 December 1940), and the shortcomings of the Airacobra would not become clear until a number of P-39Cs reached Britain during 1941. The P-400 was armed with one Hispano-Suiza Mk 404 (M1) 20mm cannon in the nose. The four .30in machine guns in the wings were replaced with British standard .303in guns. The P-400 entered British service as the Airacobra I, after a brief spell when it was known as the Caribou. Before entering RAF service the Airacobra received a great deal of positive publicity, but when it arrived in Britain the lack of high altitude performance soon became clear, and the type only ever equipped one front line squadron (No. 601 “City of London” squadron). The aircraft was soon withdrawn from RAF service. The entire production run of 675 aircraft was still completed. Around 200 of these aircraft were sent from Britain to the Soviet Union in some of the earliest of the Arctic convoys, although only around 150 of these aircraft arrived safely in northern Russia. They would become the first of thousands of Airacobra that would play a major part in the air war on the Eastern Front. The remaining aircraft were taken over by the USAAF, and a number of them found their way west into the Pacific, taking part in the fighting on New Guinea and Guadalcanal. The Model Whilst this is another re-release with just a change of decals it still looks to be a very nice kit. The parts, in grey styrene, are all well moulded with no signs of flash, only a few moulding pips and sprue thin sprue gates. The moulded details are finely done with recessed panel lines in conjunction with raised areas where appropriate. There is plenty of interior detail, although there is always room for additional detail should the modeller so wish. From research the fit is very good although it’s always wise to dry fit first to see if there any problem areas. The build starts with the very detailed cockpit. This consists of the floor, propshaft and tunnel, auxiliary panel, trim wheel, joystick, rear bulkhead, seat support, seat, and rear shelf. On the fuselage sides, the throttle quadrant and clear ports are fitted. The instrument panel comprises of the main panel, rudder pedals, pedal recesses, gun sight and rear breech blocks of the upper machine guns, the instruments are recessed with finely detailed dials, which will require some careful painting and dry brushing to bring out. The completed cockpit assembly is then fitted to one fuselage side and the fuselage closed up, but not before 15g of ballast is inserted in the nose area. The lower wing is fitted with the radiators, oil coolers and lower wing gun cartridge chutes. The two upper wings can then be attached and the assembly fitted to the fuselage, as are the two single piece horizontal tailplanes. The moulded wing and tail lights can be removed and replaced with the provided clear parts should the modeller wish. Turning the model upright the upper forward decking is fitted with the two machine gun muzzles and attached to the fuselage. The propeller is made up of a separate hub, propeller and hub; this can then be attached to the fuselage. Two wing machine gun parts are then fitted to their wing positions, whilst the exhaust stubs are fitted to their respective positions on either side of the centre fuselage. These can be left off until painting is complete. The undercarriage is constructed next. The nosewheel is in two halves which slots into the oleo yoke followed by the scissor link and front bay door. The assembly is then fitted to the front bay along with the actuating jack and retraction arms. The main undercarriage units consist of the main oleos, wheels, outer hubs and undercarriage doors. The completed assemblies are then fitted to their respective positions. The inner main doors and the front bay doors are then fitted, as are their respective retraction jacks. The rest of the build concentrates on the fitting of the smaller parts such as the 20mm cannon muzzle, pitot probe, radiator/oil cooler doors, landing light, and the optional bomb or drop tank with their respective braces. The final parts are the one piece canopy and the two doors. The doors are clear parts, but both have very nicely detailed interior cards and will need to be painted before fitting along with adding the decal placards. Decals The decal sheet is quite comprehensive giving two options, with both aircraft from the 80th Fighter Squadron of the 8th Fighter Group U.S. Army Air Force. Naturally both aircraft sport distinctive sharks teeth, although one is in Olive Drab over Neutral Grey, the other is in Dark Earth, Dark Green over Sky. The decals are very nicely printed, in good register and slightly matt. In addition to the main insignia, there is a full set of stencils. Conclusion I really like this aircraft and Hasegawa have done a nice job in reproducing it in my favourite scale. Yes, it has been released before with other decals, but that’s not really a problem as it’s a great kit. Recommended Amerang Hasegawa Review sample courtesy of UK distributors for