
Search the Community
Showing results for tags 'P-38'.
-
Hi All, I have a number of WIPs that I should really be getting on with... but i am not in the right place for that, but i do have a bit more spare time and wanted to build something, something that will hopefully be trouble free! SO after a short vote this won, the Haseagawa 1/72 P-38 Lightning. and here are some pic's of the box and content. Untitled by robert mulvey, on Flickr Untitled by robert mulvey, on Flickr Untitled by robert mulvey, on Flickr Untitled by robert mulvey, on Flickr raised panel lines and no interior detail including the wheel wells, but thats no problem... its supposed to be quick! these are the options that are provided Untitled by robert mulvey, on Flickr I will be doing the last one 'itsy bitsy', and here are some refence shots for you to delight in. Untitled by robert mulvey, on Flickr Untitled by robert mulvey, on Flickr Weather its correct or not I don't know but I will be doing this with underwing tanks and rockets... because its COOL of course!! so far so good...the kit fits together nicely, which i have always found with old Hase kits like the corsair and Tbolt i built at the start of the year, the plastic is hard and well moulded nice a crisp! so first up CP painted and some nose weight added. Untitled by robert mulvey, on Flickr then she got closed up. Untitled by robert mulvey, on Flickr then it was on with the canopy, booms, landing gear and nose. Untitled by robert mulvey, on Flickr for Ced.... whats one of these? Untitled by robert mulvey, on Flickr a dead one of these! ..... as you can see the nose weight was not enough so more was added to the engine necklaces and all the seams were sanded and then micromeshed. Untitled by robert mulvey, on Flickr Untitled by robert mulvey, on Flickr grills on and canopy masked Untitled by robert mulvey, on Flickr and finally here she is with two thin coats of citidal paints on and the black of the engine necklaces and nose painted with HU 33 Untitled by robert mulvey, on Flickr if only I had had this pace in the MTO GB!! Hope you like it hope to finish this by wednesday!! Rob
- 48 replies
-
- 12
-

-
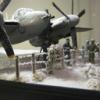
Hey all, Thought I might post this one, which is from a couple of years back - I wanted to do a Pacific island airstrip diorama for a P-38 and a derelict Zero. I also wanted to do it 'homemade' if at all possible! So I started with a sketch....a really really bad sketch ! The base was an A4 picture frame, with some wooden coffee stirrers as rudimentary planking for the Zero and some cardboard to give some ground relief... Covered in Polyfilla... The space on the left was for the crushed coral or in this case, smashed up kitty litter (unused obviously!) Any Pacific island needs palm trees so found some advice online on how to make them and went with that. First, some unwanted sprue tree for trunks.The middle one has been wrapped with ordinary masking tape in a random way for the trunk bark.. Coated in white glue and then wrapped with some cotton thread for the bark effect. Here it has been painted black to give some shading before I painted them a grey colour. The palm fronds were made from paper, soaked in white glue and wrapped around a wire so I could bend them and painted leaf green with bits of brown. I then tried to cut some random palm leaf shapes in them....not the greatest I'll be honest but fine from 6 ft away! And then marked for location in one corner of the diorama..(pics slightly out of sequence here!) You can't make it out in this picture but the coconuts are whole coriander seeds, glued into the trees - they're actually pretty good in this scale! Groundwork painted and weathered. The fuel drums are from a Hasegawa set while the maintenance table is built from matchsticks. The truck shell is the front half of a Matchbox LRDG truck, long forgotten in a model box of horrors. I also opened up one of drums to have its' contents leak out.. And how it finally all came together.. Figures are from Airfix I think and the two plane kits are an Airfix P-38J (yes, that one!) and an ancient Revell Zero - both needed some detailing to make them presentable.. I really enjoyed building this and trying new things out...and very pleased with how it ended up! Thanks for looking and any questions, comments, just ask. All the best, Dermot
- 7 replies
-
- 24
-
-
- pacific diorama
- p-38
- (and 1 more)
-
Hi there! I know You are all waiting for my flanker, but I've decided to get this build done after 4 years that spent in the box. So here we go. Aires c-pit still looks ok after 4 years... There was some extensive filling, sanding, regraving and riveting done, especially on the nose section. Tailbooms ready Wheelbays done. There are still some minor bits missing Almost ready for black primer.
- 26 replies
-
- 13
-
-
- 1/48 Hasegawa
- Aires
- (and 1 more)
-
 Neither of these are the greatest of kits to be honest but there's not a lot of choice in this scale... That'll probably be because they are all repops of the old Crown kit. I'm going to be using these lovely decals from Miniscale.
- 13 replies
-
- 3
-
-
- Minicraft
- Mini Hobby Models
- (and 5 more)
-
This is the 1/48 Monogram Pro Modeler version of the P-38. I started this for the P-38 group build, but like so many other group builds, I manage to finish them just after the build ends. Oh well. The scheme is from Kagero and depicts the Nulli Secundus/X Virgin flown in the Pacific theater. Both the kit and the decals were a joy to work with. Now the kit decals that had to be used, they were a mess due to age and brittleness. Other than my own lack of modeling skills, this kit went together well and didn’t really have any faults. Me, I got faults. If you look closely at the pictures, you will see I had to use a stand to keep the tail from resting on the ground; just didn’t put enough ballast in the nose. Anyway, the WIP thread is here: http://www.britmodeller.com/forums/index.php?/topic/234983215-nulli-secundus-p-38/ if you are so inclined to see a half-baked attempt at producing a model. (It may just be me, but I am still intimidated by putting up kits because of the excellent quality of work on this site. It just humbles me.) Oh well, on to the pictures: Rats, I still forgot to fix that one gun out of alignment. Mental note 1 Of course after I take the pictures and am posting them online, I notice other things besides the gun being out of alignment. Like the balancers on the tail are missing. (Of course I knocked them off a couple of times and just put them aside for safe keeping.) And, I guess this guy didn’t like talking on the radio as he has no radio wires. Need to add that. And while I am at is, I really don’t like the joint of the front windshield. So maybe this isn’t a total RFI, but its close! As always, all comments are welcome.
- 5 replies
-
- 11
-
-
- P-38
- ProModeller
- (and 3 more)
-
I would like to offer Monogram’s 1/48 ProModeler P-38 G/H Lightning done with Kagero decals for a P-38G flown by Lt. Kenneth G. Ladd, 80th FS/ 8th FG, Dobodura, New Guinea during 1943/44. It is called the Nulli Secundus/X-Virgin with “Ruthie” on the outer port engine. This kit has been around for a long, long time, back in the 60s or 70s when it first came out. The version I have is a 2002 reboxing with some new decals. (More about that later). Other than Accurate Miniatures, I cannot think of a line that has better instructions than the old ProModeler series. Most of them have pictures of actual aircraft (not the best quality, but at least they are there) and some helpful hints on how to make your build better. Anyway, looking forward to this build to help get my modeling mojo back. Here are the box and sprue shots. And here is the Kagero scheme I will be attempting to replicate. The cockpit is first up as it is inserted into the top fuselage half. The parts layout consists of 10 pieces. Detail for the kit’s age is not too bad Once the cockpit is built up, it rests on top of the nose wheel well. I am going to use the ladder provided in the kit, so I have to open up the bottom of the lower fuselage half. The cockpit parts get their base coat of either chromate green or NATO black. Then the weathering and dry brushing begins Once the parts are painted, dry brushed and weathered, the kit detail is pretty darned good. Especially when you consider this kit is about 50 years old. The detail on the control wheel and instrument panel are better than some modern kits that are just coming out. Assembly of the cockpit begins with the seat, the control yoke and wheel, instrument panel, rudder pedals and side panels. Some more details have been picked out to add a bit of color to the cockpit. Although given the fuselage opening, I doubt much will be seen. Must make a mental note to myself to not close up the cockpit before I source some seat belts for this plane. The cockpit is inserted into the bottom fuselage half. Next up, the wheel wells need to be built up to be inserted into each tail boom. The wheel well consists of a roof and two sides. The roof of the port wing well is warped. So with the application of brute force, some CA glue and accelerator, the roof is conformed for the most part to the wheel well sides and is now pretty square. I was hoping the starboard roof would be in better shape. No luck, it is even more warped than the port side. So some more persuasion is used. Then the two wheel wells are placed inside of each tail boom and the two tail boom halves are sealed. The kit instructions would have you place the undercarriage at this time, but with some dry fit testing, the undercarriage can be added after painting making my masking a whole lot easier. After the booms are glued together, the scoop faces and intake are put on each boom The upper fuselage half is glued to the two booms. Then the bottom half is attached to the upper half and fuselage booms. At the same time the main tail piece is fit between the two booms to make sure everything lines up correctly. Twin boom planes are always fun and games to align, but the engineering of this kit makes it a very easy thing to do. Some tape is applied to keep everything in place as the glue dries. While I wait for the glue to dry I start the job I like least in modeling, masking the canopy. Yechhhh. And why do I hate masking canopies, could it be this: Earlier in the day I had masked a canopy for an F-117 with all of its fun sharp angles and points. No problem. With this canopy and fairly simple lines, I skewer myself. This is why I buy pre- cut masks right? I tape up my finger, finish the rest of the canopy masking, (I cheated, but more on that later) and by that time the glue has set on the mainframe because I am so slow at masking. The tape is removed and now I get to inspect the seams for “irregularities” that must be corrected. And there are a few: So the plane is puttied up and left to dry overnight. While I wait for the putty to dry, I work on the propellers. These consist of a hub, 3 separate propellers, and a spinner. Now the kit comes with 4 propellers per engine. Why 4, I have no idea? Is there some P-38 variant I missed that had 4 propellers? Anyway, according to the paint scheme the back part of the hub is black, the blades are black with yellow tips, and the spinner has a green tip with a white stripe. It is morning now and the always enjoyable (not!) task of sanding the seams presents itself. So various grades of sandpaper are used to get rid of the seams and smooth everything out. The grey undersides are painted, let dry and then masked for the upper olive drab. The olive drab is then applied Now the picture tonal quality is a bit warped as the weather outside is not ideal. So the spray was done in the bathroom with the vent to the outside on so I don’t poison anyone else. Obviously the bathroom lighting leaves a bit to be desired. Might have to get different lights. Once dry, the olive drab seems to be spot on. The tape is removed and the green tips to the tail fins are applied. Once that dries, a coat or two of future is applied to get ready for the decals. Now the kit decals will have to be used for the national insignia and stencils. The Kagero decals only have items specific to each paint scheme. I start with the topside decals and stencils from the kit. The kit decals, though only from 2002 did not hold up well. They were fragile, took a long time to release from the backing and if I looked at them wrong, shattered apart. Almost every kit decal had to be pieced together. Since this will be a tired old plane, it may work out in my favor, but putting them on was very frustrating. I can’t wait for the Kagero decals. I start with the port side. The Kagero decals were superb. They went on well, could be moved around to get in the right position and reacted very favorably to Micro Sol. The kit decals, more shattering and piecing together. The starboard side decals were next. The nose art went on smoothly and looks great. The bottom was done using the rest of the kit decals, but less shattering for some reason. Now, I am going to let everything dry and let Micro Sol do its thing. Next up will be a protective coat of future and then the weathering will commence. I am still cogitating on how best to proceed with dirtying this bird up. As always, all comments are welcome.
- 9 replies
-
- 2
-
-
- Monogram
- Promodeler
- (and 4 more)
-
 Knowing how slow a bulder I am (TV is in the other room major distraction issue) jumping in so late may be a bit of gamble, but after an impulse buy at Cosford I am going to give it a go. The kit of choice here is the Hobbyboss P-39L in 1/48: My secret weapon here is that two piece fuselage/wing/tailboom assembly, which will speed things along and help me catch up - once I get to that stage. Because there is another hurdle to get over first: Yes I am going to try to wedge the Aires cockpit set in there...an exciting challenge or over-ambitious foolishness only time will tell. The reasoning behind it isn't hard, below is the kit cockpit floor with the True Details version and the Aires on the right. No contest really. Bought at the same time was Kagero's 'Pacific Lightnings'; this has eight rather attractive schemes, but I am probably going with Shady's Lady. Be warned I am not fast so posts will be irregular, but work has started in that the Aires floor is no removed from its casting block and has been test fitted into the top half of the fuselage, which has only served to warn me how much work will be required to close that that 5mm gap...
 -
 Hi gang I picked this up when it was released and have been itching all that time to get it started. As Andrew (Caution Wake Turbulence) has stated in his thread the resin pit has possible fit issues that troubled the two previous Eduard Lightning boxing's. Eduard claim to have tweaked these issues so we will see. DSC_6123 by Snapper_city, on Flickr DSC_6124 by Snapper_city, on Flickr For an Eduard special boxing I think apart from the box cover all the schemes are quite bland and nothing to shout about. I built the cover scheme as a 1:72 Matchbox kit when I was a kid so decided to do one of the others for this one. The two above along with the NMF below were my favorites but in the end I have decided to go with the one below. I have no yellow in the cabinets so this should brighten things up a bit. DSC_6126 by Snapper_city, on Flickr Sprue shots in bags. DSC_6127 by Snapper_city, on Flickr DSC_6129 by Snapper_city, on Flickr DSC_6131 by Snapper_city, on Flickr The resin, etch (cockpit PE on reverse of packet) and paint masks. For better out of the bag shots check out Caution Wake Turbulence's thread. Some of the resin details are exquisite. DSC_6133 by Snapper_city, on Flickr DSC_6134 by Snapper_city, on Flickr Master replacement barrels which for some reason do not have the cooling holes along the barrels. No idea if this is correct or not. I'll have to get researching. I did also consider a vac canopy but decided against the extra work. I will be attempting this build around my 8 month old daughter who has made modelling time a scarce thing these days so fingers crossed the three months will be long enough to get it finished. Happy modelling.
 -
Hi all! I felt i needed something different from all these Pudgys' that are on almost every decal sheet... So, here is my post-war italian P-38J. Repacked Dragon in an Italeri box and decals from Carpena/Colorado. Still waiting for my book "Lockheed P-38 Lightning in Italian Service 1943-1955" though....
-
Who maks the best P-38 Lightning in 1/72? / Andre
-
 Guadalcanal scheme This is the box art for the kit, bought as part of the 90 years of fighters triple boxed set many years ago, I invested in a few of these box sets to get the hang of things after a long break from building kits. This is a few years old now but the kit worked out at about £3.50, bargain! Free hand airbrush finish. Built for nostalgia only!
 -
 Lockheed P-38J-5-LO, 42-67291, “Haleakala”, 459th FS, 80th FG, USAAF, Chittagong, India, 1944 Pilot: Lt. H.H. Sealy 1/72 model built using parts of Hasegawa and Dragon kits (done before the Academy kit became available) with some scratch building/reshaping. The only correctly shaped drop tanks I could find were borrowed from the Frog/Novo kit. Detail sets ( used completely or partially): Aires P-38J/L cockpit set, Eduard P-38J/L detail set, Squadron P-38 F(due to the early style windscreen on J-5) vacu canopy Decals: Aeromaster (all individual a/c markings were inaccurate and had to be corrected or replaced) Dragon/Italeri kit decals, Travers, Revell (P-51B) - for technical markings
- 29 replies
-
- 17
-
-
 At Nürnberg Toy fair 2013. 1/48th Lockheed P-38L-5-LO Lightning by Hobby Boss Source: http://www.primeportal.net/models/thomas_voigt7/hobby_boss/ V.P.
 -
P-38 Lightning at War - Part II Decal / Booklet Kagero Mini Topcolors The lightning is without doubt one of the most beautiful fighters of WWII that operated in most theatres of operations. Success in the aircraft however was very mixed. It benefitted from High speed and strong capability at altitude as well as the added reliability of two engines, but became vulnerable if caught in close combat with more nimble opposition, particularly at lower altitudes. Indeed, there are black marks against the aircrafts service record where considerable losses were encountered, particularly over Europe and North Africa at the hands of the Luftwaffe, however that was because of poor tactics being used to exploit the aircrafts strengths. It achieved most success in the Pacific Theatre where it downed over 1800 Japanese aircraft, more than any other US fighter and in the process made over 100 aces. This pack takes a selection of P-38’s from various theatres with a common theme....great artwork ! Inside are decals for no less than eight aircraft in 1/72, 1/48 and 1/32 and a reference book to help not only with decal referencing, but inspiration too ! Let's look at the book first. Containing 18 colour pages, each aircraft represented on the decal sheets is superbly drawn with side views and top down view across two A4 pages. Section drawings are provided for the nose and underwing areas to assist decal positioning where they aren’t visible on the main views. Not only do the drawings show where to apply the decals, but such is the detail in the artwork, you can use them for weathering references too. Wording is provided in both English and Polish to supplement the drawings with information about the aircraft in service. If you are a lightning fan, then I’m sure that this set is a must for your collection considering that all three major scales catered for. What I really like is the stunning detail in the nose art. Whilst many decal sheets I’ve seen are limited to single colour tones, these are brought to life with exquisite shading, particularly in the skin tones. Register on the decals is bang on and the fine detail even in 1/72 is hard to beat. Even the placards are readable on lettering much less than 1mm in size when put under a magnifying glass! Decals for the following P-38's included are: P-38G-13-LO, probable s/n 42-2197, 'Nulli Secundus' / 'X-Virgin', flown by Lt. Kenneth G. Ladd of 80th FS / 8th FG, Dobodura, New Guinea, winter of 1943/1944 P-38J-15-LO, s/n 42-104107, 'Jewboy', coded '47', flown by Lt. Philip M. Goldstein of 49th FS / 14th FG, Triolo, Italy, May 1944, P-38J-10-LO, s/n 42-67916, 'California Cutie', coded (KI)- 'S', flown by Lt. Richard O. Loehnert of 55th FS / 20th FG, RAF Kings Cliffe, England, June 1944, P-38J-15-LO, s/n 43-28444, 'Vivacious Virgin II', coded 'E6-T', flown by Lt. Ian B. Mackenzie of 402nd FS / 370th FG, Florennes/Juxaine, Belgium, winter of 1944/1945, P-38L-1-LO, s/n 44-23852, 'Beautiful Bitch', coded 'B7', flown by Lt. John J. Kane of 96th FS / 82nd FG, Vincenzo, Italy, March 1945, P-38L-5-LO, s/n 44-26176, 'Vagrant Virgin', coded 'A', flown by Lt. L. V. Bellusci of 36th FS / 8th FG, San Jose, Mindoro, late 1944/early 1945, P-38L-5-LO, s/n 44-26176, 'Vagrant Virgin', coded 'A', flown by Lt. Peter Macgowan of 36th FS / 8th FG, Ie Shima, September 1945, P-38L-5-LO, probable s/n 44-26568, 'Wicked Woman', coded 'W', flown by Lt. Richard C. Livingston of 36th FS / 8th FG, Ie Shima, August-September 1945. Conclusion I'm really pleased to have got my hands on this set (although Mike was sad to see it go !!). If you like to put a lot of effort in your paint schemes, a good set of decals is a must to finish it off. Not only will you get some great aircraft choices here (which could be a dilema choosing which one to do !), but the book will give you plenty of inspiration with the colour profiles included. Considering you get decals for 8 aircraft in three scales plus a great reference booklet, the price is excellent value too. Review sample courtesy of
-
 RAAF P-38 Lightning (PR) Conversion Red Roo Models - 1/48 There has been some confusion over the correct designation of the three P-38 Lightnings operated by the Royal Australian Air Force. They have been described as F-4's, however this was not the case. The three aircraft were standard P-38E models which were locally converted to approximate F-4A standard. However examination of photographs reveals considerable differences between Lockheed factory built F-4A aircraft and the RAAF converted aircraft. The aircraft received by the RAAF were A55-1 (ex USAAF 41-2158), A55-2 (Ex USAAF 41-2159), and A55-3 (ex USAAF 41-2122). A further two USAAF aircraft 42-2220 & 41-2156 were loaned to 75 Sqn RAAF during the last quater of 1943. The three RAAF aircraft had a fairly short service life. They were all destroyed or damaged beyond repair as a result of undercarriage failure, or engine failure. The Conversion Kit The kit supplied by Red Roo to make this conversion is fairly simple. It contains the following parts; 1 x replacement nose tip. 2 x replacement left & right main camera nose. The parts are well cast with very little excess resin, they have very positive attachment points. The conversion is recommended for the Academy P-38. Instructions I am very impressed by the standard of the instructions from Red Roo. For such a small conversion you have 4 colour sheets for all the decal oprions. The instructions also contain contains black & white drawings, b&W photos of real aircraft. Decals Decals are provided for 4 aircraft. 1. A55-1 Ex USAAF 41-2158, this was one of only three RAAF P-38's to be operated in a natural metal finish. Some uncertainty remains of the colour of the mission markings so Red Roo have provided them in Black, blue & Red. 2. A55-1 This is the same aircraft as above, however it spent some time camouflaged in a hybrid pattern that differed from other aircraft. 3. A55-2 Ex USAAF 41-2159 This aircraft was camouflaged but had differing roundels to other aircraft as the blue outer band appears much narrower. 4. A55-3 Ex USAAF 41-2122 This aircraft had the same camouflage as A55-2 It appears that the stnd wing leading edge of this aircraft was damaged and replaced with stock USAAF part retaining the USAAF colours.. According to Red Roo's research they believe that none of the P-38R's were camouflaged in Foliage Green, Dark Earth and Sky Blue. It is believed that a quick and expedient means of creating a disruptive camouflage pattern was the application of Foliage Green directly over the USAAF olive Drab. Conclusion If you are a WWII RAAF fan, or a photo recon modeller then give this one a go, the results should be good. Review sample courtesy of
 -
 Hello and good morning, This is my first post and I am relatively new to the forum. My name is Ed and I recently got back into modeling when during a house move my fiancée discovered a few unbuilt kits sitting in a box left over from my childhood. She persuaded me I should have a go at building them - Now I've rediscover the model making bug and thought I'd share my pretty amateurish results with you all. I'm a member of a motoring forum and through a mutual member both here and there, decided I should post up my efforts. Hope you like. All comments appreciated. Regards, Ed Finial result - Display cabinet. Ikea cabinet with 3 additional shelves with individual shelf lighting (Christmas pressie) P-40 Kitty Hawk FW190 Mosquito P-38 P-51 Duck (0n water)


