Search the Community
Showing results for tags 'Mustang'.
-
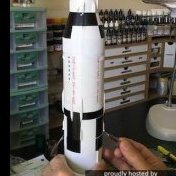
Hi guys, Going to enter with the Eduard Chattango Choo Choo model. It seems a nice kit, but I have noticed the landing gear seems off. So any advice there will be appreciated! Pictures will follow very shortly, I've managed to break my phone's camera so have to use the DSLR and transfer it all over. Anyway, the main attraction which is the markings. In the kit there are six markings, five of them nmf and then one OD and NG. I'm leaning towards the OD and NG but I also like the miss Steve marking! Choices choices! Waffling over and let's crack on! Thanks for looking Any comments, suggestions or criticisms are welcome! Joss
-
Good morning everyone I’ve recently joined Britmodeller and this is the first of two recently completed 1/72 scale builds - well not really ‘builds’ as they were more ‘restoration’ projects! A friend gave me the (Revell I believe) P-51B Mustang without propeller, canopy and landing gear, and in olive drab camouflage. I used a spare Malcolm hood and a set of Techmod decals to recreate this Mustang III flown by Squadron Leader Eugeniusz Horbaczewski of 315 Squadron, RAF in June 1944. The second aircraft is a restored Republic F-47N (P-47N until 1948) Thunderbolt of the 198th Fighter Squadron (Augmented), Puerto Rico Air National Guard, 1947-53. This model (probably Revell too) is a P-47M and also came in olive drab with a damaged undercarriage, missing canopy and propeller. I used Blue Rider Aircraft decals, a Quickboost propeller and a Falcon canopy; I also used the project to experiment with Tamiya AS-12 Bare metal silver finish. On a note of historical accuracy the subject aircraft - ‘Wild Hare’ 44-89425 which resides in the Peterson Air and Space Museum, Peterson AFB, Colorado - is a ’N’ version with slightly longer wing span (to hold more fuel for Pacific missions) while the kit I restored is an ‘M’ version. Thanks for looking! Mike
- 1 reply
-
- 22
-

-
- Mustang
- Thunderbolt
- (and 1 more)
-
P-51D Upgrades (for Eduard) 1:48 Eduard Brassin We’ve got Eduard’s new P-51D Mustang at the top of the heap in 1:48, and they’re filling all those remaining holes for the super-detailers with additional sets of Photo-Etch and masks, plus resin sets, which I’ll detail in a separate review. P-51D Upgrade Set (481000) This fret of bare brass contains detail parts to upgrade the kit in the cockpit and around the airframe. Starting with the aft compartment with skins for the boxes, additional parts for the sidewalls, rudder pedal skins, a new brass seat to optionally replace the tubular framed kit one, or to upgrade the bracing struts at the sides and top. In the gear bays there are additional hoses and clips to retain the bay doors when closed, with more hoses and oleo-scissors on the legs themselves. In the radiator bay there are new skins for the radiator cores and an additional internal structure with oval grille, with a new cooling flap at the rear. In the nose there is an insert that fits into the two options for the grilles under the nose, either mesh or perforated. Seatbelts STEEL (FE1021) STEEL seatbelts are etched from thinner material, which improves realism and flexibility in one sitting. Coupled with the new painting method that adds perceived extra depth to the buckles and other furniture by shading, they are more realistic looking and will drape better than regular brass PE. Tface Masks (EX663) Supplied on a sheet of yellow kabuki tape, these pre-cut masks supply you with a full set of masks for the canopy both inside and out, with compound curved handled by using frame hugging masks, while the highly curved gaps are in-filled with either liquid mask or offcuts from the background tape. In addition you get a set of hub/tyre masks for the wheels and formation lights, allowing you to cut the demarcation perfectly with little effort. Decals (D48033) If you need some extra National Markings for your US P-51D then Eduard supply these as a separate decal sheet. These are printed in house by Eduard and should pose no issues. Review sample courtesy of
-
Is there anything definitive on the colour of the sides (outer) of the P-51B Mustang radiator flap? The vent that lowers at the rear of the fuselage. Searching on the web and BM have drawn a blank. various possibilities occur to me; Same as the underside (neutral grey for the plane I'm modelling). Zinc Chromate, either straight (yellowish) or mixed (interior green). Silver, either NMF or doped. Cheers,
-
 P-51D Wheels 1:48 Eduard Brassin - For Eduard Kit Kit Wheel Sets Arriving the envelopes we normally see the PE in, Eduard have gone to town providing different tread pattern wheels for their new kit. All are well cast with separate hubs, each set includes a new tail wheel, and masks (not shown) . 648511 Diamond Tread 648512 Rhomboid Tread 648513 Pointed Cross Tread 648514 Grooved Tread 648505 Block Tread 648504 Cross Tread 648503 Oval Tread Review samples courtesy of
 -
Hi Folks, Probably a simple question for the Mustang experts out there (maybe @gingerbob?)... Should the top engine cowl have a panel line down it? It would be good to know before the paint goes on. Many thanks, Oops - I meant to post this in Mustang Chat, but got it wrong! Can you move it for me please Patrice? @TEMPESTMK5
-
P-51D-10 & P-51D-15+LööK Panels 1:48 Eduard - For Eduard Kit LööK Sets Arriving the envelopes we normally see the PE in, each set of 3D panels is accompanied by a set pf PE seatbelts as well . P-51D-10 P-51D-15+ Review samples courtesy of
-
P-51D-5 Mustang (82101) 1:48 Eduard ProfiPACK Kit The P-51D was developed by the North American Aviation company as a possible fighter for Great Britain, but due to the poor performance of the engine initially fitted it wasn’t all that good. Luckily they strapped a Rolls-Royce Merlin engine into the airframe and it brought out the best of its design, which included the energy efficient laminar flow wing that gave it the potential to escort Allied bombers all the way to Berlin with the addition of drop-tanks and a lean mixture when not in combat. It was flown in this guise as the Mustang III in British service, and as the P-51B/C in US service, then as the P-51D with the bubble canopy and cut-down aft fuselage, with an additional fin-fillet added later to improve stability that had been reduced by the new shape and fuel tank location. This is the Mustang that most people think of when they hear the name, unless they’re more of a petrol head. Kit This is the eagerly awaited new kit from Eduard. It is a new tool with everything you would expect from a new tool Eduard kit in terms of excellent quality. Construction starts in the cockpit, and as you would expect there is quite a lot of detail straight from the box. The seat is first made up with PE seat belts being added. This is placed on the cockpit floor along with the control column. Behind the seat the radios are added. The sidewalls for the cockpit are separate and these have small parts added before these are put into the fuselage sides. The instrument panel from PE is then added. Also added into the fuselage sides at this point are the backing plates for the exhausts and rear tail well. Construction then moves to the wings. The main wheel well is built up with a representative main spar at the front. The rear wall and all the cross plates are separate pieces. Once the main well is in the top wings can be added to the lower wing. At the font the guns are provided as insert parts. Separate ailerons are then added. The wing can then be joined with the fuselage. At the rear the tailplanes and their control surfaces are added along with the rudder. All these have realistic moulding for the fabric covering. On the underside the tail wheel is added along with the intake lip and engine vents if used for your marking option. Its then time for the flaps and main gear. It would appear the flaps are only in the lowered position so if you are going to do an "in flight" model you will need to do a bit of extra work. For the gear the wheels are in two halves with separate hubs and a three part leg. These are added along with the outer door. The inner doors can also be added at this time. Going back to the main fuselage at the front the exhausts are added, these are different ones depending on the marking option being used. The propeller and spinner are assembled and then added. The main upright aerial is added. The canopy can then go on. Eduard seem to be moulding these thinner at present, while these look good the downside is that they come off the sprues. In the review sample and kits which have been purchased there are clear parts off all the sprues. Masks (not shown) are provided for painting. Lastley for the underside both metal and paper droptanks are provided. . Decals These are in house from Eduard and should pose no problems. As well as the markings there is full stencil data, and information about which areas were left Natural Metal, and which areas were painted. There are markings for 5 different aircraft, but 6 schemes as Cripes A Mighty 3rd is shown with either full invasion stripes in June 44, or partial ones it wore later on. The options are; P-51D-5 1/48 - s/n 44-13318, "Frenesi" flown by Lt. Col. Thomas L. Hayes Jr., 364th FS, 357th FG, 8th AF, Leiston, England, June 1944 (Box art) P-51D-5 1/48 - s/n 44-13321, "Cripes A Mighty 3rd" Flown by Maj. George Preddy Jr, 487th FS, 352nd FG, 8th AF, Bodney, England, August 1944 P-51D-5 1/48 - s/n 44-13321, "Cripes A Mighty 3rd" flown by Maj. George Preddy Jr., 487th FS, 352nd FG, 8th AF, Bodney, England, June 1944 P-51D-5 1/48 - s/n 44-13321, "Devastating Dottie" flown by Capt. John M. Simmons Jr., 317th FS, 325th FG, 15th AF, Lesina, Italy, August 1944 P-51D-5 1/48 - s/n 44-13606, "Louisiana Heatwave" flown by Capt. Claude J. Crenshaw, 369th FS, 359th FG, 8th AF, East Wretham, England, September 1944 P-51D-5 1/48 - s/n 44-13859, flown by Lt. Walter Mullins, 55th FS, 20th FG, 8th AF, Kings Cliffe, England, September 1944 Conclusion It is good to see another new P-51D Mustang kit available, and this is everything you would expect from Eduard. Highly Recommended. Review sample courtesy of
-
P-51D Gun Bays (648517) 1:48 Eduard for Eduard Kit This set contains 38 resin parts & PE to fit gun bays to the new Eduard kit. The set contains parts for the gun bays. As well as the bays there are the guns and ammo belts. Decals are provided for the loading instructions inside the doors. Some surgery to the kits wings is needed, through note a lot, mainly just removing the panels. This set should get good results and would suit some kind of loading diorama. Highly Recommended. Review sample courtesy of
-
P-51D Cockpit Set (648522) 1:48 Eduard Brassin - For Eduard Kit Cockpit Set Arriving in the now normal (more eco friendly?) black box is this new brassin set for the new Eduard P-51D. Inside are 28 resin parts, a coloured photo etched fret, a small film sheet, and a small decal sheet.The photo etch parts are for the multi part instrument panel, seatbelts, and the area to the rear of the cockpit under the canopy,as well as a few smaller parts. In resin we get a new cockpit floor with the instrument housing at the front, control column, pilots seat complete with head armour, two fully detailed side consoles, gunsight & coaming, main canopy frame, and the radio area behind the pilot. The decal sheet provides cockpit placards. Review sample courtesy of
-
First model of the year, built this for the Mustang GB - thought I'd post it here too. Kit: Accurate Miniatures P-51A Mustang (No. 3402) Model: North American P-51A Mustang, Burma 1944 (USAAF) Scale: 1/48 Paints: Vallejo Model, Air & Metal Color Weathering: Oil paints, Flory Models Wash, MIG Streaking Effects, Vallejo Weathering Effects, pigments Build thread: Fun build, good details and things fell apart mostly fine. Had lots of fun with weathering. Here are some pics: Comments & constructive feedback welcomed!
-
North American P-51D/K Mustang "8th Air Force" (LS-010) 1:48 Meng Model via Creative Models Originally developed to fulfil a British requirement for new fighter aircraft, the unmistakable North American P-51 Mustang famously went from drawing board to first flight in just 178 days. It went on to become one of the most famous and successful aircraft of the Second World War. Transformed by the addition of Rolls Royce’s legendary Merlin engine, the Mustang went from strength to strength and was eventually developed into several variants. The P-51D introduced a number of improvements in response to combat experience, including a cut-down rear fuselage and bubble canopy and an increase in the number of 0.5 inch machine guns from four to six. The P-51K designation was used for Dallas built P-51Ds an Aeroproducts Propeller in place of the usual Hamilton Standard one. However the hollow bladed Aeroproducts unit was found to be unreliable and produced dangerous vibrations at full throttle. These units were replaced by Hamiltons standard units. Over 8000 P-51Ds were produced, more than any other Mustang variant. The Kit This new tooled P-51D from Meng is designed as a "snap together" kit and Meng trumpet it can be put together without glue. As such the kit is designed in a different way than your standard kit. There are more tabs and inserts and construction varies from a standard kit. Having spoken to a couple of modellers who have built the kit it certainly does go together without glue, however the modeller it would seem would be wise to glue it as they go. The kit arrives on five sprues of dark grey plastic and a clear sprue. Construction starts its seems in the conventional way with the cockpit. The front fire wall and instrument coaming are assembled with the rudder pedals clipping it. The radio area behind the pilot is installed onto the cockpit floor. The control column is added and the seat made up, then fitted. Moving on to the fuselage sides, side panels are added, then the tail wheel well & wheel are made up and attached. A couple of insert parts are attached and then the fuselage can be closed up. The propeller is then made up fro two sets of two bladed added to hub. The top engine cowl part is added along with the exhausts (2 different types being provided). Construction then moves onto the wings. The landing gear complete with wheels are added into the gear bay, this is then inserted into the rear wing. The flaps (down position only) are then added into the lower wing, and the whole thing is trapped by the addition of the upper wing. Inserts are provided on the leading edge for the guns. The cowling under the main engine is then added to the fuselage. The main ventral radiator assembly is then made up, the wing installed and then the radiator installed. Next the gear doors are installed (either up or down) and the rear scoop for the radiator added. Underwing stores are made up and installed. There is a choice for 100lb bombs, 75 Gal & 108 Gal drop tanks. Lastly the frame is added inside the canopy and its installed, followed by a top fuselage insert, the tailplanes and the rudder. Markings Two options are provided on a sheet made in house by Meng. P-51D 44-14789 "Missouri Armada" (as box art) P-51K 44-11622 "Nooky Booky IV" Conclusion Recommended if you want something a bit different, or you would like a project that snaps together, however I wont be replacing any of my other Mustang kits with this one. Review sample courtesy of
-
With my current project coming to an end, I dug up an older kit from my stash. On "order" from she who must be obeyed, I chose the Hasegawa P-51D Mustang "Nose Art". An oldie. Upon opening the box, I discovered that I already started it (not too much though ). But the instructions are missing the blue print on the inside. Since there was no internet then (yes, it is that old), I couldn't proceed then. Started to lay down the green interior layer and the zinc yellow wheel wells. Not sure about the decals, though. What is the quality and how will they hold after all these years? Upon invitation, I decided to add to the Group Build too...
-
I really expected that someone else would have entered this one by now I bought this one just the other day specifically to fill the gap If I remember correctly after all so many years this is possibly the first Matchbox kit I built when Matchbox first got plastic models into the shops Back then I built it as Dooleybiird and I wanted to do it again, and I shall but not with the kit decals. A previous owner has cut the decal sheet, some Dooleybird decals are missing and although this sheet looks fine in the picture some of the markings have micro sized cracks through them I can save a few of the decals with LDF, but I'll buy the Model Alliance decal sheet which has Dooleybird on it; https://www.hannants.co.uk/product/ML72113 Some of the Matchbox parts are poor in design so I'll replace them with better parts from my parts files. The parts to change include the wheels and drop tanks [although I may leave those off and alter the wings to build it 'clean'] Back later; I have some Hawker Tempests, Sepecat Jaguars and a couple of other Matchbox kits to do yet
- 24 replies
-
- 5
-
-
- Mustang
- Dooleybird
- (and 1 more)
-
A small project in order to recharge the mojo. This P-51D Mustang in 1/72 was done using an old tool Airfix kit. Basically as a kit it is ok, fit was ok apart from a small issue with the fuselage that was taken care of by some filler. The kit was sprayed with the humbrol metalcote range, in order to create various shades of aluminium It was finished off with a satin coat and Starship Filth from Oilbrushers. The figures where all brush painted and weathered with oil Finally the Marston Mat, was created by printing a template, holing it, one by one and then finished off with Humbrol MetalCote Polished steel Hope you enjoy....
-
I’ve always loved the P-51D Mustang! This one is the diminutive 1/144 scale bird from Minicraft. This 2018 release is actually a reissue of the 1974 Crown kit, which has been sold variously over the years by Revell, Academy, Trumpeter, Mini Hobby Models, and now Minicraft Models. This little beauty has certainly been around! Minicraft has added some value, though, with a new clear display stand, a pre-painted canopy, and some excellent Cartograf decals. The small size, low parts count, and pre-painted canopy will make this a fast build.
-
This is my entry. I thought about Burma Banshee P40 but decided to safe it for a P-40 STGB. So it will be stang. ~Hope it could be as good as Warhawk 8-) And some work I've done yesterday evening....
-
Hello! I saw this photo. Airfield Nappa, California, 1947. Tired Mustang from Dallas. And I decided to make a model for this photo. I used a set of ICM kit with modifications. Hope you enjoy looking at.
-
Bubbletop Mustangs (ED-48119, ED-72119) 1:48 & 1:72 Euro Decals by Fantasy Printshop Airfix are bringing us new Mustangs in 1/48 & 1/72, however there are no shortages of them from other manufacturers. Therefore it's only fitting that we should get some newa ftermarket decals for them These sets from Euro Decals are printed by Fantasy Printshop, and arrive in A5 ziplok bags, with a set of side profiles on the front, instructions in the middle, and the decals on the rear, so they can be inspected through the protective sheet of thin paper. Sheet shown is 1/72, the 1/48 is the same layout just larger. Inside are four-way profiles of each of the six decal option, plus a legend with suggested colours in BS & FS numbers, Humbrol, Xtracolour, Xtracrylix, and LifeColor shades, with a page of general text about the aircraft on the back page. The options from the sheet are as follows: Mustang IV KH673 South African Air Force, Italy 1945. F-15D Republic Of Korea Air Force, Chinhae Air Base, 1950 Mustang IV, 3 (Christchurch) Sqn RNZAF Territorial Air Force, late 1940s. P-51D 44-11222 "Jolie Helene" 368th FS, 359 FG, USAAF, East Wretham, 1945 J-26 Mustang 26115 F.4 Swedish Air Force, 1951 F-51D A68-56. 86 Sqn Royal Australian Air Force Bohle River Airfield 1945 The sheets provide all the national markings as well for each option. Registration, sharpness and colour density are all good, with a thin gloss carrier film cut close to the printed areas. Recommended for your next Mustang build of you like a little something different to the kit options. 1:48 1:72 Review sample courtesy of
-
P-51D-20 & CAC Mustang Upgrade set & Un-cuffed Props 1/48 Red Roo Models The upgrade set (48178) is designed for Airfix kit though there is no reason it should not fit others. This provides parts for the IFF system and rocket rails. One of the main benefits of this set is the research and information about the differences in these aircraft and how to correct them. The picture used above is for illustration only. The stubs for the rockets are in cast metal which the modeller will need to trim and clean up. There is also a new radio in resin and some wire. RAAF Mustangs deployed to Korea used both the British 60Lb rockets and the American 5" HVAR ones. The propeller set (48123) gives us 4 new un-cuffed Aeroproducts blades used by the CAC Mustang and the P-51K. Some kits may need the modeller to make adjustments to the spinner holes to fir these blades correctly. Conclusion These are some interesting sets from Red Roo. Highly Recommended for an accurate Aussie Mustang. Update Set Prop Blades Review samples courtesy of
-
 Brengun has just released a 1/72nd North American P-51 Mustang Mk.I kit - ref. BRP72031 Source: http://www.brengun.cz/e-shop/1-72-plastic-kits-28/mustang-i-1459 V.P.
 -
 A true classic, Tamiya's 1:48 Mustang B. I used the kit decals and sunk them into hot water, so they could soften up and sink into the panel lines. Painted with Revell acrylics, the olive drab is Revell 66 Olive Grey.
 -
Hey guys, pretty long long time since i was making wip build here on BM - finaly i might have a bit more time, so i m happy to be back A lot of things changed, most of it for good I have got married this summer, so you can imagine, siting by the work bench for whole evening is not anymore an option Anyway, when i saw this GB i was thinking about building the Tamiya 1/72 or 1/48 kit.. Then Meng and Airfix announced new 1/48s and i know Eduard is going to release their 1/48 D in not so far future too.. sooo.. i was thinking what to do.. then saw this kit in a sale.. well, long storry short, here i m with the amazing Tamiya 1/32 Mustang And i would like to begin with a little bit of begging If anyone has some good references for Korean Mustangs, mainly about the 45th TRS "Polka dot squadron" and their RF-51D, it would be great! I would need everything - from cockpit colour scheme, wheel wells colours, camouflage details.. If there are some aftermarket decals/masks and such.. All i know from my previous F-51D build is, the Korean mustangs had usualy cockpits repainted in black, wheel wells along with whole airframe (so not only wings but fuselage too) repainted by silver laquer. But that is quite all i know Another option could be some pacific theatre Mustang (as there are decals for it ) or some OD top side mustang, if i got some decals.. Well, thats it for now, i have a bit of free time so hurry up !
-
So, I have been away for a month or so on business and whilst I was away I got a little self indulgent present delivered After finishing my previous model I decided to challenge myself with a NMF finish and so got the 1:32 Tamiya P51-D Mustang with which to have a go. As I am still a relative newbie I am doing this OOTB..........baby steps....NMF is my next goal.........maybe scratching will come later. I have never attempted NMF before, have purchased some Alclad II black gloss primer along with airframe aluminium and dull aluminium to use on select panels as it seems people like to break up the panels to make it look more realistic.....we'll see how it goes. Got an old Nimrod model that I intend to use as a paint mule and see how easy (or not) it is to get the desired effect. If all else fails I can always go back to the Tamiya rattle cans. So, having had a week or so of very intermittent bench time I have the pit done, still needs to be weathered but I'm reasonably happy with it so far. Also got the engine done and just about ready to join the fuse halves together. Model has gone together well so far, no fit issues so hoping this trend continues as I have had very few fit issues with Tamiya (except those self imposed by not looking at the instructions properly!) So here is how she stands now..........as always, comments and critique most welcome.