Search the Community
Showing results for tags 'Mustang'.
-
Seeing as my Hellcat is on finals and the Javelin is in the paint shop I thought I would start another kit I have been itching to do, the Airfix 1/72 Mustang. I had previously picked up (very cheap) the Academy Mustang, which when I opened it up had a surprise of some extra RAAF markings. I decided on 76 Squadron SV-Z, A68-768 (incorrectly identified as A68-766 on the decal sheet) in Japan, circa 1946. With some help from the forums (see http://www.britmodeller.com/forums/index.php?/topic/234927776-raaf-p-51d-question/?hl=simonl#entry1143403), I found that as a Dallas built P51-D: - a cuffed propeller was OK - general consensus was that the wings would have been filled The filling of the wings I must admit filled me with some trepidation, it seemed somewhat unnatural to be filling what looked like fine detail. Once I had filled the requisite panel lines using some images I found on the web as a guide, I must admit I wondered just what I done. I used Tamiya filler, thinned with some Tamiya thin cement and painted on with an old paintbrush. To take my mind off the mess I had made, I started on the seat and the cockpit, which went together pretty well. Very soon I was sticking the fuselage and wings together. I must admit after all I had heard of this new kit I was expecting less trouble than I got - maybe I was just a bit negative after the experience of the filling. Anyway, I got work with various grades of wet'n'dry and then primed the model with Tamiya Primer from a rattle can - and was pleasantly surprised by what appeared.
-
Hi, After being bought this for Christmas along with a Spitfire F22 I decided to set aside some time for the building of this over the weekend/new year, I've primed this with a generic primer from the local pound shop which seems to do quite well. I've also ventured into Airbrushing for the first time with a "Expo AB652 Starter Airbrush kit" which was bought for me by the extended family which uses the can's of propellant which I can get a 750ml for £8, and did a small test with a scrap Spitfire mk1a I had in the drawer so have enclosed some photo's of my first attempt! First off the Unboxing: First use of the Airbrush: Will get some more shots of the interior up as soon as I can! Thanks for looking John!
-
Once in a while its a good thing to go to stash and select something on a whim. Take it out and just build it without getting tied up in knots about planning, research, finding etch sets, decals, improvemnets, etc etc. Just reconnect with the fun of building, open the box and crack on! One of my all time favourite aircraft is the P-51, and one of my all time favourite kits is Tamiya's P-51, so out of the stash it came. If you have never built one of these, you are missing a treat. It goes together beautifully and is a pleasure to build. I chose 'Shangri-La' flown by Captain Don Gentile of 336 Fighter Squadon, as I remember buliding Revells 1:32 scale kit of the smae aircraft in the 1970's, and I like the 'boxing parrot' marking. I put the pilot in as I had no etched seat belts and he was a good way of covering that up!. The only aftermarket I added was s pair of True Details resin wheels as I happened to to have a spare set with nice block tread on. Other than that it is an 'out of the box' build. After a simple, straightforward, fun build, 'Shangri-La' is now complete; Did I mention that I like Mustangs? Here are a few more Thanks for looking and happy new year to all. (My top tip for 2014 - Build a Mustang!) John
- 15 replies
-
- 11
-

-
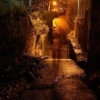
Modified P-51 Precious Metal. This P-51 is re-engined with a Rolls Royce Griffon to compete in the unlimited class at Reno. It is based at the Kissimmee Air Museum in Florida where it was photographed by Bootneck Mike.
-
 P-51D Mustang 357th FG 364th FS Major Richard Peterson 1944 Finished this one yesterday. I've had her on the go for a few weeks as a fill in build between other builds. I've used the old Hasegawa kit which I picked up for £2. This build has been a used as a try out for a few different things, so it not one of my best. Thanks for looking
 -
 Originally released in the 1960s and available (yet again) this year it has been superseded by the beautiful offering from Sweet. I'll be building this OOB but using decals from the Sweet kit for 43-6819 flown by Capt. Duane W “Bee” Beeson. The Revell kit comes with decals (rather nice quality as well!) for Yeager's "Glamorous Glen" and I'm saving those for one of the Sweet kits.
 -
I have already pledged to build the 1/32 Revell Me-110 and have started on it (pictures to come), but when I went to go get paints at my local hobby shop, I ended up with 2 kits that called my name. The kit that I am doing here is the 1960s Revell 1/32 P-51 Mustang. I remember this as a kid and was irritated when I couldn't afford it at the time. So my plan is to build this as a working model with the two electric motors, one to spin the prop and the other to raise and lower the landing gear. There is also some levers designed to drop the bombs too. Thinking I have nothing better to do and somehow believing I am not really complicating things all that much, I plan to ditch some of the innards of this kit, as it leaves a lot to be desired, and see if I can adapt some aftermarket kits: Aires (gunbay), Barracuda (cockpit upgrade and instrument panel), CMK (interior detail set) and Eduard (fabric seatbelts). I have no idea if this will work. I thought about getting the wheel bay set, but if I do then I don't think the feature of raising and lowering the gear will work. The aftermarket is on order and should be arriving next week. In the mean time, I will begin work on the stand holding the electronics and see if I can renew my Future supply as there is a lot of clear to dip. Here is the cover and the sprue shots. The sprue colors are a little garish, will have to do something about that. I have started on the control box and got the gears and the first motor installed. Next is doing the wiring inside of the box. The instructions have you just trap the wires, but I am going to break out the soldering gun for the wiring. Back to the Me-110 and may have to steal a little time for the Mosquito.
-
As above really, anybody know whats in the box? Is the kit and decals OK or should I avoid it http://www.ebay.co.uk/itm/J-26-EARLY-P-51-B-MUSTANG-SWEDISH-AF-1-72-MASTERCRAFT-LIMITED-EDITION-saab-/360501260122?pt=UK_ToysGames_ModelKits_ModelKits_JN&hash=item53ef8caf5a Cheers Chris
-
Many countries used the Mustang after world war 2, even the USA. I bought an Airfix quick build P-51D but want to do it in a post-WW2 scheme with standard decals that I dont have to order or make. Please, any suggestions would be welcome. Btw I was thinking Navy (US or UK) and COIN aircraft (US or UK). Thanks
-
 1/72nd North American P-51H Mustang USAF & ANG Source: http://modelweb.modelforum.cz/2013/08/16/novinky-rs-models-na-srpen-2013/?lang=CS - ref. 92144 - P-51H Mustang USAF ref.92148 - P-51H Mustang ANG V.P.
 -
As the title suggests did P51's that saw service in the RAF retain their original seat harnesses or were they retro fitted with the Sutton type harness? Thanks in advance Yours aye Iain
-
Source: http://www.hpmhobbies.com/high-planes-p-51a-mustang-precious-metal-ii-racer-kit-1-48/ 1/48th P-51A Mustang "Precious Metal II" racer kit by High Planes - ref. HPR048015. It's basically the 1/48th ICM's P-51A kit with High Planes resin parts and decals. V.P.
-
Hi, some quick shots of a recently built Tamiya Mustang III, one of Horbaczewski´s mounts. The paints are a mix of Tamiya sprays, Humbrol and Citadell acrylics while the decals are a mix of Tamiya´s and AJ Press "Polish Mustang Units". I managed to destroy the correct decals for bombing missions so had to use the ones for Horbaczewski´s other Mustang though....
-

Fill-in between Harriers - 1/144 models
ChocksAway posted a topic in Ready for Inspection - Aircraft
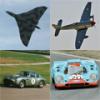
I thought I'd have a break from Harriers for a while and build a few models from my 1/144 collection. I also completed a build of the Space Shuttle for some friends. I did an Egg Plane for good measure, at the same time as the Eindecker build. Here's how they turned out ... The Dragon / Italeri 1/144th Intruder A-6E. Nice little kit, but the decals I had were completely knackered and many went on in little pieces. One for the dustbin of history perhaps ... Next up is the Airfix 1/144th Space Shuttle (yes I know it's in the wrong place as not an aircraft - well most of the time not, anyway). Built from out-of-the-box for friends - this is done as Discovery ... A lovely little P-51D Egg Plane and my first attempt at a rattle can paint finish (with a touch of the lived-in look) ... And last but not least, having seen an artist's impression of Flt Lt Alan Pollock's unauthorised flight through Tower Bridge, I thought I'd see if I could replicate it. I downloaded and printed a card model of the bridge and combined that with the Revell 1/144th scale Hunter. I made up a few decals - well, I made up a lot of things in this build. The black blob is the Loch Ness monster - she's hiding a glue blob that removed the ink from the Thames! The caption headline is "Oh Pollock! I think my wings look big in this" ... Comments welcome as ever. Back on the straight and narrow again now with a build of a 1/48th scale Harrier AV-8C flying with VX-5 "Vampires". -
P-51B 'Old Crow' Clarence E. "Bud" Anderson This is Bud's first Mustang that he received upon arrival in the UK replacing the P-39s that the Group left behind in the US. You will notice the white nose and spinner. This was just before the 357th adopted the yellow and red checker-board and yellow and red striped spinner that was so characteristic of the Fighter Group. This is the 'Old Crow' boxing of the Academy kit, although I didn't use the kit decals as they was for a later 'Old Crow' Instead I used one of the options from one of Eagle Strikes 357th sets. Right on with the photos. I have included photos taken on a blue background and identical shots taken on a white background. Please tell me which ones you prefer when you comment on the build. Thanks. Thanks for looking, as per usual your comments are welcome.
-
 What we have here is my fourth build since my thirty year break. There does seem to be quite a few of us like that. Must be the water. Or the pies more likely in my case. So, after fighting with my 1/72 SHAR build (and winning), and with time being at a bit of a premium, an OOB build of the very nice new Airfix F-51 Mustang was in order. It's a shame they weren't this good when I was at school. Even so, I like to try something new in these 'return to modelling' builds, so an NMF was just the ticket. I thought I'd try the Alclad2 stuff everyone bangs on about, so this is just a simple Alclad2 Aluminium, with some Tamiya metallic acrylics over the top in places. It also appears that Mustangs do appear to be a bit popular this week, so sorry for posting another one. Not sure what my next build will be, maybe another cleaner NMF on an F-100D, but here are the pictures of this one. Setup01 by IrritableRabbit, on Flickr Setup03 by IrritableRabbit, on Flickr Setup02 by IrritableRabbit, on Flickr Setup06 by IrritableRabbit, on Flickr Setup04 by IrritableRabbit, on Flickr Setup07 by IrritableRabbit, on Flickr
 -
 The following two planes where built for "The Battle for the Third Reich" Group Build, they where done totally out of box and I am fully aware that the grey on top is too dark, I was following Vallejo's colours for it. Live and learn eh? Please be gentle as this is my first RFI thread North American P-51 B Mustang III No. 316 (Polish) Squadron, Royal Air Force Friston, UK, August 1944 and No. 112 Squadron, Royal Air Force, Tantarella, Italy, 1944. Kit: Revell 04133 and Revell 04137 Scale: 1:72 Paint: Vallejo Model Air and Model Color Extras: Lots of swearing... and shamelessly stealing Mish's format Build thread: Linky Clicky Here... Thank you for looking, Kind Regards, Dazz
 -
Hello one and all, First of all, I hope it's okay to join in on this group build even tho I hadn't agreed to join it? I will be building a pair of Mustangs, both RAF ones, I know the theme is the Battle for the Third Reich, is the way up from Italy allowed? If not I still have the other model which I will be building at the same time anyhow. I started these two as I was waiting for the filler on my F-15 ACTIVE to finish drying/setting. Well onto the shots. Box shots... I am aware that the box art on the above model depicts an aircraft that was in China in 1944, thus eliminating itself from this GB, however the second option is an RAF aircraft which is shown below, which I think is okay for this GB, please correct me otherwise tho. Do you like my bed sheets The schemes I will be using. The Decals... Gotta love a good sharkmouth... The sprues, now I am cheating here as there is 2 models, the sprues are exactly the same for both planes bar the weapons so I will just post one set. And the work I have done thus far on the cockpits and fuselages. Done some basic work on the cockpits. Not going too detailed with the cockpit as the canopy will be closed, so you will not see much if anything. wondering if I want to have the flaps lowered or not.. hhmm... both of these builds will be totally OOB. I have got 2 of each of these models in the stash as well so I will AM those buggers to the max when I get around to them. Thank you for looking, Kind Regards, Dazz
-
HI folks, finally cleared the snow off the runway(picnic table) airfix new tool mustang, great little kit,sorry it,s the same old scheme thanks for looking,Steve.
-
 Mustang – Thoroughbred Stallion of the Air Fonthill Media The Mustang started life in response to a need for the USA to supply fighters to the RAF. Initially powered by an Allison V-1710 engine with a single stage supercharger, performance low down was good, but at higher altitudes was unsatisfactory. Early combat with the RAF was predominantly in the ground attack role making use of it’s low level capability, but there was a need for an escort fighter that could perform at high altitudes. The rest as we know is history. When the Mustang met the Merlin, a true thoroughbred was born. The Mustang became infamous for its ability to take the air offence deep into German territory when escorting the USAF bomber streams during daylight raids due to its superb range and endurance. Written by Steve Pace who has been writing aviation material for 40 years and a former Boeing employee working on the 707 & 727 production lines, this up to date record of the Mustang delivers an indepth record and understanding of the aircraft from before its conception to the current day where some still survive and partake in airshow and racing circuits. With over 200 pages and 200 images of which over 60 are in colour, the book is broken down into logical chapters. It comes in hardback form approximately A4 in size with high quality matt finish pages. Starting with a historical over view of the A-36, F-6 and P-51 leading into developmental highlights throughout its life cycle, a great amount of detail supported with good quality black and white images lays the foundation for the rest of the book. It links political and historical events around the world that drove the development of the aircraft as well as summarising the key technical progressions that allowed it to stay in the front lines for so long, indeed long after World War II. From there, the focus turns to World War II. Starting with its role within the US Army Air Force, again delving deep into it’s technical evolvement unearthing many experimental trials and prototypes to evaluate new ways of getting the most from the aircraft. Whilst the most notable event being the transition from the Allison to the Merlin powerplant, other developments included ski’s and weapons carriage. The same format follows in subsequent chapters looking at the Mustang in RAF, RAAF and other foreign service. A break in the flow of the book has 32 pages with colour images going right back to 1940 in prototype form right up to current restored aircraft. These pages are printed on gloss paper. Special dedication to each main subgroup is given, the A-36, P-51, F-6/RF-51 and of course F-82 twin Mustang with chapters on each. Mention also goes to late derivatives such as the Piper Enforcer, famously being powered by a turboprop. Service and development after the war gives particular focus on operations during the Korean War where the Mustang played a key role in ground attack operations against the North Korean troops trying to push forwards. Again, the long range and good payload of the Mustang compared to the jets of the era made it highly effective in this role which enabled it to return to front line service. A full 21 pages are dedicated to the structures and systems employed and evolved in the aircraft including drawings of fuel layouts, supercharger design, gun exploded diagrams and many more. This section is particularly valuable for modellers due to the close up photographs and diagrams to assist scratch building. In the appendices at the rear of the book are no less than 20 combat accounts from various pilots who flew on such operations. This makes for excellent reading and inspiration to get a feel for what the aircraft was like when it mattered. Conclusion This is a very detailed book, perhaps the definitive book covering the complete lifespan of the Mustang up to the present day. Due to the way the chapters are organised and written, there are however duplications of information to the point of having the same photo and text captions 3 times throughout the book referring to the XP-51G. As such, the book could probably have less pages without losing on value if one was to be critical. It provides a good mix of factual information in written form and pictorial references that makes it an ideal modelling reference book. If you’re Mustang fan and want some ideas and inspiration for your builds, you will find everything you need in this. Review sample Courtesy of
 -
After starting a can of worms on colours (http://www.britmodeller.com/forums/index.php?/topic/234931518-airfix-172-dominican-f-51-colours/) here is my take on the new Airfix F-51D using the Fuerza Aérea Dominicana markings in the box. Not too happy with the grey-white undersides, sit of the undercarriage or canopy painting\fitting (all down to my modelling rather than Airfix fault) but think it looks OK all things considered Other than adding some tape seatbelts and microscopic hardware from an ancient Reheat fret of buckles plane is as it comes in the box. Tan is Lifecolor, Green and White from Tamiya, all brush painted then Glossed with Quickshine before and after decals. I went for grey interior as some pics suggest the seat is grey rather than interior green, likewise white\grey for the UC bays. If its wrong its wrong. MIG Cold Grey Wash to finish over Lifecolor Matt Varnish. Anyway, hope you enjoy
-
 P-51D Wheels (for Tamiya) 1:32 Eduard Brassin The big Tamiya Mustang has been with us a while now, and these replacement resin wheels should improve the detail of the kit parts, as well as removing those rubberised tyres, which are like marmite with modellers. You either love 'em or hate 'em. I'm in the latter camp, so am pleased to see this set reach the market. Arriving in the standard Brassin clamshell package, the set consists of two resin tyres, with four hubs, two for the front, and two for the rear of each wheel. The wheels are attached to their casting blocks at the bottom of a very slight "weight bulge", so removal will be quite easy. A pair of slim outriggers improve casting and channel bubbles away from the wheels, and should present little clean-up due to their small footprint across the diamond tread pattern. The hubs are similarly mounted and should be easy to remove and clean-up. The spokes and lightening holes will need clearing of a fine flash that is there to ease casting. Poke them out with a needle and clean up with a sharp knife and a little patience. Each pair of hubs then affix to the ridge in the centre of the tyre, giving the correct see-through look to each hub. The depression in the back of the hub should then allow it to slide straight onto the kit gear leg. The mask sheet (not pictured) provides four doughnut shaped masks to aid painting the hubs after the wheel itself has been painted. If you intend on spraying the hubs, you will need to extend the mask with a little extra tape to avoid overspray, as the masks don't cover the whole tyre. This is standard with wheel masks however, so will be familiar to most. Conclusion It's getting difficult not to run out of superlatives for these Brassin tyres, but rest assured that casting quality and detail is up there with the best. If you're a detail freak, you'll need to doctor the "GOOD YBAR" logo on each tyre, but as that's there to avoid copyright issues, that's not too much trouble. Very highly recommended. Review sample courtesy of
 -
 Red Roo Decals 4847 - The Away Team Part 1. 3 & 450 Squadrons RAAF P-51C in Italy 1044-45 This is a large sheet featuring P-51C Mustangs of 3 & 450 Sqns RAAF. The decals seem to me to be very well printed with good colour density and in register. A full side of A4 colour instructions is provided for each decal option. The sheet provides full details and roundel to make 6 models. Most aircraft feature a light blue painted rudder with the Southern Cross on it. 1. FB128/ CV Mustang III 3 Sqn Lavariano, Italy 1945 This was one of only two aircraft fitted with Malcolm hoods. The aircraft retains a white noseband remnant of ETO recognition marks, but the rest have been removed. The aircraft has at some time been repainted in a non-factory pattern camo. RAF Colours used. 2. FX880/OK Mustang III, 450 Sqn Lavariano, Italy 1945 This was the other MK III fitted with a Malcolm Hood. The aircraft has patches of a lighter green paint either side of the engine cowlings suggesting something has been removed. The aircraft has at some time been repainted in a non-factory pattern camo. RAF Colours used. 3. KH631/ CV-V Mustang III, 3 Sqn Italy early 1945. Aircraft has factory ANA colours (or should that be colors?) The RAF Sky band at the rear has been over painted in a darker green possibly RAF Dark Green. 4. FB244/ CV-V Mustang III, 3 Sqn RAAF Cervia Italy, Jan 1945 Aircraft has been repainted in a non factory pattern using RAF colours. There is a small crocodile logo in black on the port side. The codes overlap the serial. 5. FB244/OK-F Mustang III 450 Sqn Lavariano, Italy 1945. The 3 Sqn codes were over painted in slightly lighter colours and these are given as decals to apply before applying the 450 Sqn codes.It appears this aircraft also had a repaint/repair around the port windscreen. 6. KH616/ CV-<> Mustang III, 3 Sqn RAAF, Fano Italy Dec 1944 Aircraft has factory ANA colours. Spinner is Red. Red Roo Decals 4848 - The Away Team Part 2. 457 Squadron RAAF Spitfires in the UK 1941-42 This is a medium sheet featuring 4 Spitfires of 457 Sqn RAAF. The decals seem to me to be very well printed with good colour density and in register. A full side of A4 colour instructions is provided for each decal option. The sheet provides full details and roundels to make 4 models. 1. Spitfire MK1, X4817, BP-C 457 Sqn RAAF, Jurby Isle Of Man Sept 1941 Aircraft in the standard RAF Dark Green, Ocean Grey & Medium Sea Grey camouflage scheme. A small Australian Flags was carried on the cockpit door. The significance of a small white rabbit under the windscreen is not known. 2. Spitfire MKI, N3246, BP-P 457 Sqn RAAF, Jurby Isle Of Man Sept 1941 Aircraft in the standard RAF Dark Green, Ocean Grey & Medium Sea Grey camouflage scheme. 3. Spitfire MKIIA, P8175, BP-R, 457 Sdn RAAF, Andreas, Isle Of man, Oct 1941 Aircraft in the standard RAF Dark Earth, Dark Green & Sky type S. This aircraft was a presentation aircraft that bore a silhouette map of Australia, with Charleville written beneath it. The aircraft also carried the legend “Baltic Exchange II” on the starboard side beneath the windscreen. 4. Spitfire MKVb, BL351, NP-H 457 Sdn RAAF, Andreas, Isle Of man, Feb 1942 Flown by Flt Lt J.A.A Gibson, B flight commander. Born in England but lived in New Zealand Gibson is believed to be the only Allied Pilot who flew operations in The Battle for France, The Battle Of Britain, the ETO and SWPA. He achieved 14 victories in The battles for France and Britain. Red Roo Decals 4848 - The Away Team Part 3. 457 Squadron RAAF Spitfires in the UK, MTO & Europe 1943-45 This is a medium sheet featuring 4 Spitfires of 457 Sqn RAAF. The decals seem to me to be very well printed with good colour density and in register. A full side of A4 colour instructions is provided for each decal option. The sheet provides full decals to make 5 models. 1. Spitfire MkVc, EE797, BQ-Y, El Dabra, Egypt Oct-Dec 1943. This aircraft was one of the first taken on strength by 451 Sqn. The aircraft was finished ion the Dark Earth, Dark Green over Azure Blue scheme. The Dark Green was over painted onto Middle stone areas leaving some slight over spray 2. Spitfire MkIXc MA466, BQ-S, Corsica, France May 1944. 451 Sqn was redeployed to support the invasion of Italy & Southern Europe during May 1944. This aircraft was finished in the high altitude scheme of Medium Sea Grey uppers over PRU Blue lowers. 3. Spitfire MkIXc MH771, BQ-M, Corsica July 1944. This aircraft was finished in the standard day fighter scheme, with a red spinner. 4. Spitfire MkXVIe TB592, NI-V, Matlaske, UK, March 1945. By this time 451 Sqn had been serving in the UK Since December 1944. They then moved to Marston in Feb 1945 before joinin12 group in March 1945. Operating from Matlaske the sqn participated in the hunt for V-2 rocket sites until the end of WWII. This aircraft was finished in the standard day fighter scheme. 5. Spitfire MKXIVe NH895, NI-K, Berlin, Germany October 1945. After the end of hostilities 451 sqn served as a part of the occupying forces in Germany, based at Gatow Airport in Berlin. Unlike other aircraft in the sqn NH895 did not have the camera ports painted over. The aircraft had its sky band overpainted with lead to slightly darker paint in this area Overall Conclusions These are excellent quality sheets which provide more than enough options for those modellers wanting to model RAAF Squadrons which fought in Europe. The decals look well printed, in register with a good depth of colour. The instructions are excellent and show that great deal of research has gone into producing these sheets. Even though the 1/48 sheets have been reviewed here, I should point out these are available in 1/72 as well. Review sample courtesy of
 -
RAAF PR CA-18 Mustang MK 21/22 Red Roo Models - 1/48 By 1944 the Australian government had made the decision to replace its old P-40's and Boomerangs with the excellent North American P-51 Mustang. Initially 100 P-51D's were shipped in kit form to be assembled by The Commonwealth Aircraft Corporation of Australia. These were to be know as CA-17 Mustangs, in the end 80 were completed with 20 kept for spares. These were then followed by 100 P-51K's shipped directly from the US. In 1946 CAC was afforded a contract to build 170 P-51D's, these were to be designated CA-18 Mustangs. At this time the RAAF also had a requirement for a fast photo-reconnaissance aircraft, capable of operating alongside the fighter aircraft equipping their front line Squadrons. It was not a great leap of faith to take the decision to modify the CAC Mustangs already in production for the PR role. To this end the first 14 CA-18 Mk21 Mustangs and the last 14 CA-18 Mk23 Mustangs wer modified in this way. All of these aircraft being fitted with the Packard Merlin V-1650-7 (Merlin 68)as used on the MK21 Mustang. The first 14 aircraft modified were serial numbers A68-81 to A6894 and the last were A68-187 to A68-200. The conversion itself was fairly simple. Flat optical glass was mounted in a curved frame on the port side of the rear fuselage, and a vertical camera port that extended beyond the lower surface of the rear fuselage was fitted. This was protected by a solenoid driven shutter style door. In the cockpit a small electrical panel to control the cameras and door was fitted to the port side of the cockpit, fairly low down. To aid camera alignment black sighting crosses were marked on the upper surface of the port wing, and the port side of the canopy. The Conversion Kit The kit supplied by Red Roo to make this conversion is fairly simple. It contains the following parts; 1 x oblique camera port. 1 x vertical camera port. 4 x de Havilland Australia "Cuffless Paddle" propeller blades 1 x decal sheet 1 x instruction sheet 1 x CAC Mustang locally made seat (See review of this HERE) Instructions I am very impressed by the standard of the instructions from Red Roo. For such a small conversion you have a 21 page A5 booklet. This contains black & white drawings, b&W photos of real aircraft. Colour photos of the conversion "in progress", along with full colour decal placement guides. Full conversion instructions are given for both Tamyia and Hasegawa kits. Decals Decals are provided for 4 aircraft. 1. A68-84 This was the third aircraft delivered to the RAAF In 1947 & Wears wartime Markings. 2. A68-94 As photographed at Canberra ACT in May 1950 Post war roundels. 3. A68-187 As photographed following disposal from the RAAF to Adastra Airways at Bankstown. Post war roundels. 4. A68-200 The final Photo Mustang delivered to the RAAF. As photographed at CAC Fishermans Bend, Victoria in June 1951. Post War roundels. Conclusion A must for any modeller wanting to make an accurate RAAF PR CA-18 Mustang. Review sample courtesy of
-
CA-18 Mustang Pilots Seat RAAF Red Roo Models - 1/48 By 1944 the Australian government had made the decision to replace its old P-40's and Boomerangs with the excellent North American P-51 Mustang. Initially 100 P-51D's were shipped in kit form to be assembled by The Commonwealth Aircraft Corporation of Australia. These were to be know as CA-17 Mustangs, in the end 80 were completed with 20 kept for spares. These were then followed by 100 P-51K's shipped directly from the US. In 1946 CAC was afforded a contract to build 170 P-51D's, these were to be designated CA-18 Mustangs. As happens with home grown companies building other nations aircraft, governments intercede to equip these aircraft with home grown parts. As such the CAC CA-18's were fitted with a locally made moulded plywood seat. The seat attached to the support rails on the armour plates in the same manner that the NAA Built seat did. The seat was fitted with a three point quick release harness. The CAC seat was however a true "bucket seat as it had a depression moulded into the pan to accomodate the pilots parachute. No doubt this and other modification added to the cost of these aircraft much as similar schemes continue to do to this day! This Red Roo Models pack RRR48135 provides the modeller with two of these CAC seats. They do not come with belts. The seats are well moulded with the cast block on the bottom. The accurately capture the unique CAC Seat. In addition to the pair of seat the pack comes with a comprehensive 2 pages (4 sides) of A4 instructions. Not only do these provide information on the CAC seat, but give details of other modification needed to fit the seats. This is broken down into Instructions for Tamyia Kits, and Instructions for Hasegawa Kits. Finally information is provided on other "Aussie" mods for those wishing to super detail their kit. Conclusion A must for any modeller wanting to make an accurate RAAF CA-18 Mustang. Review sample courtesy of