Search the Community
Showing results for tags 'Modelcollect'.
-
 Modelcollect is to release a 1/72nd Boeing AGM-86 Air-Launched Cruise Missile (ALCM) set (20 pieces!) kit - ref. UA72224 Link to the Modelcollect 1/72nd B-52 kits: Sources: http://www.modelcollect.com/us-agm-86-air-launched-cruise-missile-alcm-set-20-pics https://www.luckymodel.com/scale.aspx?item_no=MC-UA72224 Box art V.P.
 -
 Are What-ifs allowed here? I hope so at least. Let's start first with a disclaimer: I mostly build aircraft and never something that stays on the ground. This is not just a Panzer-46 paper project but full on craziness since it's also a walking tank, a sort of Panzer-mecha, with a big rocket on top. What's not to like? The Rheintochter itself did exist though, and I've managed to see it in Berlin when I made a trip there some years ago: From a little Googling I found that the E series of tanks was an ambitious project that Nazi Germany couldn't afford but it has led to some remarkable stuff, some of it even available in plastic form. Modelcollect has issued a whole number of different E-75 configurations so I guess this stuff is exciting. For the interested, here is a look in the quite pretty box: The instructions looks quite nice, and are clear and easy to follow. Fun fact. To open the box, you need to be at least 15 years old, but to actually build it, you only need to be 14... There is a whole bunch of runners for this one though: To round it off, a small set of decals are also provided. The details are basic but ok. Umm, this does look like a turret with dual Mk103 30mm guns. Where does that go? Oh, it's supposed to hang from underneath!? Nice! Right, lets throw all caution to the side, and make a start with the rocket rail: The fit of the parts is not of Tamiya quality, but matches the detail level quite nice.
 -
German Sd.Kfz.553 Ausf. Vierfüßler KaiserKäfer 1:35 ModelCollect Fist of War Series Fist of War is an alternative history series dreamed up by the designers at Modelcollect where the technology toward the end of WWII took a bit of a leap forward on both sides, allowing Germany to survive the Allied onslaught longer, and with futuristic tracked and even legged fighting vehicles fighting on both sides. Some of the tanks posited so far have been logical extensions of the German E range of Standart Panzers, and some have been quite a bit more advanced than that, sprouting legs and thundering round the battlefield leaving footprints rather than track marks. Enter the KaiserKafer, which loosely translated means “Emperor Beetle”, and looking at it you can see why. The Ausf. version of Vierfüßler means “quadruped”, which is again a very visible aspect of the vehicle. Rather than looking like a tank on legs, it looks like a four-legged spider and has a long-barrelled 7.5cm cannon on each side of the crew compartment, fed automatically to reduce crew workload. Would it have worked? Very unlikely with 1946 technology, but who cares? The unknown technology advances could easily have taken care of the details, and as the box art shows a Haunebu flying saucer in the background, it’s not a case of what if, more like why not? If you check out some of the other creations they’ve come up with, you’ll deduce that they have very fertile imaginations. I kind of like it. The Kit This is a new tool from Modelcollect, and arrives in one of their smaller boxes of a similar size to a tank kit. Inside are eight sprues of grey styrene, a small decal sheet in a ziplok bag, and a diminutive A5 concertina instruction and painting sheet. The vehicle is split sensibly on the sprues with the head on the largest sprue, four legs on identical sprues, and the two panniers with guns on two more identical sprues, all of which will simplify the build process a little. Construction begins with the two 75mm cannons, made up from two halves each and ensconced within their two-part panniers where the breech and loading mechanism would be. The rear of the hull is made up inverted with the two weapon supports each having two parts plus a splined retaining collar, with the modeller advised to be cautious not to glue the parts too generously so that the mounts can move using the three détentes to hold it in position with a click, thereby elevating the guns accordingly. No-one likes a stuck-up quadruped, or for that matter a floppy one. The gun paniers are brought together with the now righted hull, which is given a cupola straight off a King Tiger, plus a pair of rear doors on a frame that completes the assembly. The rest of the hull is made up from a two-part lower hull onto which the crew compartment is built, with vision slits and access hatches added along the way. The interior is decked out with flooring panels, then detailed with remarkably normal-looking crew seats split into two at the front for the two drivers/pilots, and another two in the rear for the gun crew with some fun-looking instrumentation for each task group. The front roof is dropped over the drivers, and a hoop allows the connection with the gun assembly, with a rear bulkhead fitted first to section off the interior. No tracks on this model, but you do have four legs to make, and these start by making up two cylinders, long and short with mounting points and pistons for movement, so don’t cover them with glue. The feet are flat-bottomed with four moveable toes pushed into their position over the domes round which they can rotate if you don’t apply glue to freeze them in place. The rest of the leg is also reminiscent of the AT-STs from Star Wars, with a large lower leg and foot pivot at the bottom and knee at the top. The top leg is at an angle just like the Scout Walkers, giving the legs the feel of a “chicken” or dinosaur if we’re going to honour their Therapod heritage. At the hip is a huge pivot and each part of the leg has a piston as its muscle substitute, with a couple of armoured plates fitted over the vulnerable joins at the top of the leg, and a more substantial set of armoured greaves on the lower leg that join down the front of the shin. The feet are also attached at this point, then each pair of legs are attached to a figure of eight joint with one fitted to the front of the hull and the other at the rear. Markings The majority of the small decal sheet consists of generic vehicle numbers in red, plus two types of crosses in black and black/white. There are also two pairs of stylised charging knights on horseback in red or dull green, with each pair having one reversed so they can both be applied facing forward. Both options/suggestions have a base coat of late war Dunkelgelb, over which are painted two types of camouflage, and it looks like it’s up to you to invent the history behind their units and theatre of operation. From the box you can build one of the following, although the decals provided don't seem to match up: Surprisingly for a small sheet and most welcome is the news that the decals are by Cartograf, which is a guarantee of good registration, sharpness and colour density, with a thin matt carrier film cut close to the printed areas. Conclusion It’s a simple model that will be made quickly and relies heavily on how you paint and weather it as to how believable it will seem when finished. I’m not averse to a flight of fancy from time to time, and this is an appealing model, having a very “that could work” design ethos throughout, and obeying the laws of physics to the casual viewer. I’m going to build this, although I can’t say when yet. Highly recommended. Review sample courtesy
-
Hello Here is my last build of 2019. This is the 1/72 Modelcollect Boeing B-52G in guise of El Lobo II which took part in the first strike of Desert Storm with the CALCM, called Secret Squirrel. As my kit was one of the first boxes I had to scratch build some parts which were not correct for this very aircraft. It took me many hours but here is the result. Comments are welcome but I will not modify the kit now.😄 The original tail of the kit Now with the modified radar and the 40" extension of Avionic Defense Systems Phase VI The modified leading edge Karman for the ALCM carrying B-52G I took from an old Italeri kit. When added on the kit before a long sanding operation. Patrick
-
Modelcollect is to release a 1/48th Messerschmitt P1101-104 Heavy two-seat destroyer kit - ref.UA48004 Sources: http://www.modelcollect.com/wwii-german-messerschmitt-p1101-104-heavy-two-seat-destroyer https://www.facebook.com/Modelcollect/photos/a.153755038112938/1244267079061723/?type=3&theater V.P.
- 5 replies
-
- 4
-

-

-
- P1101
- Messerschmitt
- (and 1 more)
-
After the Focke-Wulf 0310239-10 (link), Modelcollect is to release in 2019 a 1/48th Arado E.583 kit - ref. UA48003 Sources: http://www.modelcollect.com/wwii-german-arado-e583-heavy-fighter-scale https://www.facebook.com/story.php?story_fbid=1187171748104590&id=153752164779892 Box art V.P.
- 8 replies
-
- 4
-
-
- Arado
- Modelcollect
- (and 1 more)
-
Modelcollect is to release a 1/72nd Lockheed A-12 Oxcart / SR-71 Blackbird family. Source: https://www.facebook.com/Modelcollect/photos/a.153755038112938/1136440403177725 Box art - ref. UA72??? - Lockheed A-12 Oxcart Any link with the Kiwi Models project ? https://www.britmodeller.com/forums/index.php?/topic/235026630-172-lockheed-a-12-project-oxcart-by-kiwi-models-box-art/ V.P.
- 7 replies
-
- 3
-
-
- Modelcollect
- SR-71
- (and 1 more)
-
Boeing B-52G Stratofortress (UA72202) 1:72 ModelCollect The original contract for this long-lived strategic bomber was issued only a year after WWII, and went through some fundamental changes due to the speed at which aviation technology was advancing, initially having a greenhouse type cockpit akin to the B-36 Peacemaker, but eventually ending up with a more traditional cockpit, swept wings and turbo-jet engines, much of which has stayed the same in name at least since the design settled down from a rather WWII era first draft with straight wings and a prop. A B-52 prototype took to the sky in the early 50s, that would be just about recognisable as the B-52 we know now, but at this stage it still had the weird cockpit that was dropped just in time for series production. The A variant was used as a test bed, and as such only three were made, skipping quickly to the B that was the first in-service airframe, after which constant revisions walked the type through the alphabet to the G, which was the most major redesign up to that point, giving it new flying surfaces, an integral "wet wing" for the major fuel stores, the rear gunner became remote and carried out his job from the cockpit, avionics and radar were upgraded, and some rather thirsty J75 engines were used, later to be swapped out in the H for more fuel economy. The G was the most common variant with almost 200 made, and it went on to serve with the USAF until the last one was drawn down and dismantled in 2013. It could carry conventional or nuclear weapons, and for a period was tasked with carrying stand-off nuclear missiles while the older aircraft were used in Vietnam. After that conflict, the systems were updated to improve offensive and defensive capabilities, and many Gs were involved in Operation Desert Storm, flying from Saudi and RAF Fairford amongst others. After a friendly-fire incident with a HARM missile damaging the tail of one B-52 after locking onto the fire-control radar, the aft turrets were deactivated and a crew-member removed from the roster. The G left service in the 90s, and many were stored at the bone-yard before they were destroyed due to the needs of the START treaty. Only its successor the B-52H remains in service today, and is scheduled to do so for a ridiculously long time yet, allowing several generations of fliers to crew the same basic airframe. The Kit The B-52 has been not so much overlooked in 1:72, as stuck in limbo with only one kit in the scale that originated a long time ago and has been found in the boxes of several manufacturers over the years. ModelCollect have now broken that kit's stranglehold on the subject and scale, with this 100% new tool of this monster of a bomber. We have been waiting a little while now since the announcement, but it is finally here, and it is heavy. It arrives in a large box with an attractive painting on the top that appears to be from the angle of a refuelling tanker or similar, and inside there are, what can only be described as a huge number of sprues that have quite some weight to them. Just the main parts weigh a ton, and with all the interior and engine parts filling up the rest of the box, it's going to give the postman a hernia if you order more than one at a time. Our review sample took a beating during shipping from ModelCollect, but it has arrived in pretty good order, although the external carton has gone straight to recycling as it no-longer has and perpendicular sides. I have seen the Buff (Big Ugly Fat Friend, where the word "Friend" isn't what they really mean) many times at airshows and it is a substantial aircraft, but I wasn't quite prepared to see wings that were about as long as my forearm and outstretched hand. Some of the bags on my sample had split due to the rough handling this solitary model had received, but yours should fare better if it has been sent in the company of others on the slow container boat from China. This shot includes the parts knocked off the sprues in transit and the flight crew console (far left), which has been glued together. The fuselage has been moulded in sections in order to squeeze other variants from these toolings, so the box is just a bit longer than the wings, rather than having to accommodate the length of the full thing. It has a common centre section that includes the wing root, a nose section, tail section, and in this boxing, a separate tail gun, which changed throughout the development of the type, so makes sense for it to be separate. The skin has been depicted without any "oil-canning" that is seen on the real thing, which would probably have increased development costs substantially, and doubtless resulted in complaints from people that thought their model was faulty or "done wrong". If you want to portray the beast realistically, there are a number of tutorials out there that can be used to distress the metal, but check your references, as the patterns change when the aircraft is in the air, on the ground and probably also when it is loaded with fuel and weapons. Speaking of weapons, there are a large quantity included, which makes up a fair portion of the kit's weight, but by no means the majority. The nose section of the fuselage should appear to the left and right of this sprue, but these parts were knocked off during transit and are shown in an earlier photo. There are six main sprues in a mid-grey styrene, plus six fuselage and wing parts (my nose parts had fallen off the sprue), eighteen smaller sprues relating to the weapons, a clear sprue, two sheets of Photo-Etch (PE) brass, one of which is black (anodised?), a pair of decal sheets, and an A4 instruction booklet with glossy cover. It is clear that some sliding moulds have been used to obtain the detail on the fuselage parts, especially around the wing root and the sensor fairings under the nose. You will need to prepare these areas by hiding the mould lines before painting, preferably sooner than later. Once you've got past the sheer size of this model in 1:72, construction begins with the cockpit, which starts with a long floor with moulded-in aft bulkhead. Four crew seats are added, and each one is an ejection seat, with a free-standing launch-rail attached to the back, and a seam running down the centre of the cushions, which could be hidden by picking up some crew figures, seatbelts or just by adding a thin layer of pewter foil to the front. The front seats face in the direction of travel and have a control column each, and a large wrap-around console added later, while the rear seats of the Electronic Warfare officer and the gunner face backward, staring at the empty bulkhead that won't be seen anyway due to the letterbox canopy. There is a low structure fitted on one side of the space between the seats, and a stowage area on the other, plus what appears to be a jump seat just aft of that. The instrument console is built from a pair of parts split down the middle (see the fuselage picture for the parts glued together), and the black PE parts are fitted within to add the necessary instrument details to the front, and sides, with five parts in total. The console fits via a butt-joint, so placing them into their recesses on the floor is a wise move to ensure they are straight and level when the glue cures. The lower deck has a hatch in the floor from the upper, and a crew ladder allows access for the two crew there, who exit via hatches on the bottom on their compartment on their downward-firing seats that have remained unchanged through the years. There is also a large bank of equipment and instruments surrounding the lower crew on three sides, providing navigation and radar navigation services to the flight crew. This completed module glues directly to the underside of the upper floor. The B-52 is fairly unusual in having a narrow track main gear arrangement that permits steering on all main wheels, allowing it to do some fancy zig-zagging on the ground for airshow visitors. There are two bulkheads that hold the gear legs, with one pair attached to each side, which gives them a staggered appearance and four separate bay doors that can be seen straight through if you are at the correct angle. Four gear legs and eight wheels are made up and attached to the framework bulkheads, with a scrap diagram showing how the retraction jacks fit to the framework. The bomb bay also has to be made up, and this comes complete with a rotary ejector rack and eight Cruise Missiles (AGM-86) that populate it, crammed in tight to utilise all available space. Each missile is built from two halves, a separate intake trunk high and to the aft, plus a set of folded wings and PE tail fins, all of which fit on the central axle of the launcher, with a pair of suspension frames at each end, allowing the rail to rotate freely. It installs in the bay roof, and is joined by the end bulkheads, at which point the fuselage can be closed up. The instructions show you building up the nose assembly with the cockpit inserted and glazed, and then mated to the central section. This can result in tricky seams between the sections if you have been a bit sloppy with the fitting, so it's worthwhile at least considering building up each fuselage half completely before adding the interior parts, but taking care to get everything lined up as you go, as each method has its own pitfalls. The centre section receives the bomb bay and landing gear, but additional equipment boxes and gear bay doors with hinges are installed first, along with the gear bay roofs, a long perforated section that parallels the edge of the bay on each side, and some partial bulkheads. The landing gear bulkheads fit in substantial grooves in the interior for strength, and a set of bracing struts are added to the sides of the fuselage before it is closed up. Much of this section will need to be painted in the interior colour before closing up, as the nature of the gear openings will ensure that any detail will be seen. The bomb bay doors are secured to the fuselage by separate hinge parts that are best left off until later, after which the attention turns to the tail section, which has a solitary equipment box added to the front interior before it is closed up. The rear "stinger" is then put together from two halves, with an additional part for the four-barrel gun mount slotted into the centre. The BUFF can carry additional weapons on two wing pylons carried between the fuselage and inner engine pod. These are included, with six more AGM-86 Cruise Missiles and six Tomahawk Cruise Missiles (TLAM) for you to use as you see fit, with different hole diagrams for each type to fit them on the launcher. The twin engine pods are split top and bottom, with intake part, internal fan and exhaust parts separate, and a two-part pylon for each one, differing depending on which station they are fitted to. The small external fuel pylons are also included for fitting near the wingtips, and once you have glued the two wing halves together, these sub-assemblies can be attached to their mounting points, with just the fuel pylon needing the flashed-over holes drilling out. The engine pylons are located via aligning them with the stub that stands proud from the leading edge, but if you anticipate handling the model after completion, it would be worthwhile adding some additional pins to the butt-joint to strengthen it. The outrigger landing gear that stops the BUFF from toppling onto its wingtip is a simple gear leg with retraction jack that deploys from a shallow bay, the roof detail of which is moulded into the inner face of the upper wing, and comes with bay doors for each one, and a two-part wheel to finish it off. The wings have a large mating surface, so should glue together well, and have been moulded with the correct anhedral, but an in-flight model would need to be jigged to reduce this, and you should take careful note of your references to obtain the right angles. The tabs and ledges that hold the wings to the fuselage could put a strain on the top fuselage joint, which may eventually separate if left stock, so it would be as well to add some strength to this area before closing the fuselage and adding the wings. However, some would be looking to make the wings removable for storage, as this is a huge model even at this scale, so whatever solution you use will have to leave those big wings loose. The flaps are separate, and have nicely detailed bays, but there isn't any reference made to being able to pose them opened, possibly because the flap tracks were never tooled, so it was abandoned as a feature. Who knows? At this stage all the assemblies are brought together, starting with the fuselage and ending with the wings, and finally the tail fin, all three parts of which fit to the aft fuselage with substantial tabs and slots that are each about the size of a 1:48 F-15 wing. Markings There is only one decal option in the box, but it's a colourful one, with a grey base and rust/sand camouflage over the upper surfaces. Only the port side of the aircraft is provided as reference to demarcation lines however, and although information is widely available online, it would have been nice to have more than just the nose of the starboard side as reference. The decals are spread over two sheets, the larger of which consists of walkways and stencils, while the smaller sheet contains the airframe specific markings. Both sheets are printed by Cartograf, which is a guarantee of good registration, sharpness and colour density, with a thin gloss carrier film cut close to the printed areas. Care will need to be taken with the walkways as a few are 15cm and longer, but if you decide to paint them instead, you can at least use the decals as a template. The colour callouts are in Mig AMMO paints, but in this internet age it wouldn't be difficult to transpose those to your own preferred paint brand if you need to. If you plan on depicting another airframe with aftermarket decals, it is important to note the under-nose EVS pods and tailgun are particular to some airframes and periods, which may place some limits on which other aircraft it can be modelled as without needing some physical changes. Conclusion Overall it's a great looking kit with just a few things that can be shrugged off as options that would have been nice to have. It's about time we had a new tooled B-52 though, and other marks are already in production, with an early and late H model and an earlier D, which should please a lot of people. Very highly recommended. Review sample courtesy of
-
 Hi everyone, here you have my last build: E-100 ausf.c with 128mm by Modelcollect in 1/72. Very recommendable kit, with delicate surface details and a PE set included. It comes also with a very well detailed engine compartment. Of course I had invented that abt.505 markings, this tank never saw a battlefield. In fact, just one prototype was build. Thanks! 😁
- 10 replies
-
- 24
-
-
Hi all This is a conversion I'm doing of the ModelCollect T-80BV kit to a modernised version. The sand coloured resin parts are home-cast pieces and I've used a few bits from other kits - the Zvezda BMPT and T-90A. A master for the turret reactive armour modules. Turret roof reactive armour I thinned the turret stowage basket The competed turret The completed model. A couple of coats of primer
- 14 replies
-
- 8
-
-
- T-80BVM
- Modelcollect
- (and 1 more)
-
Not much to go on, but it's a start. http://www.modelcollect.com/172-mt-lb-project
-
USAF B-2 Spirit Stealth Bomber (72201) 1:72 Modelcollect Once the concept of stealth was established by the mid 70s, the requirement for a deep penetration bomber that could evade radar was mooted, and proposals from two teams based upon flying wings were requested. Northrop won the contest, possibly due to their previous experience with the flying wing design of their earlier YB-35 and 49. The project was above secret for a good portion of its development, and with the advances in computer technology, it was no longer necessary to produce a faceted design, because the processor power needed for assessing the radar cross-section of curved surfaces was then available, resulting in a very smooth looking airframe. There were still a few jagged saw-tooth lines at the edges of panels to help with dissipation, but coupled with the Radar Absorbent Material (RAM) it has a radar cross section a tiny fraction of its size. The original requirement for the Advanced Technology Bomber (ATB) was 165 airframes, but dramatic rises in development costs and the fall of the Soviet Union caused a substantial reduction to a measly 21 airframes, but at a cost of $1bn each, that's hardly surprising. The delays also revived the ailing B-1B programme, which is such a graceful looking aircraft, it would have been a shame for it to not see service. Once the blanket of secrecy was lifted in the late 80s, it became the poster-child of the US technological superiority, and has been in service ever since, with a substantial avionics upgrade in the late noughties that gave it additional capabilities as well as an improved radar. It is an expensive aircraft to maintain, so its projected out-of-service date is a movable feast, but an unmanned bomber is currently alleged to be its eventual replacement, although with the B-52s scheduled to be in service after them, it's a case of who knows? The Kit Previously we had just one kit in this scale, and its teeth were beyond long – probably false at that age, so hearing about a newly tooled kit was great news for anyone wanting to build one. The old kit was renowned for being a bit of a swine to put together, and was also a bit light on detail and accuracy in places, all of which put a great number of owners of it (self included) off. Now we have a new kit, and it's a modern tooling from a company with a good reputation and although we're a bit late to the party, we're here now and very happy to have one to peruse. It arrives in a fairly large box, but then it does need one as it's a flying wing. Inside are seven sprues in a dark grey blue styrene, plus another six parts that make up the majority of the exterior of the airframe. The package is completed by a single clear windscreen part on its own sprue, a small sheet of pre-painted Photo-Etch (PE), a reasonably large decal sheet, and a glossy instruction booklet with the painting and markings guide at the rear. I don't usually talk about the interior packaging, but this time it's quite impressive, so I will. If it's the sort of thing that bores you to tears just skip to the next paragraph. You were warned! Inside the lower half of the box there is a laminated foam layer that has been custom cut to fit the six major external parts, two fuselage halves and four wing halves. It is a snug fit, and it would take a substantial impact to dislodge them, but take care when you pull them from the box so as not to bend any edges. There is a thin sheet of expanded foam material above and below this section that protects the parts from chaffing during transit either by the bottom of the box or the parts above, which is critical because the six parts aren't bagged. The other seven sprues are all bagged either separately or in pairs, which again protects them from damage and from any loose parts going walkabout in the meantime. The only thing that's missing is a piece of card to protect the small PE fret, but as this was at the bottom of the box with the decals and instruction booklet, there's not much chance of damage there. Ok, with the easily bored back with us, lets discuss the model in broad terms. Taking the main parts out and test fitting them together shows you just how big this thing is in 1:72, but as it has a wingspan of over 170 feet, that's probably only moderately surprising. The surface is nicely moulded with engraved panel lines that are there more from the fashion than through practicality, due to the airframe's smooth radar absorbent surface, although you are of course at liberty to fill or reduce their appearance with some filler primer if you wish, and some might consider them a little deep. After multiple layers of paint and varnish however, their appearance will be much reduced, especially if you have used a filler primer. The flying surfaces are separate, the engines are depicted as full length trunking, the cockpit is well detailed, as are the gear and weapons bays. A good well-rounded package with a hint of PE to get those instrument panels looking good. Construction begins predictably with the cockpit and crew area, which are linked. The floor is fixed to the aft bulkhead, and equipment housings are fitted around the sides. An archway leads to the office, which has low, wide consoles around the edges like something out of a Sci-Fi movie, into which the ladders for the ejection seats are fitted, with the three part seats affixing to the front. The seats are built from two halves, with a separate seat pan, so you will have a choice of either filling the seam down the back cushion, or you can hide it with some belts, which aren't included in case you were wondering. The PE console surfaces are distributed around the front and sides of the cockpit, with a grey background that has a lilac cast to it. I've found in the past that where there is a little variance between the background of PE parts and the colour you are supposed to use, that a fine brush with a little paint on it makes it pretty easy to blend them in, so it's nothing to worry about. The control columns are inserted into recesses in the floor, and then the instrument panel and coaming are covered with PE parts that fit onto the top of the cockpit tub. A scrap diagram shows the correct orientation with the coaming marked in red. As this is a blended wing bomber, the gear bays must be built up and installed in the lower fuselage (if you can call it that) before it can be closed up, as must the bomb bay. The gear bays are made up from four sides, and the struts are pinned between the sides in the lowered position for strength, with the bay roof added later - posing it wheels up may involve a little work. The bomb bay is built in a similar way, with a central divide, and the rotary bomb racks are constructed and filled with bombs ready to be installed between the front and rear bulkheads. This too has its curved roof fitted later on. The engine compartments have their walls installed as a single part with hinges added on each side, and then it's the three-part nose gear bay... installed in the nose of all places! The crew accessway is fabricated to the port side of the nose gear bay, with a moulded-in top ladder section and two fold-down lower sections, plus a portion of the wall, which links up with the cockpit, as you might expect. Before the fuselage can be glued closed, the engine nacelles are inserted into the apertures in the top of the fuselage, with optionally open or closed auxiliary doors, plus the refuelling port also able to be posed open or closed. The single part windscreen glazing is inserted from the outside, which will take some sensible choice of adhesive to avoid fogging, due to its prominence and clarity. Just as you thought it would be safe to close the fuselage, you have a set of full-depth intakes to build up, with their radar defeating s-shaped kinks, a simplified GE F-118 engine and the exhaust trunks. All of this is done four times, and they are then paired up with the intakes merging into their flattened profile, with the exhausts slipped through the rear, and the front glued to the underside of the nacelle. NOW you can close up the fuselage! However…. You will need more than 50 grams of noseweight, or it will be a tail sitter. Fortunately, there is a fair amount of space in there, but test-fit to ensure that it doesn't foul the join. At this stage she's wingless, but the instructions show you putting the myriad wheels (with separate brake details); bomb bay hinges and baffles, as well as all the bay doors as the next stage. It may be sensible to delay this until you have the wings on, to avoid knocking them all off during handling, with the associated bad language that usually entails. Each wing consists of two main parts that mate snugly with the fuselage, to which you add the three control surfaces and the outermost spoilers, which can be posed open or closed. Whether it is best to build up the wings as the instructions advise, or build each half onto the top or bottom part of the fuselage is difficult to say at this stage, but getting a good seam from the outset will doubtless give you a better finish, so ponder this before you start building. The final parts to go on are the two piece tail fairing, which has a large boxy tab and plenty of mating surface for a good grip. Speaking of mating surfaces, the wings are also fitted with two tabs, and there are large surfaces to bond, which should result in a strong join. There's also a trap waiting for you if you use clamps to hold the wings together, as it is possible to over-compress the leading edge joint, which will result in an overhang on the underside and a curved lower wing surface. The same is also true of the leading edge of the fuselage, but careful gluing and taping should see things turn out well, just keep checking that nothing has slipped whilst drying, as it will take a lot of effort (and filler) to correct if it sets up with a lip. Markings RAM is the colour, and that grey is given an FS number of 36118, and you will need a lot, because this is a pretty big aircraft. The various bay interiors are white, and the exhaust pathways are a grotty metallic colour, which you'd be best looking at some references to reproduce accurately, and the same advice could be applied to the grey of the RAM. From the factory the Spirit was a nice fairly uniform grey, but over the years with new applications of patches of RAM, the effects of the weather and flying for long periods through all sorts of conditions, it can appear a myriad of shades. The decals have been designed by Two Bobs, who have a good reputation as decal makers in their own right, and printing is by Cartograf, which is a guarantee of good registration, sharpness and colour density, with a thin gloss carrier film cut close to the printed areas. There are lots of walkways with some large expanses of carrier film between the tramlines, but unless you prefer manhandling long floppy lines, this is pretty much the only sensible design choice. Ensure that the surface is nice and glossy before you put them down, express all the air from under them on application, and they should go down nicely. Any remedial work on silvering is easily done by piercing the film with a blade or pin, then applying more decal setting solution. Lots of "No Step" symbols are included, and from the box you can build one of the following: SN 82-1066 Spirit of America 509th Bomb Wing Whiteman AFB, Montana March 2012 SN 82-1068 Spirit of New York 509th 13th Bomb Squadron, Whiteman AFB, Montana, July 2012 SN 82-1071 Spirit of Mississippi 509th Bomb Wing 13th Bomb Squadron, Whiteman AFB, Montana October 2004 Most of the decals are loviz grey, with the exception of the sensor panels, which are black with silver details, the ejection seat warning triangles, and some black/yellow hazard stripes that are applied to the inside edges of the gear bays. Conclusion Awesome. It's a great looking model of an aircraft that is either amazing or dull and grey, depending on which side of the fence you sit. I'm erring toward the amazing side of things, and hope to build this one soon. The detail level has been pitched just right for the average modeller, and there's nothing too tricky to deal with, other than the large decals. Care in painting the exterior will make the model, giving it the kind of patina that can be seen on the real thing. Super-mega highly recommended, as it's a monster, even at this scale! Review sample courtesy If you really want to go to town on the detail, Eduard have already released a raft of PE sets and masks that you can find here.
-
 E-100 Waffenträger with 128mm gun Modelcollect 1/72 This is Modelcollect's Waffenträger (weapons carrier) version of their E-100, carrying a turreted 128mm Flak 40. The company seems determined to release the E-100 with every conceivable weapon that they can shoehorn onto it, however impractical the result may appear. I built a couple of the other versions last year (which can be found here), and I quite like them for their utter daftness. This one was built mainly OOB, although I slightly detailed up the turret casing with lifting eyes, weld beads etc. and @Richard E very kindly donated some tools and stowage to dress up the hull a little. The full build can be found here And finally, here it is with the previous two instalments of this series of looniness Thanks for looking Andy
 -
Modelcollect Hobby Inc is to release in 2018 (?) a 1/48th McDonnell Douglas A-12 Avenger II kit - ref. UA48001 Source: https://www.facebook.com/Modelcollect/posts/1003754996446267 V.P.
-
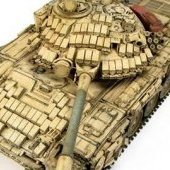
 As a modeller I have become very set in my ways, aircraft (and not just any old thing but quite specific types), 1/72 scale with a drift into 1/48. The subjects are generally the same or very similar as I build to themes. Lately however my Mojo has been almost non existent so in an attempt to kick start it back into life I have decided that 2018 should be the year I just build models, no themes, no single type builds just build whatever comes along. So with that in mind here I am with my first attempt at an armour subject since the very early 1980's (even then I was 99.9% an aircraft modeller). The poor innocent kit about to be mangled is the Modelcollect 1/72 scale T-72BA. Please feel free to offer suggestions along the way. Before I go any further I must state that I know nothing whatsoever about the subject, the kit or the accuracy thereof or, in fact, how to go about building and painting it (which will probably become apparent fairly quickly). Here are the contents of the box. It all looks really nice and well detailed to me and I like the fact that there are optional tracks. A metal lower hull will give the completed model a weighty feel but I'd have preferred the turned gun barrel that they include in some of the other kits in the range. I suppose I'd better start cutting bits off the sprue! Duncan B
 -
 Russian "Bal-E" Coastal Missile System MAZ Chassis 1:72 Modelcollect The Bal-E coastal missile defence system uses an surface-launched adaptation of the Zvezda KH-35 (AS-20 Kayak) known as the Bal (Ball) (SSC-6 Sennight) anti-ship missile system. The system is designed to guard coastal waters, straits and naval bases. The missile itself is fitted with a rocked booster for the launch phase and is designed to engage small vessels up to 5000 tonnes. The system has been fitted to differnet launch/control vehicles. This kit represents the demonstrator/test version of the Bal-E system, which used the MAZ-7910 chassis, while the production vehicle uses the MZKT-7930 chassis. As of October 2016, Russia is believed to have deployed 4 Bal-E units, each comprising 16 launch vehicles. Modelcollect are a Chinese firm who are largely known for their highly detailed and well-regarded 1:72 scale AFV kits. They have long specialised in post-war Soviet/Russian subjects such as their T-62, T-64, T-72 and T-80, as well as the new T-14 and a growing range of missile and rocket launchers and radar vehicles. Many of the kits are available as pre-assembled models as well as conventional kits. This particular kit has arrived direct from China, along with the MZKT chassis version, which we will review shortly. Inside the large,top-opening box are seven frames of parts moulded in grey styrene, as well as a slide-moulded cab, along with a frame of clear parts, eight rubber tyres, two frets of brass parts (one for the vehicle and one for the missiles) and a small decal sheet. The mouldings are clean, crisp and finely detailed. Construction starts with the lower chassis. Two long parts hold the road wheels, and between these the huge V-12 turbodiesel engine, gearbox, drive shafts and various transfer boxes all fit into place. These are covered with small plastic protective plates to prevent damage when traversing rough ground. The eight road wheel hubs fit onto the chassis next, with each made up of five parts, followed by the wheels. The tyres are moulded from a rubber-like material and there are no plastic plastic alternatives. Two large fuels tanks complete this part of the build. Flip the chassis over and the crew compartment can be assembled next. The cabin itself is slide moulded, in a similar fashion to other similar kits from Trumpeter and Hobbyboss. The doors are moulded seperately, while the clear parts are moulded from plastic. I have to say I prefer this way or representing clear parts to the more realistic, but difficult to use, plastic sheet that is often included with kits of this type. Inside the cabin there are the two tandem crew seats, as well as steering wheel and column and a few extra details for some of the electronic equipment. The windscreen wipers are made from photo etched brass and look excellent. Before the cab is added to the chassis, the radiator for that huge V-12 diesel has to be installed, along with a photo etched mesh cover. So far as I can tell, this will be completely covered over by the single-piece cab and the plate that protects the underside of the engine when traversing rough ground. The missile system is identical to that provided with the MZKT chassis version. There are two rows of four launchers, as well as the missile crew compartment. This sub-assembly comprises a seperate floor, walls and roof. The whole thing fits onto a flat platform, which in turn sits atop the chassis. A pair of missile are included, complete with small display stands. The decal sheet is generic and includes a range of numbers and licence plates. The painting diagram shows a single, generic example finished in overall green. Colour references are provided for the Ammo by Mig range only, which is somewhat unusual as there are far more widely used paint products out there. Conclusion Although this version of the Bal-E may not have quite the appeal of the production version, it is nevertheless and imposing and impressive kit. The level of detail is excellent, although the kit looks no more complex to build than any other wheeled vehicle kit. Modelcollect should be congratulated for giving us a stat-of-the-art kit this subject and I can't wait to see what they come up with next. Highly recommended. Review sample courtesy of
 -
German WWII E-100 panzer weapon carrier with Flak 40 128MM Zwillingsflak 1:72 Modelcollect The E-100 was a super-heavy tank, designed as the Second World War drew to a close. It was to be the heaviest of the proposed Entwicklung (E) series of armoured fighting vehicles, the aim of which was to simplify tank design and production around standard components. The chassis was intended to serve as a tank, mobile artillery system, anti-aircraft vehicle and heavy tank destroyer, although ultimately just a single prototype chassis was manufactured, and this was captured by American forces a month before the end of the War and then scrapped following evaluation by the British Army. The Flak 40, on the other hand, was a tried and tested anti-aircraft artillery gun, over 1000 examples of which were produced. The twin-gun Flakzwilling weighed in at 26.5 tonnes, which made it very difficult to move across country, hence the idea of mounting it on the large E-100 chassis. The guns were most famously deployed in static mountings such as on the flak towers of Berlin, Hamburg and Vienna. Modelcollect are a Chinese firm who are largely known for their highly detailed and well-regarded 1:72 scale AFV kits. They have long specialised in post-war Soviet/Russian subjects, but have more recently shown a flair for producing kits of the prototype tanks and associated vehicles that were in the design stages at the end of the Second World War, or which could conceivably have appeared had the War lasted longer than it did. This particular kit uses Modelcollect's existing E-100 and 128mm Flak 40 kits as the basis for the Zwillingsflak E-100 platform. Inside the top-opening box are eight frames of parts moulded in grey styrene, along with decals, rubber tracks and a fret of brass parts. The mouldings are clean, crisp and finely detailed. Construction starts not with the chassis, but with the zwilling gun mount. This comprises the rotating ring mechanism, crew platform and guard rails, stowage boxes and the mount for the guns themselves. A pair of Flak 40 guns is included (obviously), with each barrel split lengthwise and a seperate elevation mechanism. the guns themselves are nicely detailed, with each made up of well over twenty parts. A couple of 128mm shells are supplied and are shown fitted in the breech loading mechanism in the instructions. Once the hefty Flak 40 Zwilling has been assembled, it's easy to see how it would have taken a tank chassis as large as the E-100 to move it anywhere. Once the gun mount is complete, assembly turns to the hull. The E-100 design was essentially mid-engined, with the engine positioned forward of the turret but behind the main crew compartment. The engine deck is moulded separately to the roof of the hull, as are the crew access hatches. Photo etch parts are used to depict the grilles on the engine cover. The running gear is next, and the road wheel arrangement will be instantly familiar to those who have built a Tiger or Panther tanks as it comprises overlapping wheels with steel rims (great if, like me, you find painting sixteen pairs of rubber tyres a tiresome task). The tracks are manufactured from a flexible rubber-like material, which isn't my preference, but they look quite decent for the scale. The decal sheet is generic and includes a range of numbers and licence plates, although the instructions do not show any arrangements for the placement of decals. The painting diagram shows two examples, one with a dark yellow hull and grey Flak 40 Zwilling, the other completely dark yellow with patches of camouflage on the lower hull. Of course you are free to paint yours in whatever scheme takes your fancy as this is essentially a paper panzer. Conclusion Builders of 1:35 AFVs have had a range of kits in the E-5/10/25/50/75/100 series to choose from for a few years now, so it's good to see builders of the gentleman's scale being afforded an even better choice of subjects thanks to Modelcollect. The kit looks as though it will go together with minimum fuss and it will certainly be a talking point when built and painted. Recommended. Review sample courtesy of
-
Russian "Bal-E" Coastal Missile System MZKT Chassis 1:72 Modelcollect The Bal-E coastal missile defence system uses an surface-launched adaptation of the Zvezda KH-35 (AS-20 Kayak) known as the Bal (Ball) (SSC-6 Sennight) anti-ship missile system. The system is designed to guard coastal waters, straits and naval bases. The missile itself is fitted with a rocked booster for the launch phase and is designed to engage small vessels up to 5000 tonnes. The system has been fitted to different launch/control vehicles. In this case, the system uses the four-axle MZKT-7930 Astrolog chassis, which is also used for the Iskander ballistic missile system and the Pantsir-S1 air-defence system. As of October 2016, Russia is believed to have deployed 4 Bal-E units, each comprising 16 launch vehicles. Modelcollect are a Chinese firm who are largely known for their highly detailed and well-regarded 1:72 scale AFV kits. They have long specialised in post-war Soviet/Russian subjects such as their T-62, T-64, T-72 and T-80, as well as the new T-14 and a growing range of missile and rocket launchers and radar vehicles. Many of the kits are available as pre-assembled models as well as conventional kits. This particular kit has arrived direct from China, along with the MAZ chassis version, which we will review shortly. Inside the large,top-opening box are eight frames of parts moulded in grey styrene, along with a frame of clear parts, eight rubber tyres, two frets of brass parts and a small decal sheet. The mouldings are clean, crisp and finely detailed. Construction starts with the lower chassis. Two long parts that hold the road wheels, and between these the six-part YaMZ-846 turbodiesel engine, the huge gearbox, drive shafts and transfer boxes all fit into place. These are covered with photo etched protective plates to prevent damage when traversing rough ground. The hubs fit onto the chassis next, followed by the wheels, each of which has a fat, rubber tyre. there are no plastic alternatives. Fuels tanks and storage boxes complete this part of the build. Turning the chassis over, the crew compartment can be assembled next. There are three crew seats in the cabin, as well as a dashboard and steering wheel. The cabin itself is slide moulded, in a similar fashion to other similar kits from Trumpeter and Hobbyboss. Inside the cabin there are extra details for some of the electronic equipment, while the doors are moulded separately. The clear frame provides the glass parts, which I have to say I prefer to the more realistic, but more difficult to use, plastic sheet that is often included with kits of this type. The windscreen wipers are made from photo etched brass and look excellent. Once the cab has been added to the chassis, the secondary structure, which presumably houses control or communications equipment, can be added. This is of conventional construction, with seperate walls and roof. Photo etched parts add depth and realism. The missile system itself comprises two rows of four launchers, making eight in total. As well as the missile tubes, there is the missile crew compartment, which is also constructed of a seperate floor, walls and roof. The whole thing fits onto a flat platform, which in turn sits atop the chassis. As a special bonus, two missiles are included, complete with photo etched fins and a small display stand. You could, of course, adapt the kit to show the missile soaring out of the launch tube, or even chop the rocket booster off and hang it off the bottom of a Su-35! The decal sheet is generic and includes a range of numbers and licence plates. The painting diagram shows a single, generic example finished in overall green. Colour references are provided for the Ammo by Mig range only, which is somewhat unusual as there are far more widely used paint products out there. Conclusion As a builder of 1:72 scale (and 1:48 scale) armour, I'm somewhat unused to kits of large, complex subjects. This kit looks imposing in the box, but once you leaf through the instructions, you quickly realise that it's no more complex than any other wheeled vehicle kit. Modelcollect should be congratulated for delving so deep into the inventory of the modern-day Russian armed forces and giving us a stat-of-the-art kit this subject. Highly recommended. Review sample courtesy of
-
I built a couple of Modelcollect's E-100s earlier in the year, and I was really impressed with the level of detail they had for 1/72 kits. I'd been thinking about picking another up, and this one seemed a good choice, since it fits in perfectly with the 'utterly absurd things to stick on an E-100 chassis' theme that the previous two had .Obviously, the Waffenträger (weapons carrier) E-100 didn't exist, but at least that means you don't have to get bogged down in accuracy, and can have some fun with it, which is the main reason I'm doing it. I'll post up some sprue shots, then get on to the little bit of work I've got done on it over the last couple of days Sprues, in no particular order. Some are in light grey, some in dark grey, and a couple in sage green. Quite a few of the parts aren't needed for this version, including a complete upper hull plate, and the parts fro the working suspension, that Modelcollect included with some of their earlier E-100 kits. Some of the sprues were bagged and some were loose, and a couple of small parts had become detached and were rattling around in the bottom of the box. Nothing was missing or damaged though. The tracks are the usual rubber band sort the Modelcollect have supplied with all their other E-100s. The detail's good and they can be glued with regular cement, but they often come warped, as these ones are, although not badly So, on to the actual progress I've made, which isn't that much. The hull is together, which is only a handful of parts. Still got the etched grills and other details to add. I sanded off the mounting points for the side skirts, since I saw no reason why they'd be fitted if the vehicle was never going to have skirts. The two hatches have moulded lugs to represent the handles, so I've sliced those off and replaced them with fuse wire The only other work I've done is to get the main barrel and some of the gun cradle together. For some reason, none of the gun and turret parts have any connection pins, so getting everything lined up is a bit tricky. The plastic's quite soft too, so I had to go easy when cleaning up the join on the two-part barrel, to avoid any flat spots. Having said that, the barrel is slightly oval anyway, so it'll probably need flattening slightly on the top and bottom to get it more circular. If there was a metal one available I'd probably swap it, but I'm not aware of one so I'll stick with this one for now That's it so far. I'll hopefully get a little more done over the next few days. Andy
-
A pair of Modelcollect's E-100's, one with the Rheintochter SAM, and one with a V1. Apart from the respective missiles the two kits are identical, but the V-1 version actually includes the Rheintochter as unused parts so if you're buying one, you're better off getting that one. The kits are nice and very well detailed, but the rubber band tracks are a bit of a pain. They're made from something that looks suspiciously like Dragon DS plastic, so how well they'll last in the long term remains to be seen. The subjects are of course pure fantasy, although the Rheintochter is more of a viable possibility that the V1. Painted and weathered with AMMO paints and washes, apart from the red primer hull which was finished with Vallejo Cavalry Brown (see discussion here) Thanks for looking Andy
- 14 replies
-
- 21
-
-
- Modelcollect
- 1/72
- (and 1 more)
-
From the "you've got to be kidding" department, comes this! A P.1000 Ratte "landcruiser" WW II German tank. If Modelcollect comes through with this thing than it will be the biggest tank model kit in 1/72 scale ever made. No word yet on when it will be released of how much each copy will cost. Details to follow...
- 108 replies
-
- 5
-
-
- P.1000 Ratte
- Modelcollect
- (and 1 more)
-
After the B-52 Stratofortress (http://www.britmodeller.com/forums/index.php?/topic/235004753-172-b-52h-stratofortress-by-modelcollect-boxart) - still to release - Modelcollect is to release a 1/72nd Northrop-Grumman B-2A Spirit kit - ref.UA72201 Sources: http://modelcollect.com/usaf-b-2a-spirit-stealth-bomber https://www.facebook.com/Modelcollect/photos/a.153755038112938.33382.153752164779892/690338904454546/?type=3&theater V.P.
- 116 replies
-
- 1
-
-
- B-2
- Modelcollect
- (and 1 more)
-
Modelcollect is to release a 1/72nd WWII V1 missile launching position - ref.UA72033 Source: http://www.armorama.co.uk/modules.php?op=modload&name=News&file=article&sid=23189 Box art V.P.
-
T-72A Main Battle Tank 1:72 Modelcollect The T-72 is the one of the most ubiquitous Main Battle Tanks in the post-war world. Since its entry into service in the early 1970s, over 20,000 examples have been manufactured, making it second only to the T-54/T-55 family in terms of units produced. Exported widely, scarcely a year has gone by when the T-72 hasn't been in action in a hotspot somewhere around the globe not bad for a tank that was conceived as a hedge against the ambitious bet that was the complex T-64. The T-72 shares the basic design principles that are common to all of the post war tanks produced by the Soviet Union/Russian Federation. Compact, light and low-slung, the T-72 has a version of the 125mm gun found in other eastern bloc tanks with two-part ammunition and an auto-load system in place of a fourth crew member. The first models featured a conventional cast armour turret. This was improved and thickened for the T-72A, which featured cavities filled with quartz or sand and was named 'Dolly Parton' armour by NATO forces. Later models featured laminated armour and added additional Explosive Reactive Armour (ERA), both of which proved to be extremely effective against contemporary anti-tank rounds. Modelcollect are a relatively new Chinese firm who may not be all that familiar to the denizens of Britmodeller. For the uninitiated, they specialise in 1:72 AFV kits, with a strong bias towards post-war Soviet/Russian subjects. The range includes the T-62, T-64, T-72 and T-80, as well as the new T-14 and a growing range of missile and rocket launchers and radar vehicles. Many of the kits are available as pre-assembled models as well as conventional kits. This particular kit has arrived at BM courtesy of Modelkitworld.com, whose forum can be found in the trader's section. Inside the top-opening box are just over a hundred parts moulded in grey styrene, along with a die cast metal lower hull, a set of flexible tracks and a small decal sheet. Not being familiar with this manufacturer, I wasn't sure what to expect in terms of detail and finish. Happily I can report that the mouldings are clean, crisp and finely detailed. Unusually for a kit of this type, construction starts with the turret. This sub-assembly is fairly conventional, although the gun must be fixed in place thanks to its flexible mounting point. The gun itself has been moulded in one piece and is very nicely detailed. Slide moulding has been used to create an open aperture at the muzzle. Although it is quite shallow, this is a definite plus point. The distinctive 12.7mm NSV anti-aircraft machine gun is also very detailed, as is the turret itself. Both hatches can be finished in the open position and fine details such as weld seams and cables are all present in correct. In this respect the kit is a step ahead of the older Revell model. Finishing details include the usual stowage bins, searchlight and smoke grenade launchers. The upper hull is as nicely detailed as the turret, partly because the upper glacis plate is moulded separately, which has allowed for the accurate reproduction of finer details. Even the driver's hatch is a separate item, and although there is no interior detail, it is still nice to have the option to place a figure in there. The rest of the upper hull follows suite, with the exhaust system and engine air vent moulded as separate items. The side skirts are nicely done too. Extra details such as the headlights, tow hooks and the ubiquitous unditching beam are all nicely rendered and moulded separately. The drive sprockets, idlers and road wheels are all moulded in inner and outer halves. Aside from the crisp moudled detail, they seem to be very accurate and match photographs of the real thing very well. The die cast metal lower hull is reminiscent of Tamiya's excellent range of 1:48 AFVs, as it is both highly detailed and pre-primed. The torsion bar suspension units that run across the bottom of the chassis are all cast in place, so aligning the road wheels should be a piece of cake. Although the tracks are of the flexible type, they are quite detailed. They look very much like Dragon's DS type, which can be fixed in place with regular polystyrene cement. I've no idea whether this is actually the case, so if you've built one of these models, so let us know. The painting guide shows just one generic scheme as used by the Soviet Army in the late 1980s, but the tiny decal sheet contains a number of generic codes and markings, including some for the GDR and North Korea. Conclusion This looks to be an excellent, well-detailed kit which captures the look of the T-72 very nicely. Modecollect have packed in an amazing amount of detail - it's a step up from Revell's already very good kit - and it looks very promising on the sprue. Hopefully it will be just as easy and enjoyable to build. Highly recommended. Review sample courtesy of
-
 1/72 - Russian Object 640 Black Eagle tank - is confirmed as a next release by ModelCollect here under the Armata 3D model: 6 wheels version 7 wheels version from facebook: https://www.facebook.com/Modelcollect/photos/a.153755038112938.33382.153752164779892/494021000753005/?type=1&theater Modelcollect Hobby Inc. Russian Object 640 (Black eagle) Main Battle Tank John Karr Will the back eagle have seven road wheels? To se mi líbí · Odpovědět · 17 červen v 2:14 Modelcollect Hobby Inc. black eagle will have two ver. first ver is 6 wheels To se mi líbí · 18 červen v 2:36 from wikipedia: https://en.wikipedia.org/wiki/Black_Eagle_%28tank%29