Search the Community
Showing results for tags 'MiniArt'.
-
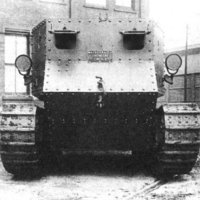
Good day, colleagues and sympathizers. Finally, I caught inspiration and" brought " to mind a couple of long-term projects.So-a British 3-ton truck.It was used in the British troops during the First World War.To be honest, I didn't go much into the history of the prototype, and there is little about it(well, or I don't know how to use Google, who knows?...) About the build. Miniart-well done. Traction, engine, controls - everything is very well detailed. But the problem, as always, lies in the poor quality of plastic and extremely peculiar injection molding.Half of the rods were eventually replaced with tubes/wire, etc. The hood assembly was also not pleased. The result - you see in front of you. Coloring - RealColor, Akan, Tamiya. Oils and pigments-Ammo and co. The junk in the back is a miniart and some other bags from the stash boxes. Thank you for your attention, enjoy watching!
-
Hallo Which kits from Miniart you would suggest to cover the developement? Also Tiran 4 or 5. I prefer interior kits. Just want to show the developement! Thank you in forward Happy modelling
-
T-55/T-55A Transmission Set (37073) 1:35 MiniArt via Creative Models Ltd MiniArt’s new interior kits of the T-55/A are highly detailed masterpieces of injection moulding, but for the inveterate detail hound, anything and everything can be improved upon. This new set includes the full transmission system, which is absent from the base kit because it is hidden away behind the radiators that sit above it. The list of kits that are compatible at time of writing is as follows: 37016 T-55A Early Production Mod.1965 Interior Kit 37018 T-55 Mod.1963 Interior Kit 37020 T-55A Mod.1981 Interior Kit 37022 T-55A Late Production Mod.1965 Interior Kit The set arrives in a small top-opening box, and inside are six sprues of grey styrene plus the instruction booklet, which is a proper booklet because the instructions are quite involved, having some changes to the base kit’s parts, as well as interleaving the new parts with the build. Needless to say, the detail is excellent and once you have got your head round the method used to explain how things fit together between the two kits, just take your time and everything should go well. The elements that are included in this box are the cooling system exhaust fan and its associated ducting, a reservoir to the right of the assembly, and an alteration to the framework that supports the kit’s engine. The casing for the transmission is based upon two halves, which are large castings on the real thing, to which a gaggle of inspection covers, power take-offs and what looks like a small compressor are added, then the two cylindrical brake housings are built and attached to their locations in each end of the transmission housing. Anti-torque suspension rods for the brakes and hosing are also added around the assemblies, then attention turns to the radiator, which is built up as a box with the concave core visible from the top, then lifting lugs, hosing couplers and pivot points are added for installation in the hull later. The base kit’s engine is altered slightly by using some different hoses that join to the airbox that is also from the kit, then the interior walls of this part of the engine bay are detailed with inserts so that the cooling fan can be installed along with the supports for the transmission. More parts are substituted in the rear of the engine deck, then the transmission is inserted along with a lot of other ancillaries and hosing that are in that area. An oil cooler or intercooler airbox is laid over the transmission on the port side, then the kit engine is dropped in with whatever steps are required by the kit instructions. The section of the engine deck over the space between the engine and transmission is replaced by a new assembly, which allows the main radiator housing to be posed down or lifted into maintenance position with bespoke hose parts to fit either, but if you’ve bought this set you’re probably going to leave it up. Finally, there is another short section of engine deck with individual louvers that can be posed up or down. There are no decals in the kit, but the rear page of the booklet is filled with two views of what’s included and it also has a colour chart at the bottom in Vallejo, Mr Color, AK RealColor, Mission Models, AMMO, and Tamiya, as well as the colour names and small swatches to help you out. Highly recommended. Review sample courtesy of
-
Checkpoint (35562) 1:35 MiniArt via Creative Models Ltd Checkpoints. They’re useful to stop people going where they’re not supposed to, and also handy to stop everyone to catch-out naughty people trying to sneak through them with nefarious deeds in mind. It’s also a good place to dump squaddies that have misbehaved and are deserving of a boring, soul-crushing job for a few hours. The Kit This diorama set arrives in a small top-opening box, and inside are twelve sprues in grey styrene, a small clear sprue and a sheet of decals. This will allow the modeller to create a booth, barrier, signposts and an area of hessian bags to hide in case of enemy action, all of which goes to make a checkpoint. Also included is a set of glossy instructions to help you build and paint your model. Construction begins with a chair. Your guard has to be comfortable, right? This is an old-style wooden kitchen chair with a curved and slotted back and non-too-comfortable seat. Your guard also gets a choice of telephones. An old-skool 70s bakelite type with a blank dial pad and wind-up handle to make a call, or a field telephone in an ammo-can style enclosure. A choice of oil lamps are also included, which both have clear parts to complete them, then the guard hut itself is made up from four sides, the front one having a large cut-out door, and the two sides with portholes that have slide open/closed hatches to stop the wind whistling through your ears. The walls and base are all planked, and before you drop the walls into place, the chair and your choice of lamp/phone are put in place. The roof is peaked, and looks to be made from lead flashing or roofing felt with ribs perpendicular to the front. The barrier is a long pole that needs an alternative pivot point removing, after which it is pinned between the two halves of its support so that it can pivot once the two-part counter-weight is installed on the short end. A sign is provided for the centre of the pole for people waiting in cars to read while the guard saunters across, and there is a single part for the support of the long end, but it’s not mentioned in the instruction steps. The eight sprues of sand bags can be used to create a C-shaped barrier by following the instructions, or you can figure out how to make any other shapes you might figure out by trial and error. Finally, there is a small desk with three-drawer pedestal and knee space, which you can place somewhere nearby if you fancy it. Mentioned on the back page are instructions for the signs, which are a subset of one of the many signpost sets that MiniArt have released of late. Each sign has a decal with the same alpha-numeric code as its part, and there are two posts included to attach them to, or you can make your own with a lolly stick, coffee stirrer or toothpick. The instructions advise you to paint the sign white before applying the decal to give it better definition. The text on the decals is German, and the suggested colour scheme for the booth is red/black/white, which further enforces the Germanic nature of the set, even though it isn’t mentioned explicitly. Conclusion A nicely detailed German checkpoint for you to wait to have your papers seen and your bumps felt for weapons or other contraband. Highly recommended. Review sample courtesy of
-
German Feldgendarmerie (35315) 1:35 MiniArt via Creative Models Ltd During WWII Nazi Germany's version of Military Police were called Feldgendarmerie and were infantry-trained soldiers that underwent substantial training before they were unleashed on the field, keeping the soldiers and civilians within the line of the law… allegedly. They were implicated in many incidents of anti-Semitism with some associated with the SS and some of their dishonourable practices, as well as a reputation in their own right for pettiness and harsh treatment for even minor infractions if the mood took them. They wore a metal gorget on a chain around their necks as well as a cuff that marked them out as Police, and generally moved into newly conquered areas after the combat troops had left, directing traffic as well as upholding the laws that they brought with them. The set arrives in a shrink-wrapped figure box with four sprues in grey styrene, a small decal sheet, larger decal sheet for sign-posts (another of their tasks), and a tiny instruction sheet that would struggle to be A6 in size. The main sprue has been cut into two to fit the box, and it contains five figures, including a driver figure leaning out of his cab in response to the typical "papers!" demand. An officer has his hand out for those papers and two of the other figures are wearing long leather great coats often seen on motorcycle troops, one directing traffic, the other banging a nail into a sign with the back of an axe. The other figure is wearing typical Wehrmacht clothing, his gorget and is holding more signs ready for the axe-wielding gentleman. Each figure is broken down to heads, torso, legs and arms plus hats and helmets that sit on their flat-topped heads. The two great coated figures have smoothed legs to allow the separate coat tails to sit correctly, and some hands are separate parts to allow better moulding of the traffic directing lollipop and the signs that figure 5 is patiently holding. The accessory sprues are split between equipment and guns, including more helmets, entrenching tools, water bottles and other bags/pouches, MP40s, Kar98 rifles, pistols and holsters, both of which will be familiar if you have any of MiniArt's other German sets. Markings The decals include helmet and cuff badges, Halt messages for the directing of traffic and golden emblems for the arms of their jackets. There are also a pair of red crosses for first-aid boxes that are included on the sprues. The signs are found on the main sprues, with a post to put them on if you don't have one already. The decals for those are on the larger sheet with 12 provided for the seven signs on the sprues, so you'll have a few spare if you don't make any mistakes. You are instructed to paint the sign faces to be decaled in gloss white to ensure clarity, and there is even a "Feldgendarmerie" sign on the smaller sheet that has cut-outs to match the soldier's moulded-in hands. Conclusion This makes a nice change from standard troops, and would be ideal to populate a crossroads, road junction based diorama or something similar. As always with MiniArt the sculpting is first rate, and parts breakdown is sensibly placed at natural joins to make the job easier. Highly recommended. Review sample courtesy of
-
 7.5cm PZGR. & GR. PATR. KW.K 40 Shells w/Ammo Boxes (35381) 1:35 MiniArt via Creative Models Ltd Arriving in a shrink-wrapped figure box, this set contains eight sprues in grey styrene, allowing the modeller to make up twelve of each type of shell, with six used cartridges that have slide-moulded hollow openings, and six ammo crates that are capable of holding three shells of one type. Also included are decals for each type of shell, and stencils for the ammo boxes themselves, just to finish them off. The shells are all a single part each, but the boxes are made up from five or six sides (depending if opened) with supports for the rounds moulded into the bottom, and additional handles on each end. The end walls also have depressions moulded-in to prevent the shells from rattling round, and the optional lids also have more supports moulded-in, but it would be a waste to hide three shells inside a closed box, so don’t. Detail is excellent as you’d expect, and the shells will just need a little preparation to remove the two sprue gates and the unavoidable moulding seam before painting. The instructions are on the rear of the box, and show the correct location of the shell stencils for both types, plus a colour chart showing Vallejo, Mr Color, AK RealColor, Mission, AMMO, Tamiya plus swatches and colour names that should provide more than enough information to make informed paint choices. Highly recommended. Review sample courtesy of
 -
Pz.Kpfw.IV Ausf.G Last/Ausf.H Early 2-in-1 (35333) Nibelungenwerk Prod. May-June 1943 1:35 MiniArt via Creative Models Ltd Unlike the later Tiger and Panther tanks, the Panzer IV had been designed in the years leading up to the outbreak of WWII, and was intended for a different role than it eventually played, which was as a form of infantry support with the mobile artillery function rolled into one. It was a heavier tank than the previous numbered types, and was well-designed, although it did suffer from the typical WWII German over-engineering that made them complex, expensive and slow to build, as well as difficult to maintain. The type went through a number of enhanced variants including a more powerful engine to give better performance, improved armour thickness for survivability, and latterly the provision of a larger gun with a longer high velocity barrel that was based upon the Pak.40, but with shortened recoil mechanism and an enlarged muzzle-brake that helped contain the powerful recoil from the 75mm gun. The new gun was in direct reaction to the first encounter with the T-34 in Soviet hands, an incident that put the wind up the German tankers and their superiors, as they knew very little of its existence until they had to fight it, and didn’t like the way their shots just bounced off that sloped glacis. The Ausf.G and H were the later mainstream variants of the Pz.IV, and were made from early 1942 until 1944 with over 4,000 made, some of which were manufactured at Vomag, Krupp-Gruson, and Nibelungenwerke, one of the largest factories in the German area of influence, based in St Valentin, Austria. By the war’s end Nibelungenwerk was the home of the Panzer IV, and as such was bombed heavily, strangling production of the last variant, the Ausf.J as the bombers took their toll. The Kit This is a new boxing of the newly tooled model of the Panzer IV from MiniArt, with a mixture of parts from other boxings plus some new sprues. It is an Interior kit, which extends to the full hull, with a great deal of detail included that should keep any modeller happy and beavering away at their hobby. The kit arrives in a heavily loaded top-opening box, and inside are seventy sprues in grey styrene of various sizes, a clear sprue, two sheets of Photo-Etch (PE) in a card envelope, a decal sheet and thick instruction booklet with colour profiles for the decal options on the inside covers. It has individual link tracks included that are made up on a jig (more about those later), and the level of detail is exceptional, which is something we’ve come to expect from MiniArt’s output. Construction begins with the interior, which is made up on a main floor with bulkheads, ammo stores with individual rounds that have stencil decals for each one, then a complete Maybach HL 120 TRM engine in a cradle. The engine is begun by putting together the transmission and final drive units, which is at the front of the hull next to the driver, with a set of instruments fitted to the top that have their own decals. This is inserted into the interior with the drive-shaft, with the driver’s seat is assembled along with the foot and hand controls, plus a worrying amount (from his point of view) of shells behind his area, plus another three ready-round boxes layered on top of various positions around the turret base. A ring of tread-plate defines the location where the turret basket will sit, and various other components are arranged around a simple seat for the radio operator/bow gunner, then the engine is assembled from its various shaped elements, topped off with the rocker covers, decals and oil filler caps. A lot of ancillaries are added, including tons of drive-belts, engine bearers, exhaust manifolds, turbocharger between the cylinder banks, dynamo and pipework. It all fits snugly into the engine compartment section of the interior to await boxing in by the hull sides. The highly detailed brake-assembly for each drive sprocket is a drum-shaped affair that comprises a substantial number of parts, some of which are PE, and really does look the part, fitted to the inside of each hull wall flanking the two crew seats, with more small equipment boxes and a fire extinguisher fitted nearby, then the exterior face of each side is detailed with the final drive housing, suspension bump-stops, return roller bases and fuel filler caps before they are glued into place on the hull sides, with the lower glacis plate helping keep them perpendicular to the floor. Back in the engine compartment, the empty spaces around the Maybach engine are filled with airbox, fuel tank and large radiator panels that are set in the compartment at an angle, as demonstrated by the scrap diagram. The rear bulkhead closes-in the final side of the compartment, and this is festooned with detail including armoured covers for the track tensioner arms, stiffener plates and access hatches, including a manual starter slot. Under the tank a plethora of mine protection in the shape of armoured plates that wrap around the suspension exits and the edges of the hull are applied, and up front the upper glacis with access hatches and their details are glued in place open to show off the detail, or closed at your whim, and a choice of fenders are slotted into the sidewalls, depending on which decal option you intend to portray. More shells are stashed on trays to the sides of the turret, again with a painting guide and stencil decals, joined by a number of dump bags of ammo for the AA MG34 on the commander’s cupola. The big towing eye and its stiffeners are applied to the bottom of the bulkhead, and after fitting another full-width plate, the big muffler is attached to the rear, made from a combination of styrene and PE straps. The addition of a cross-brace between the two hull sides with oil can and fire extinguisher strapped on completes the lower hull for now. The upper hull is constructed in a similar manner to the lower, with the roof accepting side panels after making some small holes, the engine bay is fitted out with the side vents for the radiators and a flat rear panel that closes the area in. At the front the thick armour panel is glued in, the bow machine gun rear is created and set aside while the hatches and the barrel of the MG are fitted, mostly from the outside, together with the armoured covers for the radiator louvers, hatch levers and lifting hooks, along with the jack-block in its bracket, or the empty bracket if you choose. The driver’s armoured vision port cover and the ball-mount for the gun complete the exterior work for now, and the assembly is flipped over to detail the inside, which includes a highly detailed set of radio gear that has a painting guide next to it. The afore-mentioned bow gun’s breech and aiming mechanism are inserted into the back of the ball-mount, and the forward side sections of the upper hull are detailed with gas mask canisters, vision ports, stowage boxes and levers for the ports. Flipping the assembly again and it is time to add the hatch covers and interior louvers to the radiator exits, which are delicate parts and can be inserted in the open or closed positions, with a change in how they are fitted. A pair of fans that cool the radiators within the engine compartment using movable slatted panels to adjust cooling as necessary, and these two sub-assemblies are mated before the panels are glued in place with a choice of open or closed louvers. The twin tube air filtration system on the side of the fender is attached to the exterior along the way, plus a set of four towing cable eyes, but you’re responsible for providing the braided cable, which should be 152mm long and 0.75mm thick, times two. These are wrapped around two hooks on the rear in a figure-of-eight pattern. Spare track sections are made up for the two facets of the glacis, and are held in place with small brackets on the upper section, and a long pair of C-shaped rods on the lower. You’ll also need an 11mm length of 0.4mm diameter wire for the track pin at one end of the upper run for authenticity. Now it’s pioneer tool time, with barrel cleaning rods, shovel, the well-detailed jack, a massive spanner, plus a set of four spare road wheels in an open-topped box with spanners strapped to the sides, and yet more track-links in a cage on the opposite side. The rear mudguards and front splash-guards are applied now, and the prominent external fire extinguisher with PE frame (and alternative styrene one if you don’t feel up to wrangling the PE) is fitted to the fender with a pair of wire-cutters and a pry-bar, all of which have optional PE mounts. Just when you think you’ve finished the tools, there’s a crank for the engine, a choice of two types of track-spreaders, a choice of two axe installations, plus some styrene springs to allow you to show the front guards in the up position. We’re getting closer to the tracks now, but there’s still a lot of wheels that need to be made. They are mounted in pairs on twin bogeys with a leaf-spring slowing the rebound of the twin swing-arms. There are two types of outer casting with two axles (for working or fixed suspension) that the swing-arms slot onto, and are then closed in by a cover, which you also have a choice of two designs for. Finally, the twin wheels with their hubcap slide onto the axles, and a small oil reservoir is glued to the side of the assembly. You make four for the left side and a mirrored set of four for the right, plus two-part idler, a choice of two-part drive sprockets and eight paired return-rollers that fit onto the posts on the sides of the hull. The suspension units have slotted mounting points that strengthen their join, and once you’re done, you can begin the tracks. The tracks are individual links with separate track pins, but don’t freak out yet! Each link has three sprue gates that are small and easy to nip off and clean up. The included jig will hold eleven links, which are fitted with the guides uppermost. Then you cut off one complete set of 11 track pins off the sprue and slide them into the pin-holes in the sides of the connected links all at once. They are then nipped off their length of sprue and can be tidied up. I added a little glue to the tops of the pins to keep them in place which resulted in a length of track that is still flexible. Just minimise the amount of glue you use. There are 101 links per track run, so you’ll be busy for a while, but the result is fabulously detailed as you can see from the pic. I didn’t bother cleaning up the mould seams for expediency, but if you plan on modelling your Panzer with clean tracks, you can sand them away if you feel the need. Three decal options have schurzen fitted, which has by now dictated which fenders you glued to the hull sides, so it’s too late to change your mind now. First you must add the styrene brackets on each side, then the long supports for the hook-on schurzen panels, which consist of five mesh panels per side, with diagonal front and rear lower edges to reduce the likelihood of them digging into the ground and being ripped off. Bear in mind that these panels were subject to the rigors of battle so were often bent, damaged or even missing entirely. Use your references or imagination to decide whether you wish to depict a fresh set, or a set that have been in the field for a while. Finally, we get to the turret, which begins with the ring and minimalist “floor”, to which some equipment, a drop-seat and the hand-traverse system are fixed. The inside of the mantlet is fixed to the floor after having the pivot installed, with the newly assembled breech glued into the rear once it has its breech block and closure mechanism fixed in place. The breech is then surrounded by the protective tubular frame, and the stubs of the coax machine gun and sighting gear are slid in through holes in the inner mantlet. A basket for spent casings is attached under the breech, the sighting tube and adjustment mechanism are put in place along with the coax machine gun breech, then the basket is made up from the circular tread-plated floor with tubular suspension struts and other equipment, seats, immediate ready-rounds and spare dump-bags for the coax. It is glued into the turret base, which then has the other facets added to the roof panel, with an exhaust fan and outer armoured cover included. The side hatches are the clamshell type, and can be posed open, closed or anywhere in-between, with latches and handles added, and grab-handles over the top to ease exit. The commander’s cupola is a complex raised part with five clear vision ports around it, and a choice of open or closed outer parts holding the clear lenses in place, sliding into the ring like the real thing. A ring of cushioned pads cover the interstices, and stirrup-shaped parts are fixed under each lens, with a single circular hatch with latch and handle glued into the top ring in open or closed versions, hinging open rather than the earlier two-part clamshell hatch. A blade-sight from PE is sited at the front of the cupola with a machine-gun ring around the base, and the turret can now be closed up with the lifting hooks each made up of two parts, and basket with optional open lid on the rear. The gun has a flattened faceted sleeve made up, and the muzzle brake gives you a choice of four styles that differ slightly from each other if you look closely. Pick the one suitable for your decal choice, and you can begin to put the gun tube together. The outer mantlet section with the sleeve slotting into the front is applied along with a choice of two coax installations, and a single-part styrene barrel fitting into the front with a key ensuring correct orientation, with the muzzle-brake having the same feature. Another length of track is applied to the front of the roof for extra protection, which might explain why there are a lot more than 22 track sprues, this time however using the single sprue that is separately wrapped. The turret has curved metal sheets applied to the styrene brackets that glue to the roof and sides, that has a gap for the side hatches that are filled by a pair of hinged doors for more complete protection, and if you were wondering, you get open or closed variants with PE latches. The commander’s MG34 is made up last with a separate breech, tubular mount and cloth dump bag full of ammo suspended from the mount, then linked to the ring around the cupola by a bracket. Because of the complexity and realism of the turret and its ring, it drop-fits into position as the final act, as bayonet lugs aren’t present in the real thing. Markings A generous six decal options are included on the sheet, and they have a wide variety of schemes that are appropriate for late war tanks, from monotone vehicles to highly camouflaged vehicles over the standard base coat of dunkelgelb (dark yellow) the common element. From the box you can build one of the following: Pz.Kpfw.IV Ausf.G Pa.Rgt.3, Pz.Div. Eastern Front, Operation Citadel, Summer 1943 Pz.Kpfw.IV Ausf.G 16.Pz.Div. Italy, Aug-Sept 1943 Pz.Kpfw.IV Ausf.G 16.Pz.Div. Italy, Aug-Sept 1943 Pz.Kpfw.IV Ausf.H 1.SS-Pz.Div, LSSAH (Leibstandarte SS Adolf Hitler ) Italy, Summer 1943 Pz.Kpfw.IV Ausf.H 26.Pz.Div. Italy, Autumn 1943 Pz.Kpfw.IV Ausf.H 1.SS-Pz.Div, LSSAH (Leibstandarte SS Adolf Hitler ) Italy, Autumn 1943 Decals are by MiniArt’s usual partner, DecoGraph, which is a guarantee of good registration, sharpness and colour density, with a thin matt carrier film cut close to the printed areas. Conclusion This is one well-detailed kit that should keep you occupied for a good number of hours. The complete interior is depicted with a splendid level of detail, which should allow all but the most detail-focused modeller to build it out of the box. Careful painting will bring it to life, and leaving some hatches open will show viewers just how claustrophobic going into war in these iron beasts would have been, and likely still is. Highly recommended. Review sample courtesy of
-
Maybach HL120 Engine w/Repair Crew (35331) For Panzer III/IV Family of Tanks 1:35 MiniArt via Creative Models Ltd Maybach gained the favour of the RLM and acquired the monopoly of producing all AFV power plants and spares for the Nazi war effort during WWII. As a company they were wedded to petrol for fuel and water for cooling, and instead of concentrating on a small number of designs that could be utilised in many vehicles, they obsessed with different variations on the theme, which often went into production after insufficient testing, resulting in unreliability that garnered them a reputation for producing poor motors. They were also pressured to manufacture more complete power packs instead of keeping those already in the field supplied with spares, which was another huge problem that led to some serious issues with servicing and availability of vehicles, which worsened the further the front-line was from the factories outside Berlin. Maybach had licensing agreements with other factories, and for the HL120 they worked with Nordbau in Berlin, MAN in Nurnberg and Maschinenfabrik Bahn Bedarf in Nordhausen, having to spread their subcontracting further afield after March 1944 when the Allied bombers were concentrating their efforts firmly (and successfully) on destroying Germany’s manufacturing capability. The HL120 was a high performance 12 Litre V-12 petrol engine that was used in the Panzer III and IV, but also other vehicles based upon those chassis, such as the StuG III & IV, Nashorn and Flak variants, with two units being used in each Ferdinand. In an unusual case of commonality of parts, the HL120 did share some components with the similar HL108, but this was a rarity, and it was this lack of interoperability that played a significant part in the problems of the WWII German supply train that continued to deteriorate as defeat loomed. The Kit The set arrives in a shrink-wrapped figure-sized box, and inside are five sprues in grey styrene, two each for the figures and engine, plus another for tools and accessories that are included. In addition, there is a small fret of Photo-Etch (PE) in a card envelope, a small decal sheet and instruction sheet in full colour. We’ve seen some of the sprues before in MiniArt’s engine and crane set, and the detail is excellent throughout. Construction begins with the toolboxes, one in the closed position, the other wide open with the tools on display. The tools are a combination of PE and styrene parts, some using both mediums for bladed tools with wooden handles, and there are plenty on hand, with painting instructions given on the rear of the box. The open box has PE outer lids, and the closed box has the hinge details enhanced with a PE strip on each end, and there are decals for the top of the box lids. The engine is started by building up the block from six elements, with a choice of first-motion parts, and an insert with two accompanying panels that fit into the V between the cylinder banks. The heads are topped off with curved covers and oil filler caps, and another choice of a fly-wheel or clutch housing fitted over the front of the engine. The ancillaries are added to the bottom of the engine along with the exhaust manifolds, with another layer of parts completing the lower side of the block, to be flipped over and have a similar process complete the topside, including the turbocharger in between the cylinder banks with a decal, and a choice of layers of pulleys and belts at the rear. The two repair crew figures are on their own sprues, and both are depicted leaning over the engine with their hands reaching in, tinkering with something. The gentleman in full uniform is almost straddling the engine like a jockey, while the chap in his vest is inclined to one side, leaning in from the engine deck to complete the job. Paint codes are supplied for Vallejo, Mr Color, AK RealColor, Mission, AMMO, and Tamiya plus swatches and colour names that should provide more than enough information to make informed paint choices. Conclusion If you’ve bought an exterior only kit and begun to regret it, want to detail another manufacturer’s kit, or just want an engine to add to a diorama, this set provides lots of detail, with the two mechanics and their tool boxes adding an extra layer of interest. Highly recommended. Review sample courtesy of
-
German Tractor D8506 with Trailer (38038) 1:35 MiniArt via Creative Models Ltd Tractors were a boon to farmers when they were introduced soon after the reliability of the motor car became a thing, as they were especially useful for lugging around heavy equipment around the farm, as well as the typical ploughing, sowing and reaping of crops. They also had power take-off points that could be used to drive other stationary machinery, further expanding their usefulness. Lanz were the leading maker of farm machinery in Germany, and their Bulldog range were the “hoover” of the tractor world in their country for many years. They were good quality and reliable, which led to them being copied by a number of countries, and as the initial 1921 model was improved the model number was increased until well into the 9,000s. One of the primary selling points of the vehicle was the simple “hot-bulb” single-cylinder engine that could be run on a variety of fuels and had very few moving parts, which made it easy to repair and maintain. They started off as 6L and grew to 10L engines, and their slow turnover high-torque output suited the tractor’s work very well. In 1956 they were sold to John Deere, and the name slowly fell out of use. There are still many working examples to be seen at country fairs and historic events, kept in splendid condition by their loving (some may say obsessed) owners. The Kit This is another rebox of MiniArt’s D8500 range of kits, with this being the fifth that we know of. This boxing brings together one of the tractors with a large cargo trailer, plus a quantity of milk churns and barrels that you have probably seen elsewhere in their range before now if you’re either a reader of our reviews or owner of any MiniArt kits. Detail is excellent as we’ve come to expect from MiniArt, with a female driver figure is included to give it some human scale. It arrives in a standard top-opening box, and inside are twenty-eight sprues of various sizes in grey styrene plus two tread parts for the big wheels on their own sprues, a clear sprue, a small sheet of Photo-Etch (PE) in a card envelope, decal sheet and the instruction booklet that has colour profiles of the decal options on the inside covers. Construction begins with the tractor, which has a large cast metal chassis that is made up from two halves each end around a centre-point, with lots of parts used to create its distinctive shape, plus a few PE parts on the forward end cap. The superstructure is roughly rectangular, having various filler caps on the top, radiator panels on the sides, and a PE name-plate and number plate on the front, which should be curved ever-so-slightly to match the shape of the cowling. The driver’s foot pedals are long curved linkages to the underside of the chassis, and with these in place the driver’s tread-plated floor is installed and a big handbrake is fitted to the deck, with a stowage box under the lip at the left rear. The driver’s seat is mounted on a sturdy spring, a couple of hand controls are inserted into depressions in the deck in front of her, then the large drive housing is mounted on the left side of the chassis, with a bell-housing on the opposite side, and two large fenders/sidewalls over where the rear wheels will be, plus a sturdy bumper-bar at the rear with some PE cross-braces. Two large exhausts are made up from various odd-shaped parts, and the front axle is built with a central leaf-spring and steering arms, then attached under the chassis in several places, with a pair of large clear-lensed headlamps on an oversized cross-member on the topside. The wheels on this tractor have heavy tread, which is built up by layering five parts together to make a tyre-sandwich at the front, and a three-part layer for the larger rear wheels. The tyres have their hubs moulded-in, while the rears have additional rear hub parts added between the wheels and rear axles. This edition has a rudimentary hood, with a flat windscreen in a frame at the front and two upstands sloping backwards at the rear that support a curved canopy that is the last thing to be fitted in the instructions, presumably after inserting the driver in her seat. The fifth wheel is the steering wheel, which can be fitted atop the steering column as you’d expect, or detached and used on a shaft to manually start the vehicle via the input shaft hidden behind a cover in the centre of the right-hand bell-housing. The flatbed for the trailer is next, made up on a ladder chassis with two sections of bed, which has fine engraved wood texture on both sides, as do the other wooden structures in the kit. The towing hitch to daisy-chain trailers together is attached to a cross-member at the rear, and in front of it are a pair of leaf-springs for the fixed rear axle. The front axle is similarly built, but on a frame that has a turntable between it and the bed to enable the axle to rotate freely for easier manoeuvring. The pneumatic tyred wheels are supplied as a five-part sandwich to achieve a realistic tread, and each one slots into the end of its axle when complete. A small bench seat is added to the front of the shallow headboard of the flatbed, with two long sides and rear tail-gate with tiny styrene clasps giving the impression of holding it in place. To model it with the sides and tail-gate down is simply a matter of gluing them in place folded down and fitting the clasps loosely against the sides accordingly. The cargo consists of eighteen barrels with separate ends, some of which have taps on the sprues, plus twelve churns in two sizes, and nine hessian bags of various shapes and sizes. As already mentioned, there is a driver, who is a young woman, and is seated for obvious reasons, wearing a simple shirt and trousers, tucked into the cuffs of her socks over a pair of sturdy boots. She is also wearing a headscarf to keep her hair in check, and is looking over her shoulder at the trailer behind her. Sculpting and parts breakdown is up to MiniArt’s usual excellent standard, and her head is broken down into front and rear halves, with two locating pins assisting with alignment. Markings There are two schemes available from the small decal sheet in civilian use, so quite colourful. From the box you can build one of the following: Regierungs Bezirk Leipzig, 30-40s British Occupation Zone, 40-50s Decals are by MiniArt’s usual partner DecoGraph, which is a guarantee of good registration, sharpness and colour density, with a thin matt carrier film cut close to the printed areas. Conclusion It’s a perfect complement to a country diorama, and could be juxtaposed with the brutality of war on the other side of a fence, or just on its own. Exceptional detail helps with its appeal of course, and the figure adds extra interest. Highly recommended. Review sample courtesy of
-
 M3 Lee Mid Prod. Sahara with Crew (35274) 1:35 MiniArt via Creative Models Ltd In the years before WWII America realised that they were lagging behind in respect of armour, a fact that became especially clear when Germany came out from under the Versailles treaty to show off and then use their new tanks and Blitzkrieg tactics. The M3 Lee was conceived in 1940 as a medium tank carrying a powerful 75mm gun, partly for manning by their own crews, but also because Britain had requested a large number of tanks to make good their losses from Dunkirk. The Lee was a decent tank but suffered from a high silhouette and limited traverse of the sponson-mounted 75mm gun, but was still widely used. In British service it was known as the Lee if it was fitted with the original American turret, or the Grant when using the lower-profiled British specification turrets. The Lee was used primarily in Africa and the Pacific theatres where the 2nd line equipment seemed to be fielded (for the most part) by the enemy, and against the Japanese who were far behind with their tank designs and tactics. It underwent some substantial changes including cast, welded and back to riveted hulls plus changes in the power pack and loss of the side doors to stiffen the hull. The riveted hulls suffered from rivets popping off and becoming projectiles when hit, which could be just as lethal as a penetrating round and was never fully eliminated. The Film Sahara was originally released in 1943 staring Humphrey Bogart. It tells the story of an M3 Called Lulubelle separated of its unit during the retreat from Tobruk collecting a rag tag bunch of soldiers on the way to finding water. There is then a stand off between the tank and its crew against a superior German force for the control of a well which the Germans dont know has actually dried up. It pretty good for the time frame being pumped up with war time feelings such as cinema was at the time. The film was remade in 1995 with Jim Belushi taking the lead role. The Kit MiniArt began 2019 with a new tooling of the M3 Lee and are expanded their range by adding new parts as they go along. We've come to expect great things from MiniArt's new kits and of course this one is no different with a ton of detail included. The box is standard MiniArt fare with an attractive picture from their usual artist, and inside are a huge number of sprues of varying sizes with in grey styrene, a single sprue in clear, a fret of Photo-Etch (PE) brass, decal sheet and the instruction booklet with painting guide at the front and rear completing the package. The extras here for the Sahara boxing are a set of figures produced by Masterbox, and some additional equipment sprues from various Minart British Soldier boxings. Thet ank can be built as the one form the original 1943 film or the later one, with some different parts in places to reflect this. Construction begins with the vehicle floor onto which the transmission and final drive assemblies are fixed. The rolled lower glacis part is also added, and the final drive bell housings that are incorporated into the sidewalls mate with these to complete the shape of that area. The side plates are added and then the top sponsors. To the rear the engine compartment is built up, the doors are fitted along with the exhausts. At the front additional plates over the drive shafts are added. The big 75mm gun and substantial casemate are built up next for fitting into the hull front and the curved splinter shield that allows 14o of traverse to either side to counter any errors in position from the driver or enemy movement. The breech is surrounded by a shield. The various hatches can be posed open or closed, however as there is no interior best close them up! The bow machine gun is actually a twin mount with two .30 cal M1919s firing through a hatch near the port sponson. The rest of the hull is then built up in much the same manner as the real thing, but with glue and the rivets only there for show. Two large bins for the rear are then built up. When we reach the engine deck there are two large panels, the smaller of them having PE grilles and more filler caps, with both of them covered in small PE tie-down lugs. The rear of the deck overhangs the hull and a small armoured "skirt" protects the tops of the exhausts from stray rounds where PE brackets are used to hang the aft lights. The completed deck is then covered with pioneer tools and their PE tie-downs, plus the towing cables that you need to source yourself to go with the plastic eyes at each end. A scrap diagram shows their location and how to fix the PE straps to the tie-downs and eyes, with a length of 145mm suggested. At this stage the majority of the hull is built, but it is likely to fill with rain until the roof is fitted. The stiffening plates to the lower glacis are also glued to the hull and then the roof is made up from a large main part that is stiffened with a number of ribs, and an extra section is attached to the side with a small periscope in the middle. The three square access doors for the crew can all be posed open or closed with latches and small viewing hatches within that can also be posed open. After fitting the armoured cover to the main gun's periscope and a few grab handles, you get to build up the running gear. Aren't you lucky? The Lee's suspension is very similar to the Sherman's with two fat wheels on a bogie with a return roller at the top, and there are three of these assemblies per side. The wheels with their moulded-in tyres are attached to the bogies via swing-arms that pivot inside the cast bogie with an additional arm linked to the compressible rubber towers. Before the front of the bogie is fitted the return-roller is installed so it is trapped between its two bearings. Repeat that six times and then make up the idler wheels, which have PE edges and separate hub caps. The bogies are attached to the sides of the hull on their mounting plates, and two stiffeners are added to the top of each one, while the idler wheels are attached to their axles on the adjustable tensioners. At the front the drive sprockets are made up from two parts with an internal collar allowing them to remain mobile if you're sparing with the glue. Tracks. Love 'em or loathe 'em, they're a necessary part of most tanks and you have to do them eventually. There are 79 track links per side, and each link is made up from four parts. The pads are split to accommodate the links between them, and this is a little fiddly. I built a test section up with the earlier interior kit, and each link is good looking with fine detail at the ends, flexing well as per the real thing. It'll take some time to complete them, but they will be excellent as long as you're careful with preparation and the glue. With the tracks in place, the side skirts can be installed and the additional stowage boxes can be fabricated from their parts and attached to the hull with PE brackets, their shape conforming to the surfaces that they are placed on. The side skirts are finished off with mudguards at the rear by boxing in the tops of the track runs. The rest of the pioneer tools are bracketed to the hull along with the front headlights and their PE protective cages, the former having PE tie-downs and brackets holding them down. You will need to find some thin wire to link the headlamps to the gland that takes the cable inside the hull, then the single-part main gun barrel is nipped from the sprues, has its seamlines removed and is joined to the optional two-part blast-bag that has excellent realistic-looking canvas wrinkle and sag moulded in. We're still not quite ready for the turret though, as there are a number of PE parts stretching the length of the side-skirts which are used to hang additional stowage in the real thing. These fit onto small depressions on the sides of the hull, and scrap diagrams show the correct way to fold the perpendicular front sections. Now you can start the turret, most of which is held within the upper part, and that has some very nice casting texture moulded into it that should look great under a few coats of paint. The frames for the small hatches are first to be added, then the hatches themselves are fitted in the open or closed position with small stays holding them at the correct angle for the former. The breech is started by joining the two main parts together, adding the surround, the coax machine gun, then setting it aside while the mantlet and elevation mechanisms are made up. The barrel fits to the mantlet and the turret halves joined, the aerials are then added. The commander's .30cal weapon is mounted on a curved fitting on the front of the turret and is fitted with a drum magazine that has moulded-in bullets plus a separate short length that feeds into the breech, sandwiched between the two end-caps with built in mounting frame. A studded bezel is installed in the top rim along with the hatches. The turret can then be fitted. Figures The figures here are a Masterbox Set 3594 originally released in 2011, done to represent the characters from the 1995 film without actually saying so, probably to avoid licensing issues. The set features a Senegalese infantryman, and Australian soldier (with a Bren Gun), and British young soldier, a Free French soldier and the American commander. As with all Mastbox sets the as well sculpted and should pose no issues. Miniart have also included three sprues of equipment, these can be seen in different British sets. On one of these sets one of the Sten guns was missing and the other broken, though they are not used in this set so no real issues there. Markings The decal sheet is quite small and features markings for Lulubelle from the original 1943 film, or the later 1995 film. The decals are printed by DecoGraph as usual for MiniArt, and have good register, colour density and sharpness, with thin matt carrier film cut closely to the printed areas. Conclusion The parts count is large thanks to the inclusion of the figures and equipment. This is a good opportunity to make the tank for either film. Highly recommended. Review sample courtesy of
 -
Has anyone tried a metal barrel in the above kits? The kit barrel in my boxing is not in great shape, so I'd rather replace it. But I don't think that any company yet makes a barrel to fit, and those on Scalemates (all for older kits) all look far too short to be a simple and solid drop-fit.
-
Traffic Signs – Syria 2010s, Israel (35648 & 35653) 1:35 MiniArt via Creative Models Ltd Before GPS or Satnav became common, sign posts were an absolute necessity and remain a useful confirmatory backup even when you are using GPS, but soon become more useful if your satnav konks out or isn’t up-to-date. These two sets from MiniArt offer signage for the adjacent countries above, and are based upon the same sprues with just the decals and larger paper signs differing between boxes. The sets arrive in a shrink-wrapped figure-sized box, and contain six sprues, two that contain a large rectangular sign plus one each square, octagonal and small rectangular, giving eight signs in total. The four smaller sprues have two round, two small rectangular, a square, triangle and long rectangle sign, twenty-eight signs in total, with a grand total of thirty-six between all the sprues. There are also eleven poles to put your signs on, and as you can see from the photos, the rear of the signs have brackets to hang them, as well as a representation of their stamped and formed construction. The paper sheets with large signs are in addition to the decals, and some on the Syrian set are larger than the provided sizes, so you would have to make up your own backing for those two. Decals are printed by MiniArt’s usual partners DecoGraph, and have good registration, sharpness and colour density, with a thin satin carrier film cut close to the printed areas. A white painted background for the decals will give them a higher brightness, although signs are often old, dilapidated weathered and damaged – even shot at in war zones or areas where guns are commonplace. People just don’t seem to be able to help themselves! Traffic Signs Syria 2010s (35648) Decal Signs Paper Signs Traffic Signs Israel(35653) Decal Signs Paper Signs Conclusion Signposts are a useful background item in any diorama or vignette, so having pre-printed signs available is just the ticket to add interest and realism to your work quickly and easily. Don’t forget the bullet holes! Highly recommended. Review sample courtesy of
-
Steel Trash Bins (35636) 1:35 MiniArt via Creative Models Ltd Old tyres not included We’re sometimes a tidy bunch of highly developed apes, and like to throw things away in nice neat places to be collected by more of our kind, who throw them in big holes in the ground out of sight and out of mind, or more recently, recycle some elements, while leaving little representative piles in the middle of our streets so that even the stone deaf know they’ve been. That’s a quip for us British readers, but probably applies worldwide. The Kit This diorama accessory set arrives in a shrink-wrapped figure-sized end-opening box, and has a painting of the contents on the front, plus instructions and painting guide on the rear. Inside the box are four sprues, two of each type, allowing the modeller to create two traditional pressed steel bins, and two more larger wheeled “dumpsters” that you see out back of shops and factories where more capacity is required. The bins are a piece of cake, moulded in two halves and a separate lid that has a moulded-in handle lying flat against the top of the lid. The dumpsters are created from four sides that also incorporate the base, and have a pair of handles at each end and on the front, plus a set of four castor wheels on the bottom, mounted on short outrigger brackets to make it more stable. The lid is of the swing-open type that rotates over to the back on a pair of angled pivot arms, and has a handle added to the front for easy operation. The paint codes are called out in Vallejo, Mr Color, AK Real Color, Mission Models, AMMO, Tamiya, the colour name, and a swatch for good measure. The suggested shade is aluminium, which is a good match for the galvanised material often used, with some tyre black for the rubber tyres on the castor wheels. Conclusion The key to finishing these useful diorama tools will be the painting and weathering, so check your references for some inspiration. You can of course paint them any colour you like if you’re minded. Highly recommended. Review sample courtesy of
-
T-44 Soviet Medium Tank (35356) 1:35 MiniArt via Creative Models Ltd As soon as the T-34 began production, the Soviet engineers were designing its replacement, in an effort to make a more technologically advanced tank that was lighter, better armoured and faster across rough terrain than its already formidable forebear. That may sound like an impossible task, but the engineers managed it, just a little late. The resulting design looked like a T-34 and a Panther tank had a baby, and in fact it was compared directly in trials with a Panther, where it performed extremely well. By rotating the engine 90o so that it was mounted transversely, they managed to enlarge the crew compartment, giving more room for shells and other equipment, and allowing the turret to be moved aft. The change from christie-style suspension to torsion-bar allowed the hull to sit lower, giving yet more room for shells, and the use of thick sloping armour made it impenetrable to the German 88mm shells from the front, and the larger octagonal turret with an 88mm main gun gave it exceptional hitting power. It sounds like a winner, and it was ready for production in 1944, but the higher-ups were sceptical of the concept of mounting an engine transversely, and incorrectly thought that it would result in a massive increase in repair and maintenance of the vehicle. The technology of the T-34 was also evolving, and the fitting of the larger turret with the 85mm gun to the older tank gave less impetus for change, as the upper-echelon weren’t all that concerned about survivability or crew comfort that the T-44 would offer. It did suffer from some teething troubles of course, which is still true today of any military project, and various changes to the armour thickness were implemented, which curiously still didn’t increase its overall weight, thanks to other weight savings. They attempted to put a 122mm gun in the turret, but it was unsuccessful, so was shelved. The T-44A was signed-off for production, but initial production was painfully slow, and took time to pick up, partially thanks to the move of the whole factory back to the west from Factory 183 in the east. In total, around 2,000 vehicles were made, but the T-44B that was to have an interim 100mm gun fitted and some other changes but was also subject to the vagaries of the changing situation after the end of WWII. A new tank was requested post-war, and the T-44B was used as the basis for the T-54, which evolved into the T-55, a tank that has the distinction of being the most produced tank in the world, so while we may not have heard much about the T-44, it played an important part in Soviet tank development at the end of WWII and during the Cold War. The Kit This is a brand-new tooling from MiniArt, and it is also an Interior Kit, so is jam-packed with detail. The kit as depicted here represents the third stage prototype and production variant that became known as the T-44A, with the driver’s hatch moved aft so that it was completely on the hull roof, rather than the earlier prototypes that were partly on the glacis plate. It arrives in a standard MiniArt top-opening box, with 72 sprues in grey styrene, two clear sprues, a sheet of Photo-Etch (PE) brass in a card envelope, decal sheet and the instruction booklet in full-colour on glossy paper, with painting and decaling profiles on the inside covers, again in full colour. The detail included in this kit is astronomical and can appear a little overwhelming on first looks, but if you are familiar with the recent output of MiniArt, you’ll realise just how impressive this model is. Construction begins with the torsion bar suspension, which are set up on four sets of frames with two bars per unit that operate two opposing swing-arms each. These are laid into the hull floor, with a slightly different fifth suspension unit placed at the front. Over these are placed a section of tread-plate under the turret location, a large shell stowage box on the right of the front hull, and the right side of the driver’s station butts up against it with decals added for the instruments that are installed there. The driver’s seat is made in two steps with controls fixed to the front frames and to a small panel on his right, then the bow-mounted machine gun is installed on the ledge to the driver’s right along with a stash of plate-style magazines for the bow gun, a toolbox and a set of foot pedals in the floor, with the seat fitted last. The hull sides have two layers, and need a number of holes drilling in the outer skin, a small tab is cut off the larger inner skin part, and the smaller inner part butting up to it at the rear. The left side also has a rectangular section inserted into the cut-out near the rear behind the firewall, which is detailed with fire extinguishers and ammo before it is glued to the floor, and the side walls are mated along the sides along with the rear bulkhead. The rear bulkhead has an internal skin added too, but this is first detailed with a large fan unit that sits within curved ductwork, and slides in from above after the final drive inner housings are glued into the sides. A set of engine support frames are made and put into slots in the hull floor, with a number of other parts added around the engine bay, before the transmission housing is fabricated from a large number of parts, plus the cylindrical brake units on the outer faces and a number of linkages to the rest of the vehicle, which includes a driveshaft take-off for the fan in the rear. More supports, linkages and engine ancillaries are scattered around the bay, then the 12-cylinder diesel engine is made, again with excellent detail throughout that includes all the hoses, ducts and exhaust manifolds almost filling the bay when the engine is dropped into place on the cross-braces installed earlier. In the fighting compartment two rows of shells are strapped in place horizontally, and two large stacks of plate magazines with PE slots and straps are installed, with more attached elsewhere. The crew area is then ready for closing, beginning with the roof panel, which has the turret ring and driver hatch moulded-in, the latter needing its hatch and vision block adding before it can be glued in place. The glacis plate is simplified from the third prototype onwards, having just a vision slot visible from the outside, and a couple of holes drilled in the edges to mount the bow-wave deflector later on. The two panels are glued down, and additional bump-stops plus final drive bell housings are fixed to the sides at the same time, adding a radiator-like box in the engine bay. In order to enjoy the hard work you’ve done in the engine bay, you can leave the three hatches on the front engine deck panel open, or close them up if you prefer, then the fenders and idler axles are fixed to each side of the hull on slots. There’s still some space in the engine bay, which is taken up by a large radiator bath that is made from individual faces, feeder hoses and a pair of brackets at each end. It slips in beside the small box inserted earlier, and can be posed in the open or closed position for access to the engine underneath. The hatch above it has a framework with four PE meshes that slot in place over a louvered exit, and it too can be posed open or closed, with the closed option only viable if the inner radiator is closed too. If the radiator is open, an alternative hose is included to link it to the engine as per the real thing. At this point there is still a small section of the engine deck missing at the rear, which has a full-width hatch, and two half-width hatches that can be fitted open or closed just forward of it, with PE meshes in their centres. More detail is then applied to the fenders, including pioneer tools, long stowage boxes, and supports for the four cylindrical external fuel tanks added with PE carry-handles and tie-downs, plus the fenders front and rear with stiffening brackets on the aft. Additional track links with PE tie-downs, towing hooks on the glacis, and two towing cables are fixed to the fenders to finish them off, having the choice of using the moulded cables, or cutting free the eyes and drilling holes to accept your own braided cable for better detail and flexibility. Two twin idler wheels with their axles are prepared along with ten paired road wheels and their pins are made up, then the drive sprockets with five circular spacers between the faces, and a long pin for attachment to the hull, which is of course next. With the running gear in place, you can make up the tracks, which are created from 35 pairs of two different sections, one of which is flat, the other having a guide horn, interleaved to create two runs of 70 parts each. These are individual links, with small pegs and recesses to give an element of flexibility to them, although you shouldn’t rely on the pins too much, as they are easily damaged. It’s best to use them during construction of the sections, and then set them in place using liquid glue once you have the correct shape and sag of the track run. I put a run of six parts together quickly, with each link having four sprue gates to remove from the curved edges. Once cut off, the roundness can be sanded back into the links, and those areas will be hidden to a great extent between the links, so they don’t have to be picture perfect. The turret exterior joints are another aspect that doesn’t have to be perfect, but first you have to make up the breech for the main gun, add pivots and a seat for the gunner, then mount it in the lower turret part where another seat is also fitted. Seat backs, sighting gear, coaxial machine gun with PE stock and other ancillaries, then adding a massive store of sixteen shells in a framework box, with all the shells having stencil decals and a detailed painting guide. The turret sides have a really nice rough cast texture moulded into the outer skin, which extends onto the underside and mantlet, offering some great visual interest to the finished model, even including the protruding weld beads that close it up. The sidewalls are prepared with radio gear, traverse mechanism, additional shells and ammo magazines, plus various other bits & bobs. The roof is also prepared with vision blocks with handles, lights, fume extraction fan, as well as the external aspects of the turret, such as an open or closed gunner’s hatch and the commander’s cupola, which has five narrow vision blocks around its circumference and a fold-up hatch with periscope in the front section. The gun barrel is slide-moulded and inserts into the base of the breech with the outer armoured mantlet slid into place over it, then closed at the top with a PE cover. At the rear of the bustle is a grab-handle and a folded-up tarp lashed to the back. More grab-handles and tie-down lugs are added to the sides as a final act, then the turret is dropped into the hull, and that’s it finished. Markings There are eight options included on the decal sheet, with colour profiles in the front and rear covers, although one only has front and rear profiles, mainly because that’s where all the decals are. From the box you can build one of the following green monsters: Red Army, Summer 1945 29th Armoured Division, 5th Guards Mechanised Army, Slonim, Belarus, 1946-7 Red Army, Summer 1945 Red Army, 1945-6 Soviet Army, late 40s 8th Mechanised Army, Operation Whirlwind, Budapest, Hungary, November 1956 8th Mechanised Army, Operation Whirlwind, Budapest, Hungary, November 1956 Soviet Army, presumably Belarusian Military District, 1950s Decals are by DecoGraph, which is a guarantee of good registration, sharpness and colour density, with a thin matt carrier film cut close to the printed areas. Conclusion It’s an impressive-looking vehicle that bears more than a passing resemblance to both its progenitor the T-34, and the German Panther that it was intended to blow to pieces in short order. The huge amount of detail will appeal to anyone wanting to get maximum modelling time from their purchase, which this kit will supply in spades. Very highly recommended. Review sample courtesy of
-
Plastic Barrier Set (35634) 1:35 MiniArt via Creative Models Ltd Road works. Gotta love ‘em! Modern road works are often full to the brim of traffic cones and colourful plastic barriers to separate traffic that are usually filled with sand or water to stop them from blowing away. Where the alleged workers are is usually a mystery however, but that’s another story all together. This set arrives in a shrink-wrapped figure-sized end-opening box, and inside are six identical sprues, each of which carries two single-part cones, two plastic bollards, and two two-part barriers. You don’t need anything else really, as the real things are just injection-moulded in their thousands, only on a larger scale and using a different type of plastic from styrene. The instructions are found on the rear of the box, and they are painfully simple for obvious reasons. Another painting shows the finished articles with suggested colours, but if you are depicting those unusual green cones, paint them green. The colour is really down to you and your references. Hazard Tape not included Conclusion Cones, bollards and barriers aren’t just used when there are roadworks, so these parts should find uses in dioramas of all sorts, from check-points to roadside debris left behind after work, or thrown in the back of a wagon for use later. Highly recommended. Review sample courtesy of
-
Good day, colleagues. Heat(in Moscow +35C) - it's time to finish one of England's desert armored vehicles - AEC Armored Car Mk.I A car based on the AEC Matador truck, with a Valentine turret. They were mainly used during battles in Africa and Egypt. It's hard to say anything about the model itself. Just Miniart. Brittle plastic, joining of some parts gives a separate "pleasure" The only thing that really pleased me was the wheels. So pleased that I gave up buying epoxy. The assembly itself is out of the box, a couple of nuances have been improved, the main of which is the Headlight on the tower, "forgotten" by the Miniart. Guys - Miniart, Masterbox Some stuff - Miniart and a little "scratch" Coloring - AKAN. Oil & Pigments - Jimenez & Co. Thank you all for your attention, enjoy your viewing.
- 14 replies
-
- 38
-

-

-
 Hey all, Here's my Tamiya Cromwell. I used Black Dog Models stowage set and hessian set along with Miniart's Tank Crew & Tank Rider's set. The Black dog set utilises an all new resin turret as well as a whole load of stowage. I used a figure from the Miniart Tank Crew set along with the original kit commander along with the tank riders that Miniart do as well. I painted the vehicle using Humbrol Enamels and I weathered it using a mix of oils, Ammo by MiG and pencils. Thanks for looking! Again, thanks for looking guys, Sam
 -
Syrian T-34/85 (37075) 1:35 MiniArt via Creative Models Ltd The T-34 was Stalin's mainstay medium tank that was produced in incredible volume by sometimes crude and expedient methods, to be thrown into the fray against the numerically inferior German tanks on the Eastern Front. The engineers combined a number of important advances in design such as sloped frontal armour, wide tracks to spread the load, and the ability to cope with the harsh Russian winters without freezing to a halt, which was a problem that affected the Germans badly after the initial successes in the summer of Operation Barbarossa. The part count and cost of the tank was continuously reduced during production, with plants turning out up to 1,300 units per month at the height of WWII. The initial welded turret was replaced by a cast turret with more room, and later the 76mm gun was replaced by a more powerful 85mm main gun in the T-34/85 with the enlarged turret, giving even the Tiger pause for thought before an engagement. The T-34/85 served until after WWII in Soviet service, but once it became obsolete, they were exported aggressively to Soviet friendly nations, who could always find uses for them, sometimes for a long period of service. Syria took on charge a total of 100 of the type that had been upgraded by the Czechs to include a heavy DShK anti-aircraft machine-gun on a prominent mount on the turret. These vehicles were used by Syria in the 60s and 70s, most notably the 6-Day War in 1967, where they didn’t fare well against the more modern Israeli armour. Some were later gutted and turned into border pillboxes by the victors, facing the opposite direction of course. The Kit This is another boxing of MiniArt’s recent T-34 line, and is not an interior kit, but the box is still loaded with sprues of all sizes, including the huge DShK and its impressive mount. In total there are sixty-five sprues in grey styrene, two in clear, a good-sized Photo-Etch (PE) brass fret, a reasonable-sized decal sheet and instruction booklet with colour profiles inside each of the front and back covers. Many of the sprues will be seen in various other boxings of the T-34, notably the Czech production that we reviewed earlier, which is the reason for their use of smaller sprues that make their kits so eminently modular. It makes the process easier and cheaper for them, and makes the likelihood of receiving many different options to choose from much more promising for us, which with the rate we’re still receiving them for review seems to be the case. As always with MiniArt, the design, detail and crispness of moulding is excellent, and the inclusion of Photo-Etch (PE) brass in the box is one less thing you need to fork out for. Unsurprisingly, construction begins with the lower hull. The floor is decked out with four tubular fittings for the suspension on each side and has a lower escape hatch, then the engine firewall near the rear that performs the task of upper hull support in this boxing. The lower hull walls are next, with their Christie-style suspension springs contained in channels up the inside face. The upper hull begins with the ball-mount and DT Machine gun for the bow, without a stock for the gunner’s (dis)comfort. The gun is left to swivel inside the port, so be sparing with the glue when you complete this assembly. The glacis plate accepts the gun from inside after fitting of the armoured protection, and has an armoured external cover to protect the majority of the barrel from incoming rounds. The driver’s hatch is hinged at the top, and the armoured cover is applied to the top edge of the aperture, and a pair of raised marks are cut away and made good for this edition, with a length of track-links running across the lower section of the glacis on two rows of raised pips, adding the lower glacis plate at the front of the hull first. The upper hull top and sides are moulded as one, and the sides have a substantial number of holes drilled out before they are used, with a few nubs cut from the exterior on the way, then the glacis plate it fitted to the front and glued to the lower hull. A pair of slim styrene parts are glued to the hull sides next to the turret ring, with two stiffener plates in PE where the front fenders will be later. At the rear the engine bay is still exposed, which is next to be addressed by adding a frame around the rear bulkhead then attaching this large rear panel with exhausts and filling the circular inspection hatch in the centre, with a pair of armoured exhaust covers for the exhausts and two cylindrical fuel tanks on brackets at the top corners. The engine deck is covered with vents and louvers that are added with a central inspection hatch, then fixed over the engine bay. Additional armoured covers with PE grilles are fitted over the basic louvers, then the suspension swing-arms and stub axles are installed under the sponsons, with final drive housing and idler wheel axles at front and rear. At this stage the driver’s hatch is also built with twin clear periscopes, hatch closures and external armoured cowls for the ‘scopes and hinges. Mudguards are assembled with PE strips for the front fenders, with bow-wave deflector passing over the track links on the glacis, and at the rear a pair of curved racks for additional fuel tanks are installed to the rear of the hull sides, with many short tie-down loops and a few longer ones in the mid-section, plus some stowage boxes made up with PE clasps that mount on the narrow horizontal fenders running down the side of the vehicle. Small parts including various pioneer tools and stowage boxes are made up and fitted onto the sloped sides of the hull, and interlinked towing cables are glued just forward of them. A trio of smooth-surfaced cylindrical fuel tanks are installed on the sides later by using curved brackets and five-piece tanks with PE and styrene shackles holding them in place, the cables taking up the space where the fourth tank would be. The headlight is a detailed assembly made up from PE and styrene parts, with an angled cage folded around a jig to obtain the correct shape. Ten pairs of wheels with separate hub caps are built with two drive sprockets and idler wheels to complete the rolling part of the tracks. At the same time the main towing cables are made from styrene towing eyes, but you will need to supply two lengths of 100mm braided cord or wire, so make sure you have some on hand when you begin. Now for the tracks. The T-34’s wide tracks were simple and easy to produce, as well as great at spreading the tank’s weight and helping prevent freezing of the drivetrain in cold weather, of which Russia has more than its fair share, but their ruggedness also applied to desert conditions. There are two different track parts, one flat, the other with a guide horn in the centre, and both have exquisite casting details that includes the ID numbers on both parts and indeed both faces. They have four sprue gates on each link, attached on the curved hinge-points, making them easy to cut back flush and then sand smooth with a sanding stick, to ease assembly and gluing. I made up a short length as a test, and was finished in a few minutes with a little liquid glue thanks to their close tolerances that keep them together while you apply the adhesive. Each side uses 72 links, which equates to 36 of each part, and once you get into a rhythm it won’t take too long to complete the task, wrapping the still flexible links around the curved sections and holding them in place with tape and other clamps, wedges etc. to obtain the correct sag on the top run once the glue has cured. The detail is so good it’s almost a shame to weather them once painted. This is not an interior kit, so the basic gun breech is made up from a few parts with another 7.62mm DT machine gun mounted coaxially in the mantlet, before it is set to one side while the turret floor is completed. The floor part first has a lip inserted within the ring, then the inner mantlet support is prepared with the main gun’s mount, which is glued to the turret floor and has the breech slid in from behind to be joined by the coax DT with its mount. The turret upper starts as an almost complete shell with three sides moulded into it, which has some holes drilled into the skin and the roof added, which has a large cupola with clear vision blocks and binoculars built into the front of the hatch, plus a simpler hatch for the gunner, both of which are shown fitted closed. The roof also has two more periscopes under armoured shrouds, and two vents on the rear, which are covered by a linked armoured mushroom cover. The single-part slide-moulded gun tube is inserted into the inner mantlet and covered by the outer, has a hollow muzzle for extra detail. A top mantlet cover, plus a self-made canvas tarp (using your own stock) can be fitted to the rear with PE straps, or you can depict the straps hanging loose if you choose. The DShK 12.7mm anti-air machine gun is made up of many parts with a large ammo can and a section of link joining it to the breech, then mounted on a substantial oval cantilever mount on the cupola top with hinges and a large piston in the centre, affixing to the turret around the commander’s cupola, with the hatch cover built-in. The turret is finally dropped into place in the hull to complete the build, with no bayonet lugs to hold it in place, so take care if you decide to inspect the underside one day. Markings The decal sheet is relatively large even though this is a tank, which is handy (sorry), and the sheet is printed by DecoGraph, which is a guarantee of good registration, sharpness and colour density, with a thin matt carrier film cut close to the printed areas. From the box you can build one of the following: Syrian Armed Forces, Syria, Damascus, Early 1960s Syrian Armed Forces, Six-Day War, Summer 1967 Syrian Armed Forces, Six-Day War, Summer 1967 Syrian Armed Forces, presumably Yom Kippur War, Golan Heights, October 1973 Conclusion We’ve been treated to many, many variants of this doughty and long-lived medium tank that saw service in almost as many places as the AK47 until the 1970s at least. The Syrians used them extensively, although unsuccessfully, mainly because they were by then outdated, under-armoured and under-armed. It’s a great kit, and the handprint covered option is very tempting. Highly recommended. Review sample courtesy of
-
Austin Armoured Car 3rd Series (39010) 1:35 MiniArt via Creative Models Ltd Armour became an important part of WWI, seeing the first fielding of the Tank by the British, and numerous types of armoured car that saw various uses. At the beginning of WWI Austin’s armoured car was built on their civilian chassis, with light armour and two Maxim machine guns in separate turrets, one firing to each side, front and rear. Many were destined for Russia, but after the Russian Revolution in 1917 some of the later variants were used in British service. Of course, during missions some would fall into enemy hands due to abandonment or breakdown, just as the tanks did, so they were occasionally found with big crosses on them after some re-branding by the Germans. The third series of armoured cars had some alterations made to improve their usage, including deleting windows, putting bullet-resistant glass in the front vision ports, and small armoured sheets to the sides of the machine guns to prevent their cooling jackets from being holed by incoming rounds. A few of the 3rd series were sent to the Russians before they bailed out of the war due to the revolution, and they in turn gave a couple to the Finnish Red Army, but they were captured and used by the Finnish Army instead. Later, a batch of 1918 Pattern vehicles were manufactured for Russia, but were never delivered, with a batch handed to the newly formed Tank Corps, to be utilised in battle using a novel method of deployment. Tanks would tow them across the battlefield through no-man’s land, after which they would peel off and roam freely along and even behind enemy lines. They caused chaos and were almost too effective, ranging miles behind enemy lines at times, occasionally breaking down or getting otherwise captured, but they set the scene for the Armoured Car and Infantry Fighting Vehicle of wars yet to come. At the end of the Great War some were returned to the UK and repurposed, but many that were formerly in Russian possession found their way into the inventory of other Eastern European countries, and a small batch were even used by the Japanese, who were British Allies in WWI. Some of those were still in service up until just before WWII, and the Finnish used their few into the 20s. The Kit This is another reboxing of MiniArt’s recently tooled base kit, with new parts to accurately portray the third series included, including the new side panels, vision ports and wheels. It arrives in standard-sized top-opening box with a painting of the vehicle on the front, and inside are nineteen sprues in grey styrene, a sprue of clear parts, a small fret of Photo-Etch (PE) in a card envelope, a decal sheet and the instruction booklet that has colour profiles inside the front and rear covers. It’s an Interior kit, so some of the sprues are small, but you get a lot of detail moulded-in, thanks to MiniArt’s diligent designers that make full use of techniques such as slide-moulding, which helps improve detail without creating too many additional parts in achieving this goal. Construction begins with the ladder chassis, which is built up from two longitudinal rails held apart by various cross-members, some of which have mounting points and pass-throughs for other parts such as drive-shafts for the rear wheels. The engine has its own bearer rails, and it is built up on the sump with a good number of parts, resulting in a nice replica. The transmission fits to the rear of the rails behind the engine, then they are dropped into the chassis as a unit, and joined by a number of ancillary parts, controls and a chunky radiator that mates with its feeder pipes. Exhaust and leaf-spring suspension along with bumper irons are glued to the inverted chassis, and the rest of the driver controls are attached to the topside, even before the cab is started. The rods that turn control movements into actions are threaded through the chassis rails, or can be replaced by 0.3mm wires of your own stock, with PE tensioning mechanisms supplied if you choose this option. The big rear axle with drum brakes and the front axle with steering arms are fabricated and attached to their relevant suspension mounts, with more control linkages for the handbrake and steering joining things together. Finally, a little bodywork is attached, initially at the sides of the engine compartments in preparation for the gluing of the swooping front arches, then each axle gets a wheel at both ends, made up from single-part hubs at the front, and rear which also gets a circular PE ring, onto which the four radial-treaded tyres are fitted, each one having a seam in the centre of the tread, which should be removed carefully to preserve tread detail. Now standing on her own four wheels, the floor of the fighting compartment and the crew cab plus the firewall and various small fittings are placed on the top of the chassis, with another insert providing the bases for the two turrets that have pivot-points in the centre for the machine gun mounts. Various stowage boxes are made up and sat next to the rear steering wheel assembly that was added for this variant, and also has a simple seat for the new crew member who would get them out of hot water and dead-ends just that little bit easier. Two similar crew seats are attached to the front along with steps at the sides, then the somewhat complex upper hull is built sensibly in a step-by-step fashion that stops the modeller from becoming over-faced. Several raised features should be removed from parts before fitting, and additional rivets are shown being added in various other locations, which you can slice from the flat section of the two Ck sprues, unless you’ve got a set of Archer raised rivet transfers. The crew flap can be posed open to give a wider view of the battlefield for the drivers by using two lengths of rod, and when in battle it can be closed down, restricting the driver to a letterbox view of the world, which although frustrating is infinitely better than being shot in the face. Plenty of scrap diagrams show the correct orientations of all the parts, so there’s little room for error unless you rush at it and don’t plan ahead. The hull has a number of doors that can be posed open and closed too, with vision flaps for additional situational awareness, and again there is a lot of hand-holding to get things in the right place, and a number of PE parts to add more detail. A single headlight is fitted to the front, and a searchlight that flips up from inside the turrets on a flap to protect them from incoming bullets, both with clear lenses for realism. Even the radiator has a remotely operated armoured cover, as an engine overheating on the battlefield could become troublesome if the flap stays closed too long. The side-cowlings for the engine compartment can also be posed open or closed, and have small PE straps holding them closed. With the addition of the rear fenders, the hull/body is lowered over the chassis. To begin the turrets, you build up a mount for the either a Maxim, Schwarzlose or MG-08 machine gun, including a tractor-style perforated seat for the operator and a large ammo can to feed the gun, which is fitted into a cradle mount that is inserted inside the turret later on. A few more of those slice-off rivets are glued to the sides of the two turret halves, mainly for detail purposes, as adding moulded-in rivets to a curved part is very difficult, and results in a poor results due to the way the parts are removed from the inflexible metal moulds. A pair of armoured plates are installed on either side of the gun port to protect it from harm, with PE brackets holding them square to the barrels. The roof is detailed with latches, the pop-up searchlights on PE brackets and other small fittings can be fitted open or closed as you see fit. The machine gun mount is inserted from below, taking care to slip the barrel through its port first, then gluing the two ends of the lateral cradle supports onto the inner wall of the turret. There are two turrets included that are handed so that the searchlight flap is on the outer side, and these drop into the circular cut-outs in the roof of the fighting compartment, held in place by gravity unless you fix them into position with a little glue. Markings There are a generous five decal options on the decal sheet, with their four-view profiles printed in full colour on the glossy pages of the booklet, and they are all either green or grey, depending on operator and time of service. From the box you can build one of the following: Armoured Car Platoon 1, Royal Prussian Army, Kyiv, Ukraine, Spring 1918 Armoured Car Platoon 3, Royal Prussian Army, France, Autumn 1918 Austro-Hungarian Army, Italy, Summer 1918 Finnish Red Guard, Battle for Helsinki, Finland, April 1918 Finnish White Guard, Finland, Helsinki, 1919 Decals are by MiniArt's usual partners Decograph, which is a guarantee of good registration, sharpness and colour density, with a thin matt carrier film cut close to the printed areas. Conclusion Another cool-looking WWI Austin Armoured Car, which saw service with many different armies in a relatively short period. Highly recommended. Review sample courtesy of
-
German Tractor D8506 w/Cargo Trailer (35317) 1:35 MiniArt via Creative Models Ltd The German military had a habit of pressganging anything they needed into service during WWII, and they weren’t averse to pinching civilian machinery to use for any task they were struggling with. Tractors were especially useful for lugging around heavy equipment, as that was their original job around the farm, so it made sense to press a few of those into service as transports over rough ground and to lug aircraft and other heavy equipment around their airfields. The Kit This is another rebox of MiniArt’s D8500 range of kits, with this being the fourth and not the last. This boxing brings together one of the tractors with a large cargo trailer, plus a quantity of oil drums and large boxes that you have probably seen elsewhere in their range before now if you’re either a reader of our reviews or owner of any MiniArt kits. Detail is excellent as we’ve come to expect from MiniArt, with a pair of figures included to give it some human scale. It arrives in a standard top-opening box, and inside are twenty-five sprues of various sizes in grey styrene including two tread parts for the big wheels on their own sprues, a clear sprue, a small sheet of Photo-Etch (PE) in a card envelope, decal sheet and the instruction booklet that has colour profiles of the decal options on the inside and one of the outside covers. Construction begins with the tractor, which has a large cast metal chassis that is made up from two halves each end around a centre-point, with lots of parts used to create its distinctive shape, plus a few PE parts on the forward end cap. The superstructure is roughly rectangular, having various filler caps on the top, radiator panels on the sides, and a choice of two styles of PE name-plates on the front, which should be curved ever-so-slightly to match the shape of the cowling. The driver’s foot pedals are long curved linkages to the underside of the chassis, and with these in place the driver’s tread-plated floor is installed and a big handbrake is fitted to the deck, with a stowage box under the lip at the left rear. The driver’s seat is mounted on a sturdy spring, a couple of hand controls are inserted into depressions in the deck in front of him, then the large drive housing is mounted on the left side of the chassis, with a bell-housing on the opposite side, and two large fenders/sidewalls over where the rear wheels will be, plus a sturdy bumper-bar at the rear. Two large exhausts are made up from various odd-shaped parts, and the front axle is built with a central leaf-spring and steering arms, then attached under the chassis in several places, with a pair of large clear-lensed headlamps on an oversized cross-member on the topside. The wheels on this tractor have heavy tread, which is built up by layering five parts together to make a tyre-sandwich at the front, and a three-part layer for the larger rear wheels. The tyres have their hubs moulded-in, while the rears have additional rear hub parts added between the wheels and rear axles. The fifth wheel is the steering wheel, which can be fitted atop the steering column as you’d expect, or detached and used on a shaft to manually start the vehicle via the input shaft hidden behind a cover in the centre of the right-hand bell-housing. The flatbed for the trailer is next, made up on a ladder chassis with two sections of bed, which has fine engraved wood texture on both sides, as do the other wooden structures in the kit. The towing hitch to daisy-chain trailers together is attached to a cross-member at the rear, and in front of it are a pair of leaf-springs for the fixed rear axle. The front axle is similarly built, but on a frame that has a turntable between it and the bed to enable the axle to turn for easier manoeuvring. The solid rubber tyred wheels are supplied as two halves with moulded-in hubs, and each one slots into the end of its axle when complete. A small bench seat is added to the front of the shallow front upstand of the flatbed, with two long sides and rear tail-gate with tiny styrene clasps giving the impression of holding it in place. To model it with the sides and tail-gate down is simply a matter of gluing them in place folded down and fitting the clasps loosely against the sides accordingly. The cargo consists of four barrels with separate ends and stiffening ribs, which also come with some hand pumps on the sprues. The wooden crates are of various sizes, with three in total to place in the bed of the trailer. As already mentioned, there are two crew, consisting of a driver and officer. The driver is seated for obvious reasons, while the officer is carrying an MP40 loosely by his side in his right hand, and is wearing typical officer-style riding trousers and knee boots, plus a flat-topped officer’s cap. Sculpting and parts breakdown is up to MiniArt’s usual excellent standard, and there is a map case, pistol holster and a pair of binoculars on the sprues next to the figures. Markings There are two schemes available from the small decal sheet, one in Wehrmacht service, the other in Luftwaffe. Although they’re both panzer grey, the Wehrmacht machine is covered in dunkelgelb squiggles. From the box you can build one of the following: Unidentified Luftwaffe Unit, 1940-95 Wehrmacht, Eastern Front, 1942-44 Decals are by MiniArt’s usual partner DecoGraph, which is a guarantee of good registration, sharpness and colour density, with a thin matt carrier film cut close to the printed areas. Conclusion It’s a peculiar assemblage, but that’s one of the things that makes it appealing. Exceptional detail helps in that regard of course, and the figures add extra interest. Highly recommended. Review sample courtesy of
-
Market Cart with Vegetables (35623) 1:35 MiniArt via Creative Models Although the roadside stall is something of a blast from the past, only really seen as Starsky and Hutch plough through it in a car chase, these small businesses used to be commonplace in most towns and villages. This set includes a hand-portable cart that is finely balanced so that a single person can walk with it in front or behind them. Inside the shrink-wrapped box are four sprues, one containing the cart, two fruit boxes, and another is filled with plastic fruit and veg. The instructions on the rear of the box cover the construction of the cart, the two upstands that allow the boxes to be displayed, and the eight shallow veg boxes themselves. They also helpfully tell you what is what, and show the two-part pumpkins being glued together. In the bottom right an example drawing of the completed cart with produce is given, showing which veg go where in case you really can’t decide yourself. You even get told which colours to use on which fruit and veg, just in case you’re not familiar with the colour of any of them. Here’s a list of all the produce you’ll find on the sprue: Potato Eggplant Bell Pepper Cucumber Onion Carrot Tomato Beet(root) Pumpkin (two types) Some of the carrots look suspiciously like parsnips, but all you have the power to paint them a yellowish shade if you agree with me. As usual with MiniArt sets their sculpting is exceptional with crisp wood detail and sensible parts breakdown, plus loads of vegetables of differing shapes from their brethren to add realistic randomness. Highly recommended. Review sample courtesy of
-
British Tank Crew (35332) 1:35 MiniArt via Creative Models The British tank crews in WWII generally wore custom overalls and either a black beret with the tank regiment badge on the front, or a potty-style helmet without brim, so that they wouldn’t get hung up on the scenery inside their vehicles. This set depicts a crew of five in and around a tank wearing just such items of clothing, suitable for all but the hottest and coldest of weather. Inside the shrink-wrapped box are four sprues, two containing the figures and two their helmets, weapons and accessories, plus a small paper sprue map to show where all the parts are. The commander is wearing a leather tabard over his overalls, while the rest of the crew aren’t, but some of them are wearing drop-leg holsters for their side-arms, which look surprisingly modern. The commander is stood with hands on hips, two other crew are stood, one resting a hand and foot against something, while the other inspects some charts against his compass. The two seated characters could be half in or out of their hatches, one with a foot up level on the edge of the hatch, the other leaning forward talking into a microphone. Most of them also have comms headsets on under their helmets or over their berets. As usual with MiniArt figures their sculpting is exceptional with crisp detail and sensible parts breakdown plus extras to add some detail to their vicinity if you use them in a diorama. The helmets have their internal webbing moulded-in, and a set of goggles and holster is supplied for all, with a few ammo pouches, map case, unholstered pistols and even a sniper rifle with scope can be found on the sprues. Highly recommended. Review sample courtesy of
-
British Infantry Weapons & Equipment (35368) 1:35 MiniArt via Creative Models Ltd This set from MiniArt brings s a whole host of British Army Infantry Equipment. There are Mk.III & MK.IV Lee Enfield rifles along with a Sniper Version. What look to be Both Enfield & Webley Service revolvers along with a US Colt 45. There are bayonets for both types of rifle and various parts of 37 pattern webbing. There are MK.II Helmets with and without netting and the newer Mk.III Helmets, Other parts include Hand Grenades, Holstered Pistos, Binoculars, and even a camera. You can never have enough equipment at times for any troop scene or diorama, Highly recommended. Review sample courtesy of
-
 Finished! The kit is a bit over engineered in some parts, most of all the rear hull. And half of the plastic is unused, some of it goes straight to the spares box. Great fit over all. I really enjoyed it, though. I don’t know why I’m so fond of rusted blue vehicles. Maybe it’s because of the old SAAB I drove when I was 20. Hm. The only thing I'm not so pleased with is that the dust turned out a little bit too orange. Anyway; hope you like what you see. Til next time, happy modelling! Torbjörn
 -
The tractor was a testbed of sorts: Now to the real thing, the Miniart kit of the SLA APC T-54 with Dozer blade. First a rust primer, then chipping medium, and finally Tamiya XF-18 (blue) and Vallejo 70957 (red, on top of some light dusting of Mig Steel). And you know the feeling when you stop just short of overdoing stripping off the paint after using the hairspray technique? I think I did it just right. Hope you agree. A little weathering (oils and what not) will follow. Stay tuned.