Search the Community
Showing results for tags 'Luftwaffe'.
-
Hallo again This is my He-111 H-6. The kit was Revell. I used aftermarket Aires Cockpit and Eduard etched parts for the bomb bay. Well, I did the KG 54. The a/c has a standard painting. Nothing special. It si an a/c of this particular time. BTW: Flying this a/c is something different. On many occasions the cockpit inside was fogged with condensing water. It was all white! In addition, the pilot had to stand up with the extension of the control column and was acting like a captain on a Vosper! Can you imagine such an obscure situation? The head was protected just with the tiny windshield. Happy modelling
-
Hi guys! When I took pictures of a another model, I also improved photos from one of my first Eduard models. This is a Fw 190A-8 kit in 1/72 scale, which I build few months ago. I added to this kit brassin fuselage guns (fit perfectly!), brassin wheels, brassin exhaust stacks and Master armament set with pitot tube. Model was painted with Gunze and Tamiya paints. Weathering I make with oil paints for artists, dry pigments from Ammo mig and Tamiya Weathering Master sets.
- 10 replies
-
- 22
-

-
Hallo again This Arado in 1/32 is from Fly. The kit is not easy to build. The instruction is good. I intended to build the night fighter option, but due to the lack of correct positions of the antennas, I choose another option. The cockpit is very difficult. With the items from Yahoo, it went great on. I brought some books about it with drawings, so I could get on easily. The masks where of great help. The masks for the cockpit from NewWare are excellent! Well, so far a nice build. Happy modelling
-
A fun project from beginning to end, only watered down because the weights in the nose got lose. It was brush painted in RLM 79/70/65. I still have to come up with an interesting Luft 46 story.
-
Just completed the excellent Gaspatch 1/48 Henschel Hs123B-1, this really is a beautiful kit, although it doesn't fall together like the Tamigawa kits, but requires some patience and thought to assemble. I also used the Eduard p/e accessory set, mainly for the control panel ( a bit of laziness on my part ) instead of using the kit supplied plastic panel and decals. This kit actually requires no aftermarket parts everything is supplied. I decided I wanted to represent a well used, well worn machine. I used Vallejo Model Air Paints for the main camouflage colours RLM 71/65 and Mission Models paint for the RLM04. I actually faded the paints more than I usually would to give a well worn finish. This particular machine is from 4/SchG2 Russia 1942-43, this aircraft scheme is from the internet and AMTech boxing of the old ESCI kit which incorrectly states it to be a Hs123A-1. Although it is difficult to differentiate between the A and B models the wings being fabric covered on the A and metal on the B not easily discernable from photographs. The base is just a temporary setting for the "photo-shoot"! Cheers Andy
- 11 replies
-
- 33
-
-
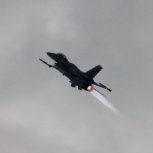
Hi Folk's finally after a good half dozen epic fail's I've moved out of WW2 into the jet age(apart from the recent Meteor),built for the ongoing NATO GB it's Hobbyboss's little easy kit of the Luftwaffe of JG 71 in1963.The kit i'm told has the wrong wing for this aircraft but for just over four quid I'm not loosing any sleep over it the kit decal's were used and were pretty good too.Many thank's for looking in.
-
Photos of my latest build, Hobby Boss´s Bf 109G-6 in 1:48. The only fit problems I could find were with the nose covers (a bit oversized), a cockpit piece that was in the way of a good fitting cockpit, and what I think was an oversized control panel that had to be trimmed. The model was brush painted, and the fuselage camouflage was handpainted, without guides, I´ll use Tamiya tape for the next 109, seeing they always have straight fuselage camouflages. I used Hasegawa´s Bf 109G-6 1:32 painting instructions for this model. Use plenty of water if you´re planning on using the kit´s decals, they tend to stick on the surface. As per real life photos of this aircraft, the fuel tank, its mount and the underwing cannons were left behind.
-
Hi, it´s me again. I bought this decal sheet, and because Eaglecal´s profiles don´t give me much information regarding camouflage mottling, I wanted to know if you guys had photos of: 1) Fw 190A-3 Chevron and Wavy line, attached to I/JG51, painted in the temporary white camouflage scheme (I want to know if the aircraft had the normal Fw 190 camouflage before being painted in white). 2) Fw 190A-3 Yellow 5 and horizontal bar of the same colour, attached to 6/JG1 (I want to know if the aircraft had the outer guns and the bulges under the wings, or if it was a factory release of an aircraft without the outer guns and flat panels under the wings). 3) Josef Priller´s Fw 190A-2, attached to III/JG26. I was able to find a single blurry photo of this aircraft´s left side. I hope you guys can shine some light above these three aircraft. Thanks!
-
This conversion is only my first build of 2018, it took a lot of effort to complete this build as my interest in it tended to lose its' way due to various non modelling factors! However I eventually managed to complete the build and I now would like to share the end result. The base kit for the AIMS conversion is the Dragon Junkers Ju88 family of kits, in my particular case I used a Ju88C-6 I had not yet got around to building. Basically one replaces the front fuselage with a resin replacement, removes the rear fuselage and again replaces with a resin replacement, a bulged bomb bay/recce pod also resin is added to the fuselage (see pics below). The wingtips were replaced with the extended resin ones supplied. Control surfaces, tailplanes, vertical tail surface, elevators, engine cowlings, props, spinners were all supplied in resin. A P/E sheet was also supplied with detail items to add to the conversion, also a excellent decal sheet and a cd with instructions plus excellent reference photos. Last but not least 2 vac form canopies which caused me an awful lot of grief which I won't bore you with!!! I leave you with some shots of the interior detail added:- One final note, model was finished using Mission Model paints in 82/83(81?)/76, the 83/81 colour was a mix of greens due to the awful colour Mission Models supply as RLM83 (if that is if RLM83 Green existed of course!). My aircraft is based on a photo appearing on the Ju388 site showing several machines abandoned on an unknown airfield at the end of the war. I have purposely weathered the upper surfaces of the aircraft as the elements would have had on these machines left out in the open and hardly flown due to lack of fuel and allied air superiority - that's my take anyway!!!! Cheers Andy
- 22 replies
-
- 44
-
-

-
- AIMS/DRAGON
- 1/48
- (and 1 more)
-
After completing my Hawker tempest I thought it would be interesting to build a Dora as it was one of the adversaries of the Tempest. I also wanted a kit that didn't need much correction or scratch building so I could have a relaxing build so I chose to build the Eduard 1/48 FW 190D-9 kit. Cue obligatory photo of a box! Now, I did say I didn't want to have to have to scratch build but then as I started putting the cockpit together it really struck me how boring some of the PE parts are, especially the seatbelts. I had just seen a tutorial on how to build detail with Milliput so I thought I would have a go at creating my own belts rather than using the PE ones. Well, you know how it goes, one thing leads to another and the next moment I'm scratch building the instrument panel as well. So much for not wanting to scratch build anything this build 🙂
- 62 replies
-
- 11
-
-
-

-
Someone offered me this kit as an alternative to the more expensive Hasegawa 109E with a Galland resin body, so I wanted to know your opinions about it regarding the type of plastic, the quality of the decals, fit, and particularly the size of the sprue gates (if you had any troubles removing the parts from the sprues). Any comment is appreciated.
-
Having built three of them and with two more on the stash, I wanted to know if someone else has had issues fitting the gear doors to the struts because of their length, because when the time comes, I have to trim both doors to get them to fit, am I doing something wrong? Thanks.
-
Here´re the photos of my latest model, Revell´s 20 year old Me 262A-1a. The model had an overall good fit, except for the front nose piece, which curves up and the canopy, which has a terrible fit (worst fitting part in the entire kit). I added a 30 gram lead weight in the frontal bulkhead of the cockpit, and discovered after attaching the wheels that it was just enough to keep the model from being a tail seater (I bought some 10 gram weight that I´ll cut in half and glue them as forward as possible for the next time). I´m also accepting advice regarding how I should take my photos.
- 4 replies
-
- 11
-
-
- me 262
- kommando nowotny
- (and 1 more)
-
It was nice to finally open again Revell Germany´s rectangular blue box. I had built this model twice in the past, both times I ended up with a mess instead of a plastic model (the second time I ended with melted plastic because I used too much glue on my weight in the nose), but this time I got a fully assembled aircraft without much trouble. Time has not been kind to the model, the moulds are worn, resulting in a lot of flash, particularly in the lower nose assembly. Instructions forget to mention to open holes for the lower antennae and the circular one over the fuselage. I was able to open the hole for the circular one, but the lower one won´t be present on this model. Tomorrow I´ll try to begin and finish painting it, so I can decal it the next day.
-

Two Hasegawa Fw 190s and a Revell Me 262A-1a
Sturmovik posted a topic in Work in Progress - Aircraft
In my effort to build the kits with as little changes as possible/effort, I´ve decided to build the A-6 as Gerhard Vivroux´s aircraft, because it doesn´t need any modifications for the lateral armour plating (White 20 was in fact an A-7 and White 1 needs to have a panel line added to the armour plating). The Fw 190A-8 will be built as the tiger striped mount of Ernst Schröder following Tamiya´s painting instructions. And last but not least, the Me 262 will be built as White 19 from Kommand Nowotny, Achmer, 1944. I´ll guide myself from a couple of black and white photos and some colour profiles found on the internet. The Me 262 will be built first because of its simplicity and smaller size, perfect for a 4-day holiday. It´ll also serve as a test bed for my seam filling and weight to use (when I added weights the first two times the plastic melted, totally my fault).- 1 reply
-
- 2
-
-
- fw 190 hasegawa
- me 262 revell
- (and 1 more)
-
Hi all I have decals for Schaufer's 110 but cannot find any images online. Any help appreciated http://s1079.photobucket.com/user/HappyBunny26/media/ME 110g_zpse2ekspni.jpg.html Thanks in anticipation
-
 Hello Everyone, I have been building the FW190 over the last couple of weeks and originally wasn't going to submit it in RFI because I had a few issues but in the end, I decided I would. The Eduard kit is very nice, the panel line and rivet details are absolutely amazing and the fit of every piece is perfect. The problem I had was with the decals, I managed to smudge the port wing cross whilst it was drying and then just made it worse trying to fix it. I then decided to remove both decals and start again but just ended up messing up the paint! I ended up having to paint the upper wing surfaces again and as I didn't have any replacement decals I painted the crosses. Its one of those things that you wouldn't notice unless someone points it out but I know its there are it bothers me, the only upside was I really liked the painted crosses so will paint them on more often in future. Despite the issues, I enjoyed building her and I am quite pleased with the result but any constructive criticism is more than welcome.
- 19 replies
-
- 27
-
-
I bought Revell´s Me 262A-1a, and I´m inclining to build the aircraft as the mount of Erich Mikat, but I have doubts about the camouflage. Revell´s instructions show an aircraft with high fuselage demarcation line of RLM 76 with several squiggles of RLM 81 and a splinter pattern in RLM 81/82 on top, however, Osprey Aircraft of the Aces "German Jet Aces of World War 2" show the same aircraft with a solid RLM 82 (or 83) camouflage and several RLM 76 squiggles on the fuselage. There´s one real life photo of the aircraft, but its too small to figure something out. Anything is welcome (and if I can´t convince myself, I´ll go with the second camouflage option).
-
 Phoenix - A Complete History Of the Luftwaffe 1918-1945 Volume 1 - The Phoenix is Reborn 1918-1934 ISBN : 9781910294505 Helion and Company Casemate UK The Phoenix here is referring to the rebirth of the Luftwaffe following the end of The First World War. This series of books is based on an amazing 40 years of research and covers much more than famous aircraft, battles and aces. Areas such as Training, organisation, and areas not normally researched such as Anti-Aircraft guns, signalling and medical services are also examined. This series of books will examine five major themes from the history; (A) Strategy and Command, (B) Ministerial Activity, (C) Technology and Production, (D) Infrastructure and Training, and (E) Operations. This will enable readers to look at a particular area if it suits them, and look at the relationships between, and holding these aspects together. This first volume covers a period which has not been extensively researched before. That immediately following the first world war, and the intervening secret build up of the Luftwaffe prior to its public unveiling in 1935. A great deal of development / preparatory work was done in this period not only in training, and aircraft development but in organising all the various parts. It shows how Goring and Hitler essentially inherited an air arm in waiting – a product of covert military professional endeavour over a period following the end of WWI. This volume is split into two parts. The first part deals with the years 1918 to 1932. The book calls this the period of secrecy where the emergency of the new German Armed Forces was kept secret. It follows from Germany in chaos after WWI, through the building of a new military, ordnance development, civil aviation, training of pilots, the development of the Flak Artillery; and the development of German Naval Aviation. The second part follows the rise of Hitler from 1933 to 1934 when all of the military activities came more to the fore. Conclusion This book should provide readers with a complete understanding of the early years of the Luftwaffe while is existence was still in fact a secret to many. You can see where the 40 years of research have gone to provide such an in depth look at this period. The book is hard cover slightly larger than A5 and 650 pages long. There are two sections with black & white photos. Highly Recommended. Vol I Review sample courtesy of
 -
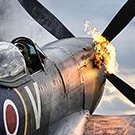
I thought I´d share 15 photos I took while visiting IWM Duxford when I was in London some time ago. Why doesn´t this aircraft have more markings apart from the crosses and Swastika? Was it restored?
-
 Since seeing an article in Airfix Magazine in the early 70's on converting the Airfix 1/72 Bf109G-6 into the two seater G-12 and attempting the conversion non too successfully, I've wanted to add both Luftwaffe two seater conversions of Bf109 and Fw190 to my collection. It has taken me 40 odd years to actually get these models built. I collected and stashed away the Falcon vac form conversion, the MPM Fw190S short run kit but just never got round to building them! With the introduction of the excellent Eduard 1/48 Bf109 and Fw190 series, I took a look at the other 109s and 190s in my stash, with the Hasegawa 109s being slighly inaccurate in the fuselage I decided to use a G-4 and a G-6 as donors for conversion. I also decided to use 2 Dragon Fw190s for conversion purposes. With the following results:- All the schemes shown were taken from photos in books or off the net. It is unknown which units these four machines came from! I used a lot of spare parts for these models mostly taken from the large amount of spares Eduard give us in their 109 and 190 kits. A short summary of parts used:- Bf109s :- Eduard wheels,exhausts, Fusion resin spinners/props, Aires and FCM resin interiors (front cockpits), Falcon vacform canopies and rear fairing. Fw190s :- Eduard u/c legs, 2 x cockpits, ailerons, 1 x rudder, MPM resin interior, resin spinners, rear fairings from MPM and Falcon kits. Whilst I can see a fair few flaws in these builds I at least now have fufilled my ambition to add these types to my Luftwaffe collection. Cheers Andy
- 11 replies
-
- 19
-
-
First aircraft I built after coming back to scale modelling. It was brush painted with Revell acrylics 45/39/40/49 (RLM 02/71/70/65), the pattern masked with common masking tape and the paint ridges sanded down as best as I could with a 1000 grit sandpaper. Note: I currently have four models, this one, two Fw 190A-5s, and an A-4B/P, none of them with their seams filled. I´ll try to use CA for my fifth model. Edit: I forgot to add that I had to cut and trim the tailplanes struts because they were molded too long. The Academy kit looks the same as the Hasegawa Emil kits, I don´t know if the latter has the same issue (I´ll make a topic about that later).
- 6 replies
-
- 12
-
-
- luftwaffe
- messerschmitt
- (and 1 more)
-
Sat thinking the other day, I've not done a kit review and build for ages because along with a quite a few of our like, I seem to have lost a bit of Mojo! Anyway, I saw this sat on the shelf and thought, why the hell not use your semi-interesting, A-Level journalistic training and do a bloody review... so here it is! Eduard 1/48 Avia B.534 III One of the last mass-produced biplane-fighters, the first of the type flew in August 1933 and an initial order of 100 units was placed by the Czech Army Air Force with deliveries taking place in late 1935. Main users, were the Czechs, Bulgaria and the Luftwaffe and in 1939 after the German occupation of Bohemia and Moravia, large numbers of B.534s were acquired by the Slovak Air Force and used against the Russians. Powered by a 850hp Hispano Suiza HS-12Y in-line engine, it had a max speed of 245mph, a range of 360 miles and a service ceiling of 35,00ft! The Kit Standard Eduard 'Weekend Edition' of no frills, no extras and minimal marking options. This cames with 2 sets of livery and I'll be doing the Luftwaffe version totally OOB build with no extras and what could be described as a 'quick build'. Four crisp sprues of grey plastic and one transparent greet you when opening the box and still one of the things that bugs me about Eduard kits is their insistence on sticking everything in one bag! Nice, clean decal sheet and finally an A5 sized instruction/construction manual. Theres plenty to be built before you have to think about paint, so the cockpit and fuselage sides were built up before being primed and painted in Vallejo Silver. Sub assemblies of the radiator and instrument panel were primed and painted and wings were also primed to check for any flaws. It's looking far too clean so tomorrow will be an oil wash on the tub and murk it up a bit. So although I only spent an hour or so on her today, progress seemed swift but I suppose that is the idea of the Weekend series kits!
-
 I can't quite tell from the pictures that I have found, but does anyone know, of the captured Luftwaffe or Swiss P-51B Mustangs (or even other a/c types for that matter), when they were repainted, would the original english stenciling / data have been left on and in any places where they were painted over, would they have been replaced in either Country's own language?
 -
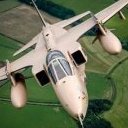
I am getting near the painting stage for my Airfix 1:48 Canberra B.2, which I am going to finish as 99+35 as used by the Luftwaffe. Unfortunately I can't make up my mind which paint is the closest to the Orange that these aircraft were finished in - photos from the interweb vary from red-orange to orange-yellow! Humbrol 18 seems to be too dull, whereas Humbrol 209 looks to be too bright! Any advice, suggestions, recommendations would be greatly appreciated. Martin