Search the Community
Showing results for tags 'Lightning'.
-
RAF English Electric Lightning F.2A, No. 19 Sqn. B (Wng. Cdr. R.K. Barcilon), November 1974, Gütersloh, Germany Another Airfix kit I built this year that did not disappoint. Huge chunk of an airplane represented nicely in 1:72 scale. Metal finish was tempting but I went with the green in the end. Built straight from the box apart from the seat ejection handles, seat harness & pitot tube. Painted with Vallejo acrylics and weathered with Ammo products and oil paints.
- 18 replies
-
- 56
-

-

-
 Hobby 2000 from Poland is to rebox the 1/48th Academy P-38 Lightning kit. - ref. 48027 - Lockheed P-38J Lightning - ETO 1944 Sources: https://www.mn-modelar.com/148-p-38j-lightning-eto-1944-129012 https://hobby2000.pl/index.php?id_product=98322&rewrite=p98322-hobby-2000-48027-p-38j-lightning-eto-1944&controller=product&id_lang=1 - ref. 48028 - Lockheed P-38L Lightning - 80th Fighter Squadron Sources: https://www.mn-modelar.com/148-p-38l-lightning-80th-fighter-squadron-129013 https://hobby2000.pl/index.php?id_product=98323&rewrite=p98323-hobby-2000-48028-p-38l-lightning-80th-fighter-squadron&controller=product&id_lang=1 V.P.
 -
After the A & B variants, Italeri is to release in 2024 a 1/72nd Lockheed Martin F-35C Lightning II kit - ref. 1469 Source: https://www.italeri.com/uploads/news/0hFsarN8VqpofmHNCQiD0phaHkvlSZQY30JTdrFK.pdf V.P.
-
After the A & B variants, Italeri is to release in 2024 a 1/48th Lockheed Martin F-35C Lightning II kit - ref. 2833 Source: https://www.italeri.com/uploads/news/0hFsarN8VqpofmHNCQiD0phaHkvlSZQY30JTdrFK.pdf V.P.
-
HobbyBoss is to release in 2024-2025 a 1/48th Lockheed-Martin F-35 Lightning II family. - ref. 85815 - Lockheed-Martin F-35A Lightning II - ref. 85816 - Lockheed-Martin F-35B Lightning II - ref. 85817 - Lockheed-Martin F-35C Lightning II Source: https://tieba.baidu.com/p/8854669690 V.P.
-

Keeping my hand in - Lightning F6
Enzo the Magnificent posted a topic in Work in Progress - Aircraft
I now find myself in a strange situation. I have six concurrent builds, five of which are likely to be finished over the weekend. I have never had so few ongoing builds in at least ten years. Things will get back to normal after the new year when the 2024 groupbuilds swing into action but until then I need something to keep my hand in. So I thought it might be nice to build an English Electric Lightning. I haven't built one for a few years now, so it's about time. I will build the Airfix 1/72 kit. The box art is bizarre as the artist forgot to put the tailplanes on. Later issues of the box have that rectified. I'm going to build the second option, a grey jet from the Lightning Training Flight (aka 11 Sqn). I have never built a grey Lightning before. There were a number of grey schemes carried by the Lightning. This is the darkest of the schemes. So here are the sprues. Photos are taken (with permission) from the Britmodeller review. All the above sprues are in the F2A boxing. To cater for an F6, Airfix add an additional sprue. Yes, one of the fins on the Red Top missile is short shot. It's the same in my kit as well. The kit was originally issued ten years ago. The sprues in my kit are exhibiting some flash, notably around the wing trailing edges, Firestreak missiles and IFR probe. Considering that the kit has sat in The Stash for a good five years, the amount of flash from a five year old mould is puzzling. -
I'm proud to announce my first diorama! I'm sure it'll be followed by many more. It's not based on a specific crash as all of the ones I saw were a bit more complicated then I wanted to attempt, or didn't have enough photos to go off of. It was a nice change of scenery (no pun intended) as it was less repetitive then making an airplane or car: the build, paint, stare at the drying paint waiting to build more, repeat... Anyway, lets get into logistics! The airplane was a friend's completed model that I could tell was sitting around for a bit (yellowed decals, peeled paint, etc.) and that was when I first decided to tear it apart further. I used a lighter to gently melt and form the plastic to make it look crashed, thinner to streak the paint, and some other mods. I used Vallejo Model Air paints and drywall plaster to create the dirt and static grass with moss pieces. In short, the idea was that the P-38 was in a dogfight when it was strafed down one engine and the back one of the booms. Too far from any base, one engine cut out due to loss of oil and overall damage. A crash landing in this uncultivated field resulted. Comments, suggestions, critiques and questions are always welcome!! As always, I hope you like it! Until next time, Joanna
- 10 replies
-
- 32
-
-
-
Evening all, I've been contemplating what to build next for a few weeks. Got a Hobby Boss F-5 on the go which has just come out of the paint shop (albeit with half the number of wings attached that it went in with 😬) which had left me losing in mojo. Don't think the heat in the last couple of weeks has helped. Had to take my daughter to London the other week to visit the Doctor Who shop, so took the opportunity to visit Hannants in Hendon on the way back - never been and it seemed too good as opportunity to miss. I almost came out empty handed as nothing really jumped out at me, but on about the 5th circuit a came across the Sword Lightning trainer not which I've been looking at. Love a lightning, and I enjoyed building Sword's Gannet a while back so that was decision made. I actually found myself craving an airfix mosquito when we got back for some reason, that's one for another day. In a break with tradition, I've decided that this is going straight into production rather than languishing in the cupboard for months on end. I'm going to do the 111 sqn T.4 - being an ex Leuchars local these two squadrons are quite dear to me ( I know, 111 never flew lightnings from Leuchars - it's tenuous!). Box and contents shot: Unfortunately it's not a top opening box - I'm going to be sharing the desk with my wife who's about to start a uni course so I'm going to have to try and keep this contained. That might slow me down - even more!! I've found a build thread on here by @71challywhich has some very useful information, especially regarding the fuselage changes required to make this a better T.4. I won't be worrying about the instrument panel being for a T.5 though. I couldn't tell the difference so I don't think anyone else who sees this will either 🤣 So commences the second lightning in my collection. Wish me luck! 🤞 Al
- 114 replies
-
- 12
-
-
Hi, Though I like early French jets and Special Hobby kits, I also like British aircrafts and other brands. I just love the looks of the Lightning and had to build one: I added below some explanations on the build for those who would like more details. Kit and extras: The Airfix F.6 with the infamous missing stabilisers box art was my choice: I intended to assemble it OOB until I came across the wonderful Baraccuda Studio sets. Being weak, lazy and really impressed, I purchased them: They are worth every penny. I also bought an Eduard PE fret but it focuses on the cockpit and ended up being close to useless, as many other parts looked to flat anyway. The pitot probe from Masters is also a must. Ejection Seat: The seat supplied with the kit simply does not stand the comparison with its resin équivalent, even when improved with the PE: Seat painted with Vallejo acrylics. Cockpit: Same applies here. The Barracuda Studio cockpit and IP coaming are way better than their plastic couterparts. A careful painting and a dark brown wash bring it to life and it does look busy: It even helps detailing the inside of the canopy: Exhausts: Again, the resin parts look way better than the kit parts. Painted with Vallejo Metal Color Jet Exhaust, followed by a black wash and a light dry brush with Vallejo Metal Color aluminium. Air intake ring: I decided to cut it off in order tomake life easy for sanding the joint, thin the lips and, I thought, have easier joint with the fuselage halves. I still think it made my life easier but still took some work adjusting it to the fuselage. Painted with Molotow chrome pen. Build: The rest of the build went OK. The plastic is soft. So much so that I ruined the tanks, hence their absence... There a few shrink marks on the flaps, but nothing catastrophic. Worse is the grainy surface. A killer when you want a NMF. I did not manage to get rid of all of it despite thorough sanding. Well, not thourough enough by the looks of it. There are a lot of scoops to drill or modify. I have seen better adjustments but I have also seen much worse! Caution: if you want to stay out of harm's way, it is necessary to sand flush the ejector marks inside the fuselage halves. Otherwise, the air intake, exhaust and cockpit will not fit correctly and you will be left with nasty gaps. I also improved the landing gear legs and flaps. Canopy: The clear parts sprue was missing in my box. I sent an e-mail to Airfix but being honest, I mentioned that even though I doubted it, I could also have lost the sprue. Well. They considered I had lost the sprue and asked for more money than the kit's value to send it. Therefore, thanks to a friend, I thermoformed one: Painting: I painted the model with Vallejo Metal Color paint. Mostly "aluminium" with some panels painted "white aluminium" and "chrome". The tail fin was masked and left glossy black. Decals: I used the kit decals without questioning their accuracy. 'hope that was not an error. Ifound them to be thick and "rigid" but they reacted very well to Daco Strong. I usually do not like to gloss after decals but that was necessary to blend them with the rest. Washes: I applied a localised wash inside the panel lines and around the raised details using a 50-50 mix of Black and Neutral True Earth washes. I applied a Vallejo European Dust wash on the tail fin. Weathering: I tried not to overweather her and kept my eye on the reference pictures all the time. I hope it did not go OTT. First weathering effects were done with the airbrush and a highly diluted NATO black. I then depicted the dirt accumulations, streaks, etc. using felt tip pens. And voilà! 🙂 Thank you for reading this far and please feel free to tell me if there are errors, inaccuracies and things to improve.
- 26 replies
-
- 75
-
-
-
 This build was quite fun, I had my doubts about sword but after this build I am left with a more positive outlook on them. The kit has it's difficulties though. I go into more detail in the WIP thread: Anyway, without further delay, here she is, T.5 XS416: Here she is with my other lightnings And here she is with my other camo RAF aircraft Thanks for looking!
 -
 This is my latest build in my Series of Suffolk based aircraft. This is my favourite cold war jet, an early Lightning in bare metal. English Electric Lightning F.1, XM144, Target Facilities Flight, RAF Wattisham, Early 1960's Suffolk Series #5 Subject; English Electric Lightning F.1 with Firestreak missiles. Manufacturer; Airfix Kit number; 01979 Scale; 1/48 Aftermarket; CMK resin cockpit set, QMD resin FOD cover, Master pitot, LD Models boarding ladder, Dead Design mask set and Model Alliance decals. Paint; Exterior; AK Xtreme Metal Aluminium, Matt Aluminium, Dark Aluminium, Polished Aluminium, Duraluminium, Burnt Metal and Jet Exhaust. Interior, canopy and anti-glare Tamiya LP65 Rubber Black. Shock cone AK Real Colour RAF Interior Grey Green. Various Tamiya X and XF and Posca pens for detailing. Mr Finishing Surfacer White on the Firestreak's. Primer; Mr Surfacer 1200 and Tamiya LP1 Gloss Black to base the metals. Varnish; AK Gauzy Shine Agent. Weathering; Flory Dark Dirt wash, Abteilung oils and Tamiya weathering palettes. Extras; Scratchbuilt main gear bays.
 -
Lockheed P-38J Lightning 44-23631 'Double Trouble' 367th FG 392nd FS 1/72 - Academy kit CMK F72221 Eduard EDCX087 Eduard 7701 Quickboost QB72304 Academy 13403 Kits-World KW172227 Studyo Pera Modelling 72001 Studyo Pera Modelling 72002 Studyo Pera Modelling 72003 Studyo Pera Modelling SS002 +scatchbuild extras
- 14 replies
-
- 52
-
-
-
After the F-35A (link) and F-35C (link) here's the Trumpeter's 1/32nd Lockheed-Martin F-35B Lightning II - ref. 03232 Release expected in China in late June 2023. Source: http://www.hobbyboss.com/index.php?g=home&m=article&a=show&id=230 Box art V.P.
-
I just finished my 1/48 EE Lightning. It's the Grand Phoenix boxing of the Airfix kit with additional Aires resin bits and Cartograph decals. I also used the Xtra Decal 23 Squadron decals for unit markings and roundels. I did start a WiP post on the kit but didn't keep up with it. I used the resin cockpit and seat, engine nozzles, and forward intake/landing gear bay. The main gear bays looked really good with excellent detail but were twice as thick as the wing. I would have had to shave them down to almost no sidewalls, losing most of the detail, so opted not to use them. I wanted to preserve the sleek lines of the Lightning so closed the canopy and did not use the over-wing fuel tanks. So much for the Aires cockpit... Paints were Tamiya spray can Gloss Aluminum and airbrushed Testors Model Master chrome silver. The Tamiya silver went on a little too heavy in places and I had some runs. The runs that I caught early I cleaned up and resprayed. Other sags, minor, I didn't notice until it was too late. The chrome was very fragile and scratched easily. I sprayed Testors Glosscote overall to try to protect the silvers. It did not dull the shine much at all. I let that dry for a couple of days to really harden and protect the paint. I also wore latex gloves when handling the model during the remainder of the build. Stencil decals by Cartograph and 23 Squadron unit markings from Xtra Decal were excellent. The only complaint is that the maintenance stencil decal placement guide was quite vague. As were the Airfix instructions. (Grand Phoenix instructions were the same, with the resin part numbers included.) Luckily previous threads here on BM gave me tips and tricks to get this one together. Particularly poor are the landing gear instructions. The retraction struts have no positive attachment points on either end. I added short posts on both the main gear struts and in the gear well to attach the retraction arms. I used cheap kitchen foil for the nose ring, aft engine trim, and the forward part of the belly bulge. I expected some wrinkling and was not surprised. But overall it's a good effect. Maybe someday I will try Alclad or some other metallic finish paints, but I don't have any. Finally, a huge thank you to the folks that posted the many photos in the Walkaround section of BM. I used many of those photos throughout the build. And she was placed on the shelf with my other recent completions. Upper shelf L-R is a 23 Squadron Mosquito (Tamiya), 2 FGR.2s (Hasegawa) also using Xtra Decals. Middle shelf is the Lightning, Luftwaffe F-4F (Hasegawa, my most recent completion before this), and the Eurofighter Typhoon (Revell). All are 1/48th. I wanted to keep the 23 Squadron stuff together so I moved the Italeri JAS-39A Gripen to a new location. Bottom shelf are my flight helmets. The white and gray ones are USAF issue that I used way back when. The one to the right is a WW2 set up that I bought many years ago. The cabinet doors close and help keep the dust out.
- 13 replies
-
- 38
-
-
-

Eduard P-38J Cockpit (648812 for Tamiya) 1:48
Mike posted a topic in Aftermarket (updates/conversions)
P-38J Cockpit (648812 for Tamiya) 1:48 Eduard Brassin PRINT Tamiya’s new range of P-38s has been augmented by the new -J, which is a great kit, but you can always improve on injection-moulded perfection with resin, especially the new 3D printed sets that Eduard are now producing. Having used one of their cockpits in an F4F-3 I built recently, they are at the pinnacle of aftermarket technology, offering superb detail with a relatively low part count. As is now usual with Eduard's more complex resin sets, they arrive in a deep Brassin cardboard box, with the resin parts safely cocooned in bags, and the instructions folded around acting as padding, augmented by a pair of foam sheets top and bottom. Inside the box are three large bags containing twenty-two printed resin parts, a sheet of pre-printed, nickel-plated Photo-Etch (PE), a decal sheet, a slip of over-printed clear acetate, and the instruction booklet, which consists of three sheets of A4 printed on both sides and folded into an A5 booklet. There is a small amount of preparation to be done before you can start building, cutting off two rounded nubs from the rudder pedals if you are using the gun bay set in the nose (648790), and a section of the inside of the lower fuselage that would otherwise baulk the cockpit floor. Two more rods are removed from the rear of the cockpit opening in the upper fuselage later on too, so it’s as well to get it all done at outset. The parts are printed resin, attached to the base via thin tendril-like fingers that are easy to cut off and sand the little upstands away, leaving them ready for action. The build phase begins with the pilot’s seat, which is fitted to the head armour on a moulded-in frame that has another piece of equipment behind it. The PE seatbelts are all applied over the painted seat, including additional comfort pads beneath the buckles. The seat and its bulkhead are lowered into the floor along with a lever, and there are some more decals in addition to the detail painting to be done. The switch panel in front of the main panel is glued to a tab on the top of the rudder pedals, with decals applied to both visible faces, then it is inserted into the cockpit to be joined by the L-shaped control column and a choice of two instruments that fit into a slot in the top of the switch panel. The steering yoke slips into a hole in the end of the column, and a resin spacer is socketed in the front of the cockpit, leaving it out if you plan on using the gun pack (648790). The cockpit sidewall details are printed on a thin sidewall, with a choice of parts for the starboard side, and a PE adjustment wheel on the port, plus lots of detail painting and some decals again. The main instrument panel is a single printed part with a decal applied over the top before it too is inserted into the cockpit, which is inverted and glued to the upper fuselage half after cutting the afore mentioned rods from the rear. There is a choice of two styles of gun sight to consider for application into the windscreen after painting and adding the curved acetate glazing that is pre-printed on the sheet. A triple-layered PE roll-over hoop is made up with a pair of handles added for good measure, ending up glued into position at the open edge of the windscreen. There is a choice of two styles of radio rack at the rear of the cockpit, each of which is a single print that is painted up and has stencil decals applied to the sides, adding a roll-over bar over the top, and the more detailed option also has an equipment box fitted near the front, and some 0.35mm wire from your own stock, with the lengths called out to assist you. The decals are called out in scrap diagrams, and the more complex option also has more stencils applied once painted. The internal structure with the spar moulded into it needs the stiffening webs removed, and your choice of radio racks is dropped into the space behind the pilot. Conclusion There’s not much you can say about Eduard’s growing range of cockpit sets other than sublime, and get some. Very highly recommended. Review sample courtesy of -
My last RFI of 2022. This project took 3 weeks, I'm pretty happy with the result. It's my fourth lightning, they go well together.
-
Hello! Time for another lightning. As always I started with the interior. Seat always needs an upgrade. Pretty happy with this one. Going to be XS903 Any reference images would be greatly appreciated.
- 23 replies
-
- 10
-
-
After the F-35C (link), Trumpeter is to release a 1/32nd Lockheed-Martin F-35A Lightning II - ref. 03231 Source: http://www.trumpeter-china.com/index.php?g=home&m=article&a=show&id=243 box art V.P.
-
News from All Japan Model and Hobby Show 2022, Tamiya is to release a new tool 1/48th Lockheed Martin F-35A Lightning II kit - nef. 61124 Sources: https://www.tamiyausa.com/blog/lockheed-f-35-lightning-ii/ https://www.facebook.com/TamiyaUSA/posts/pfbid0DsupchYkdFciHSQSSJ4ZDwo4vQymWPjsq8UmhVu8Jdp6Vz7QTGYLFXd8UK8dALnPl V.P.
- 267 replies
-
- 10
-
-
-
Hello again. Back this time with some finished pictures of a project I've been dragging along on for some time. Years ago, I bought this Anigrand XP-49 kit on-line, as a used kit. It had some problems. The boom halves were badly warped, the landing gear doors and nose gear leg were missing, as were the mass balancers for the elevator. So, I started slowly sawing, slicing, bending and scrounging replacements parts,in this case from the same old MPC P-38F kit that I scrounged other parts from for my XP-38 prototype build. Only the nose gear door had to be fashioned from an old fuel tank of the right diameter, as the one on the XP-49 was longer than on the P-38. This became one of those kits that were only worked on while paint or glue on other models in progress were being built, so I never shot pictures for a build thread. Other than the above-mentioned problems, this was just another simple resin kit, albeit, one of the older Anigrand offerings. Like most other resin vendors, Arnold has improved his techniques in later years, and are these days, his kits usually quite build-able. The Lockheed XP-49 was a later proposed variant of the P-38, with larger, more powerful engines and weapons, as well as a pressurized cockpit for higher altitude flight. The newer engines didn't pan out, and while the XP-49 was said to have "run circles" around the P-38's, the advent of the long-range P-51's made it not worth the effort, First flown in 1942, it was tested to destruction at Wright Field in 1946. In any event here are a few pics of the finished beast: And, for those interested, here is a shot of the Lockheed twin-boom brethren, from left to right, the XP-38, the XP-49, and the XP-58 "Chain Lightning", for comparison purposes. As always, I'm glad to add it to the collection. Thanks for looking, comments or questions always welcomed. Ed
-
 Hello everybody, As said and already shown in the chat section, my entry for this STGB will be this Italeri 1/72 P-38J. A single look at the sprues clearly shows that it's the nice Academy kit and should someone have any doubt about the origin of the plastic, the box mentions "plastic parts made in South Korea". We have their now usual "super decals sheet" for 4 versions: 2 NMF, 1 OD over NG, an experimental "intruder" scheme with flight blue over black. Quite thin and no flaws, will look perfect after some polishing. But after a look at this glasshouse, this Eduard PE "zoom set" suddenly seems more useful. I'll try to use at least part of it. We'll see ..... as I prefer to paint details and the pit is - IMHO - more than decent: Except for the seat that looks armored like a Tiger MBT .... but wait, there is a seat on the PE fret. "Hurray!" My original choice went long ago for the Miss Ann box scheme, an "experimental" one on a 7 th FG plane. Still, I'm pondering about 2 of the 3 other options in the box or even something entirely different - surprise, surprise - if I'm able to produce decent self-made decals. Hope this pic can be useful to you @Christer A. Italeri instructions say FS35190 Flight Blue for the upper surfaces. I hope not to disappoint this time. Comments, as well as tips or even stop signs if I'm about to do something dumb are more than welcome. Pat. PS: be safe and be well AND keep being cautious. That 👹 virus finally caught up with my wife and me.
- 43 replies
-
- 11
-
-
Hello! Not including much info on this build, one of my fastest yet (17 days) and I'm very happy with it. WIP thread: anyway, without further ado, here she is, EE Lightning F.2A XN793 92Sqn. RAF Gütersloh, ~1972: Here she is with my other two lightnings!
-
Trumpeter has just released in China a 1/32nd Lockheed-Martin F-35C Lightning II kit - ref. 03230 Source: http://www.trumpeter-china.com/index.php?g=home&m=product&a=show&id=3780&l=en V.P.
-
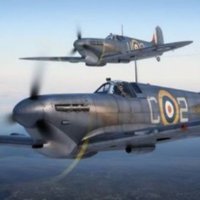
Hello! WIP Thread Without any further ado, here she is: XN781 of 19 Sqn. RAF Gütersloh, flown by Wing Commander R.K. Barcilon, late 1974. Here she is with XS921. I had a lot of fun with this model, unfortunately the decals silvered a bit but not much I could do about it. I will be building another lightning soon, most likely XN793.
- 10 replies
-
- 37
-
-
Finished this a couple of weeks ago and was waiting for some sun to get some good pics (which promptly hid behind a big black cloud on the first pic!) Trumpeter 1:72 lightning F1A of 56 squadron 1960s. Acquired from a friend minus a seat so seat made up roughly just to fill the void and bloke unused from a Canuck model to hide the dodgy seat. OOB build otherwise and painted with humbrol and revell paint and trialed a can of silver for the NMF which really shows up the texture in the plastic I didn’t realise pre painting. Not a bad build except for the instructions/decals. They only supply enough decals for 1 missile of either type and the 56 squ decal instructions only show one side so lots of guess and cross refer to other schemes. Word of advice for anybody with this in the stash. Do not glue the jet pipes in till the end I hadn’t and glad I didn’t as it needed some nose weight which can be pushed down the rear fuselage to the nose. So here she is added to my 15yo F6 and with an F2A in the stash I think a lightning Air Force is likely.