
Search the Community
Showing results for tags 'Large Scale planes'.
Found 8 results
-
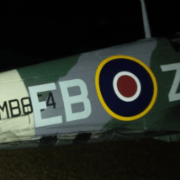 Hey all modellers, my name is Troy and this will be my first post on here following through this, imo, jank process of making a one-off 1/24 Hawker Tornado, specifically, P5224 This is being constructed by a 20 year old who is obsessed with kit building but only has the most basic of tools plus a 3d printer. I started this project late last year so this is a catchup of sorts. Props to @Troy Smith for putting the idea up to post it here. Enjoy! It must've started from this and the fact I have a handful of Typhoon kits in the stash ready for action From then I bought two 1/24 Merlin engines and, well, cut them down the crank line and smushed them together, along with other bits of plastic like a Citroen injector sleeve (the reduction gear housing) I did use diagrams and measurements to make sure it actually is scale accurate to a Vulture. A RR Vulture which is two RR Peregrines, being a RR Kestrel that is lengthend to take two sets of conrods. Trying to figure what pipe went where and how things should look isn't too easy when old scans and one drawing is all you have but I think it worked out out okay Now this is where the Tornado really started. I wanted to make the truck and Sabre engine diorama so naturally I did but now I've opened the Typhoon box so naturally I need to finish it now So now it has began, starting off wings spars and cockpit tubing which was already removed for the previous project as well as cutting the wings up where the 3inch (3mm to scale) drop should be The first bit of scratch building was the quite different cockpit up the front. Thank goodness for the Valiant series Typhoon book It wasn't really meant to be a super serious project but seeing as this is probably the only model of a Vulture and only 24 scale Tornado I thought, maybe I should do this good I found that after taking out the Sabre and it's relative supporting structure, that the kit sort of falls apart in that there aren't many places to glue. The instructions were vaguely being followed but the rest was just figuring out how to make it work. Lots of calculator and ruler work More recently, I was finally getting somewhere. The wings are 3mm lower from their mountings but also 5mm back from there mounting as I discovered after something wasn't lining up. Something I don't think is documented The pencil line on the belly shows the change in positions quite well. Visible also is the replacement forward wing spar and the gaps where new sheet will put to make the iconic flattish bottom of the Tornado Following the repeated removal and fitting of the engine to make it "right", I was on to the accessories which obviously needed modifying, this being the coolant trunks on the side of the radiator The exhausts needed cutting down as they protruded too far of the cowlings. The cowlings, canopy hood and propeller unit are all 3d printed. Some technology it is, brilliant piece of hardware if you can use it right which my younger brother Eddy is especially good with. This is where we are now. No photos show the mount bracket for the radiator so it's anyone's guess as to how they mounted it. Just one photo of the cowlings removed is found unless there are more *plezz* The Rotol propeller, which, from what I can see, is 100% spot on with size. This has a 14Ft diameter to the point when scaled up
- 41 replies
-
- 14
-

-
- Hawker Tornado
- prototype
- (and 1 more)
-
 Hello Chaps, It's been a long haul build- 8 weeks in total, but that is because my wife and I are actively involved with contractors working on our new home that we will be moving to in mid-April....sorting out kitchen design, wood flooring, carpeting, tiles for kitchen and bathrooms, shower designs, paint colors for every room, new faucets for all sinks, choosing granite countertops and sinks for kitchen and bathrooms, new light fixtures and door handles etc etc....I hope this is the last time we have to move now, moving is a stressful and tiring event! Anyway, enough of the waffle and lets get on with sharing photos of my completed build, which is built straight from the box, no after market additions, only using 1.010" fine black EZ-Line for the antenna cables. I hope you like.... Regarding what I think of this kit: It's a great kit that goes together well, has some nice features such as a highly detailed cockpit, pose-able ailerons, flaps, elevators, rudder and air-brakes, recessed panel lines and other surface detail. The parts were all molded very well, with minimal flash and/or parting line miss-match that required clean up before painting. It offers two sets of markings, I chose to do this version that was active in the "Battle of Britain", and the decals are excellent- they go down very well on a gloss clear coat with no silvering, and once the finishing matt clear coat was applied, they look painted on. I did come across two issues during the build: 1) When fitting the engine nacelles to the undersides of the wings, I had a considerable gap between the mating areas of the front and rear nacelles. This is discussed in my "Final Reveal" video and can be seen in my "WIP" thread....links below: 2) When fitting the wheels onto their axles, both axles sheared off very easily and remained inside the wheel mating holes. I drilled these out of the wheels and drilled corresponding holes into the wheel struts and fitted steel pins. I then took a black rubber Tamiya propeller bushing and cut it down the middle to create two thinner bushings. I slid these over the new steel axles and super glued them into place. These then provided some surface area for the wheel hubs to glue to. Again, I used CA glue to fit the wheels in place and it worked a treat, providing me with a very rigid and stronger undercarriage. WIP thread link: http://www.britmodeller.com/forums/index.php?/topic/234996419-revell-pro-modeler-132-junkers-ju-88a-1-bomber-build-update-5-31516/ My YouTube "Final Reveal" video link: This kit would be superb if it came with two completely detailed Jumo 211B-1 engines, external bomb pylons and bombs and an open bomb bay with internal bomb racks and bombs!! That would make it super eye candy and a fabulous kit to work on.....I can dream! Thanks in advance for taking a look at this RFI and for any comments left, they are greatly appreciated! In the meantime, and until the start of my next build which won't be until we have moved and settled into our new home-probably the end of April, happy modeling and have fun! Cheers Martin
- 38 replies
-
- 51
-
-
- Revell
- 1/32 Scale
- (and 8 more)
-
Eduard 1/32 "Weekend Edition" Messerschmitt BF109E-3 "Final Reveal" (8.17.15) Hello Chaps, So, she's finally completed and here are my "Final Reveal" photos of her. I hope you like?! If you've followed my build updates for this kit, you'll be aware of the fit issues that were present when trying to assemble the engine, bulkhead and firewall into the space provided, having to file around 2.0mm away on the width and length of the engine assembly and fuselage internal walls combined, along with filing down the length of the internal assembly and its location points within the fuselage to get it to fit. I also had to jack up the engine with spacers to ensure the exhausts stacks lined up with the apertures that they go through, as well as file the exhaust aperture to make them wider and longer due to the exhausts being larger and not going through. Regarding whether I think this is a VFM kit - "Value For Money" kit, the answer would be an unequivocal and resounding "No"! I base this on the cost of the kit compared to the newly tooled Revell Germany 1/32 BF109G-10 that I modelled. Although the Revell kit doesn't come with a Daimler-Benz DB601A engine, it does have nice cockpit and external details and goes together extremely well without the need for filler. The Eduard kit is 50% more expensive than the Revell Germany kit and one has to ask oneself..."Do I want to pay 50% more just to include an engine that is problematic to fit?". Also, if you chose not to display the engine with the Eduard kit, then I would say that you'd be wasting your money paying the extra for a kit that includes an engine, for it not to be used...you definitely should choose the Revell kit if you take that option and save yourself $12.00. The Revell Germany 1/32 BF109G-10 was $23.95 and the Eduard 1/32 BF109E-3 was $35.95. Regarding providing my scores for the overall quality of engineering, quality of molded product, quality of details included, quality of the instruction manual and the decals and packaging, I score as follows: Quality of Engineering Fits: 4/10 based on how badly engineered the internal assemblies were when fitting inside the fuselage halves. Filler was required in a few places. The worst gap was at the underside front end of the two fuselage halves. The gap was around 2.0mm, which led me to file down the sides of the oil cooler, the front exhaust stacks and the inside faces of the fuselage halves where they mated. Without destroying the exhaust stacks, there was still a gap of around 0.75mm that I filled. There were also gaps of about 1.0 to 1.5mm all around the rear area of the wing assembly where it joins the fuselage on the belly of the plane. I had to fill these areas, too. Quality of molded product: 9/10- the product is very nicely molded, parts are crisp and clean with just a few spots of flash. No warp was present on any of the parts and ejector pin witness marks were away from visual areas. I didn't have any sink marks to contend with and the canopy parts were nice and clear with minimal distortion when looking through. There are finely recessed panel lines and rivet details, although some of the rivet details are too fine for them to show when the plane is given a dirt wash during the finishing stage. A good rivet forming tool would cure that, should you have one and want to attempt improving them. Quality of details included: 8/10- The included engine, bulkhead and firewall have nice details that look good at the end of the build, but they require a lot of patience to get them to fit. The undercarriage is nicely detailed too and includes brake lines and treaded tyres. The cockpit is very nicely detailed and would be enhanced more with after-market seatbelts and foot pedals, but as always, I build "Out of Box" to establish a fair assessment of what you're getting for your money compared to similar kits. Quality of the instruction manual: 9/10- I thought it was very easy to follow, but, it would be nice if the painting instructions were in color. They are if you chose to buy the "Profi-Pak" version instead of this "Weekend Edition" version. Quality of Decals: 8/10- There is only one option for color and markings. The main decals are very good and go down well onto a gloss clear coat in combination with a good decal setting solution, adhering to recesses and surface features. However, some of the smaller stencils had a tendency to "Silver" which I hid with weathering and painting ove the silver areas. Quality of packaging: 9/10- the box is a two part base and lid construction with the base being very sturdy cardboard. I prefer the base and lid style rather than the open end version provided by Revell. Sprues are packaged in clear polythene bags. Further notes: I wouldn't recommend this kit to a beginner because of the fit issues, it's definitely a kit for the more experienced modeler who has patience to overcome the fit issues. Did I enjoy the build?- I did up until the fit issues arose, then it was a "Debbie downer" until those were overcome. Then after that, the rest of the build was smooth sailing. Would I buy this kit again? NO! I'd hope that Revell Germany would Introduce the engine details into their kits for an extra $5.00 which I'd pay willingly, as long as there were no issues. Or, I'd recommend the Trumpeter 1/32 BF109E models that come complete with engine details, a fret of PE and rubber tyres. If you'd like to see my "Final Reveal" video for this update, here is the link to that: https://youtu.be/ej54LH-n8iY Thanks for following along with this build and for your comments, much appreciated! Time to get back onto the Revell 1/32 Spitfire Mk.II when the replacements for the missing and damaged parts arrive next week! Happy modeling and have fun! Cheers Martin
- 23 replies
-
- 18
-
-
- Messerschmitt
- BF109
- (and 6 more)
-
Hello Guys, Because I have to wait 8 weeks now for the missing part and damaged part to arrive from Revell Germany for my Revell 1/32 Spitfire Mk.IIa, I'm now going to start a new kit that will be my 2nd entry into "Battle of Britain 75th Anniversary GB" both on here and on YouTube- hosted by Ukscalemodeller and CharlesScaleModelling. This is Eduard's "Weekend Edition" of this model. You can buy what is called a "Profi-Pak" version that is more glitzier, that includes a full color booklet, photo-etch and more color/marking options. This kit was kindly given to me by a modeling buddy and so the sprues had already been taken out of their bags and some parts had been removed from their sprues. The Box is made from a two-ply card base and a single-ply lid making it very sturdy, which I prefer moreso than the single ply Revell boxes that open at one end. The box contains a 8 page black and white instruction/assembly/painting and decaling booklet. Only one option of color/markings is offered, that of Major Otto Bertram's aircraft who was a Luftwaffe ace fighter pilot with 22 kills credited to him that earned him the "Knights Cross of the Iron Cross".... The instructions look straight-forward and the color call outs are for Mr. Color and Hobby Color only, so conversions to your preferred paint will be necessary. Front Page 1 and Back Page 8 Pages 2 and 3 Pages 4 and 5 Pages 6 and 7 There are two sheets of decals/stencils that are very thin, nicely registered, almost zero carrier film around the edges and they are a nice satin/matt finish. Decal Sheet Stencil Sheet The kit comes with 6 olive colored sprues and one clear sprue, but as mentioned earlier, because this kit was given to me, the sprues had been taken apart. But, here are photos of all the parts on their sprues or removed with some close ups too, to show the nice fine panel line and rivet details and also how nicely molded these parts are. There is zero flash on the majority of these parts, with the tiniest amount in a few places. The parts are crisp and clean with zero warping/distortion and ejector pin marks are absent from seen surfaces. One thing that I'm excited about is that this kit includes a Daimler-Benz DB601N engine and removable cowlings to display it if you wish to do so, unlike the Revell 1/32 BF109G-10 build I did recently that didn't include one... The Clear Sprue is very clear with thin molded parts that include riveted frame details. They are free of any aberrations and very little distortion of image when looking through them... At first sight, this kit looks like a really nice kit, well engineered and excellently molded, although it would have been nice to have one or two more options of color/markings. This kit is available from on-line USA distributors for $35.85, which is about 24.00 quid in the UK, which is $12.00 (8.00 quid) more than I paid for the Revell 1/32 BF109G-10, although the Revell kit didn't have an engine and open cowling options. At the end of this build, I'll let you know my thoughts on how well it goes together and compare it to the Revell kit I built to establish my personal opinion on whether it is good value for money. Okay, with that out of the way, I can now go and wash the parts in readiness to make a start on her next Monday! I have the grandson coming soon and he's here until Sunday evening! In the meantime, if you'd like to see my YouTube "In-Box-Review" video for this kit, here is the link: https://youtu.be/H23GCnQS9os Happy modelling and have fun! Cheers Martin : )
- 56 replies
-
- 8
-
-
- Messerschmitt
- BF109
- (and 8 more)
-
Hello Guys, Because I have to wait 8 weeks now for the missing part and damaged part to arrive from Revell Germany for my Revell 1/32 Spitfire Mk.IIa, I'm now going to start a new kit that will be my 2nd entry into "Battle of Britain 75th Anniversary GB" both on here and on YouTube- hosted by Ukscalemodeller and CharlesScaleModelling. This is Eduard's "Weekend Edition" of this model. You can buy what is called a "Profi-Pak" version that is more glitzier, that includes a full color booklet, photo-etch and more color/marking options. This kit was kindly given to me by a modeling buddy and so the sprues had already been taken out of their bags and some parts had been removed from their sprues. The Box is made from a two-ply card base and a single-ply lid making it very sturdy, which I prefer moreso than the single ply Revell boxes that open at one end. The box contains a 8 page black and white instruction/assembly/painting and decaling booklet. Only one option of color/markings is offered, that of Major Otto Bertram's aircraft who was a Luftwaffe ace fighter pilot with 22 kills credited to him that earned him the "Knights Cross of the Iron Cross".... The instructions look straight-forward and the color call outs are for Mr. Color and Hobby Color only, so conversions to your preferred paint will be necessary. Front Page 1 and Back Page 8 Pages 2 and 3 Pages 4 and 5 Pages 6 and 7 There are two sheets of decals/stencils that are very thin, nicely registered, almost zero carrier film around the edges and they are a nice satin/matt finish. Decal Sheet Stencil Sheet The kit comes with 6 olive colored sprues and one clear sprue, but as mentioned earlier, because this kit was given to me, the sprues had been taken apart. But, here are photos of all the parts on their sprues or removed with some close ups too, to show the nice fine panel line and rivet details and also how nicely molded these parts are. There is zero flash on the majority of these parts, with the tiniest amount in a few places. The parts are crisp and clean with zero warping/distortion and ejector pin marks are absent from seen surfaces. One thing that I'm excited about is that this kit includes a Daimler-Benz DB601N engine and removable cowlings to display it if you wish to do so, unlike the Revell 1/32 BF109G-10 build I did recently that didn't include one... The Clear Sprue is very clear with thin molded parts that include riveted frame details. They are free of any aberrations and very little distortion of image when looking through them... At first sight, this kit looks like a really nice kit, well engineered and excellently molded, although it would have been nice to have one or two more options of color/markings. This kit is available from on-line USA distributors for $35.85, which is about 24.00 quid in the UK, which is $12.00 (8.00 quid) more than I paid for the Revell 1/32 BF109G-10, although the Revell kit didn't have an engine and open cowling options. At the end of this build, I'll let you know my thoughts on how well it goes together and compare it to the Revell kit I built to establish my personal opinion on whether it is good value for money. Okay, with that out of the way, I can now go and wash the parts in readiness to make a start on her next Monday! I have the grandson coming soon and he's here until Sunday evening! In the meantime, if you'd like to see my YouTube "In-Box-Review" video for this kit, here is the link: https://youtu.be/H23GCnQS9os Happy modelling and have fun! Cheers Martin : )
-
Hello Guys, This will be my first entry into the "Battle of Britain 75th Anniversary Group Build" - the Revell 1/32 Supermarine Spitfire Mk.IIa. I plan to accompany this Spitfire with the Eduard 1/32 Messerschmitt BF109E-3. Introduction to the kit: The Box Art: The Box Contents The Box Contains 3 clear bags of light grey sprues; 5 in one bag, and 4 in each of the two other bags making a total of 13 light grey sprues. There is another small clear bag containing 3 small clear sprues. There is a 12 page black and white assembly/painting and decaling instruction booklet that includes two options of paint scheme and squadron markings, and lastly, a sheet of cartograf decals; Sprues A + B: Sprues C + D + D- NO, that's not a mistake, but it is one by Revell of Germany!! I have two sprue D's which are the portside upper wing sections and no Sprue E which is the starboard side upper wing section! Aaaarrrrrggggghhhh!!! I went to Revell's website to order the missing sprue E and it can take up to 8 weeks to be delivered from Germany!!!!!????!!!! Bloody hell!! Sprue F Sprue G Sprue Q Sprue T Sprue S (x2) Sprue H (x2) Clear Sprues I, R + U A 12 page black and white Assembly/Painting and Decaling Instruction Booklet Front Page 1 and Back Page 12 Pages 2 + 3 Pages 4 + 5 Page 6 + 7 Pages 8 + 9 Pages 10 + 11 The Decal Sheet The molded parts are very crisp and clean with zero flash apart from a couple of little areas. The parts have nice fine recessed panel lines and lots of rivet details. The clear molded parts are very clear with zero aberrations except for one side of the sliding canopy which is slightly "glazed". The decals are excellent looking with zero carrier film beyond the decal edges and good register. The black and white instruction booklet appears to be clear and concise, but the two paint and decal options would be better in color. The color call outs are in Revell colors only. I will make a final report when the build is complete indicating any issues that I come across. In the meantime, thanks for taking a look and I hope you enjoy following along with my build. In the meantime, if you'd like to see my YouTube "in-Box-Review" video for this kit, here is the link: https://youtu.be/SWiiFXlU6zA Let the build begin!! Cheers Martin
- 36 replies
-
- 1
-
-
- Supermarine Spitfire Revell 1
- Revell
- (and 8 more)
-
Revell 1/32 Arado AR196A-3 Seaplane "FINAL REVEAL!!": Hello Guys, Following on from my "Build Update #6" posting, I assembled the canopy onto the fuselage, attached an EZ-Line antenna, glued all the light lenses into their locations, glued the pitot tube and counter-balance weights onto the underside of the wings, along with door handles on the canopy frame sections, and, fitted the engine cowlings and engine bay doors in their open positions to complete her!! So, here are the "Final Reveal" images of my completed Arado AR196A-3...I hope you enjoy the views as much as I enjoyed building her! And, forgive me for the number of photos that I have posted, I couldn't make my mind up which ones to select and it was taking me too long to choose, so in the end, I just uploaded all of the photos. Well, there she is. I hope you enjoyed the views as much as I enjoyed building this fabulous kit, which I must say, is fabulous value for money! Now, I have to start designing and planning part two of this build, which will be the diorama to set this plane into. I have 4 ideas presently "floating" around my head (no pun intended), but first, I need to sketch them all out and calculate my material requirements and costs before deciding which design idea I go with. I'm a little anxious as I've never built a diorama before and have no clue where to start, so, I guess watching some fellow modelers "How To" vids are my next step! If you didn't see my "Build Thread" for this model, here is the link to it: http://www.britmodeller.com/forums/index.php?/topic/234980467-revell-132-arado-ar196a-3-seaplane-my-first-post/ In the mean-time, if you'd like to watch my "Final Reveal" YouTube video for this plane build, here is the link to it: https://youtu.be/ZRKU-k-M-BE And, on my YouTube channel you can find my "In-Box-Review" and "Build Update" Videos, for this build, too: "In-Box-Review" video link: https://youtu.be/MxfUpfYJDyU "Build Update #1" video link: https://youtu.be/nJ4rEbxFcv8 "Build Update #2" video link: https://youtu.be/Z_NoWew9Qus "Build Update #3" video link: https://youtu.be/AUQsz__kKyE "Build Update #4" video link: https://youtu.be/FpnxQFUASbU "Build Update #5" video link: https://youtu.be/iyCPzT-H_wU Thanks again to everyone that has followed this build thread, and, for the kind and encouraging comments that you have left me, they are all greatly appreciated and keep me motivated to continue! Happy modeling guys! Have Fun! Cheers!! Martin
- 52 replies
-
- 39
-
-
Hello Everyone, I have just joined the forum and this is my first contribution to Britmodeller. I hope you enjoy this build thread? History: The Arado Ar 196 was a shipboard reconnaissance low-wing monoplane aircraft built by the German firm of Arado starting in 1936. The next year it was selected as the winner of a design contest and became the standard aircraft of the Kriegsmarine (German navy) throughout World War II. Design and development In 1933, the Kriegsmarine looked for a standardized shipboard reconnaissance aircraft. After a brief selection period, the Reichsluftfahrtministerium (German Air Ministry, RLM) decided on the Heinkel He 60 biplane. This was one of a line of developments of a basic biplane airframe that appeared as a number of floatplanes, trainers, and fighters. Deliveries started in a matter of months. By 1935, it was found that the He 60's performance was lacking and the RLM asked Heinkel to design its replacement. The result was the He 114. The first prototype was powered by the Daimler-Benz DB 600 inline engine, but it was clear that supplies of this engine would be limited and the production versions turned to the BMW 132 radial engine instead. The plane proved to have only slightly better performance than the He 60, and its sea-handling was poor. Rushed modifications resulted in a series of nine prototypes in an attempt to solve some of the problems, but they didn't help much. The Navy gave up, and the planes were eventually sold off to Romania, Spain and Sweden. In October 1936, the RLM asked for a He 114 replacement. The only stipulations were that it would use the BMW 132, and they wanted prototypes in both twin-float and single-float configurations. Designs were received from Dornier, Gotha, Arado and Focke-Wulf. Heinkel declined to tender, contending that the He 114 could still be made to work. With the exception of the Arado low-wing monoplane design, all were conventional biplanes. That gave the Arado better performance than any of the others and the RLM ordered four prototypes. The RLM was also rather conservative by nature, so they also ordered two of the Focke-Wulf Fw 62 design as a backup. It quickly became clear that the Arado would work effectively, and only four prototypes of the Fw 62 were built. The Ar 196 prototypes were all delivered in summer 1937, V1 (which flew in May) and V2 with twin floats as A models, and V3 and V4 on a single float as B models. Both versions demonstrated excellent water handling and there seemed to be little to decide one over the other. Since there was a possibility of the smaller outrigger floats on the B models "digging in", the twin-float A model was ordered into production. A single additional prototype, V5, was produced in November 1938 to test final changes. 10 A-0s were delivered in November and December 1938, with a single 7.92 mm (.312 in) MG 15 machine gun in the rear seat for defense. Five similarly equipped B-0s were also delivered to land-based squadrons. This was followed by 20 A-1 production models starting in June 1939, enough to equip the surface fleet. Starting in November, production switched to the heavier land-based A-2 model. It added shackles for two 50 kg (110 lb) bombs, two 20 mm MG FF cannons in the wings, and a 7.92 mm (.312 in) MG 17 machine gun in the cowling. The A-4 replaced it in December 1940, strengthening the airframe, adding another radio, and switching props to a VDM model. The apparently mis-numbered A-3, which had additional strengthening of the airframe, replaced the A-4. The final production version was the A-5 from 1943, which changed radios and cockpit instruments, and switched the rear gun to the much-improved MG 81Z. Overall, 541 Ar 196s (15 prototypes and 526 production models) were built before production ended in August 1944, about 100 of these from SNCA and Fokker plants. The Ar 196C was a proposed aerodynamically-refined version. The Ar 196C project was cancelled in 1941. Operational history An Ar 196 on board the German cruiser Admiral Hipper The plane was loved by its pilots, who found it handled well both in the air and on the water. With the loss of the German surface fleet, the A-1s were added to coastal squadrons and continued to fly reconnaissance missions and submarine hunts into late 1944. Two notable operations were the capture of HMS Seal, and the repeated interception of RAF Armstrong-Whitworth Whitley bombers. Although it was no match for a fighter, it was considerably better than its Allied counterparts, and generally considered the best of its class. Owing to its good handling on water, the Finnish Air Force utilized Ar 196s just for transporting and supplying special forces patrols behind enemy lines, landing on small lakes in remote areas. Several fully equipped soldiers were carried in the fuselage. Arado in Allied hands Arado AR196 naval reconnaissance floatplane in the collection of the Bulgarian Air Force Museum at the airport in Plovdiv. The aircraft is the pride of the director, who is seen in the foreground. Previously, this seaplane was at the Marinemuseum in Varna, but was returned to the Air Force Museum for lack of space The first Arado Ar 196 to fall into allied hands was an example belonging to the German cruiser Admiral Hipper, which was captured in Lyngstad, Eide, by a Norwegian Marinens Flyvebaatfabrikk M.F.11 seaplane of the Trøndelag naval district on 8 April 1940, at the dawn of the Norwegian Campaign. After being towed to Kristiansund by the torpedo boat HNoMS Sild, it was used against its former owners, flying with Norwegian markings. At 03:30 on 18 April, the Arado was evacuated to the UK by a Royal Norwegian Navy Air Service pilot. The plane was shortly thereafter crashed by a British pilot while on transit to the Helensburgh naval air base for testing. At the end of the war, at least one Arado Ar 196 was left at a Norwegian airfield and kept in use as a liaison aircraft by the Royal Norwegian Air Force for a year on the West coast. Former military operators Bulgaria- Bulgarian Air Force Finland- Finnish Air Force Germany- Kriegsmarine Luftwaffe Norway - (captured)Royal Norwegian Navy Air Service, Royal Norwegian Air Force Soviet Union- Soviet Air Force, Soviet Naval Aviation Aircraft on display Ar 196 A-3An aircraft operated by the Bulgarian Air Force is displayed at the Museum of Aviation and the Air Force, Plovdiv, Bulgaria.Ar 196 A-5, Werknummer of 623 167An aircraft that formerly equipped the German cruiser Prinz Eugen is in storage at the Paul Garber Facility of the Smithsonian's National Air and Space Museum, and awaiting restoration. Ar 196 A-5, Werknummer of 623 183Another aircraft from the Prinz Eugen was displayed from 1949 to 1995 at the Naval Air Station Willow Grove, Pennsylvania and subsequently transferred to the National Naval Aviation Museum in Pensacola, Florida. The upper fuselage and canopy were damaged during transit, and it remained in storage awaiting restoration. In December 2012, it was packed into containers and shipped to Nordholz, Germany. Restoration began in August 2013, in time for that city's celebration for 100 years of German naval aviation. The plane, on long term loan from the National Naval Aviation Museum, will eventually be displayed at the Naval Air Wing 3 (Marinefliegergeschwader 3) headquarters at Nordholz Naval Airbase. The Aircraft Historical Museum, Sola, Norway, has on display an Ar 196 A-2 fuselage frame raised from the wreck of the German cruiser Blücher in Oslofjord. Another aircraft is known to lie in the Jonsvatnet, a lake near Trondheim in Norway. A number of wartime German aircraft have been recovered from the lake, but the Ar 196 remains undisturbed as its crew were killed when it crashed there in 1940 and it has the status of a War Grave. A wrecked Arado Ar 196 A-3, believed to be D1 + EH, was snagged by a fishing trawler off the island of Irakleia in 1982 at a depth of 91 meters. It was towed out of the fishing lanes to shallower waters (about 11 meters). The upside down plane, with fuselage and wings mostly intact, has become a popular spot for Scuba diving. Specifications (Ar 196 A-2) General characteristics Crew: Two (pilot and observer) Length: 11.0 m (36 ft 1 in) Wingspan: 12.4 m (40 ft 0 in) Height: 4.45 m (14 ft 7 in) Wing area: 28.4 m² (306 ft²) Empty weight: 2,990 kg (6,592 lb) Max. takeoff weight: 3,720 kg (8,200 lb) Powerplant: 1 × BMW 132K 9-cylinder radial engine, 960 PS (706 kW, 947 hp) Performance: Maximum speed: 311 km/h (193 mph) Range: 1,080 km (670 mi) Service ceiling: 7,010 m (23,000 ft) Rate of climb: 300 m/min (980 ft/min) Wing loading: 98.2 kg/m² (20.1 lb/ft²) Power/mass: 167 W/kg (0.101 hp/lb) Armament: Guns: 1 × 7.92 mm (0.312 in) MG 15 machine gun 1 × 7.92 mm (0.312 in) MG 17 machine gun 2 × 20 mm MG FF cannons Bombs: 2 × 50 kg (110 lb) bombs The Box and Artwork: A side panel of the box showing some of the many details included in this kit: Contained within the box are 13 grey sprues, one clear sprue, a 16 page black and white assembly, paint and decal instruction booklet and a sheet of cartograf decals. The grey sprues are divided into 5 clear polythene bags that are sealed with a strip of cellotape, and, the clear sprue is in a bag of its own. The decals are covered with a soft opaque paper sheet and inserted into the center pages of the instruction booklet. The box is one fabrication with access to the contents enabled by pulling open one of the end flaps. I much prefer the two piece box constructions with a base and a lid: Pages 2 + 3: Pages 4 + 5: Pages 6 + 7: Pages 8 + 9: Pages 10 + 11: Pages 12 + 13: Pages 14 + 15: Pages 1 + 16- the front and back pages: The 13 grey Sprues: A close up of some detail on one of the sprues: The clear sprue: And, finally, the Decal sheet: Overall, at first sight, these parts look very well engineered with zero flash, and if any, it's hardly noticeable. The details are nice and crisp, the molded parts are clean, free of warp and ejector pin marks in visible surfaces. The clear parts are thin, free of blemishes, gate blushing and/or splaying, air traps, knit and weld lines and no optical aberrations to disturb visual transparency and clarity. There's a ton of styrene for the price, the decals are very nice (cartograf), but the instructions look a little confusing in places...we'll see when we get to the build. That's my introduction done with, now onto the build! Thanks in advance for taking a look guys and commenting. Cheers, Martin