Search the Community
Showing results for tags 'King Tiger'.
-
Hi Folks, So this is my first AFV build, I have previously being building things that only have wings so decided to give something different a go and try and learn a few new techniques along the way. I first spotted this kit when it came out and I was immediately drawn to it so I am glad I finally got my hands on it. It is the Takom 1/35 King Tiger full interior kit featuring Abt. 505. I will be doing my interpretation of how the tank would have looked at the time. Considering I haven't been able track down too many references of this particular KT I am taking a little bit of an artistic licence with the weathering and battle damage. I plan on building the tank as if it was engaging a target from a static position at a distance as I have learned these machines weren't built for close engagements. With this in mind it will mean leaving it buttoned up, but I am going to leave a large portion of the doors and panels unglued so they can be removed and you can have a look at the interior. Unfortunately I never took any pictures when I was building up the interior so I only have them after it has been built and painted but will try and keep up with pictures as I progress. I think I was a little heavy handed on the chipping, but should be able to clear all that up when I start weathering. The engine all painted up. I later gave this a run over of panel line wash and will rust up the exhaust pipes a little later. Also need to add some chipping. And the weathering begins...and finishes: I then started to put everything into place. Thankfully even with the paint everything managed to slip together nice and snug. I have added a lot of grime, oil and even a few leaves to portray the winter environment and the crew dragging the dirt inside the tank. Nothing special was used, litte european earth pigments, streaking grime for interiors, black night panel wash and also some black ink was flicked from the brush to replicate oil stains and spills. If anyone has any questions or comments please feel free to share and chat! Cheer
-
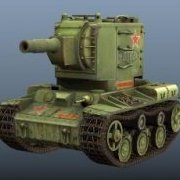 Ok so rather than Flooding the forum with a huge amount of new topics I'd just condense some of my favourite 1/16 models all done in the last 18 months. Theres a few more to come still!!! I've a Bulldog and tank transporter to detail and paint too.and will need to take some photos of my winter KV1 note the T34 interior was based on photos I took from inside one at a show that was happily driving around the arena... the amount of rust and paint flake has NOT been exaggerated 😳😳😳 album link as there are many more. https://flickr.com/photos/150255258@N02/sets/72157686523917386 Sorry so so many photos!!!
- 10 replies
-
- 5
-

-
- T34
- king tiger
- (and 1 more)
-
1945 King Tiger Takom/Ammo 1:35 Hitler, and therefore Nazi Germany was obsessed with bigger which they equated with better, and this was reflected in almost every aspect of arms production in the run-up to, and throughout World War II. After the Panzer IV had been matched by Allied designs, the Tiger addressed the balance back in their favour, becoming the most feared combatant from any force, despite several draw-backs of its design, such as a weak transmission, and a level of complexity that meant it was slow to manufacture, prone to break-downs and expensive to repair. Expecting the Allies to bring heavier tanks to the field before too long, the King Tiger, Tiger II, or Königstiger as the Sd.Kfz.182 was known came into existence, having begun development even before the war started. Porsche's ground-breaking and complex design was unsuccessful for this reason, while the Henschel proposal was taken forward to production, using the same underpowered Maybach engine that was barely adequate for the Tiger I, and taking on the sloped armour of the successful Panther to significantly increase the effective thickness of the armour whilst keeping weight down to a staggering 70 tonnes. The initial turrets had curved surfaces that were difficult to manufacture, and a redesign was necessary to cure this and remove the shot-trap under the mantlet, with the new design being known today as the Henschel turret, while the old design became the Porsche turret, although both were designed by Krupps. A weak transmission design, coupled with the underpowered engine ensured that many vehicles broke down in the field, and plans were in progress to improve both aspects with fuel-injection and a new drive-train, but were curtailed by the end of the war. Most of the initial order of 1,500 units were built under difficult circumstances due to bombing of the factories and the encroaching Allied forces, and despite its problems it became one of the icons of German tank design of WWII, with a number surviving to be placed in museums, with some still running. The Model We have had a few King Tiger (KT) kits in 1:35 over the years, but nothing new for quite a while, and at times the preferred brands have been hard to come by with prices reaching silly levels on eBay. Takom's new range of KT kits aims to provide a full set of these imposing tanks, with and without Zimmerit anti-mine coating, with Henschel and Porsche turrets, and with or without interiors. This should cater for almost every possibility, and if you like your tanks buttoned up, you won't be wasting the interior if you buy wisely. This special edition kit has been produced in an alliance with AMMO by Mig Jimenez. The types included from the box haven’t been released by Takom before, so you can add it to your collection without fear of duplication. It is ostensibly a 1945 King Tiger Ausf B with a Henschel Turret, but one of the options is to build it as a July 1945 Project with Infra Red sights, whilst the other is for a Standard March 1945 Late version. Inside the box are a lot of sprues, taking up almost all the available space. There are ten sprues, two hull parts and upper turret in a grey styrene, one sprue of clear parts, one small sheet of Photo-Etch (PE) brass, and decal sheet. The instruction guide is in the by-now-familiar Takom format, in landscape A4, with a separate booklet for the painting instructions. All the parts are beautifully moulded with no sign of flash or other imperfections, but there are quite a few moulding pips, and for those modellers who have an aversion to indie link tracks, look away as, although these are link and length, each individual link is connected to the sprue by no less than six gates which will require the nice tedious job of cleaning them up before fitting. Construction begins with the rather unusual start point of the upper hull and the fitting of the towing cables, pioneer tools, and the separate panel for the drivers and bow gunners hatches. Inside, there is a large panel glued to the inside of the glacis plate, along with the two periscopes. The three piece bow machine gun is then assembled and glued into the ball socket in the bow plate. Then, on the outside the rest of the ball mechanism is fitted, along with the armoured hood. The track guards are also added at this point, although I’d probably leave them off until the entire hull is complete and the tracks fitted. Each of the road wheels and the sprockets are made up from two parts whilst the idlers are three part units. Once the gearbox covers and axles have been fitted to the hull all the wheels can be attached to their relative axles. There is a separate lower glacis plate to be attached as well. With all the track links and lengths cleaned up it’s just a case of patience and following the build guide carefully, ensuring it sags in the correct places. If you’re following the instruction rigidly then you will be fitting the upper hull to the lower at this point then adding the upper bow mounted track guards, three piece bow mounted light and lower, inner gearbox covers, to which the towing shackles are attached. The rear bulkhead is fitted out with the engine gearbox cover, a smaller access hatch, two, three piece exhausts, exhaust covers, track puller, the two rear mudguards and rear mounted towing shackles. The completed bulkhead is then attached to the rear of the hull. On the rear upper hull alternative centre engine covers, one is fitted with three individual engine hatches each fitted with a ventilation style dome and two other access hatches. The alternative centre hatch is fitted with a single large hatch each with two ventilation domes. There are also alternative radiator covers, attached each side of the centre hatch, there have different grilles and on one style the grilles are covered by armour plate. Each of the centre mounted circular opening is covered by PE grilles. Each assembly is then glued into position. The turret is assembled next, with the single piece centre section of the turret fitted with the roof, inner rear bulkhead, gunners internal hatch framing, inner section of the commanders cupola, outer rear bulkhead gunners hatch actuator, in open or closed position, three piece gunners hatch, periscope cover, small access hatch and grab handles. The large eight piece rear mounted hatch is then attached with its hinge covers, along with the roof mounted ventilator cover or alternative cover plate. The turret base is fitted with the gun trunnion section via two trunnion mounts and then glued to the turret. The outer commanders cupola is fitted with the seven periscope covers before being glued into position. The turret is then further detailed with four sets of six track link brackets and ten links, two at the front and three at the rear on each side. The March 1945 version is fitted with the commanders four piece hatch and a four piece MG34 machine gun. The July 1945 is fitted out with the same style hatch, but instead of the machine gun there is an eleven piece infra red sight and searchlight, plus on each side of the turret there are covers for the new rangefinder. The five piece gun barrel is the same for both versions, but the mantlet is slightly different, each version made from three parts, but make sure you are using the correct mantlet. The completed turret is then attached to the hull, completing the build. Decals Since there are four decal/paint schemes for each of the two versions the paint instructions is quite large, but very well printed. So good in fact you could possible separate them and frame them should you wish. All the paint codes are for AMMO paints, but with the German names for each colour. There are six schemes with vehicle numbers; the other two just have generic crosses etc. The decals have been printed by AMMO and although only a small sheet they are nicely printed, in register with good opacity. The larger numbers though have quite prominent carrier film, so will need a good gloss coat before applying. The options are by the town they served in and include:- Standard King Tiger from Paderborn 1945 King Tiger, No. 304 based at Hamm 1945 King Tiger, No. 421 based in Koln 1945 King Tiger, No. 235, found at the Henschel Plant, February 1945 Infra Red fitted King Tiger, based in Wildau 1945 King Tiger, based in Gorlitz 1945 King Tiger, No 502, based in Saltsburg, Austria 1945 King Tiger, No 232, based in Kassel 1945 Conclusion This is a very nice kit, as we have come to expect from Takom, and it is an interesting alliance with AMMO. Although, if you’re going to do something with a paint company, at least include some paint in a special edition like this, even if it was of only one or two schemes. As a marketing ploy, which it after all it is having some paint in the box may have got some modellers moving over to those paints rather than just sticking with what they know. The track links are also a bit of a letdown, since the previous release, with interior had the links separate in poly bags, it’s strange Takom went with the link and length approach. Other than that a fairly easy build and will look great in any collection. Review sample courtesy of UK Distributors for
-
Hi everyone, this is the first build I am posting here, this is my most recent build. Any feedback would be much appreciated, thank you for reading! Scott
- 5 replies
-
- 12
-
-
- Takom
- King Tiger
- (and 1 more)
-
Hi Guys, I've been struggling for motivation lately but seeing that this kit is finally on sale, I couldn't resist! First impressions are very good. Surface detail is excellent, particularly the welds and rolled steel texture. Tracks are link and length which I think is the best compromise between indy links and belt type tracks. The kit comes with a few PE parts, metal barrel (first batch only), two figures and 4 decal options. At £30 for the exterior kit, only Dragon comes close to matching this. Tamyia's offering is now well and truly redundant! I'm going to be building this OOB for the most part. I have a very nice Aber barrel in the stash which needs to be used. So, a few photos before I get started Turret roof with nice weld detail. Designed to left unglued if adding the interior. Both types of mantlet included. Lower hull tub. Note that there are a lot of locating holes for the interior that will need to be filled if leaving the fenders off. Hull roof is also separate for easy viewing of the interior. Link and length tracks very nicely detailed. Not a pin mark in sight Upper hull with excellent detail PE, decals and Instructions showing some of the 5-view painting guide. Nice to see all 4 decal options having a full painting guide too. So, on to the rivet counting part (sorry ). Accuracy wise, there is very little to comment on. The only 'issue' being the the turret ring is molded to the hull roof. This should be part of the turret but it's not really an issue and it was likely done this way to keep everything lined up. The kit best represents a vehicle built between June and mid / late August 1944 and would be better off having zimmerit applied. Of the 4 decal choices, the 2 with zimmerit are closest to the details provided but '124' of Pz Abt 505 will require a few parts to be left off. The 2 options without zimmerit will require a few more changes to be 100% accurate. Most of these details are minor in reality so unless you are wanting to be as accurate as possible, it's a non issue. My only other comment would be that I have doubts about the painting guide for option 4, '324' Pz Abt 509. I'm yet to see a photo of a partial whitewash over ambush camo as depicted but would be happy to see one So rivet counter hat off, I will hopefully starting the build tomorrow. First step is the wheels. More to follow soon hopefully Cheers Matt
- 43 replies
-
- 10
-
-
- meng
- King Tiger
- (and 1 more)
-
Trumpeter 1/16 Tiger II Here is my Trumpeter Tiger II finally completed after almost 3 1/2 years. This project was a huge challenge, with lots of firsts for me. The base kit was modified with lots of aftermarket and scratch built items to increase the detail / accuracy. I won't go into detail about the build as it can all be found HERE. Just want to say a quick thanks to all those that followed the build and all the encouragement to get this build finished 1 by Matt Tullier, on Flickr 2 by Matt Tullier, on Flickr 3 by Matt Tullier, on Flickr 5 by Matt Tullier, on Flickr 6 by Matt Tullier, on Flickr 9 by Matt Tullier, on Flickr 4 by Matt Tullier, on Flickr 8 by Matt Tullier, on Flickr 7 by Matt Tullier, on Flickr 10 by Matt Tullier, on Flickr 1 by Matt Tullier, on Flickr 2 by Matt Tullier, on Flickr 3 by Matt Tullier, on Flickr 4 by Matt Tullier, on Flickr 5 by Matt Tullier, on Flickr 6 by Matt Tullier, on Flickr 7 by Matt Tullier, on Flickr 10 by Matt Tullier, on Flickr 12 by Matt Tullier, on Flickr 13 by Matt Tullier, on Flickr 14 by Matt Tullier, on Flickr Cheers
-
 I rarely make armour (this is my third in about 15 years of modelling) but this kit and PE combo was going cheap in China so i bought it on a whim. Eight years after starting, assembly is complete! It's the Dragon Porsche turret kit with Voyager PE set. The Zimmerit is a resin set from Cavalier Model Productions. I thought it was excellent. The barrel is from Lion Roar. That's it so far, ready for paint. I'm going for a three-colour scheme which is probably fictitious and may offend the purists! Al
- 31 replies
-
- 15
-
-
We've just received stock of these greatly anticipated 1/35 scale Model Tank Kits from Takom Models. Including three excellent German King Tiger models with interior detail parts and a 2-in-1 Chinese PLA Type 59/69 Tank Kit. https://www.wonderlandmodels.com/blog/article/takom-tanks-stock-king-tiger-type-59-69/
-
Takom have three gorgeous 1/35 scale King Tiger kits due for release at the end of August, featuring zimmerit, full interior detailing, scale armour plate thickness and individual track links! For full details, please see our newsletter.
-
- 1
-
-
- new releases
- takom
- (and 8 more)
-
This was a scene I put together for two of my Achtung Panzer GB builds. When I was planning what to do for the base I thought it was a good opportunity to see what could be fitted onto the maximum size of base allowed in the proposed Vignette Group Build - 6 inches x 6inches. The base itself is MDF over which I added some filler to try give the impression of part of a cart type track with some slight raised areas ether side. All the green stuff is left over from some railway modelling projects from many years ago. The figures came with the Dragon Tiger 1 kit. The background sky is part of my Spitfire display base/shelf. The WIP for the whole project can be found here. Top down view: Kind regards, Stix
- 19 replies
-
- 30
-
-
Please help me, I'm lost! I need to get a king tiger before I go mad. I've been inspired by PlaStix to build a king tiger (tiger II) but I am not sure which kit and aftermarket parts to go for. Should I go with the Eduard kit and PE/resin or Tamiya and PE/resin? So let your wisdom guide me!
-
Hello Everyone! Decided to build my second tank as well as experiment with terrain. This build was primarily an excercise in armor weathering and terrain generation. Thus historical accuracy was not high on the priority list. Built OOB, only additional detail added was dents and a loose panel in the side-skirts, and drilling out of the exhaust vents. And here's my first attempt at a tank back in 2014 I found the following links invaluable for weathering the King Tiger: http://www.panzermania.com/tipps/weathering_en1.html http://www.panzermania.com/tipps/weathering_en2.html Your comments and constructive critiques are welcome! Thanks for watching! Cheers, Alex.
- 8 replies
-
- 16
-
-
- 1/76
- King Tiger
- (and 1 more)
-
Hey guys, this is my first tank build since i came back to modelling (and obviously my first AFV WIP here ). I m building the Tiger II for my friend, who asked me to build it - i was happy to do so, but there was deadline of 9th november.. So i had like one month for the build, making it effectively like 10 days for the build - we have decided then it ll be OOB build with no interior and we have chosed the Tiger II (Konigstiger, King Tiger) as the subject - Still i wanted it to look as great as possible, so here is the shopping list : - Dragon 1/35 King Tiger (Henschel Turret) - Fruil Models Hunting Tiger (wide) tracks - Nordland Productions German Standard 2m AFV antenna rod (at first i thought i ll just use wire for antenna, but 3pcs for like 3,5 E and looking great, well,easy decision ) - RB Model 8,8cm L/71 barrel with muzzle brake - Eduard Brass-in MG34 machine gun Because of the limited time, i gave up on making of the zimmerit and from given late war camouflage schemes, my friend chosed the very late war scheme (olive green factory base, late war dunkelgelb + brown pattern applied by the operation units), which i did read was used for like last 30 King Tigers. I did not find any good images though so the camouflage is kind of what-if. I was mixing the colours following the RAL sampler, but i have underrated the influence of the dark washes/streaks and glossy varnishes and now the colours are much darker than what i wanted.. well, there is no time to fix it, so it is lesson for next time. Here is the progress - first i did some scracthes to the plastic all over the armour, thinned the right front fender and "damaged" it (the left fender wont be used at all, the side fenders ll be made from metal sheet from aluminium can). I have also removed/filled all equipment holders/holes prepared for holders and replaced these. Also i made some texture on the armour plate edges as i saw it on some builds and quite liked it - later when i saw some good shots of real KT´s i noticed, these are not so significant in real.. well, another lesson learned for future.. I have also made all the handles from wires rather than using the plastic parts (even though these were nicely done, but i was too lazy to clean the little parts.. :/ ), added wire to the frong reflector and tried to make some weld around the MG cover in the front hull, as there was nothing and it did not look right to me (i m not saying now it is any better.. ) Second i did paint the tanks body overall with vallejo red-brown primer and made chips in various rust tones by sponge on exposed areas or where i had plans to have chips through camouflage and primer paint to the bare metal - nothing too precious, just to give it some random pattern. Next i sprayed the chipping fluid all over, let it dry a bit and painted the olive green mix. Once it has dried a bit, i was working on some scratches around. Some shots from the progress : I know it could be much better, but the limited time.. Anyway, next steps were again the same : semi-gloss varnish - chipping fluid - dunkelgelb - chipping - semi-gloss varnish - chipping fluid - brown paint - chipping - semi-gloss varnish. Once this was done, i have applied overall filter (green + yellow + brown oil paints + white spirit - like 95%) to blend the paints together a bit and dark brown pin wash. The exhausts were painted in some rusty pattern (well, i have tried ) using Ammo rust acrylics applied by sponge from darkest to lightest, followed by chipping fluid, repainted by dark grey-brown-blue mix to simulate the burnt iron and then chipped down to the rust, then i have applied black pigment around the openings to simulate the soot. This is where i was after these steps : I have started to work on some mud and dust after that but i did not make shots yet, so i ll add more shots later I ll appreciate any tips for the final weathering (mud, dust, leaks, streaks) Thanks and have a good time guys, ll see ya later here
- 18 replies
-
- 3
-
-
- King Tiger
- Tiger II
- (and 2 more)
-
 “Was vor uns liegt?” - Two Tigers – a chance meeting? (For details of each Tiger please see below) King Tiger No.333 PzKpfw SdKfz 182 Ausf.B S.Pz.Abt.501 - Ohrdruf Proving Ground, Germany 1944 Kit: 1/72 Dragon Armor Pro Series King Tiger - Henschel Turret w/Zimmerit This was the first kit I finished for the Achtung Panzer GB and it was completed back in March. However, I waited until I got a base made for it before putting it in the RFI section – and in fact I’ve decided to display it alongside the 1/72 Dragon Tiger 1 I also made for the GB. I’m going to post both builds in this one thread rather than clutter up too much of this area of BM! (I’ve still got three other APGB builds to post here at some point!) The only things I added to what comes in the box are the cable for the front light, the brackets that secure the front fenders to the side skirt armour and the aerial. Paints are all Humbrol and Revell applied by hairy sticks. WIP - http://www.britmodel...40315-finished/ And with a twenty pence piece to show the size: Tiger 1 No.112 Pz.Kpfw.IV Ausf.E Tiger 1 late 1./Pz.Abt.101 Normandy 1944 Kit: 1/72 Dragon Armor Pro Series Tiger 1 w/Zimmerit plus Tiger Aces figures This was the second kit I finished for the Achtung Panzer GB. To what's in the box I have added spare track links on the turret (links kindly donated by Sgt.Squarehead for my D-Day Tiger 1 build) tow cables (made from twisted wire) and the turret machine gun from the spares box. It's all brush painted with Humbrol and Revell acrylic paints applied with hairy sticks. The WIP thread can be found here: http://www.britmodel...0315/?p=1914060 And with a twenty pence piece just to show how small it is!: Kind regards, Stix
- 28 replies
-
- 25
-
-
 Hi, I am about to built a few King Tigers of s.SSPzAbt. 501 in 1/72 during their deployment to the Ardennes offensive and I am a bit confused regarding camouflage schemes, turret numbers, Zimmerit (or not) and so on. Does anyone know about a good site where I can get an overview? I found something here and there on the net but I would love to find something listing up tanks and their specifics. And by the way - did King Tigers have a standard factory camouflage pattern from some point on? INgo
 -
Did these recently. The Comet was fine but the Churchill was fiddly in the wheel and track area. The King Tiger was evil regarding the tracks. Had to stuff them up under the fairings to hide the mess. Also had a bit of artistic licence by putting a 'hastily applied zimmeritt coating' on some surfaces. Other cast surfaces I used liquid poly dabbed with the poly brush for a rough texture. Oh and you can probably guess I'm still trying to work out this camera A size comparison with the Panzer ll and Matilda
-
Hi All, This is the first armour model i have built since getting back into the hobby. I got this about 4 years ago and started pretty much immediately gluing bits together. Then i got stalled on working out how to paint it as the tracks are injection moulded and i couldnt figure out if i could build them up around the wheels and then slip the whole lot off to paint. Well eventually just before christmas i found the kit again,had a go and found it you could so got myself out of the rut and started again, only took 4 years to work it out!! The kit is really nicely detailed out of the box, the only bits i added were the track hangers from a beer can and the mesh grilles over the rear deck made from a cafetiere filter that was rescued from the bin, you know when something looks useful - now i know where my 7 year old daughter gets it from when she says dont throw it away we could make it into something whenever theres a cardboard tube etc about to go into the bin... I had loads of fun weathering it, armour paintwork is much more forgiving than aircraft, i used a mix of pastels, oils and sponge chipping. Keen to get a bigger one now! On with the pics and hope you like, an C&CC appreciated, cheers Stu
- 20 replies
-
- 19
-
-
- Revell
- King Tiger
- (and 1 more)
-
Königstiger KAGERO - Casemate UK At very nearly 70 Tons the Königstiger was the heaviest Tank that the Germany Army fielded during WWII. The Tank we commonly refer to as the King Tiger is in fact the Panzerkampfwagen IV Ausführung B, or Tiger II. They were armed with Kampfwagenkanone 43L/71 88m Gun which could destroy any allied tank of the time, at ranges outside of even the best armed adversary. The tank also benefited from sloped armour upto 180mm thick. Thankfully for the Allies the Germans were not able to produce this Tank in large numbers. Another factor which worked in the Allies favour is that these tanks suffered from reliability issues to the drive train and engine seals. This book from Kagero arrives as an A4 portrait soft cover volume with 82 pages. The first 18 pages offer a brief history of the type along with a series of black & white pictures of the tanks in combat, and abandoned/knocked out examples. There are then a series of 1/35 scale drawings of the Tanks and its various parts. A series of excellent walkaround pictures then follow. These pictures feature Turret number 321 exhibited in Munster Panzer Museum (Germany), Turret number 300 at The Bovington Tank Museum (UK), and Turret number 213 at the December 44 Museum in La Gleize (Belgium). There are also pictures of the the tanks Maybach engine, and the 88mm gun. There follows a few pages concerning the Crew and Camouflages used by the Tank. The last few pages contain colour profiles of various operational tanks. Conclusion This is a great book for the WWII history buff, those interested in Tanks, or indeed German Tanks. The detail photographs and line drawings will make it a great reference source for modellers as well. Overall this is a well produced book and highly recommended. Review sample courtesy of
-
- 1
-
-
- Königstiger
- KAGERO
- (and 2 more)
-
 Tiger II, official designation Panzerkampfwagen IV Ausf. B. Named Königstiger which was wrongly translated as King Tiger. Turret number 300. Tiger II with early production turret is on display at Bovington Tank Museum. This vehicle was the second soft steel prototype made and did not see active service. The main gun on this tank is not original, it was added during its restoration. Pictures thanks to Alan Brown.
 -
King Tiger for Academy 1:35 Eduard The new Academy King Tiger is a corker of a kit, but as always there’s always room for improvement, and Eduard have now released two new sets to super detail the kit. Admittedly some of the styrene parts within the kit can look rather over scale and this is where the etched parts really come into their own. The modeller will need to provide styrene or brass rod and some of the kit detail needs to be removed before the etched parts can be added, as per standard procedure for Eduard sets. [36260 External Set] This set is contained on a medium sized fret of relief etched brass. As is pretty much standard with these sets the majority of the smaller parts are dedicated to replacing the clamps, brackets and supports for the various pioneer tools. Also include are new brackets and straps for the headlights and fire extinguisher. Each of the vision blocks around the commanders cupola are fitted with new guards. For the engine deck the set includes not only mesh grilles, but armoured covers for them, theses are supported by four risers made of styrene rod sourced from the modellers supplies. The turret receives new lifting eyes, hatch fittings for the gunner, (internal and external), commander and expended cartridges, (also internal as well as external). There are also foot steps up the turret sides and additional fittings for the turret roof. [36257 Fender Set] As the name suggests, this set is for the complete replacement of the tanks fenders and side skirts. The set comprises a medium sized and a smaller sized fret. Each of the side pieces and mudguards will need to be carefully bent to shape and fitted to the sides of the model. Unfortunately Eduard haven’t given any templates for this, so it’ll be a bit of trial and error using the kits parts to get the shape right. Between each individual section there is an additional jointing piece which will also need to be bent to the correct shape. The front mudguards are slightly more tricky in that they need to be rolled to shape and the side piece folded to sit snugly alongside the curved part. Additional details such as the hinges, strengthening strips and locks are provided for both the front and rear mudguards. Conclusion A pair of very nice sets, which given the detail on the Academy kit may not be necessary to some modellers, but they will certainly give an extra finesse to the detail, particularly the fenders with the better scale thickness. Highly recommended. Review sample courtesy of
-
Photo Etch Grille Sets (for Heng Long) 1:16 Taigen These sets are designed as quick and easy upgrades to the stock Heng Long radio control tanks, which although they are quite good in terms of broad details, they have no grilles covering the engine deck louvers. This omission isn't really that surprising, as a lot of the tanks will just end up as play things for kids, but for us alleged "grown ups" with access to modelling sites, references and endless patience, accurizing (an Americanism I hate) is quite popular. As a first step, these Photo-Etched (PE) mesh grilles are excellent, and once applied can be distressed to depict the wear and tear they suffered during daily use. King Tiger (3888-006) The largest of the sets includes the circular fans in the centre of the deck, four rectangular grilles that sit fore and aft of the circular grilles, and a pair of optional larger mesh covers for the forward set of rectangular intakes that extend to the edge of the turret ring, and provide an additional area of non-slip mesh for the crew. Check your references whether the tank you intend to model uses the curved or rectangular parts before you start. Tiger I (3818-008) Suitable for the Heng Long Tiger, this set includes the four rectangular mesh grilles for the louvers on the engine deck, with the rearmost ones having small T-shaped cut-outs for the retaining lock positioned toward the outer side. Panther/Jagdpanther (3869-1/3879-1) This set includes two circular mesh covers, one of which has a central circular cut-out, plus four rectangular grilles with outer frames and etched in bolt-heads for extra detail. Panzer III (3848-009) The Panzer III had a pair of air boxes on the sides of the hull, which were of course covered with mesh to prevent both foreign objects and grenades being placed deep within the engine compartment. This set includes the mesh and framework in PE, plus a set of tooled brass bolt-heads to complete the construction. These will really add some extra detail to your Panzer III. Conclusion As well as being a great first step to detailing your large scale radio control tank, these PE mesh grilles are also good value, as they are quite large sheets. They are easy to install, and with some light pressure from your fingers you can replicate the deformation that occurs when careless crew tread on them, and a sharp implement jabbed into the mesh can simulate a more violent encounter, such as falling masonry or something thrown or dropped on the grilles. Previously these sets have been labelled in poor English, as you might be able to see in the first photograph, but Steve @ Welsh Dragon Models, Taigen's UK importer advises that future deliveries will be more sensibly labelled without the Chinglish that dogged earlier batches. Highly recommended. Review samples courtesy of .