Search the Community
Showing results for tags 'Junkers'.
-
 Scratchaeronautics is to release a 1/72nd Junkers unnamed ground attack project (Luft 46) resin kit Source: https://www.facebook.com/Scratchaeronautics/posts/1472262192806833 Preorder: http://www.ebay.co.uk/itm/JUNKERS-GROUND-ATTACK-PROJECT-RESIN-1-72ND-SCALE-/252798865471?hash=item3adbfc903f:g:JJsAAOSwdGFYu-XE V.P.
- 1 reply
-
- 1
-

-
- Junkers
- Scratchaeronautics
- (and 1 more)
-
 Hi all Haven't done a Work In Progress build for a long time, so thought I would bring this one out for one I'm currently reading "Battle of Britain - A day to day Chronicle" by Patrick Bishop, so the model fits in nicely with that This model was bought when I went on holiday this year to the Isle of Wight, where we had a stop off at Hendon and a short detour for me to the Hannants shop down the road. Would have been a wasted opportunity otherwise! The model cost me just £5 as it was from the second-hand section, but it was sold knowing some parts were missing so I will have to work around this as best as I can. Still, couldn't leave it at that price he said foolishly! So here's what I've got to work with: Most parts look to be still on the sprue and all the major parts are there as far as I can tell. I noticed one half of a aileron from one of the wings was missing, but should be able to replicate something to look like this. Now to get started on all that lovely internal cockpit detail! Cheers
- 15 replies
-
- 4
-
-
- Battle of Britain
- Luftwaffe
- (and 1 more)
-
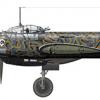
Hello Finally I had some time to continue the work on my Ost-Front scene. I've finished the models some time ago: Ju 87G-2 Stuka 'Kanonen Vogel' and Heinkel He 111 H-6. Both in 1:72 scale. Now it's the time to build the diorama for them. The plan is something like that: So, here is what I've done so far: Ju 87G-2 Stuka 'Kanonen Vogel' from Academy Heinkel He 111 H-6 from Revell Perspex box base with both of them arranged: Some SC250 bombs from Czech Masters (6) and one left from Messerschmitt Bf-109 kit: Some SC1000 bombs. Four again from Czech Masters and two from the Heinkel kit. They are a little bit bigger. Not sure which are in correct scale but I've decided to use all of them. The sledges to transport the bombs I've made from matches. Cut, glued, filed, airbrushed, drybrushed and finally weathered with washes. Here is how they look with the bombs: And finally Kettenkrad to tow the sledges and Kubelwagen for pilots (who are not ready yet). Both from Academy kit. The diorama will have some boxes, barrels etc. plus of course ground crew servicing the planes and the pilots resting and waiting for the mission. Thanks for watching.
- 33 replies
-
- 17
-
-
- kubelwagen
- heinkel
- (and 8 more)
-
Ju-88D-2/4 1:48 Special Hobby The Ju-88 was designed as a schnellbomber in the mid 30s, and at the time it was faster than current fighter designs, so it was projected that it could infiltrate, bomb and exfiltrate without being intercepted. That was the theory anyway. By the time WWII began in the west, fighters had caught up with the previously untouchable speed of the 88, and it needed escorting to protect it from its Merlin equipped opponents. It turned out to be a jack of all trades however, and was as competent as a night fighter, dive bomber or doing reconnaissance as it was bombing Britain. They even popped a big gun on the nose and sent it against tanks and bombers, with variable success. The D mode was developed for Long-range photo-reconnaissance with the 4 being tropicalised version of the 2. The Kit This is a new variation on the original tooling that was released recently by ICM, with new parts added to make it version specific, and the addition of some welcome resin parts for the wheels and cameras. The box is the usual top-opening with an inner lid style, and inside you will find eight sprues in grey styrene, one in clear, decal sheet and a glossy covered instruction booklet with spot colour inside, and the decal options in full colour on the back cover. If you have been lucky enough to see the original kit, you'll know that detail is right up there in terms of quality and crispness, with ICM really improving over the last few years, which has to be great news for modellers, as they aren't frightened of tackling what to us may seem niche subject matters. With the sprue-related excitement out of the way, work on the fuselage begins with the addition of sidewall details in the capacious cockpit area. Rear bulkhead, side consoles and seats are all added to the cockpit sides for a change, with an insert in the fuselage for the circular antenna and tail wheel added into the starboard side. The instrument panel is supplied with decals, and fits into the fuselage during joining. The missing floor is added to the lower fuselage panel that includes the lower parts of the inner wings and gives the structure some strength. It also receives the rudder pedals, control column, and the two remaining crew seats before being joined to the fuselage. The camera frame is built up and the resin cameras added. The tail plane has articulated flying surfaces, and the wings are supplied as top and bottom, with the flaps and ailerons separate from the box, and neat curved fairings so they look good when fitted at an angle. The flaps include the rear section of the soon-to-be-fitted nacelles, which are added as separate parts to avoid sink-marks, and these and the ailerons run full-span, terminating just as the wingtip begins. This variant was fitted with the under-fuselage gondola, and each side has separate glazing panels inserted from inside, and a seam running vertically through its length. It is added to the hole in the underside of the fuselage, with the front and rear glazing plus zwilling mounted machine guns later in the build. At this time the landing gear is made up on a pair of upstands that are added to the underwing in preparation for the installation of the nacelle cowlings. The engines have to be built up first though, consisting of a high part count with plenty of detail, and a rear firewall that securely fits inside the cowling. Even though this is an in-line engine with a V-shaped piston layout, the addition of the annular radiators gives it the look of a radial, with their representation added to the front of the cowling, obscuring much of the engine detail. The cooling flaps around the cowling are separate, and the exhausts have separate stacks, which aren't hollow but are large enough to make boring them out with a drill a possibility. The completed nacelle fit to the underwing over the top of the main gear installation, securing in place with four pegs, two on each side of each nacelle. The props are made from spinner, backplate and a single piece containing all three blades, sliding onto a pin projecting from the engine front, which will require some glue if you want to keep them on. At this point the instructions recommend adding the canopy glazing, which consists of a choice of two faceted nose cones, and the main greenhouse for the cockpit aperture. The rear portion is made from two additional parts due to its double "blown" shape to accommodate the two rearward gun positions, so that the gunner's head isn't pressed against the canopy. The guns are fitted through the windscreen and the two circular ports on the rear, although no ammo feed is supplied. Under the wings the dive spoilers are added with four bomb crutches on aerodynamic mounts, with bombs supplied that have two of their fins moulded separately, along with the stabilising struts that fit into notches in the fins. While the airframe is flipped over, the two-part wheels and twin main gear bay doors are added, both having good detail and the former a radial tread. Addition of the canopy mounted antenna completes the build, but this is likely to be done long after main painting for safety's sake! Decals The kit includes three markings options; Junkers Ju.88D-4 Luftwaffe 7A+GH, 1.(f)/121, North Africa RLM 79 & 80 over 78. Junkers Ju.88D-2 Luftwaffe 4N+FH, 1(F)22, Norway RLM 70 & 71 over 65. Undersides heavily dashed with RLM 70. Aircraft unusually features 2 kill markings. Junkers Ju 88D-2 Royal Hungarian Air Force, F9+15 Long Range Recon Sqn RLM 70 & 71 over 65. The decals appear to printed in-house and have good register, colour density and sharpness, with additional instrument dials included on a clear carrier film to help with cockpit painting. All of the stencils are legible, and overall they inspire confidence, with a thin carrier film cut close to the printing. Conclusion ICM's range of Ju.88s are a good example of how far they have come in recent years, Special Hobby have used this to their credit and with a few additional parts have brought us a great version of this aircraft. The kit is well-detailed and comprehensive in what it includes, and with a nice pair of decal options it says "build me". Highly recommended. Review sample courtesy of
-
Master-X is to release in 2017 two 1/72nd Junkers G-24/he conversion sets for Revell G-24 kit http://master-x.wz.cz/index.html http://master-x.wz.cz/doplnky 1-72.html - ref. MX7226.01 - Junkers G.24/he "Luftwaffe" - ref. MX7226.02 - Junkers G.24/he "Jannina" - ref. MX7226.03 - Junkers G.24/he "Dionysos" V.P.
-
I've been lurking for so many years that I thought I'd better contribute something. I'm a bit of a hack but it's good to share... right?! My latest finished model is the lovely ICM Junkers Ju-88 A5. I've built it straight from the box, warts and all. If I built another I would definitely fix the rear canopy frame and do something about the blank radiator faces and air intakes. Apart from that I think it's a great kit. The hardest part was sticking the Eduard gun sights on! I'm also half way through the old Monogram He-111 but I'd like to ask if anyone has some spare transfers from the night-bomber version - is that allowed here or do I have to wait until I have 100 posts and place an advert? I'll post details only if it's OK. Excuse the dodgy photos, it's the last day of summer here in NZ and the nights are drawing in. The first photo was taken before the gun sights went on but at least it was daylight. The colours definitely look more realistic in that one, I used Tamiya Primer (can't get Vallejo to stick), Vallejo Air paints, Klear gloss, and Vallejo Satin Varnish. Oh, and Eduard Masks.
- 21 replies
-
- 40
-
-
Hello all and a Happy New Year! It's that time of year again and I always enjoy putting up a Yearbook of my latest models (though not so much Photobucket being terribly slow and crashing multiple times). Despite having a fairly busy year including moving to a new full time 9-5 office job since May, I have still found time to do plenty of models as usual That's what weekends are truly for! I've had three main themes running this year mostly; WW2 Luftwaffe, Cold War Soviet and WW2 and Post War RAF, but there's the odd other thing in there too. Now, my lists are saying I've completed a stupidly huge 124 models this year, but as I have to sell most of them to make space for more, here's a photogenic list of what's left starting from January... January Italeri / Zvezda 1/72nd Mikoyan MiG 23ML Flogger Iraqi Air Force February Italeri 1/72nd Caproni Ca 313 Italian Air Force Revell 1/72nd Junkers JU 87 B-2 Stuka Luftwaffe March Hobbycraft 1/48th Dornier DO 17Z Luftwaffe April Revell 1/72nd Junkers JU 87 B-2 Stuka Luftwaffe Italeri 1/72nd Savoia Marchetti SM 82 Canguro Italian Air Force May Italeri 1/72nd SAAB JAS 39A Gripens - bottom Swedish Air Force and top Hungarian with HAD decals June Monogram 1/72nd Dornier DO 17Z Luftwaffe Italeri 1/72nd Dornier DO 217 K-2 with Fritz X Missiles Luftwaffe Italeri 1/72nd Junkers JU 188 Luftwaffe Revell 1/72nd Focke Wulf FW 200 C-3 Luftwaffe with Fritz X Missiles July Revell 1/72nd Junkers JU 88 A-4 Luftwaffe PM Model 1/72nd Sukhoi SU 21G Flagon Soviet Air Force KP 1/72nd Sukhoi SU 7 BKL Fitter and Mastercraft 1/72nd Sukhoi SU 22 M3 Fitter Soviet Air Force Academy 1/72nd Mikoyan MiG 21 F-13 and KP 1/72nd Mikoyan MiG 21 MF Fishbed Soviet Air Force Trumpeter 1/72nd Ilyushin IL 28 Beagle Russian Air Force AMT 1/72nd McDonnell Douglas F 15E Strike Eagle Israeli Air Force August Revell 1/32nd Messerschmitt BF 110 G-4 Nightfighter Luftwaffe Hobbyboss 1/72nd Messerschmitt BF 110 C-3 Zestorer Luftwaffe #1 Hobbyboss 1/72nd Messerschmitt BF 110 C-3 Zestorer Luftwaffe #2 Hobbyboss 1/72nd Messerschmitt BF 110 C-3 Zestorer Luftwaffe #3 Airfix 1/72nd Hawker Hurricane Mk I RAF FROG 1/72nd Bristol Blenheim Mk I RAF September Supermodel 1/72nd CANT CDRA 1007/bis Italian Air Force Airfix 1/72nd SEPECAT Jaguar GR 1 and Italeri 1/72nd SEPECAT Jaguar T 2 RAF Airfix 1/72nd BAe Sea Harrier FRS 1 and Airfix (old tool) 1/72nd Hawker Siddeley Harrier GR 3 RAF Revell 1/32nd Hawker Hunter FGA9 RAF Matchbox 1/72nd Panavia Tornado F 3 RAF October Italeri 1/72nd McDonnell Douglas F 4 Phantom (masquerading as an RAF 64 / 228 Sqdn Aircraft) Italeri 1/72nd McDonnell Douglas F 4 Phantom (masquerading as an RAF 19 Sqdn Aircraft) Italeri 1/72nd Panavia Tornado GR 1 RAF Zvezda 1/72nd Sukhoi SU 24M Fencer Soviet Air Force Zvezda 1/72nd Sukhoi T 50 PAK-FA Russian Air Force November Heller 1/72nd Dassault Mirage 2000N Armee De L'Air Revell 1/72nd McDonnell Douglas RF 4E Phantom "Tigermeet" Luftwaffe Revell 1/72nd Blohm Und Voss BV 222 Wiking Luftwaffe Revell 1/72nd Heinkel HE 111 H-3 Luftwaffe December Heller 1/72nd Potez 631 Armee De L'Air Airfix 1/48th Supermarine Spitfire Mk Vb RAF Airfix 1/48th Supermarine Spitfire Mk Vb RAF Revell 1/48th Supermarine Spitfire Mk XV Royal Navy Hasegawa 1/72nd IAI Kfir C2 and Airfix 1/72nd Dassault Mirage III Israeli Air Force ...and that concludes my output for another year on the production line, see you again this time next year! All the best for 2017!
-
 Dear Fellow Modellers, Finally I'm starting my thread on this much anticipated GB. I'm building Revell's 1/72 A-4 version and will be using Quickboost's resin exhausts and Eduard's BIGED PE and mask set. I'll be building scheme A, as shown in the box, for an aircraft based in Sicily, Italy, June 1941: As usual, here are pictures of the sprues. The clear parts are good, very transparent, without defects: The plastic is beautifully detailed, neither too soft nor too hard: This is the decal sheet, which looks good: I'll have to use swastikas from an xtradecal sheet. There's a total of 125 parts. But I just can't build anything out of the box, so here are the resin exhausts: The following are the several PE sets that come in the BIGED set. The interior PE parts (2 frets): The exterior PE set: The surface panels set: And the canopy masks, which are a must for these German bombers: Building starts with the cockpit. This is the first part: The moulded detail was removed, to be latter replaced by PE: The second part: The levers on the left hand side were also removed, as they will be replaced by metal levers: The two parts were glued together. Fit is very good: These two parts, complete the cockpit base. The level of detail out of the box is superb: The cockpit base was assembled: The control column was also removed from the sprue: It will be glued in place after painting. Now starts the PE odyssey. First, I assembled the levers. This metal part, already bent, will hold one of them: Here are the levers, ready for installation: The levers were glued in place of the plastic ones that had been removed: The next step is building the pedals, their mechanisms and supporting beams: However, all plastic in this step will be replaced by PE, as shown in the PE instructions: I started with the supporting beams. Here we can see one ready and the other just removed from the fret: The same here for the mechanisms: These parts were glued together: For comparison, here are the replaced plastic parts: The enhanced level of detail provided by the PE parts is readily apparent. Here we can see the pedals: one ready, the other just out of the fret: For comparison, here is a plastic pedal and a PE pedal, side by side: I think the increased effort of preparing and assembling the PE parts is fully compensated by the enhanced realism achieved. Moving on to the cockpit walls, here is the port wall: Some detail was removed, to be latter replaced by pre-painted PE, and the unpainted PE detail was glued in place: The starboard side wall. The moulded detail is superb: but some must be removed: I'll post more progress tomorrow, as this post is quite big already. Thanks for looking. Cheers Jaime
- 397 replies
-
- 11
-
-
The Junkers F13 was based on the experiences of the Junkers J12. The outside appearance of both aircraft is very similar, but the F 13 or J 13, as it was called during its development, got a larger fuselage and a complete new wing design. Instead of the three passengers of the J12 design, the J13 was able to accommodate up to 4 passengers plus two pilots. Between January 1919 and June 1919 about 9000 developmental hours were invested into the project. On June 25, 1919 Junkers pilot Emil Monz flew the first F 13. The first F13 was s/n 533 and it was named "Annelise" after Hugo Junkers daughter Annelise Junkers. A second aircraft (s/n 531) became available three weeks later and was used for type certification in July 1919. The F 13 design of Reuter was fully satisfying the demands. It became the world's first all metal airliner and it seems to be the first aircraft, which was fully designed as a passenger aircraft. About the aircraft modeled: In 1924 Junkers sent two F 13 W floatplanes, D 217 (Flamingo, s/n 637) and D218 (Kauz, s/n 638) on a South America Sales Tour. D 217 crashed during this tour, killing a son of Hugo Junkers. Crew was performing some flights in South America to promote the sale of the Junkers F.13 to local operators. Aircraft left Albina Airport, in Suriname, bound to Macapá, in Brazil. Just after passing the border between French Guyana and Brazil, crew encountered very bad weather conditions and elected to make an emergency landing on the Oyapock River, off Oiapoque, State of Amapá. In unknown circumstances, aircraft crashed into the river and was damaged beyond repair. While the pilot Drewsky was injured, the mechanic Thill, Hugo Junkers son was killed. I memory of Thill, I have decided to build D 217 Cheers Pat
-
 Hello Chaps, It's been a long haul build- 8 weeks in total, but that is because my wife and I are actively involved with contractors working on our new home that we will be moving to in mid-April....sorting out kitchen design, wood flooring, carpeting, tiles for kitchen and bathrooms, shower designs, paint colors for every room, new faucets for all sinks, choosing granite countertops and sinks for kitchen and bathrooms, new light fixtures and door handles etc etc....I hope this is the last time we have to move now, moving is a stressful and tiring event! Anyway, enough of the waffle and lets get on with sharing photos of my completed build, which is built straight from the box, no after market additions, only using 1.010" fine black EZ-Line for the antenna cables. I hope you like.... Regarding what I think of this kit: It's a great kit that goes together well, has some nice features such as a highly detailed cockpit, pose-able ailerons, flaps, elevators, rudder and air-brakes, recessed panel lines and other surface detail. The parts were all molded very well, with minimal flash and/or parting line miss-match that required clean up before painting. It offers two sets of markings, I chose to do this version that was active in the "Battle of Britain", and the decals are excellent- they go down very well on a gloss clear coat with no silvering, and once the finishing matt clear coat was applied, they look painted on. I did come across two issues during the build: 1) When fitting the engine nacelles to the undersides of the wings, I had a considerable gap between the mating areas of the front and rear nacelles. This is discussed in my "Final Reveal" video and can be seen in my "WIP" thread....links below: 2) When fitting the wheels onto their axles, both axles sheared off very easily and remained inside the wheel mating holes. I drilled these out of the wheels and drilled corresponding holes into the wheel struts and fitted steel pins. I then took a black rubber Tamiya propeller bushing and cut it down the middle to create two thinner bushings. I slid these over the new steel axles and super glued them into place. These then provided some surface area for the wheel hubs to glue to. Again, I used CA glue to fit the wheels in place and it worked a treat, providing me with a very rigid and stronger undercarriage. WIP thread link: http://www.britmodeller.com/forums/index.php?/topic/234996419-revell-pro-modeler-132-junkers-ju-88a-1-bomber-build-update-5-31516/ My YouTube "Final Reveal" video link: This kit would be superb if it came with two completely detailed Jumo 211B-1 engines, external bomb pylons and bombs and an open bomb bay with internal bomb racks and bombs!! That would make it super eye candy and a fabulous kit to work on.....I can dream! Thanks in advance for taking a look at this RFI and for any comments left, they are greatly appreciated! In the meantime, and until the start of my next build which won't be until we have moved and settled into our new home-probably the end of April, happy modeling and have fun! Cheers Martin
- 38 replies
-
- 51
-
-
- Revell
- 1/32 Scale
- (and 8 more)
-
Junkers Ju 52, pics thanks to Steve.
-
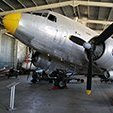
Ju 87 G-2, Werk Nr. 494083 at The RAF Museum, Hendon. Pics mine. This is a later, ground-attack variant; it was captured by British forces at Eggebek, Schleswig-Holstein in May 1945. It is thought to have been built in 19431944 as a D-5 before being rebuilt as a G-2 variant, possibly by fitting G-2 outer wings to a D-5 airframe. The wings have the hard-points for Bordkanone BK 3,7 gun-pods, but these are not fitted. It was one of 12 captured German aircraft selected by the British for museum preservation.
-
- 41 replies
-
- 55
-
-
 The latest new release from Airfix is now on the shelves at Wonderland Models. It is their new-tool A03087 1/72 Junkers Ju 87B-1 kit. The kit has optional markings for 2 machines 1. 9./Sturzkampfgeschwader 51 based in France in August 1940 2. Kampfgruppe 88 Condor Legion based in Spain in 1938
 -
After the 1/32nd - ref. 03213 - Junkers Ju-87A - http://www.britmodeller.com/forums/index.php?/topic/234960465-132-junker-ju-87a-stuka-by-trumpeter-released/ - ref. 03215 - Junkers Ju-87B-2/U4 - http://www.britmodeller.com/forums/index.php?/topic/234944403-132-junkers-ju-87b-2u4-stuka-by-trumpeter-released/, - ref. 03218 - Junkers Ju-87G-2 - http://www.britmodeller.com/forums/index.php?/topic/234977636-132-junkers-ju-87g-2-stuka-new-variant-by-trumpeter-released/ Trumpeter is to release a 1/32nd Junkers Ju-87D Stuka - ref.03217. Release is expected late December 2015 Source: http://www.trumpeter.cn/index.php?g=home&m=article&a=show&id=61&l=en Box art V.P.
-
Hi everyone. Just wanted to show you recently finished model. A Hasegawa 1/48th scale Stuka bomber. As usual couple words about the kit first. It was quite old kit, but as you can expect from this manufacturer still nicely moulded and detailed. One downside was the decals. They were yellowish after all those years. I didn't pay any attention to it until I reached the level when I had to put them on.. Followed the advices online, I left them in the window for couple days, in the nights for couple hours left them in the UVB light. Still a bit yellowish I was desperate to finish it, so put them on and.. well, most of the yellow tint disappeared! MAGIC:) Seatbelts homemade with masking tape and a bit of wire. Used only Eduard masks and swastikas by ExtraDecals. Build was going fine until the very last things to do.. While matt-varnishing it, Stuka Diving (important word) Bomber took his first dive into the ground, The pilot didn't manage to pull up and the aircraft crashed quite badly.. Fortunately I found all the pieces and left the german engineers do the work and there it is two days later: Enjoy! Thanks! Bart
- 15 replies
-
- 21
-
-
After the Ju-87B-2/U4 - ref. 03215 (http://www.britmodeller.com/forums/index.php?/topic/234944403-132-junkers-ju-87b-2u4-stuka-by-trumpeter-released/) and the Ju-87A - ref.03213 (http://www.britmodeller.com/forums/index.php?/topic/234960465-132-junker-ju-87a-stuka-by-trumpeter-released/) Trumpeter is to release a 1/32nd Junkers Ju-87G-2 Stuka kit in late April 2015 - ref.03218 Source: http://trumpeter-china.com/index.php?g=home&m=article&a=show&id=42&l=en Box art V.P.
-
Hello all One of my recent builds - Italeri's Stuka in 1/48. Built out of the box, with just a Montex mask to assist with the canopy (which would have driven me nuts to do myself with tape) and a bit of EZ line for the aerial. Generally happy with the result, although I had a couple of issues, more down to my limited skills than the kit I suspect. I was originally planning to pose it with the engine partially exposed, as the kit had a decent looking engine included, but just couldn't get it lined up properly to have the engine cowls on one side, so ended up covering it up completely. Also, had a bit of trouble with the bomb release mechanism, so the main bomb is just stuck on... Painted with Tamiya acrylics, weathered with a Flory dark dirt wash and a flattened finish with Vallejo Matte Medium. Anyhow, to the pictures. Thanks for looking. Adam
- 17 replies
-
- 13
-
-
Another tribute to all who were fighting over Great Britain. This time I'm presenting Ju 88 A-4 crashed at Blackbrook. Whole story You can find here: http://www.dorkingmuseum.org.uk/the-blackbrook-bomber/ Thanks to Mr Nick my profile of Ju 88 is at Dorking Museum.
-
Hi all, I'm very keen to (one day) complete a model of the JU188 in the scheme which the Matchbox kit originally came in during my formative years! But I've bought the Hasegawa kit rather than struggle with Matchbox's old offering, as awesome as it looked back in the day! It's 8H+OH, a JU188 D-1 from GR.33 St. Martin, France in 1944 and has wide stripes of RLM76 applied over 70/71/65, I believe. I've been scouring the internet and I cannot find a single photo of this aircraft - I assume they must exist, as the scheme is relatively popular... can anyone please assist and point me towards (or post) a piccie of this machine? Thanks very much, Ian
-
AIMS (http://www.aimsmodels.co.uk/index.html) is to release a 1/32nd Junkers Ju-388 L-1 conversion set for the Revell's Junkers Ju-88 kit. Source: http://www.aimsmodels.co.uk/Coming-soon/coming-soon.html V.P.
-
Announced new in the Zvezda 2015 catalogue introduction page??? http://www.britmodeller.com/forums/index.php?/topic/234973092-catalogue-zvezda-2015/?p=1833400 Zvezda is to release in 2015 a 1/72nd Junkers Ju-88G-6 kit - ref.7269 Source: http://scalemodels.ru/news/8359-katalog-zvezda-2015.html V.P.
-
G`day Chaps: I`m trying to convince my Loved One (and myself) that I`m still a modeller and not a collector, So here you have it, the second model I finish this year! JU-88G-6 1/48 Dragon. I bought this kit partially build on Trademe (local ebay) at a good price, It was painted with Vallejo and weathered with dry pastels. It has been a model of firsts, as I had never done a mottling before (need more practise) and had never tried dry pastels. Very nice kit. The only problem I had were the decals, they disintegrated so I had a go at DIY decals (need more practice too). Hope you like it. 7 by adrianmunozm, on Flickr 1 by adrianmunozm, on Flickr 2 by adrianmunozm, on Flickr 3 by adrianmunozm, on Flickr 5 by adrianmunozm, on Flickr 4 by adrianmunozm, on Flickr 6 by adrianmunozm, on Flickr 8 by adrianmunozm, on Flickr Adrian
- 22 replies
-
- 22
-
-
 Good afternoon I represent you my new model. Simple Zvezda model + 3 * MG15 New World + Begemot decal Ju88. production a method - is many masks Акan RLM70-71-65 + RLM76 willenmuster 1/Kg26 Norway, Bardurfoss 1944 Процесс ... ENJOY
- 25 replies
-
- 17
-
-
Hi Fellow modellers, This will be summer holiday build. Let see when this will be ready. OH-ALL was Junkers Ju-52 that was used by Aero (Now Finnair) in Finland. There were some modifications in airframe during time, so I need to think if I will make it early state or later state. Definitely it will be with floats. Kit that I will use is this: And decals are from Antti Lappalainen who was kind to make these. Thanks Antti ! More pictures later today.