Search the Community
Showing results for tags 'ICM'.
-
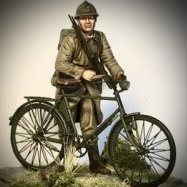
Model T 1917 LCP with Vickers MG (35607) 1:35 ICM via Hannants Formed in 1914, the Australian and New Zealand Army Corps (ANZAC) played a substantial part in WWI often in areas that are seldom given the prominence of the Western Front. They were a major player in Gallipoli where they were heavily mauled due to the Lions led by Donkeys approach that pervaded at the time. They also served in Palestine and Egypt, and it was the former where they used the then new Ford Model T to replace the previous vehicles that were suffering due to the poor availability of spares, They used six of them as Light Armoured Cars, often mounting weapons in a manner that became more familiar in WWII in the shape of the LRDG. The Kit The kit arrive in the usual ICM top-opening box with the captive flap on the lower tray and artwork depicting the contents on the lid. Whoever puts those lids together certainly makes them tight and difficult to get off even after cutting the tape between the two parts. This is the LCP Kit number 35663 with an added Vickers Machine Gun kit to mount in the back. Despite being small, this is a full-detail kit and includes a nicely detailed representation of the engine using 11 parts, a two-part radiator that is moulded into the front axle and attaches to the front of the body shell along with four lifting eyes inside the engine compartment. The completed engine is dropped in behind the rad and with the chassis upended the exhaust is put in place linked to the exhaust manifold on the side of the block. The rear axle of the Model T was suspended on a single lateral leaf-spring, and this is next to be constructed along with the differential and drive shaft assembly. This is also fitted to the underside with various swing-arms and the steering mechanism, then the four single-part wheels are installed and the model is righted once you've had a few moments to appreciate the detail of the wheels, which even have the valves moulded-in. The vehicle looks a bit odd with no upper body, so with the steering column fitted the crew compartment is made up from front, sides and back which have the doors moulded in and the base of the windscreen mount added as a separate part, a two part fuel tank is added behind the cab. The truck bed is made up of the bed, sides, front and rear sections in addition to the outer curved panels, bench seat and optional rolled up canvas cover attached to the right bed side. The two-part battery is fitted to the driving compartment bulkhead, along with the scuttle, doors and foot pedals. The gear stick and steering column are then fitted to the chassis as is the truck bed assembly. This assembly is then glued into position between the truck bed and engine compartment. Each of the two-part bonnet sections are fitted with grab handles, then fixed together, before being fitted to the engine bay. If you’re very careful, the modeller could cut the lower section of one side of the bonnet and fold it up along the hinge line to show off the engine. The semi open cab consists of the rear three-piece bulkhead, roof and two side sections, which leaves the upper door areas exposed. The windscreen is made up from upper and lower sections that can be folded or extended. The two headlights and single tail light are assembled and fitted, along with the spare tyre, a storage box and water container rack. The windscreen can be found on the clear sprue as you'd expect as can the rear light, the front ancillary light and both of the wing-mounted headlights. The screen is in two parts with a C-shaped frame attached to the two halves and a pivot to allow them to be folded or opened. Another pair of fuel cans are attached to the left running board and a spare tyre (no hub) is found on the right. Vickers MG At 1:35 it’s a small model in itself. You can build one complete assembly from the box, but there are two guns and two tripods, the former having options for the fluted and straight cooling jackets, while the latter are set up for seated or prone operation. Construction is simple, with the breech details and firing handle attached to your jacketed barrel of choice, followed by the two arms that hold the gun in place and their central arm with adjustment wheel at the bottom. A length of finely moulded ammunition slides through the breech, and the unused end is fixed to the ammo can with more moulded rounds in an insert that sits on top of the box. The weapon is inserted into the hole at the top of your choice of tripods, then the aforementioned ammo can and the water reservoir for the cooling jacket, which is linked by a hose to the underside of the muzzle, but isn’t mentioned at all in the instructions. Depending on how you will deploy your gun, you could use a length of lead wire or similar to portray this, gluing it to the can. If you’re unsure of the correct locations, there are a number of good resources online. Markings A very small decal sheet (not shown) contains only the vehicle numbers LC 913. Conclusion ICM have given us another version of their good looking WWI Model T car. Available in the UK from importers H G Hannants Ltd. Review sample courtesy of
-
It’s been a little while since I posted a build. It’s very easy to get distracted by life in general, but always nice to open a box & start a new build. I quite fancied building a very early car & this fits the bill: lots of parts. Nothing in the way of a main body shell and white rubber tires. I think it will be hard to stay away from painting it all black
-
MiG-25 BM Soviet Strike Aircraft (72175) 1:72 ICM In the early part of the Cold War, the strategic bomber was seen as the obvious means by which to deliver a nuclear payload. The interceptor - large, heavy and fast - was seen as the equally obvious countermeasure. The MiG-25 Foxbat was, in many ways, the ultimate embodiment of this technology. It wasn't particularly groundbreaking and nor was it particularly sophisticated, but it was capable of incredible speed and could carry four large missiles to high altitudes very quickly indeed. The MiG-25's shortcomings as a combat aircraft were largely addressed through the MiG-31 Foxhound, but the type continued as an effective mission platform in a variety of guises. The BM variant was dedicated to the Supression of Enemy Air Defence (SEAD) role, known in the US Airforce as the 'Wild Weasel' role. As such, it was fitted with anti-radar systems, jammers and could carry up to four KH-58 'Kilter' missiles. Forty examples were produced in total. I think this kit is the fourth iteration of ICM's new 1/72 MiG-25 family, following on from the RBT, RB and RBF variants. The model is pretty much a scaled down version of their 1:48 kit, which is a jolly good thing indeed. Inside the robust top-opening box are seven frames of light grey plastic and one of clear plastic. The kit is almost identical to the previous iterations, but includes revised parts for the nose and a couple of new frames that hold the KH-58 missiles. The airframe is covered in crisp, recessed panel lines which look very good indeed, and the mouldings are crisp and clean. The instructions are an A4 stapled booklet which has been printed in colour and the decal sheet is clear and well printed. The overall impression is of a well-executed, modern kit which looks like it should be thoroughly enjoyable to build. Construction begins with the cockpit and nose gear bay. Some detail is moulded in place on the sidewalls of the cockpit, with extra parts provided to represent additional details. Before the main structure of the cockpit can be completed, however, you have to add the bulkhead that forms the front wall of the cockpit and the rear wall of the nose gear bay. The instructions have you installing the nose gear leg at this stage, but I can't see any logical reason as to why this can't be done at the end. This would, of course, save you from breaking the leg part way through the build. The cockpit itself is nicely detailed, with the ejector seat alone made up of no fewer than five parts. An instrument panel and control column completes this section of the build. Once the forward fuselage halves have been joined together, the whole sub-assembly fits onto a spar that also holds the huge engine air intakes. I've noticed that kit manufacturers are moving increasingly toward this style of construction, where certain parts are provided for purely structural purposes instead of the older slot and tab style of construction. I guess the main advantage, other than strength, is that everything can be positioned at exactly the right angle - a helpful feature for kits that feature quit a complex breakdown of parts such as this one. Each engine intake is full-length, with engine compressor faces provided. What results is a complete forward section of the aircraft up to the wing roots, with the internal structure of the air intakes protruding from the rear. The lower face of the main fuselage can be joined to this structure once the main landing gear bays have been added. ICM suggest that you add the main landing gear legs at this stage. Again, I can't see any reason why they couldn't be fettled into place after the main construction has been completed. Once the lower face of the main fuselage is in place, another structural bulkhead can be added, after which the slab-sides of the fuselage, including the outer faces of the air intakes, can be added. The dustbin-like jet exhausts are added at this stage, and very nicely detailed they are too. Once in place, the upper face of the fuselage can be added. Some modellers have noticed that the central spine has a flattened profile instead of a rounded shape. This is true, but I imagine most modellers will choose to live with this flaw. All that remains now is to add the nosecone, flying surfaces and finishing details. Each vertical tail is split vertically, with a seperate rudder. The outer face is moulded with part of the rear fuselage in place, so presumably it will be impossible to fit these parts at the wrong angle. Somewhat surprisingly, the upper wings are not moulded in one part with the upper fuselage. Instead, they are split into separate port and starboard halves, with two seperate flaperons and upper wing fences and fittings for missile pylons below. The nosecone is simply split vertically. The canopy is nice and clear and can be finished in either open or closed position. Four KH-58s are provided, along with pylons. Other than that, and a few aerials, lumps and bumps, the huge aircraft is now finished. Three options are provided for on the decal sheet: MiG-25BM, 'White 37', Lipetsk Combat and Conversion Training Centre. This aircraft is finished in the brown/sand/green over blue scheme; MiG-25BM, 'White 43', Ahtubinsk Airfield, 1987; MiG-25BM, 'Red 81', VVS, 1984 The decals look nicely printed and a full set of stencils is included. Yes, I know that's not a MiG! Conclusion We've waited a while for a new, more more modern kit of the Foxbat in this scale, but the wait has been worth it. ICM's effort is excellent, with high quality mouldings and plenty of detail. Overall this is a well executed and carefully designed kit, while the SEAD configuration is very appealing indeed. Highly recommended. Review sample courtesy of
-
 Hi all, here is my Spitfire TR9 G-CTIX (PT462) which I converted from the 1:48 ICM Mark IX kit. Critiques are obviously welcome, but don't be too harsh 😜. This kit was just a distraction from all my school work the past few weeks so it's not perfect! Overall the kit went together well, brilliant abundance of parts from ICM. For £13 you get not only a full 1:48 Spitfire (that you can make several versions of!) with an engine, but also the ground crew with benches, ladders etc. A brilliant base kit for conversions. Here is a link to the build progress post : Enjoy! Thanks
 -
Model represent the Po-2 used as coherent aircraft, belonged to the 1-st "Normandia" Fighter Regiment (from November8, 1944 regiment named "Normandia-Nieman") from 303-th Fighter Avision Division, 1-st Aerial Army ofthe VVS RKKA, Monastyrshina airfiled, september 1944. Plastic from ICM with no fit issues, with Eduard PE set for interior and exterior as additional. It's my first biplan in 1/48 scale and i'm thinking photoetched turnbuckles is a quite usefull additions at least in this scale IMHO. Engine from North Star Models, it's another story. Realy it's a model inside the model. M-11 in 1/48 scale have a fine quality and despite the amount of a small parts (48 parts to be exact) i had not any troubles during the build. It's the best M-11 engine in 1/48 scale to my mind. Decals from Begemot. On the final photo, the original spark plug from M-11 engine near the model. Thanks for looking.
-
Model represent the Po-2 used as coherent aircraft, belonged to the 1-st "Normandia" Fighter Regiment (from November8, 1944 regiment named "Normandia-Nieman") from 303-th Fighter Avision Division, 1-st Aerial Army ofthe VVS RKKA, Monastyrshina airfiled, september 1944. Plastic from ICM with no fit issues, with Eduard PE set for interior and exterior as additional. It's my first biplan in 1/48 scale and i'm thinking photoetched turnbuckles is a quite usefull additions at least in this scale IMHO. Engine from North Star Models, it's another story. Realy it's a model inside the model. M-11 in 1/48 scale have a fine quality and despite the amount of a small parts (48 parts to be exact) i had not any troubles during the build. It's the best M-11 engine in 1/48 scale to my mind. Decals from Begemot. On the final photo, the original spark plug from M-11 engine near the model. Thanks for looking.
- 10 replies
-
- 27
-

-

-
Hello there.I hope you are all doing well during this pandemic.I present you my MiG-25RBT of the Iraqi Air Force.The kit has been built mostly oob.The only addition are the seatbelts and the pittotube.If you want to know more about the build you can watch my video on youtube where I build the model from start to finish and all in around 15 minutes. https://youtu.be/9e-v6xLSfFs
- 12 replies
-
- 46
-
-
Hi, It’s been a while since I last posted so I’d like share with you some photos of my recently completed Ju88 A-5. It’s built from the ICM 1:48 kit. This is the first of their range of Luftwaffe bombers I have built and I am very impressed. Excellent detail, great fit and all at a bargain price. I wanted to finish this model a little differently and chose a winter camo scheme – something like this aircraft would have seen in service on the Eastern Front. The pattern is based on giraffe skin (!) and was masked (slowly) using the blu-tak sausage method. Although probably not historically accurate I’m pleased with the way it came out and I feel it looks the part. The kit also comes with a pair of well detailed Jumo engines which I thought would be wasted under the cowlings so I opened the engine covers on one and completely removed the cowling panels on the other (a little surgery required here) to show them off. A bit of dry brushing and added plumbing and there we have it. Construction was without any major problems. Well detailed cockpit, detailed and sturdy landing gear, some nice engineering on the lower wing hides any joins under the engine nacelles. And the decals are OK too. ( I recently built an ICM Spitfire MkXVI whose decals were useless) For the glazing I used liquid mask, as some of the very small panes in the nose would be impossible to mask otherwise. All painting done with Gunze Acrylics and finished with a Flory Models wash. So, all in all, a very enjoyable build and I would thoroughly recommend this ICM kit. ( I also have their Do 215 – hope it’s as good.) Thanks for looking, Bob
- 13 replies
-
- 49
-
-
-
FCM 36 With French Tank Crew (35338) 1:35 ICM via Hannants The FCM 36 was a light infantry tank that was the result of a proposal issued by the French government in 1933 after Hotchkiss had offered a design to the ministry. Of the resulting series of designs from the different manufacturers, three were taken forward including designs by Hotchkiss, Renault and of course FCM, which stands for Forges et Chantiers de la Méditerranée, who were based at Toulon in the French Riviera. The FCM offering was well-liked due to its sloped welded armour, and was continued with despite the fact that they couldn’t get the thing working during the initial test period. It was sent back for repair, and that also turned up a number of other issues such as weak suspension and insufficient armour, increasing weight even further over the original limit. It was originally equipped with a pair of machine guns in much the same way as the German Panzer I, but one was removed in favour of a 37mm cannon, mounted in a turret that was intended to become the standard turret design for all French light tanks, despite a number of problems. One of the reasons it was well-liked was that it was considered to be the design with the most design potential, which was in part responsible for some serious delays spent working on an upgraded version that eventually came to nothing. By the time they had reverted back to the comparatively superior original it was outdated, and too late to fight the advancing Germans in any great numbers. The Kit This is a new tool of this type from ICM, it has been released previously on its own, with the figures in a separate boxing also. This box six sprues of grey styrene, two runs of flexible black tracks, a small decal sheet and instruction booklet within, the latter having colour painting guides on both sides of the glossy rear cover, there is a separate sprue for the figures. It is crisply moulded with lapped panels, rivets and weld-lines over the exterior, and although there is no interior, the crew hatches can be posed open as long as you either block the view with figures or prepare yourself for some scratch-building of any visible areas. Construction begins with the lower hull, which is made up initially of the floor and two sides, with bulkheads added to the sides to support the lower sponson panels that give the vehicle more ground clearance. The running gear is made up from a three-part drive sprocket, eighteen sets of twin wheels that are fitted to eight double bogies and two singles, then the big idler wheels at the rear of the hull on sliding tensioning axles. The sloped armoured upper sponsons are installed along the way, with the mud-shedding “windows” on each side. Two pairs of return rollers on the top run are glued inside the sponson, then the flexible black “rubberband” tracks are glued together, the instructions neglecting to mention that styrene glues won’t join them, so you should use super glue or epoxy instead. Each run has two sections, with the joints best placed in the centre of each run so they stand less chance of being seen on the finished model. Detail on the tracks is very nice, with twin guide horns and perforated centres like the real thing, but of course the links will curve round the ends, rather than give the correct faceted look that individual links provide. The upper hull is mostly complete, needing some small facets adding near the glacis, and some louvered vents on the engine deck and sides. Lifting eyes, latches and other small parts are added around the rear and sides, then are joined by a set of pioneer tools, a loop of cable, and a large bifurcated exhaust system that exits the top of the engine deck and has two mufflers, one on each rear fender with a hollow flared exhaust pipe. Stipple those with some Mr Surfacer and paint them lots of shades of rust, and they should be a nice focal point of the model. The driver’s pop-up hatch has grab handles, armoured vision port and large exposed support ram on the left side that can pose the hatch open if you wish. Hinges for the moulded-in lower panel on the glacis are also fitted at this time, as is a folded tarp on the left side. Despite the kit having no true interior, you get a full breech and coaxial machine gun that slots through a perforated inner mantlet that bears a passing resemblance to a piece of swiss cheese, then has supports added to the sides, which are in turn glued to the turret bottom with the upper dropped over it, and an outer mantlet cover slid over the barrel. The barrel is tipped with a hollow muzzle, a domed recuperator cap, and armoured bell-shaped cover for the machine gun barrel, then the various vision ports are fixed to the sides, and the large trapezoid hatch at the rear is made up and can be attached open or closed. A couple of grab-handles are glued to the sides of the hatch aperture to assist the commander in and out of the turret, then the completed assembly is twisted into position on a pair of bayonet lugs that should hold it in place throughout most of its traverse. The final task is to make up four lengths of chain from the two sprues of oval-shaped styrene parts, which are held on the towing eyes front and rear by a pair of pegs. Markings There are two decal options on the colourful decal sheet, both being French as you’d expect. From the box you can depict one of the following: FCM 36, 7th BCC, Chemery, France, 14th May 1940 FCM 36, 4th BCC, France, 10th June 1940 The decals have good registration, sharpness and colour density, with a thin gloss carrier film cut close to the printed areas. The Crew In a release schedule now typical of ICM we have seen the original tank, and the crew released as seperate kits, the figures could always be pressed into use on many other French WWII tanks with little or no modification, however its good to see both in the same box now. Truthfully, calling it a tank crew kit does it an injustice, as it also includes two children that are being shown around the vehicle by the crew, which you can use to create a scene, or put the little ones to one side for another day if you have a different atmosphere in mind. There are three tankers and two boys, two tankers are stood, presumably showing the kids around, one pointing out some part of the vehicle to the lad clutching his beret in both hands. The final figure is sat half inside the turret on the hatch, with a WWII style French tank helmet with bumper at around brow level. The other two crew are both wearing berets with badges on the front and all three are dressed differently, including pull-over, tunic and overcoat, as well as a heat-resistant gauntlet for the seated figure. The chap with the tunic has a separate rear to the back of his tunic, to give the correct overhang (underhang?) as he bends slightly forward to bring himself down to the level of the boy he’s talking to. The boys are both dressed as you would expect two young lads in WWII France to be, with shorts, socks & shoes, but with different tops as would be expected. As usual with ICM figures their sculpting is exceptional with crisp detail, realistic cloth drape and sensible parts breakdown plus loads of extra detail moulded into each part as appropriate. Conclusion The perfect package from ICM to make a small diorama with your FCM 36. Highly recommended. Available in the UK from importers H G Hannants Ltd. Review sample courtesy of
-
 WWII Soviet BM-13-16 MLRS Vehicle Crew (35648) 1:35 ICM via Hannants Made by Ford UK under the Fordson brand, the WOT 8 was the last of a long line of vehicles using similar nomenclature in service of the British Army. Introduced in 1941 there were approximately 2,500 built, with a number of those sent to Russia as Lend/Lease vehicles, of which a number were converted to carry BM-13-16 Katyusha rockets on an angled rack that extended partially over the cab and is bolted firmly to the chassis. They carried 16 RS-132 rockets in an over-and-under configuration on each of the eight rails, which made a uncanny howling roar as they were unleashed from the rails. Its large fuel tank gave it a healthy range and a reasonable top speed thanks to the Ford V8 engine that put out 85hp, which wasn’t terrible for the day. The Kit This is set of figures for the kit we looked at here, though I am sure they can be used with other kits as well. The set arrives in a standard ICM box with their captive inner lid and a nice rendition of the crew on it. All four figures are on one sprue with a separate instruction booklet and product code. They are moulded in ICM’s by now familiar lifelike style, with lots of detail, realistic poses and sculpting, and including a number of weapons to sling over their shoulders. Three of the figures are shown loading rockets onto the back of the rails, while the fourth can either be their commander watching over the process, or with the tweak of his arm, he can be propping up the next rocket for loading with one of his hands, as can be seen in the picture below. Conclusion Another first-rate figure set from ICM. Recommended. Available in the UK from importers H G Hannants Ltd. Review sample courtesy of
 -
Italian Pilots in Tropical Uniform (1939-1943) ICM 1:32 (32110) Figures This is ICMs figure set no doubt designed for their new CR.42 kit, but could be used elsewhere. There are two pilots standing and one sitting stroking his dog, this dog is also included, and the dog being held by the standing figure is moulded in; as it would seem from wartime photos that Pilots of any nation were quite fond of having their dogs around. All are what would be considered dressed for the period and the climate. In general the moulding is crisp and clean with plenty of detail. . Like ICM's recent figures these are well sculpted and should build up well. Conclusion This is another great set from ICM and looks like a direct add on for their new CR.42 kits (though they can be used elsewhere) Highly recommended. Available in the UK from importers H G Hannants Ltd. Review sample courtesy of
-
Taxi de la Marne ICM 1/35 Finally finished after 18 months on and off It’s been a challenging build - slightly misaligned molds meant every part had to have work to get them to fit along with the usual ICM over engineering (why use 1 part when we can use 5 on something you won’t see when it’s finished anyway 😜😳) Happy with the result though in the end
- 10 replies
-
- 29
-
-
Roman Gladiator (16303) 1:16 ICM via Hannants It’s a well-known fact that Romans were a bit mad, and enjoyed some realistic and sometimes fatal combat between Gladiators, Gladiators and big cats and even Christians vs big cats on occasion. The professional Gladiators were often slaves that were expendable and were pitted against each other in amphitheatres for the delight of the bloodthirsty onlookers, and probably more than a little gambling on the outcome was involved. This is a new tool from ICM, and arrives in a shallow box with the usual captive inner flap under the lid. Inside are two sprues in grey styrene and another sprue and base in black, the latter being a staple of their figure range that you will see in other boxings. The instruction sheet is simple, and an additional print of the box art is included on glossy paper for your wall if you are so minded. It is a proper dyed-in-the-wool 60s era Spartacus figure that is dressed almost identically to the famous victor in the painting Pollice Verso. He is dressed as a Murmillo and is wearing a large bronze “Cassis Crista” colander-like helmet with full facial armour and a plume bristling from the crown. His torso is unarmoured save for his mighty six-pack, wielding a Spartha with a curved tip, while his sword-arm is protected by cloth Manica armour that is wrapped with leather bands. His legs are protected at the front by bronze Ocrea, with more cloth wrappings tied with leather thongs at the rear. In his free hand he carries a Roman “Scutum” shield that would be equally at home in the possession of a Legionary, and lastly his feet are bare. His stance represents a typical on-guard pose, with feet spread wide, knees flexed and his shield forward waiting for the next onslaught. He is wearing a loincloth around his waist that is held up by a large leather belt with bronze decoration and an oversized buckle at the front. The sculpting is excellent on the figure, and the accessories such as the metal armour are finely engraved with raised details, which were 3D scanned to obtain greater accuracy. There is also a smaller round shield on the weapons sprue with handle for the rear in case you feel like personalising your build a little. You’ll be pleased to hear that behind the helmet you are supplied with a complete face to show off if you can figure out how or if the helmet opens at the front. The de facto base for this range is moulded in black, and has a top and bottom plate to close up the fluted sides, and if you elect to add some groundwork that should make for easier creation and allows you not to avoid masking during the process. Conclusion He’s a big lad, and will look great with some sympathetic painting. With a few of these on a sandy base, you could tell the story of a battle. Highly recommended. Available in the UK from importers H G Hannants Ltd. Review sample courtesy of
-
Sd.Kfz.247 Ausf.B with Crew (35111) 1:35 ICM via Hannants The Sd.Kfz.247 was a small four-wheeled 4x4 armoured car that was ordered in small quantities to keep battalion commanders and other officer types safe whilst ranging around the battlefield marshalling their subordinates. They weren’t intended for front-line use, but were sufficiently well-armoured to withstand a 7.62mm round from a distance, although the open rear compartment would have been a tempting target for a well-tossed grenade. They were manufactured by Mercedes Benz on a Horch 108 chassis, and could maintain a good 50mph top-speed on a made-up road thanks to its 8-cylinder 3.5L Horch petrol engine. It had better off-road characteristics than its 6-wheeled Ausf.A predecessor, and saw extensive use in the early part of WWII, during the fast-paced Blitzkrieg advances through France and the lowlands. The Kit This is a reboxing of a new tool from ICM that adds a group of crew figures to the mix, but it does share a few clear parts with one of their earlier Mercedes kits, using the light lenses and little else, plus the tyres from the Horch. It is a fairly niche product with only 58 having been made and used at the beginning of WWII, but it’s an attractive armoured car, and as they intimated on their Facebook page, it bears a passing resemblance to the recently announced Tesla Cyber Truck. It arrives in ICM’s usual top-opening box with captive tray lid, and there are six sprues in grey styrene, a tree of black flexible tyres, a clear sprue, decal sheet, and a glossy-covered instruction booklet with painting guide on the rear cover, with a booklet for the figures tucked inside. Detail is excellent, as we’ve come to expect from ICM, including an almost full interior with engine, radio gear, seating for the crew and pioneer tools all depicted in styrene. Construction begins with the ladder chassis, with two beams running front to back that have a box-section profile thanks to an insert, separate suspension mounts and cross-braces, plus the two axles with their differential bulges in the middle. The upper swing-arms are fitted onto the chassis and mate with the combined hub/brake drum parts, then the steering arms and other parts are installed, the two-part twin springs per wheel are glued in, and the lower swing-arms close up the assembly. The power pack is built around the two-part block with cylinder heads, ancillaries, exhaust manifolds and timing belts added before it is inserted into the chassis over the front axle. The front bumper iron is built up and fitted with hooks, then placed at the front of the chassis rails, after which the wheels can be made, comprising three parts to the hubs, which press on either side of the flexible tyres, being well-detailed and come from an earlier Horch kit. These could be painted and weathered after a good scrub in warm soapy water to improve adhesion. This is replicated on each corner, with a keyed shaft ensuring correct location on the rear of the hubs. Attention now turns to the bodyshell, which begins with a tread-plated floor pan that has a number of parts added to the underside first, then is flipped over and receives the driver’s foot pedals. The lower sides are separate, and have doors with handles fitted, external arches and other clamshell doors, then they’re attached to the floor along with the radiator to create the angular lower hull, which is then joined to the chassis and has all the remaining underpinnings and mudflaps added along the way. With the two assembles mated, the radiator is joined up and the rest of the driver controls are installed with the instrument panel, plus decals for the dials in the dash. The gear shifter, hand brake and the crew seats are next, with a bench seat opposite the large double-stack radio rack that is built from a large number of parts into a well-detailed assembly that just needs a few cables. Another jump seat is positioned next to the radio stack, and it has tubular framing, just like the rest of the seats in this vehicle. The upper bodyshell is prepared with front drivers’ inner and outer hatches plus three more hatches on each side, with mechanisms applied from the inside, and each one is shown in a scrap diagram to assist with correct placement of the parts. A hatch on the bonnet/hood is installed, then the hull halves are mated, with an armoured panel and headlamps at the front, plus width “lollipops” on both fenders and the exhaust on the right rear one. There are numerous raised shapes on the exterior of the vehicle, which are location points for the many scabbed-on stowage boxes of various shapes that clutter the sides of the vehicle, and are joined by rear lights, covered spare wheel, towing hitch, aerial mast and the familiar pioneer tools that adorned the outside of almost every WWII German truck, tank of armoured car. Convoy light, wing mirror and another aerial finish off the build. Crew Figures The figures are all found on one sprue in a separate bag, with the instructions hidden in the main booklet as previously mentioned. Sculpting and moulding are first rate as you'd expect from ICM with impressive detail and realistic drape of clothing throughout, plus sensible breakdown of parts around belts, clothing seams etc., and once the seams are scraped smooth and a little sympathetic painting is carried out (sounds easy, doesn't it?), you should have a great-looking crew for your model. On the sprue are four figures, including a driver figure and two radio operators, one adjusting his set whilst listening in on headphones, the other with his headphones round his neck writing on a pad that is resting on his left knee. The officer of course is wearing his rank appropriate cap, binoculars and riding breeches, and is resting his right arm on the lip of the vehicle's walls and his corresponding foot propped up on a box within the vehicle. His other hand is looped through his belt/over his holster and he is leaning forward as if he is interested in what's going on. The accessories are fairly sparse due to the duties of the crew, and consist of bands for headphones, binoculars, pistol holster and notepad, while the figures themselves are broken down into separate legs, arms, torso, head with moulded in caps, or separate cap for the officer. The driver figure has his arms split at the elbow to obtain a more realistic position while maintaining detail on the hands etc., and to give a little adjustment when fitting his hands onto the steering wheel. Markings There are four decal options on the small sheet, with three in panzer grey and another in the late war dark yellow, having survived up until D-Day. From the box you can build one of the following: Sd.Kfz.247 Ausf.B Grossdeutschland, Ukraine, Summer 1942 Sd.Kfz.247 Ausf.B Russia, Autumn 1941 Sd.Kfz.247 Ausf.B Russia, Summer 1941 Sd.Kfz.247 Ausf.B France, Summer 1944 Decals are printed by ICM’s usual partner on a bright blue backing paper, having good register, sharpness and colour density as well as nice crisp instrument decals to detail the interior. Conclusion It’s a fairly rare piece of WWII German hardware, and a detailed model in the bargain, with just about everything you might need to build an excellent replica of this coupé of the armoured car world, now including a group of tasty figures. Highly recommended. Available in the UK from importers H G Hannants Ltd. Review sample courtesy of
-
New ICM Foxbat variant in 1/72nd announced - ref. 72177 - MiG-25PD "Foxbat-E" Sources: https://icm.com.ua/en/aviation/mig-25-pd-3/ https://www.facebook.com/story.php?story_fbid=1534837893375810&id=421205504739060 Box art V.P.
- 41 replies
-
- 11
-
-
-
 Finally, let me show something too! The theme is (to me personally the most beautiful WW2 aircraft) the MiG-3 with UBK gun pods that was shot down in the fall of 1941, although there is no information on this aircraft. I based the model on the data provided by the famous Masimo Tessitori on his page ( https://massimotessitori.altervista.org/sovietwarplanes/pages/mig3/shotdown5/shotdown5.html ) and I won't go into a much more detailed story about the apparatus itself. The model itself is already well known and is the original 1/48 ICM cast. I finished it around 2015 (started 4/5 years earlier), but just now I found it appropriate to take a picture of it: (and to dusted it). As I have listened to all sorts of things over the years, I have to say that I am pleasantly surprised! Despite the strange break down of wings, I had no major problems fitting! The level of detail is at an adequate level and with a little effort it is possible to raise model to a higher category. But to be true, not so new Trumpeter's MiG-3 is better for the class, but IMHO ICM is holding water pretty decent! The paint job is free handed airbrushing and the top greens are Humbrol 151 (or the new 226, I'm not sure but in any case FS34151), and Humbrol 91. The lower mix is Humbrol 65 + 47 in 1/1. Yellow 5 is brush painted. Weathering is a combination of dry pastels, oils, watercolor pencils (silver, green and gray). I had terrible problems with the airbrush because it functioned as a single action gun due to the faulty nozzle. Pardon me for such long story and for the bad photos (and the amount of them)! Hopefully next time it will be much! From https://massimotessitori.altervista.org/sovietwarplanes/pages/mig3/shotdown5/shotdown5.html
- 10 replies
-
- 17
-
-
Dornier Do.17Z-2 WWII Finnish Bomber 1:48 ICM (48246) The Dornier Do 17, nicknamed the flying pencil due to its slender shape, was a light bomber designed by Dornier Flugzeugwerke in the mid-1930s. Along with the Heinkel He 111, the Do 17 carried out the lion’s share of bombing raids against the UK up to the end of the Battle of Britain. The Do 17 Z was the main production variant and featured a redesigned forward fuselage that was enlarged in order to accommodate a rear gunner. The Z-2 sub-variant featured new 1000hp engines which addressed an earlier problem with under powered units. This enabled the bomb load to be doubled from 500kgs to 1000kgs, this full load did though limit combat radius to 210 miles. For the crew there were additional side firing guns, however as the three guns in the pod were only served by one gunner he could not do all at the same time. After heavy losses the machine guns were replaced with heavier MG 151/15 cannons. As the Germans supplied equipment to their allied No.46 Sqn (Later 46 Bomber Sqn) of the Finnish Air Force would receive 15 Aircraft in January 1942. Ten of these would be lost to operations but the remaining five would serve through to 1952 when they were scrapped. The Kit ICM have been releasing plenty of Do.17 and Do.215/7 variants in the last couple of years, which has been great news for the Luftwaffe modeller in 1:48, with only a few kits and variants to choose from previously. The Z-10 was first of the Do.17 variants to hit the shelves, with the Z-2 and Z-7 all based on the same basic sprues but with additional parts added to depict the differences. The origin of the tooling is 2015, and is part of the newly ICM that has been improving their mould manufacturing techniques, so is of good standard, with plenty of detail. There are a number of parts that will be left on the sprues after construction due to the nature of the tooling, and these are marked out on the instructions. The box is standard ICM fair with the inner flap protecting the parts, and inside the sprues are protected by a single resealable bag with another separating the clear parts within to prevent any issues. Construction begins with the cockpit, but unusually it is the sidewalls details that are inserted within the fuselage, which even includes the small raised platform on which the pilot's seat and control column sits. The other crew seat is fitted to the starboard fuselage side along with more details, and aft of this there are three bulkheads that bracket the bomb bay, which also has a stiffening lip added long the sides. The rear gunner's seat is fitted last on frames at the rear of the cockpit, and what passes for a cockpit floor is first glued to an insert that then attaches to the underside of the nose. The underside nose glazing is then added. A main internal tank is then made up and fitted behind the cockpit section. The upper wing is full span, and the lower wings are separate, with cut-outs for the landing gear bays that expose moulded-in detail within the inside of the upper panels. It has separate ailerons and fits over the top of the fuselage, covering the bomb bay over. If you're planning on opening the bay doors, remember to paint the inside of the wing a dark colour so it can't be seen, as it doesn't have any internal structure, but does have some recesses and ejector pin marks that could possibly be seen past the fuel tank or in the aft portion of the bay that is empty. The elevators are separate and form a H-shaped assembly with the rudders, which are also poseable, and these fit flush with the top of the fuselage by the usual slot/tab arrangement. Taking care to align these properly now will save a lot of work blending them in later. Building up the engine nacelles commences with the firewalls added to the lower wing cut-outs, following which the aft bulkhead has the retraction struts glued in place, and they too slot into the wing. The inner sides of the wheel bays are added to the wing, and these have pegs on their backsides that locate the outer nacelle skins on the airframe correctly, after the engine mounts are inserted into the port sides. The starboard sides are mounted in the same manner, and the radial engines are then constructed from a healthy number of parts, including detailed pistons, crank case, exhaust collector and fishtail tips, fitting onto the exposed engine mounts in each nacelle. The cowlings are provided as a frontal section with the annular radiator behind them, and then a framework that allows the access panels to be posed open or closed to show off the detail provided within. The props are single parts, with a spinner that fits over them, and if you're so minded, you could leave them able to spin just for the fun of it. A few scoops are fixed to the nacelles, the sturdy twin undercarriage legs with large tyres slot into the front of the bays, with two bay doors per nacelle, one each side fitting onto little hinge-points within the nacelle lip. The landing gear is made up of a two part wheel added to the main strut. A mud guard is also fitted. For the inside of the bomber full bomb racks and bombs are supplied which are now built up and slotted inside. The bomb bay doors can of course be closed as well as open but it would be shame not to include all the detail. The rear of the nose gondola is a clear part with two circular windows that will need masking off, and the canopy is moulded as a single part. Four ball-mounted machine guns slot through the front, rear, and both sides (at the rear), an aerial fits into a recess on the roof, and a blade aerial fit on top. The canopy can then be mounted. The nose glazing can also be fitted with its ball mounted machine gun. Decals There is a choice of two markings from 46 Sqn of the Finnish Air Force. Both are in Black/Green camo with blue undersides. They have yellow fuselage bands and underside yellow wing tips. One Aircraft also has large areas of white winter camo. Decals are in good registration, sharpness and colour density, with a thin gloss carrier film cut close to the printed areas. Conclusion Another of ICM's excellent line. Good detail with a slightly narrow choice of decals, which given only one sqn of the Finnish Air Force flew them its hardly surprising. It's now more possible than ever before to build a wide range of Do17s in 1:48, for which ICM are to be congratulated. Highly recommended. Review sample courtesy of
-
MiG-25 PD Soviet Interceptor Fighter 1:72 ICM (72177) In the early part of the Cold War, the strategic bomber was seen as the obvious means by which to deliver a nuclear payload. The interceptor - large, heavy and fast - was seen as the equally obvious countermeasure. The MiG-25 Foxbat was, in many ways, the ultimate embodiment of the latter. It wasn't particularly groundbreaking and nor was it particularly sophisticated, but it was capable of incredible speed and could carry four large missiles to high altitudes very quickly indeed. The MiG-25's shortcomings as a combat aircraft were largely addressed through the MiG-31 Foxhound, but the type achieved considerable longevity as a reconnaissance platform. The Kit This kit is the sixth iteration of ICM's new 1/72 MiG-25 family as they work their way through all the variants. Inside the very sturdy top-opening box are seven frames of light grey plastic and one of clear plastic. The kit is almost identical to the previous version, but includes a different sprue for the revised parts for the nose, and additional weapons sprues. The airframe is covered in crisp, recessed panel lines which look very good indeed, and the mouldings are crisp and clean. The instructions are an A4 stapled booklet which has been printed in colour and the decal sheet is clear and well printed. The overall impression is of a well-executed, modern kit which looks like it should be thoroughly enjoyable to build. Construction begins with the cockpit and nose gear bay. Some detail is moulded in place on the sidewalls of the cockpit, with extra parts provided to represent additional details. Before the main structure of the cockpit can be completed, however, you have to add the bulkhead that forms the front wall of the cockpit and the rear wall of the nose gear bay. The instructions have you installing the nose gear leg at this stage, but I can't see any logical reason as to why this can't be done at the end. This would, of course, save you from breaking the leg part way through the build. The cockpit itself is nicely detailed, with the ejector seat alone made up of no fewer than five parts. An instrument panel and control column completes this section of the build. Once the forward fuselage halves have been joined together, the whole sub-assembly fits onto a bridge that holds the huge engine air intakes. Each engine intake is full-length, with engine compressor faces provided. What results is a complete forward section of the aircraft up to the wing roots, with the internal structure of the air intakes protruding from the rear. The lower face of the main fuselage can be joined to this structure once the main landing gear bays have been added. ICM suggest that you add the main landing gear legs at this stage. Again, I can't see any reason why they couldn't be added after the main construction has been completed. Once the lower side of the main fuselage is in place, another structural bulkhead can be added, after which the slab-sides of the fuselage, including the outer faces of the air intakes, can be added. The dustbin-like jet exhausts are added at this stage, and very nicely detailed they are too. Once in place, the upper part of the fuselage can be added. The tail with seperate rudder can now be added. All that remains now is to add the nosecone, flying surfaces and finishing details. Each vertical tail is split vertically, with a seperate rudder. The outer face is moulded with part of the rear fuselage in place, so presumably it will be impossible to fit these parts at the wrong angle. Somewhat surprisingly, the upper wings are not moulded in one part with the upper fuselage. Instead, they are split into separate port and starboard halves, with two seperate flaperons and upper wing fences and pylons going on underneath. The nosecone is simply split vertically. The gear doors and wheels can now go one. Four R-40 missiles are provided for the four pylons as well as the large centre line tank. The canopy is nice and clear and can be finished in either open or closed position. Other than that, and a few aerials, lumps and bumps, the huge aircraft is now finished. Three options are provided for on the decal sheet: MiG-25PDS Soviet 1986 MiG-25PD, Iraqi Air Force late 1980s MiG-25OPD, Libyan Air Force 1990s The decals look nicely printed and a full set of stencils is included. Conclusion We've waited a while for a new, more more modern kit of the Foxbat in this scale. ICM's new effort is excellent, with high quality mouldings and plenty of the detail. The surface structures are fine and crisp. Overall this is a well executed and carefully designed kit which is very appealing indeed. Highly recommended. Available in the UK from importers H G Hannants Ltd. Review sample courtesy of
-
 After the Dornier Do.215 ( http://www.britmodeller.com/forums/index.php?/topic/234947782-icm-148-do17-do215-for-2014/), ICM is to release two 100% new molds 1/48th Dornier Do.17 kits in 2015: - ref.48244 - Dornier Do 17Z-2 - WWII German Bomber (100% new molds) Sources: ICM 2015 catalogue : http://www.icm.com.ua/katalog/ http://www.hannants.co.uk/product/ICM48244 Box art - ref.48243 - Dornier Do 17Z-10 - WWII German Night-Fighter (100% new molds) Sources: ICM 2015 catalogue : http://www.icm.com.ua/katalog/ http://www.hannants.co.uk/product/ICM48243 Box art (and the same in 1/72nd: http://www.britmodeller.com/forums/index.php?/topic/234975686-172-dornier-do17z-2-z-10-by-icm-box-arts-release-in-2015/ V.P.
 -
Soviet Firemen 1980s (35623) 1:35 ICM via Hannants These figures were originally released as a Chernobyl Fire Man set. The single sprue contains all four of the figures for this set of firemen, three wearing breathing apparatus.. There is a length of fire hose for one of the figures to hold, two clear sprues for the helmet visors. There are then 2 smaller spures with equipment, and some what look to be parts of the graphite elements of the reactors from the Chernobyl set. Conclusion It’s a shrewd decision by ICM to bring out this set again to accompany their excellent Soviet Fire Engine kits. Highly recommended. Available in the UK from importers H G Hannants Ltd. Review sample courtesy of
-
American Civil War Weapons and Equipment (35022) 1:35 ICM via Hannants This set of weapons and equipment was originally released by ICM in both their Union & Confederate Infantry sets, but is now available on its own if needed. Conclusion Another two equipment set from ICM of a period with not a lot available. Recommended, Available in the UK from importers H G Hannants Ltd. Review samples courtesy of
-
ICM 2021 downloadable catalogue : https://icm.com.ua/wp-content/uploads/2021/02/katalog_2021_web____.pdf NEW aircraft references in 2021 1/32 - ref. 32023 - Fiat CR.42AS - link - ref. 32024 - Fiat CR.42CN - link - ref. 32025 - Fiat CR.42 - link - ref. 32036 - de Havilland DH.82C Tiger Moth - link - ref. 32037 - de Havilland DH.82A Tiger Moth - link - ref. 32044 - Gloster J-8 Gladiator - link - ref. 32060 - Bell AH-1G Cobra (early) - link - ref. 32061 - Bell AH-1G Cobra (late) - link - ref. 32062 - Bell AH-1G Cobra with Pilots - link 1/48 - ref. 48225 - Gotha Go.242A - link - ref. 48226 - Gotha Go.242B - link - ref. 48279 - Douglas B-26K Counter Invader - link - ref. 48280 - Douglas B-26K Counter Invader - link - ref 48286 - Douglas DB-26B/C Invader - link - ref. 48292 - Cessna O-2A Skymaster - link - ref. 48300 - North American OV-10A Bronco - link - ref. 48301 - North American OV-10D+ Bronco - link - ref. 48388 - Bristol Beaufort Mk.I - link - ref. 48400 - Ryan Q-2A (AQM-34B) Firebee - link - ref. 48401 - Ryan Q-2C (BQM-34A) Firebee - link - ref. 48402 - Ryan Q-2A (XM-21/KDA-1 ) Firebee - link - ref. 48403 - Ryan Q-2C (BQM-34A) Firebee - link 1/72 - ref. 72178 - MiG-25PU "Fowbat-C - link V.P.
-
Chernobyl #4 Deactivators (35904) 1:35 ICM via Hannants After the partial core meltdown at Chernobyl in 1986, a massive clean-up operation was begun almost immediately to help damp down the radiation in order to help clear away and reduce the contamination that had escaped the burning reactor after the accident. After the initial firefighting efforts resulted in the deaths of the majority of the crews from radiation poisoning, the debris nearby on the roof of the nearby buildings was cleared by the Liquidators, a group of soldiers that were able to work for only 60-90 seconds in that high radiation area, shoving highly radioactive matter into the exposed reactor, and any further exposure would likely be lethal, especially if their curiosity got the better of them and they risked a peek over the lip. The wider area around the plant was still exposed to a dangerous level of radiation, and these soldiers were wrapped in rubber protective gear, masks and gloves to spray chemicals on the affected areas that could be damped down and remove the more contaminated materials. A lot of these soldiers were left ignorant of the dangers, and many of them received high doses that if they didn’t suffer immediately, they would suffer from radiation-related illnesses in later life. These brave/ignorant people did a lot to help with the rehabilitation of the farming land, even though many of the villages are still deserted to this day. The Kit This figure set depicts four of these Deactivators, and is part of the recent Chernobyl themed series that ICM have been releasing lately. The kit arrives in a slim, top-opening box that is larger than the usual figure box, due to the cardboard diorama base that is included along with the two sprues of grey styrene, length of flexible hose, and instruction sheet. It’s a new tool, so the sculpting and injection-moulding is thoroughly modern, with excellent detail. The background is also very effective for its simplicity. The four figures are dressed in two styles, one type wearing full rubber suits with additional lower leg protection, gloves, full-face mask and goggles. These figures are both stood up straight, one handling a large cylinder, while the other is spraying chemicals from a back-mounted cylinder, with a long coat over his other clothing. The other two are dressed in standard uniforms with just the lower leg protective bootees co-operating to use a hand-pumped spray system that is fed from a jerry can. These poor chaps have face masks only, leaving their upper face exposed between their masks and hats. Of the two, you’d want to be the guys wearing the rubber uniforms any day of the week. The accessories are found on the smaller sprue, and include the large cylinder, spray units, the backpack and jerry can, which are well-detailed and created from a number of parts. The instructions show the hoses as having to be scratch-built, but inside the bag is a 6”/15cm length of tube that is an off-white colour and quite flexible, but may be a little thick, so check your references and replace it if you feel the need. The instructions show the figures in their respective poses, with part numbers and red boxed letters for the painting instructions, which are referenced on the other side of the sheet with colour names, Revell and Tamiya codes that should give you enough ammunition to convert them to your paint colours of preference. As usual with ICM figures their sculpting is exceptional with crisp detail and sensible parts breakdown into torso, legs, arms, heads and hats, while the chap in the long coat has a two-part body/head/coat-tails amalgam, with separate legs with smooth upper sections, and arms with separate finger parts that give him the correct grip for the spray unit. The separate fingers are also seen on the less well-protected figure with the spray head. The folding backdrop is made from a single large piece of card that has been pre-folded in three places to enable easy construction, with a tab to join the right side to the base and create the three-sides diorama. It is well-painted and has some atmospheric aerial perspective to enhance the creepiness, as well as some smoke palls to further the post-apocalyptic vibe. Conclusion Another great Chernobyl themed set that opens up many diorama possibilities separately, or when coupled with some of the other kits in their range. It was a horrific disaster that has lingering effects even today, and we would do well to remember it to avoid similar catastrophes in the future. Very highly recommended. Review sample courtesy of
-
MiG-25RU Soviet Training Aircraft (72176) 1:72 ICM In the early part of the Cold War, the strategic bomber was seen as the obvious means by which to deliver a nuclear payload. The interceptor - large, heavy and fast - was seen as the equally obvious countermeasure. The MiG-25 Foxbat was, in many ways, the ultimate embodiment of this technology. It wasn't particularly groundbreaking and nor was it particularly sophisticated, but it was capable of incredible speed and could carry four large missiles to high altitudes very quickly indeed. The MiG-25's shortcomings as a combat aircraft were largely addressed through the MiG-31 Foxhound, but the type continued as an effective mission platform in a variety of guises. The RU version being the twin seat trainer for the reconnaissance version of the Foxbat. The Kit This kit is now the fifth iteration of ICM's new 1/72 MiG-25 family, following on from the other variants. The model is pretty much a scaled down version of their 1:48 kit, which is a jolly good thing indeed. Inside the robust top-opening box are seven frames of light grey plastic and one of clear plastic. The kit is almost identical to the previous iterations, but includes revised parts for the nose. The airframe is covered in crisp, recessed panel lines which look very good indeed, and the mouldings are crisp and clean. The instructions are an A4 stapled booklet which has been printed in colour and the decal sheet is clear and well printed. The overall impression is of a well-executed, modern kit which looks like it should be thoroughly enjoyable to build. Construction begins with the rear cockpit and nose gear bay. Some detail is moulded in place on the sidewalls of the cockpit, with extra parts provided to represent additional details. Before the main structure of the cockpit can be completed, however, you have to add the bulkhead that forms the front wall of the cockpit and the rear wall of the nose gear bay. The instructions have you installing the nose gear leg at this stage, but I can't see any logical reason as to why this can't be done at the end. This would, of course, save you from breaking the leg part way through the build. The cockpit itself is nicely detailed, with the ejector seat alone made up of no fewer than five parts. An instrument panel and control column completes this section. Once the forward fuselage halves have been joined together, the whole sub-assembly fits onto a spar that also holds the huge engine air intakes. I've noticed that kit manufacturers are moving increasingly toward this style of construction, where certain parts are provided for purely structural purposes instead of the older slot and tab style of construction. I guess the main advantage, other than strength, is that everything can be positioned at exactly the right angle - a helpful feature for kits that feature quit a complex breakdown of parts such as this one. Each engine intake is full-length, with engine compressor faces provided. What results is a complete forward section of the aircraft up to the wing roots, with the internal structure of the air intakes protruding from the rear. The lower face of the main fuselage can be joined to this structure once the main landing gear bays have been added. ICM suggest that you add the main landing gear legs at this stage. Again, I can't see any reason why they couldn't be fettled into place after the main construction has been completed. Once the lower face of the main fuselage is in place, another structural bulkhead can be added, after which the slab-sides of the fuselage, including the outer faces of the air intakes, can be added. The dustbin-like jet exhausts are added at this stage, and very nicely detailed they are too. Once in place, the upper face of the fuselage can be added. Some modellers have noticed that the central spine has a flattened profile instead of a rounded shape. This is true, but I imagine most modellers will choose to live with this flaw. All that remains now is to add the nosecone, flying surfaces and finishing details. Each vertical tail is split vertically, with a seperate rudder. The outer face is moulded with part of the rear fuselage in place, so presumably it will be impossible to fit these parts at the wrong angle. Somewhat surprisingly, the upper wings are not moulded in one part with the upper fuselage. Instead, they are split into separate port and starboard halves, with two separate flaperons and upper wing fences and fittings. The nosecone is simply split vertically and houses the front cockpit. This is made up and added in along with its rear bulkhead, Once closed up the completed nose section can be joined with the rest of the fuselage. The canopies are nice and clear and can be finished in either open or closed position. Even though the wing tip missile rails are present no armament was used, and plugs are provided for the underwing pylon spaces as well. Other than that, and a few aerials, lumps and bumps, the huge aircraft is now finished. Decals Two options are provided for on the decal sheet: MiG-25RU, 47th HRAP, Russian Air Force 2001 MiG-25RU, No. 102 Sqn Indian Air Force, 1990 The decals look nicely printed and a full set of stencils is included. Conclusion We've waited a while for a new, more more modern kit of the Foxbat in this scale, but the wait has been worth it. ICM's effort is excellent, with high quality mouldings and plenty of detail. Overall this is a well executed and carefully designed kit, while the trainer configuration is very appealing indeed. Highly recommended. Available in the UK from importers H G Hannants Ltd. Review sample courtesy of
-
Fiat CR.42 Falco in Foreign Services (D3206) 1:32 ICM via Hannants The brand new tool Falcos in 1/32 from ICM are really great kits. This set of additional decals has been produced for those aircraft which were used outside of Italy & Germany. The set arrives in a re-sealable foil bag stapled to a header card, with the decals covered by a sheet of translucent paper to keep moisture from damaging the carrier film. There are options for four airframes on the sheet, The decals are printed under ICM's banner, and are in good registration, sharpness and colour density, with a commendably thin gloss carrier film cut close to the printed areas. The few stencils included are crisply printed and legible under magnification, which is always a sign of good printing and attention to detail. From the sheet you can decal one of the following; V-205 Hungarian Air Force, 1939 V-266 Hungarian Air Force 1941 3 Sqn, II Groupe, 2 Regiment, Belgian Air Force 1940 9 Kungligq Gota Flygflottilj, Sweedish Air Force 1941 Conclusion A really nice set of decals that expand your options for the new kit. Highly recommended. Available in the UK from importers H G Hannants Ltd. Review sample courtesy of