
Search the Community
Showing results for tags 'Hunter F.6'.
Found 8 results
-
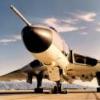
 XE584 was delivered to the RAF in November 1956 and initially served with 263 squadron at Wattisham before the unit moved to Stradishall in August ‘57. It remained here with the 263 squadron until it was disbanded and immediately renumbered 1 squadron in July 1958, with most of the unit’s Hunters transferring and gaining new markings. This Hunter was one of the aircraft borrowed for 111 squadron’s 22 aircraft loop. The nose section survives to this day. I thoroughly enjoyed building this Airfix kit, the fit is good and it’s quite a straightforward build. It does need plenty of nose weight though. Apart from the aftermarket decals it’s oob other than the little wire aerials and jetpipe cut from a 10mm diameter aluminium tube. The decals are superb apart from the fact that 263’s lion should face forward on both sides but they printed it facing backwards on the starboard side. I’ll just have to live with that. All comments, etc welcome as always!
 -
Having just seen and subsequently bought the brand new Airfix Hunter FGA.9 for a bargain £38 on eBay, I decided to make one of the other Hunters in the stash; currently the F.4/5 and two F.6s, settling on one of the latter. Currently I have one of these built in 19 Sqn markings, and I’m planning to do the F.5 in the lovely 34 Sqn colours (wolf and crescent moon, etc) and the FGA.9 in 1 Sqn markings. I’ve amassed quite a few aftermarket decals for Hunters, so there’s quite a choice! I haven’t decided yet whether to do this one as 56 Sqn or 263 Sqn, it’ll probably be a last minute decision. The colours, etc are the same anyway; gloss dark green and DSG over silver, so it should be ok. I’m using this superb book as reference.
-
XE557 was delivered to the RAF on 15th November 1956. Originally having straight leading edges on the wings, it was one of many F.6s to soon be retrofitted with the familiar dog-tooth leading edge, serving with the famous 19(F) squadron for a number of years. The aircraft later served with 229 OCU before being sold to the Chilean AF in the 1970s where it is now apparently preserved. By now a familiar kit, the Airfix Hunter goes together really nicely, with just a bit of filler needed around the tail fin join to the fuselage. I added an Eduard etch set for the instrument panels and cockpit, and used a 10mm aluminium tube for the inner jetpipe as the kit doesn’t include one. The inside of the flaps was bare so I used spare Academy ones. Finally I scratch built the two little spine aerials and little pipe on the rear fuselage. Decals are from Xtradecal set 48-105. Paint was gloss dark sea grey and dark green spray cans, and silver spray undersides. Comparison with the Academy Hunter. I’ll definitely be making another of these, and the F.4/F.5 at some point. All comments welcome!
- 14 replies
-
- 35
-

-
This is a great little kit which fits together really well and requires little filler. The decals are excellent with two nice RAF markings to choose plus a RNethAF example. I chose the CFS as I liked the contrasting yellow markings plus they were based at West Raynham which is pretty close to my mum’s! I built this oob except for the masking tape seat belts and a slight change of serial number. I built XG209 instead of 204 as the latter was subsequently lost. This is my first attempt with gloss camo spray instead of satin. The yellow took quite a bit of masking and touching up!
- 11 replies
-
- 29
-
-
Another fine thoroughbred from the Hawker stable. I’m going back to 1/72 for this one, fancy something smaller to go with the Meteors, Javelin and Vampire on the shelf. Plus, I’d like to test out my new gloss green/grey spray before using it on 1/48 jets. Nice box art. Very simple sprues, especially after the Kinetic Harrier! The kit includes tailpipes for the F6 and an FGA9. I’ll be making the F6 version as on the box. Nice decal sheet, glad it includes instrument panels. I like the 66 Sqn markings with triangular roundel bars, and was going to do that one until the yellow box art tempted me to go for the Fighter Combat School one. Once I found out they FCS were based at West Raynham that confirmed my choice, as it’s a nice little village not far from my mum’s house in north Norfolk. It must have been lovely round there with Hunters and Javelins flying around over the countryside. Does anyone have any advice? Is it worth getting any aftermarket (seat, cockpit?) or is it decent oob? Hoping for a fairly simple build.
-
 Done! And not too pleased. It seems the more models I make, the worse I get. Loads of mistakes - never going to leave attaching the canopy until after painting ever again! As you see it is after 3 re-paints!! Anyway, here it is. Airfix's 1/48 scale Hawker Hunter F.6. Decals are from Xtradecal, sheet X48-105 and depicts Hunter F.6 XF527 'P' of 19 Squadron at Church Fenton in 1958. I used replacement resin wheels and wheel bay doors. The aerials are stretched sprue and I added a small exhaust port on the tail underside. The rest is OOB. Paint is mainly Vallejo Model Air but the undersides are Humbrol 11 (another mistake!).
- 25 replies
-
- 50
-
-

-
- Hunter F.6
- 1/48
- (and 1 more)
-
Here's an old classic! And best of all, there were two complete Hunter kits in the one box, albeit with some parts off the sprues. As the Hornet didn't take that long, I thought I'd squeeze in one more model before we move! Despite its age it looks like a nice kit, and better than the Mistercraft Hunter. I'll be making her as a green/grey camo one with high speed silver undersides, probably either 56 sqn or 74 sqn, not decided yet. Any issues to watch out for?
-
 Hello, I've just added the Harrier TERMA pod, Lancaster Blockbuster and limited re-print RAE P.1109A sets on my website, available to order now. All are 1/72; Thanks Colin http://www.freightdogmodels.co.uk