Search the Community
Showing results for tags 'Hobbyboss'.
-
French Battleship Dunkerque HobbyBoss 1:350 Dunkerque was the lead ship of the Dunkerque class of battleships built for the French Navy in the 1930s. The class also included Strasbourg. The two ships were the first capital ships to be built by the French Navy after World War I; the planned Normandie and Lyon classes had been cancelled at the outbreak of war, and budgetary problems prevented the French from building new battleships in the decade after the war. Dunkerque was laid down in December 1932, was launched October 1935, and was completed in May 1937. She was armed with a main battery of eight 330mm/50 Modèle 1931 guns arranged in two quadruple gun turrets and had a top speed of 29.5 knots (54.6 km/h; 33.9 mph). Dunkerque and Strasbourg formed the French Navy's 1ère Division de Ligne (1st Division of the Line) prior to the Second World War. The two ships searched for German commerce raiders in the early months of the war, and Dunkerque also participated in convoy escort duties. The ship was badly damaged during the British attack at Mers-el-Kébir after the Armistice that ended the first phase of France's participation in World War II, but she was re floated and partially repaired to return to Toulon for comprehensive repairs. Dunkerque was scuttled in November 1942 to prevent her capture by the Germans, and subsequently seized and partially scrapped by the Italians and later the Germans. Her wreck remained in Toulon until she was stricken in 1955, and scrapped three years later. The Model At last we are seeing some of the more interesting and some would say attractive battleships of WWII being released, and a good start to a larger line up of French ships. The kit comes in quite a large, longish box, with an artist’s impression of the ship being attacked at Mers-el-Kébir. Inside there is the single piece hull, which, according to my research and the Seaforth book on French battleships, by John Jordan and Robert Dumas, is actually pretty accurate. Although the two lower strakes down the side of the ship need to be sanded back a bit as they shouldn’t reach the bow. The rest of the parts, five separate pieces, thirteen sprues of grey styrene, and two sprues of clear styrene are all beautifully moulded, with no flash or other imperfections and only few moulding pips. The kit also comes with six sheets of relief etched brass, a length of chain and a small decal sheet. Construction begins with the drilling of several holes in the foredeck and main deck. The three deck sections are then glued to the hull. Unusually there are no bulkhead parts to strengthen the hull, so check first and you may need to add thwart ships beams for added rigidity. With the decks in place the foredeck is fitted out with three capstans, three lengths of chain, suitably painted, and the three, two piece bow anchors. At the stern there is a single capstan, chain and another two piece anchor. Several sub assemblies are the built up, six two piece searchlights, six double Carley float assemblies, four three piece twin 37mm cannon mounts and eleven quad 13.2mm cannon mounts. The hull is turned upside down and fitted with the two bilge keels and four propeller shafts, A frames and propellers, along with the single rudder and two stern mounted boat booms, which should probably be left till nearer the end of the build. The PE and styrene catapult is also assembled at this point and put to one side to dry along with the two quadruple main turrets, each made up from thirteen parts. The twelve ships boats, each with separate decks and PE cradles are also assembled at this point, along with the eleven piece main mast and rear mounted armoured control station. The upper and middle rangefinder turrets are also assembled, from nine and eleven parts respectively. Moving to the foredeck again, the area is fitted out with the various cleats, bollards, deck houses, ventilators, the jackstaff and the large breakwater, along with a couple of paravanes. The main deck is given the same treatment, and also fitted with davits and four of the ships boats. The quarterdeck is also fitted with cleats and bollards. Six more of the ships boats are glued into position, along with the various boat booms, Carley float assemblies, accommodation ladders ensign staff and inclined ladders. The secondary turrets are assembled, the two twin turrets from four parts and the three quadruple turrets from seven parts. The ships cranes are built up from four styrene parts are three etched parts. The assembly of the superstructure begins with the assembly of the ten piece funnel searchlight platform onto which four searchlight assemblies are fitted. The lower bridge is then assembled, and the rest of the ships boats are on fitted onto the boat deck section, along with the two boat cranes and four inclined ladders. The aft superstructure is fitted out with the aft quad 130mm mounting, two paravanes, the hanger door, several vertical ladders and a couple of deckhouses. The searchlight platform assembly is fitted to the fore end of the aft superstructure and the assembly put to one side. The lower bridge deck is built up from three sub-structures, six support beams, and eleven PE supports before being fitted with the lower bridge assembly, a medium rangefinder, two small rangefinders, lower tower block and two quad AA mounts. The next level platform is fitted with four lookout stations and two searchlights. Onto this platform the upper tower block is attached, followed by another platform. The larger of the three rangefinders fitted to the tower is assembled and the two smaller units fitted to each others roof. The topmost rangefinder is fitted with an elaborate PE aerial array. The upper tower is also fitted with three large aerial spreader bars before being attached to the lower tower and the whole assembly being glued to the front of the boat deck, followed by the fifteen part funnel assembly. The completed structure is then glued to the main deck, followed by the aft superstructure, main and secondary turrets, catapult and nine piece aircraft handling crane. The model can be displayed onto the four piece stand included. The kit comes with two of the Loire 130 seaplanes the ship carried, each is produce in clear styrene, which, I must admit I’m not a fan of, but it can help with the clear sections I guess. The fuselage is in two halves, which, once glued together are fitted with the tailplanes and wings, each of which has separate floats. The engine and separate two bladed propeller is the attached to the top of the fuselage. Decals The small decal sheet provides the French national flags in straight and wavy forms; ships name plates, plus the roundels and fin flashes for the aircraft. They are nicely printed with good opacity and in register. The ship is painted in Dark Sea Grey overall, with black boot topping and red anti fouling. Conclusion This is a very welcome release of a very attractive ship. She, and her soon to released sister will make a great accompaniment for anyone’s collection. The model appears to be pretty accurate from the research I’ve done, which is a nice change for a Trumpeter/Hobbyboss kit. The only downside is that whilst the kit provides most of the railings required, the main railings around the fore, main and quarterdecks aren’t provided, so you will need to source these yourself. Review sample courtesy of
-
Munitionschlepper auf PzKpfw 1 Ausf A with Ammo Trailer HobbyBoss 1:35 The Model This is the fourth ex-Tristar kit, (originally released in 2011), to be reviewed on BM and it follows the same pattern as those of the Panzer IV Tauch, and the Panzer 38(T) in that the box art is the same as the Tristar packaging with the colour artists impression surrounded by a yellow boarder. As with the other kits, all the parts are beautifully moulded, with the sprues and separate lower hull and turret in a sandy yellow styrene. There are nine sprues in the yellow styrene, one of clear styrene. There are also three sprues of dark grey styrene for the track links, one sheet of etched brass, two small springs and a smallish decal sheets. There is no sign of flash or other imperfections, but there are quite a few moulding pips that will need to be cleaned up. Looking at the parts count and layout, it doesn’t appear to be a complicated build, with perhaps the exception of the individual track links, which look like they will need careful removal from the sprues and I know some modellers still don’t like. Construction begins with the interior which is made up of the fighting compartment floor, transmission tunnel, rear bulkhead, transmission outtake, nine piece transmission, stowage boxes, and torsion beams. The hull is then built up around the fighting compartment, which is further detailed with the drivers seat, transfer shafts and inner gearbox covers, along with more stowage boxes, and other equipment which I cannot identify. The road wheels consist of the inner wheel section, with tyre and two separate inner and outer rims. These are then attached to the two piece leaf suspension units. The idler wheel is fitted to its separate suspension unit, whilst the sprocket is a three piece assembly attached to the outer gearbox cover. The wheel assemblies are then attached to the hull and the two road wheel sets joined by a connecting beam. The task of fitting the tracks comes next, but it may be better to leave until nearer the end of the build. The upper and lower glacis plates are fitted, as are the two fuel tanks in the engine compartment. The engine itself is made up from no less than twenty one parts before being fitted into the compartment and connected up. The track guards are then attached and the right hand one fitted with a stowage box and bracket. Before fitting the working compartment the radio sets need to be fitted to the inside of the roof, along with a hatch lock and a couple of other brackets. The assembly is then attached to the hull, along with the radiator and supports in the engine bay. The five piece engine bay cover is then attached along with the optionally positioned hatches. The two exhausts are fitted, one either side of the engine bay on the rear track guards, as is the transmission hatch, “turret” side and top hatches, which can all be posed open to show off the lovely interior. The three piece PE mudflaps are then attached to the front of the track guards, whilst the rear mud flaps are all styrene. To the rear bulkhead the external telephone box is attached as is the five piece towing arm. The tank is then fitted out with the various pioneer tools and PE exhaust covers. Assembly of the trailer begins with the ammunition. There are four rows of shells, sixteen armour-piercing and sixteen high explosive. These are fitted into racks vertically, and surrounded with the trailer sides and the bottom. The hatches on top can be posed open for diorama use and are fitted with latches and a locking bar. The trailer itself is made up from the chassis, axle, suspension arms, and ten other parts. The metal springs form part of the suspension system and are locked off with end caps. The single piece wheels are then fited to the axle and finished off with a locking cap. The ammunition box is then attached and the completed trailer attached to the tanks towing system. Decals The small decal sheet contains to types of national markings and two id plates. Whilst small it is nicely printed and in register, and, fortunately very opaque, being mostly white. Conclusion I was pleasantly surprised with this kit having a full interior, excellent news for those who like to have all the hatches open or for use in a diorama. It’s only small, but they have packed a lot into it, and it builds into something less run of the mill for your collection. Review sample courtesy of
-
Soviet SU-18 Self-Propelled Howitzer HobbyBoss 1:35 History Initial experience with tanks in the Soviet Union was related to captured foreign models (British and French) used by the Whites during the Civil War. However, in 1920, fourteen burned-out captured French Renault FTs were dismantled, studied and replicated by the Krasnoye Sormovo Factory. Fifteen exact replicas delivered in 1922, called the “Russki Reno”. These were the first locally-built Soviet tanks in service. However, they were plagued by manufacturing defects, but gave enough experience to the Russian engineers to plan a new model. This came with the formation of a “tank bureau” in 1924, which was charged with writing a specification for the first Soviet indigenous model. This called for a 3-ton tank (later 5) capable of a 12 km/h (7.5 mph) speed, having 16 mm (0.63 in) of armour and armed with a 37 mm (1.46 in) gun, similar to the French Puteaux design, but with a longer barrel. In November 1929 ANII K. M. Ivanov, commissioned by the UMM RKKA produced a self-propelled gun based on the T-18, as well as the ammunition carrier for it. The prototype was a captured French Renault FT-17BS. The SU-18 kept the same design as the French vehicle, but replaced the turret with one that resembles a truncated pyramid. The SU-18 used the 76.2-mm regimental gun model 1927 with a slotted muzzle brake to reduce rollback. It had an ammunition capacity of 4-6 rounds and no machine guns. Other prototypes were created using a high power 37-mm PC-2 gun and a 45-mm model 1930 tank gun, which was planned to be installed on T-24 tanks. Armour consisted of 5–7 mm thick plates. The ammunition carrier could hold 10 trays with 50 rounds each of 76.2 mm shells, or 16 trays of 169 shells each 37mm or 45mm guns. The crew consisted of one driver and one gunner. The decision to build the SU-18 was made on June 11 and stipulated the delivery of a prototype by October 10, 1930. However, due to the small ammunition capability and the limitations of the T-18 (a narrow gauge chassis and a high center of gravity) the design was abandoned in favour of larger and better self-propelled gun designs and further work on the SU-18 was stopped. The Model The kit comes in a standard Hobbyboss top opening, and quite attractive box, with an artistic representation of the tank trundling along in the country. Inside there are five sprues of beige, almost caramac, (for those old enough to remember), coloured styrene, three separate parts for the hull, turret and turret base, two brown sprues of track links, a small photo etch sheet and a small decal sheet. The parts are really well moulded with no flash and only a few moulding pips needing removal. Although not to everyones taste, the track links, whilst pretty small, are beautifully moulded, and fortunately only 102 required, (51 per side), which isn’t so bad considering the small size of the links. Considering the small size of the model, it’s nice to see that Hobbyboss haven’t gone mad on the detail as they have done in the past, particularly the suspension. The main suspension units are moulded as a single piece and all the modeller has to do is add the wheels. There are two units with four wheels and single unit with six wheels per side. The completed units are glued into position on the lower hull, followed by a single return roller aft and a six wheeled bank forward. The idler axles and sprocket gear covers are attached, followed by the front glacis plate and single shackle at the front. On each side of the front hull there is a two piece bracket. The left hand one is fitted with a headlamp, whilst the right hand one si fitted with a horn. Both the sprocket and idler wheels on each side are two piece affairs, which, when assembled are glued into position. The two hatches that cover the driving position are each given a grab handle and glued into place. With the lower hull done, it’s onto the so called turret. The howitzer itself is made up from seven parts for the recoil slide and four for the gun itself. The assembly is then glued to the floor plate, which in turn is glued to the support brackets below it. The turret is then slide over the barrel and glued into position, followed by the two rear doors, each with separate grab handles. The turret rings of the original FT-17 is fitted with angle plates and grab handles before having the two track guards attached and the drivers viewing port. The turret is then attached to the original ring assembly before the whole lot is glued to the lower hull assembly. The PE grille plate is then folded and rolled to shape and fitted to the rear bulkhead, which in turn is fitted to the rear of the hull. Two engine hatches are attached, followed by the three piece slide panel, (unditching panel), that is fitted to the rear which is in turn fitted with a stowage plate. Then it’s on with the tracks, which probably are best made up into link and length style to get the sit/sag right. Decals The small decal sheet contains just two red stars for each side of the turret. It’s also very simple to paint as it comes in only one colour, Russian green Conclusion Hobbyboss have been releasing some really obscure vehicles from between the wars/early WWII Russian vehicles and they should be commended for it, at least there is a little more information on this vehicle than there si for others I have reviewed. It is certainly a rather odd looking little tank will make an interesting addition to any modellers collection. Review sample courtesy of
-
Hello Chaps, Until my man-cave is setup in my new home, I cannot do any airbrushing and so my last 6 builds have been "old school" brushing with the "hairy sticks". I've decided to stick with 1/72 scale while using brushes because there is less surface area to cover compared to the 1/32 scale I prefer to build. This was my first adventure with the bristled wands that I completed in November, 2016- the HobbyBoss 1/72 Seahawk Mk.100/101. Not a bad little kit with decent tub details for this scale; I added seat belts made out of foil from the top of a wine bottle and the rest was OOB... If you'd like to see my YouTube build video, then here is the link to that: Thanks in advance for taking a look and commenting, much appreciated. In the meantime, happy modeling! Cheers, Martin
- 7 replies
-
- 17
-

-
- HobbyBoss
- 1:72 Scale
- (and 1 more)
-
Hi, This is my 1/72 A-7 Corsair from Hobbyboss, straight out of the box build. Thanks for looking.
-
At the RAF Hendon show last month I snagged a Hobbyboss A-7D Corsair to see if I could top that Century Wings diecast version…delusional me… My eyesight sucks so most of this was attempted with me squinting like Mr Magoo despite an up to date prescription. Mainly out of the box, no after market embellishments aside from seat belts made from 0.4mm masking tape and scratched instruments using plasticard. HobbyBoss do not include a decal or anything for the front office avionics. Which is surprising. Office decked out with brass wire as ejection handles…. Painted cockpit but effect looks rough so hoping from afar it won't...… Avionics bay Filling wing roots, also seams needed treatment, but nothing too dramatic. Fit was good with this kit… Primed and pre-shaded….although I always seem to obscure the pre-shade. I shoot Halfords grey primer through an airbrush but should have polished surface before paint. Attempting freehand SEA camo – first timer as ditched the blu tac white worms in this scale so was a little nervous….here goes.. All three colours down (UK made Humbrol formula..but soon to defect to Gunze)….seems okay to my eye but I’m too fat fingered to get that perfect look that others amazingly achieve around here… Applying post shading filters by adding yellow to primary colours and then white to enhance the centre of randomly selected panels. Spraying at very low psi. Klear airbrushed for gloss and then polished with micromesh- should have polished before the Klear..live and learn. The boring bits…..spraying the tiny bits…like watching paint dry… Since the above sprayed more Klear as surface was not glossy enough…..decals next week and hoping to finish….. Thanks Sanjay..
-
My third completed kit for 2017 (but started in late 2016) is the F4U-5 by Hobbyboss. I found the build to be fairly pleasant and easy. Fit was near perfect, but I used a lot of filler to even out the outer wing panels. Hobbyboss gives you fabric covered panels, but the -5 model had metal skinned wings. Hobbyboss did right on the rest of the kit though. Details throughout are nice, and I love the wingfold engineering. With a few simple parts, Hobbyboss gives you a sturdy, and busy looking folded wing. The flap actuators have to be cut to build the flaps down, but that was very easy. I also added harnesses made from tape and wire. I really wish the kit came with HVAR rockets. Painting was done mostly with Tamiya. The photos don't capture it, but I did a lot of clear coat effects with various levels of gloss to break up the solid wall of blue. Weathering was kept to a minimum, as this was not an aircraft that saw much combat. The markings are from VF-14 in 1952-1953, when they were on-board the USS Wasp and later the USS Franklin D. Roosevelt., both times in the Mediterranean Sea. I'm seeing conflicting info though, as some sources say that VF-14 flew the F4U-4 and not the -5. Sigh....it's only a model.
-
French Pre-Dreadnought Danton Hobbyboss 1:350 Although the Danton-class battleships were a significant improvement from the preceding Liberté class, especially with the 3,000-ton displacement increase, they were outclassed by the advent of HMS Dreadnought well before they were completed. This, combined with other poor traits, including the great weight in coal they had to carry, made them rather unsuccessful ships, though their numerous rapid-firing guns were of some use in the Mediterranean. Danton was laid down at the Arsenal de Brest in February 1906, launched on 4 July 1909, and commissioned into the French Navy on 1 June 1911. The ship was 146.6 meters (481 ft 0 in) long overall and had a beam of 25.8 m (84 ft 8 in) and a full-load draft of 9.2 m (30 ft 2 in). She displaced 19,736 metric tons (19,424 long tons; 21,755 short tons) at full load and had a crew of 681 officers and enlisted men. She was powered by four Parsons steam turbines with twenty-six Belleville boilers, the first French warship to use turbines. They were rated at 22,500 shaft horsepower (16,800 kW) and provided a top speed of around 19 knots (35 km/h; 22 mph). Coal storage amounted to 2,027 t (1,995 long tons; 2,234 short tons). Danton's main battery consisted of four 305mm/45 Modèle 1906 guns mounted in two twin gun turrets, one forward and one aft. The secondary battery consisted of twelve 240mm/50 Modèle 1902 guns in twin turrets, three on either side of the ship. A number of smaller guns were carried for defence against torpedo boats. These included sixteen 75 mm (3.0 in) L/65 guns and ten 47 mm (1.9 in) guns. The ship was also armed with two 450 mm (17.7 in) torpedo tubes. The ship's main belt was 270 mm (10.6 in) thick and the main battery was protected by up to 300 mm (11.8 in) of armour. The conning tower also had 300 mm thick sides. In May 1909, at the launching ceremony for Danton, socialist activists prevented the ship from leaving the stocks. The ship was eventually launched on 4 July 1909. A week after she was completed, she was sent to the United Kingdom in honour of the Coronation of George V in 1911. Upon her return to France, Danton was assigned to the 1st Battle Squadron, along with her sister ships and the two powerful dreadnoughts Courbet and Jean Bart. In 1913, while off Hyères in the Mediterranean, Danton suffered an explosion in one of her gun turrets, which killed three men and injured several others. Danton served in World War I in the French Mediterranean Fleet. At the outbreak of the war in early August 1914, she was assigned to guard convoys bringing French soldiers from North Africa, to protect from attack by the German battlecruiser SMS Goeben and light cruiser SMS Breslau, which were operating in the area. At the time, she remained in the 1st Battle Squadron alongside her sister ships, under the command of Vice Admiral Chocheprat. By 16 August, the French naval commander, Admiral de Lapeyrère, took the bulk of the French fleet from Malta to the entrance of the Adriatic to keep the Austro-Hungarian Navy bottled up. Danton, commanded by Captain Delage, was torpedoed by U-64, commanded by Kapitänleutnant Robert Moraht, at 13:17 on 19 March 1917, 22 miles (19 nm; 35 km) south-west of Sardinia. The battleship was returning to duty from a refit in Toulon and was bound for the Greek island of Corfu to join the Allied blockade of the Strait of Otranto. Danton was carrying more men than normal, as many were crew members of other ships at Corfu, and had been zig-zagging to foil enemy submarines. The ship sank in 45 minutes; 806 men were rescued by the destroyer Massue and nearby patrol boats, but 296, including Captain Delage, went down with the ship. Massue attacked U-64 with depth charges, but the U-boat successfully evaded her attacker. In February 2009, it was made public that in late 2007 the wreck of the ship was discovered "in remarkable condition" during an underwater survey between Italy and Algeria for the GALSI gas pipeline. The wreck lies at 38°45′35″N 8°3′30″E, a few kilometres away from where it had been thought she sank, sitting upright with many of her gun turrets intact at a depth of over 1,000 metres (550 fathoms; 3,300 ft). The Model This is the first Pre-Dreadnought release of the year, with at least three more to be released this year and a very welcome release it is too, with the hope that there will be many more to come. Packaged in the standard style of box Hobbyboss use for their ship kits, it is somewhat smaller than most. Inside there are thirteen sprues of light grey styrene, and one separate deck section. There is also a small black stand, three sheets of etched brass, a length of chain and a smallish decal sheet. All the parts are very nicely moulded with some very fine details, particularly on the deck and superstructure. The parts are all cleanly moulded, with no sign of flash or other imperfections, but there are quite a few moulding pips, mainly on the small parts. The exceptions being a couple of the loose parts, where they have become detached from the sprue and will need the a bit more cleaning up. The instructions are well printed and very clearly mark the positioning of parts and sub-assemblies along with a nicely printed painting guide. Construction begins with the fitting of the two hull halves between which are two bulkheads and the rudder. There are two, two gun casements fore and aft and two four gun casements, one on each beam, these sub- assemblies are then fitted into their appropriate positions in the hull. The main deck section and the quarterdeck section are glued into position once a couple of holes have been drilled out in the main deck. The hull is then turned upside down, so that the bilge keels, four propeller shafts, A frame supports and propellers can be attached. Before continuing the main build, several sub-assemblies need to be built up; these are the main capstans, and the folding of the inclined ladders. The capstans, bitts, chocks and roller chocks are fitted to the foredeck and quarterdeck, whilst the inclined ladders are fitted in their appropriate positions as are the PE casement doors which can be posed in either the open or closed positions. The anchors, anchor chains, ensign staff, jack staff, midships mounted winches, several deckhouses and four searchlights are then glued to the deck, whilst along each side there are more PE doors, vertical ladders and plastic boat booms are glued into position. The bridge structure is assembled next with the base being fitted with the bridge deck which includes the bridge wings. Under the wings and bridge front there are fifteen PE supports to attach. The after superstructure is also assembled with the deck mounted on sixteen supports, and fitted with a small deck house. The main bridge is then fitted with the armoured hood and another deck house, followed by another deck and four light guns, two rangefinders, four vertical items, which I cannot identify, the binnacle and the navigation lights. The bridge, aft structure and upper deck structure aft of the bridge are attached to the main deck. The aft structure is then fitted with four light guns, binnacle and four upright items. The turrets are then built up, two main turrets and six secondary turrets, each made up form a turret base, two guns on a single trunnion, two trunnion mounts, turret top, and sighting top. The two masts are also assembled at this time each with separate yardarms, platforms and their associated railings. The masts are then glued into position, along with nine ventilators and several deck houses, plus three chimneys. The most obvious identification for this ship is the five funnels, each is made up form two halves, then fitted with two piece funnel tops and PE grille, along with PE vertical ladders and railings. The two boat cranes are built up from seven plastic and seven PE parts. The completed funnel and crane assemblies are then glued into position. The two PE boat cradles are folded to shape and attached to the main deck, followed by a set of railings and a selection of PE inclined ladders. There are ten rowing boats and two steam launches to assemble. The rowing boats have thwarts fitted and the steam launches a funnel, they could do with some etched oars, rudders and propellers, but other than that they look ok. Once assembled, the ships boats are then fitted to their respective cradles. The kit does come with a full ships complement of railings which are now attached, followed by the turret sub-assemblies, PE accommodation ladders, boat davits and boats, side anchors and small cranes, completing the build. Decals The small decal sheet provides the French national flags in straight and wavy forms; ships name plates and a white funnel band. They are nicely printed with good opacity and in register. The ship is painted in Dark Sea Grey overall, with the option of having green or red antifouling. Conclusion At last, we are seeing the promised release of the pre-dreadnoughts. This is great looking kit and from the research I did for this review it looks pretty accurate, although the middle side turret extension may not be correct, depending on which pictures you view. I’ll let you decide on that one, but to me it’s not quite the right shape. Other than that, it should be an enjoyable build and I’m sure the aftermarket people will be releasing some more etch for it. Review sample courtesy of
-
Hi all Finished this one a couple of weeks ago so thought id get some (not very good) pics out in natural light. Built OOB with paint from Akah. This is my first ever Russian aircraft so pretty happy with how it came out. Enjoy ScottC
-
M4 High Speed Tractor (3 in./90mm) 1:72 Hobbyboss Based on the chassis of the M3 'Stuart' Light Tank, the M4 was an artillery tractor designed to tow 90mm, 155mm and 240mm guns and howitzers. Over 5,500 examples were manufactured by Allis-Chalmers of Milwaukee, and it was used by the US Army until 1960. The M4 was also supplied to Brazil, Greece, Japan, the Netherlands, Pakistan and Yugoslavia. A flexible and tough design, many M4s enjoyed a second career after their military service, being popular vehicles in the logging and road construction industries. After a bit of a hiatus, Hobbyboss appear to have made 2017 the year of the small-scale AFV. A month or so ago we received their new Land-Wasser-Schlepper for review. Now they've followed up with a mini-range of the M4 tractor, starting with the 90mm version. The kit is vintage Hobbyboss, being well-packed in a sturdy box, beautifully moulded and yet incredibly simple due to a focus on ease of construction and through the extensive use of multi-part slide moulds. Construction is simplicity itself. The running gear and tracks are moulded as single parts, with just the inner face of the drive sprocket, the return rollers and the trailing arm for the idler wheel moulded separately. Obviously some compromises have been made in order to mould the tracks in this way, but they really are pretty good considering the low part count. Even though the inside faces of the tracks are relatively untroubled by moulded detail, I probably wouldn't complain if a lot of my small-scale tracked vehicles were supplied with tracks like these. Once the tracks are complete, they can be fitted to the lower hull. In keeping with the rest of the model, this is a simple structure with just the frontal section of the hull moulded separately. A basic interior, including crew and passenger seats and driver's controls, has been included. This is good, as it really would have shown if Hobbyboss had elected to scrimp on the interior. Although sometimes seen unglazed, many photographs of these vehicles show a windscreen in place, so it's a shame that Hobbyboss have omitted this feature. Once the interior has been assembled and painted, you can drop the slide-moulded body onto the lower chassis. The 90mm ammunition box is a separately moulded part (the 155mm/240mm variant is on the way), leaving just the headlight and defensive machine gun to finish the model off. Small details such as the tools have been moulded in place, which doesn't surprise me given the approach Hobbyboss have taken to this kit. Two marking options are provided, but tn historical notes are included to place the marking options in context, which is a shame. Paint references are included for the Mr Hobby, Vallejo, Model Master, Tamiya and Humbrol ranges. Conclusion This kit marks a welcome addition to Hobbyboss's range of 1:72 AFVs. Whilst some compromises have been made, detail is generally good and the one-piece tracks are adequate for this scale. It's a shame that they haven't provided a windscreen, but fitting some clear film should be within the capabilities of most modellers. Other than that, for what it is, this is a really neat little model. Review sample courtesy of
-
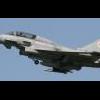
AMX A-11B Trainer 1:48 HobbyBoss The AMX was designed as a replacement to the Fiat G.91 and derivatives, and was the product of a newly create company called AMX International, which was a cooperation between Aeritalia, Aeromacchi and the Brazilian company Embraer. Each partner builds a portion of the aircraft, with the first assembled in Italy for flight testing in the mid 80s. After successful completion of testing, it started to enter into service toward the end of the 80s, as the A-11 Ghibli with the Italian Air Force and the A-1 with Brazil. The B model is the two seat trainer. The aircraft uses a license built Spey engine, which was chosen for reliability and ease of integration with the design, although later other engines were considered. It has been used substantially by both operators and has undergone a number of upgrades of the avionics over time. The two-seat trainer was completed in the 1990s, and many of the approximately 200 airframes are still in service, barring accidents and total loss incidents, of which there have been a few over the years, ironically one of which was due to engine failure. The Kit This new tool from Hobby Boss arrives on eight sprues of grey plastic, a clear sprue, two small sheets of photo-etch, rubber tyres; and two decal sheets. It was evident from the single seater kit reviewed here that a two seat version was planned. Construction starts in the cockpit. First the ejection seat s are made up, they has PE belts. The seats are put in the cockpit tub along with the instrument panels and control columns. Once the seats are in the cockpit sides are added. This is then put to one side. Next up the undercarriage bays are built up. The font bay is a single part to which the 4 part leg is added the front wheel which is a separate hub abd rubber tyre is also added at this stage. For the main gear bays there is a two part leg, a landing light which attached to the leg, the main wheel & hub, plus two retraction struts. Once the gear bays are finished they can be installed in the fuselage halves. Before these are closed up the two part exhaust needs to be fitted inside. The trunking is one part so no seam to worry about. Once the main fuselage is together the intakes are fitted each side along with their attached lights. A note he is that the intakes in the kit appear to rounded and not as square as the real thing. They should be able to be squared up if the modeller wants my a little work. The HUD is made up and attached to the instrument cowling, this is then fitted in front of the cockpit. The front screen then goes over this. For the main canopy there is an internal frame to add, along with three photo-etch mirrors. The next stage is to make up and attach the wings. The wings come with separate flaps and slats which is good, and they can be positioned open or closed, however there appear to be no actuators present. The wings themselves are a single part to which the flaps and slats are added. Once made up they can be attached to the fuselage along with the vertical tail. The tail is a conventional left/right split and there are a pair of aerials to be added from the inside before you close them up. Moving on to the last stages of construction various aerials are added along with a pilots ladder if needed. The gear doors are added along with two prominent rear ventral air scoops for the engines, along with the prominent re-fuelling probe. The arrestor hook is added along with the wing tip & under wing pylons. A wide variety of stores are included with the kit for the modeller to choose from. These are AIM-9P & AIM-9L missiles, MK82 and MK-84 bombs, fuels tanks and GBU-12 guided bombs. Canopy The clear parts in the kit are thin and very clear. As always with Hobby Boss they wrap the clear parts in a protective foam which is a good thing to do. Decals There are two decal sheets in the kit. One provides markings for two aircraft, and the other the markings for the weapons. The two marking options provided are; 32-40, 13 Gruppo, 32 Stormo, Italian Air Force. 2-10, 14 Gruppo, 2 Stormo, Italina Air Force. Conclusion This is good looking kit from Hobby Boss. Recommended. Review sample courtesy of
-
I've got six Shermans inn my 1/48th scale collection, although one them, a Mk.Vc Firefly is in a rather dilapidated condition and requires rebuilding. The others are a mix of different marks from various sources. Kit wise, I only know of the three from Tamiya (Mk.1c, M4A1 and M4) and the ones from Hobbyboss which are based around M4A3's and early M4's. There are, or have been, a few after market offerings in resin to produce different marks. This first one was the first that I built in this scale, namely an early direct vision Sherman ll. This uses the lower hull from the Tamiya M4A1 and the upper hull from the German company MR Modelbau, who also supplied the early M3 VVSS. Decals are from Bison. The second one is a Sherman lla. To build this one I used the Hobbyboss M4A3 lower hull and turret coupled with an M1A1 barrel from RB Models. The upper hull came fro m a US company called Iron Division, which I think unfortunately, is no longer trading. Decals again are Bison. Next up is a Mk.V of the RMASG named "Fox". This came from the excellent resin kit from Fighting 48th, who once again are sadly, no longer available. The kit is actually meant for the Firefly, so the M4 turret from Tamiya was used instead along with an RB Models barrel. The decals were custom made for me by Ernst Peddinghaus. Once again, Iron Division supplied the upper hull for this one. The lower hull, VVSS units and the turret came from Tamiya's Firefly 1c and the 17pdr is R Models. Finally, I built this 10 years ago and just after I completed it, Black Dog announced that they were going to do one in resin, although I don't think that they ever did. The lower hull was completely scratch built and then I added the HVSS units from the Hobbyboss M4A3E8 kit. The upper hull was a combination of the front piece of the Tamiya M4 mated to the rear half of the Hobbyboss M4A3 with an extension piece each side. I used the Hobbyboss M4A3 turret and glued a load of plastic onto the rear and then blended it in with Milliput. The mantlet was made from a triangular piece of plastic to which a barrel made from a Panthers 75mm along with a scratch built muzzle brake was fixed. The engine deck was made from card and the decals again came from Peddinghaus. I will one day get around to building the others that I have in the pipeline, namely Sherman lll, M51 and (I know it's not a Sherman, but almost) an M3 Grant. Regards, John.
- 49 replies
-
- 26
-
-
Hi folk's,with a few "E" models under my belt I wanted to build an F,My LMS has Hobbyboss' easykit in stock at a decent price so here we are, it is an easykit yes it builds easy but is a nicely detailed kit certainly on par with Airfix's offerings and some fine surface detailing that would give Eduard a run for their money,accuracy I can't comment on I'll leave that to the 109 experts,Thanks for looking in.
-
 HobbyBoss is to release a 1/48th Industria Aeronautică Română IAR-80 kit in 2016 - ref. 81757 Source: https://www.facebook.com/TrumpeterModel/photos/a.103538733138062.8169.103526326472636/537476479744283/?type=3&theater V.P.
 -
Hello everyone! My next build is the F-14D. Easily one of my favorite aircraft, it's been on the build radar for a while now. I settled on the hobby boss offering as the I already own a die-cast F-18F in the VF-2 CAG scheme. The Hobby Boss kit is a pretty well balanced kit. There's a reasonable amount of well defined surface detail which stands up pretty well to reference photos. Despite this, it has a relatively low part count (as compared to the Hasegawa offering) and hopefully should come together with minimal fuss. The kit is lacking or could use some sprucing up in a few key areas. I see this as a +plus as it offers a good opportunity to scratch build. Armed with a healthy bunch of stretched sprue, thin cement (chloroform) and styrene card, my intent is to detail the aircraft to as close to the real thing as possible. I have added links below to the various build milestones crossed so far for your quick reference. Main Landing Gear: Part 1: Torsion Link weight reduction depressions Part 2: Hydraulic Lines and adding missing elements Part 3: Hydraulic Lines (contd) Part 4: Paint, decaling and weathering (Coming soon....) Ejection Seat: Upgrading the stock Ejection seat Ventral Fin upgrade: Scratch building the Ventral fins with the NACA ducts Cockpit: Part 1: Console Hood Canvas using tissue paper, and installation of the DreamModel cockpit PhotoEtch Part 2: Cockpit errors Part 3: Cockpit corrections Nose Gear Bay: Detailing the side walls on the Nose Gear Bay Weathering Test Painting and weathering test on styrene card using Vallejo paints, acrylics and oils Nose Gear: Hydraulic lines and details added using stretched sprue and styrene card New! Kit sprues and close-ups: Since a review of the kit is missing here on Britmodeller, I took the liberty of posting sprue shots and close-ups for anyone interested. (Pic heavy) Box Art: My choice of livery for this build. The kit also comes with two other options including the low-vis version of the same livery. Upper fuselage: Fine recessed lines and riveting detail. The airbrake is moulded in the closed position, but for this build, it isn't a concern. Lower fuselage: Sprue A: Front Back LHS front fuselage RHS Front fuselage Nose gear bay and MLG bay door detailing Nose gear (RHS) with option of catapult bar raised and lowered Nose gear LHS MLG detail MLG Wheels Nose gear wheels Lower hull surface below cockpit area Sprue B: Control surfaces. The great advantage of the kit is the possibility to pose the wings extended or withdrawn. Unfortunately, there's no option for dropped flaps. Upper wing detail Lower wing detail Vertical stabilizers Elevators Sprue C: Sparrow Missiles and fuel tanks Sprue D: Phoenix and Sidewinders Sprue G: Exhausts etc Sprue J: Pretty detailed Ejection Seats. Will spruce them up a bit nevertheless. Sprue E: Clear parts Decals: Pretty comprehensive with almost all stencils provided. Weapons stencils: Dream-Model PE for the cockpit: DreamModel Brass Pitot: That wraps up the introduction to the kit. In the next post I plan to start detailing the Main Landing Gear. Your feedback, suggestions and comments are much appreciated. Thanks for watching! Cheers, Alex.
-
Here is my Hobbyboss 1/48 Yak-38 Forger A. Painted with Akan paints, an Eduard interior, Pavla seat, Quickboost exhaust and fan and finished with a Flory wash. The only thing I am not sure about it whether to matt it down or not. Robert
-
Next HobbyBoss 1/48th Schwalbe variant is the Messerschmitt Me.262B-1a/Avia CS-92 - ref. 80380 Release expected for late January 2016. Source: http://www.hobbyboss.com/index.php?g=home&m=article&a=show&id=55&l=en Box art Hobby Boss Schwalbe variants & boxing: - Messerschmitt Me.262 A-1a - ref.80369 - http://www.britmodeller.com/forums/index.php?/topic/234948927-148-messerschmitt-me262-a-1a-schwalbe-by-hobbyboss-released - Messerschmitt Me.262 A-1a/U1 - ref.80370 - http://www.britmodeller.com/forums/index.php?/topic/234965082-148-messerschmitt-me262-a-1au1-schwalbe-by-hobby-boss-release-october-2014 - Messerschmitt Me.262 A-1a/U3 - ref.80371 - http://www.hobbyboss.com/index.php?g=home&m=product&a=show&id=523&l=en - Messerschmitt Me.262 A-1a/U4 - ref.80372 - http://www.hobbyboss.com/index.php?g=home&m=product&a=show&id=551&l=en - Messerschmitt Me.262 A-1a/U5 - ref.80373 - http://www.hobbyboss.com/index.php?g=home&m=product&a=show&id=448&l=en - Messerschmitt Me.262 A-1a/U2 (V056) - ref.80374 - http://www.hobbyboss.com/index.php?g=home&m=product&a=show&id=430&l=en - Messerschmitt Me.262 A-1b - ref.80375 - http://www.hobbyboss.com/index.php?g=home&m=product&a=show&id=330&l=en - Messerschmitt Me.262 A-2a - ref.80376 - http://www.britmodeller.com/forums/index.php?/topic/234971808-148-messerschmit-me262-a-2a-schwalbe-by-hobby-boss-released - Messerschmitt Me.262 A-2a/U2 - ref.80377 - http://www.britmodeller.com/forums/index.php?/topic/234987781-148-messerschmitt-me262-a-2au2-schwalbe-by-hobby-boss-box-art-release-october-2015/ - Messerschmitt Me.262 B-1a - ref. 80378 - http://www.britmodeller.com/forums/index.php?/topic/234954190-148-messerschmitt-me262b-1a-schwalbe-by-hobby-boss-released - Messerschmitt Me.262 B-1a/U1 - ref.80379 - http://www.britmodeller.com/forums/index.php?/topic/234953218-148-messerschmitt-me262b-1au1-schwalbe-by-hobby-boss - Messerschmitt Me.262B-1a/Avia CS-92 - ref. 80380 - http://www.britmodeller.com/forums/index.php?/topic/234992900-148-messerschmitt-me262b-1acs-92-schwalbe-by-hobbyboss-released/ V.P.
-
Finished this yesterday, took the final photos today in daylight. I like this kit - you get a lot for your money, though a few bits of the engineering could be better (specifically the engine / nose panels being in clear). Painted with Mr Color laquer paints (which I love), and weathered with Oils. Decals got damp and didn't play, so used home made masks for all the markings apart from the slogan which was hand painted, and I apologise in advance if the spelling / sentiment is wrong. Wip is available here Peter
-
Started the Hobbyboss 1/32nd IL-2M Sturmovik. Unsurprisingly starts with the cockpit Then slotted the bulkhead in place with the seat, but still need to add the belts and weather down later Peter
-
Hello Buddies , this is my first post here in Britmodeller. This is my Corsair F-4U-4 Hobbyboss 1/72, this was a easy and funny kit to build, painted whit acrilyc paints and the decals applied whit acetic acid for a much better adherence. I hope you like it.
-
 After seeing how nice the 1/48 Hobbyboss FW-190D-9 kit was, I picked up the D-11 kit planning on a parallel build. While it is nice, it has some accuracy issues. It basically is a D-9 kit with a new cowl and supercharger intake, and replicates a mistake on the D-9 kit in that it has a single cartridge ejection chute between the wheel wells (the D-9 should have 2, and the D-11 should have none) Also, the D-11 has the outboard MK-108 cannons miss located, no upper or lower breech covers or ejection chutes, and incorrect panel lines. The cowl cover is also bulged where it should be nearly straight and the motor mount subtle bulge is missing. Time to play ... here's the un modified D-11 wings - note how far outboard the MK-108's are compared to the drawing here's the modified wings, rescribed, with a fairing made from sprue (D-9 wings on top for comparison) (cartridge chute filled on the D-11, and a second one added on the D-9) After priming, with the guns relocated Upper breech covers made from .040 plasticard and panel lines rescribed as nesc. (also note that I've removed the cartridge chutes from in the wheel well) The gun cowl for the fuselage (Eduard's on the left, unmodified D-11 below, and D-9 above) You can see how "bulgy" the cowl is originally Cowl was backed with Millput and filed/sanded to shape and rescribed, the primed The cowl flaps were also separated with a razor saw, and the one flap in front of the supercharger closed For the D-9, the lower, aft portion of the wings is unpainted, so I've done a bit of "stressed skin" and riveted it. IMHO, large expanses of smooth aluminum just don't look right Even with this, it looks like a much simpler build than the Eduard's kit, and accurate in (most) outlines. Hope you like, so far, Colin
 -
A-6A Intruder 1:48 Hobbyboss The Intruder was the eventual replacement for the successful and long-lived Skyraider (as was the A-4), and was unusual in having a side-by-side cockpit arrangement for the pilots, which meant a wide nose that became well known due to its involvement in operations and deployments around the world. Entering service in 1963 in the Vietnam war, it performed all-weather and night attack missions extensively throughout the conflict for the US Navy and the Marines, it had a long service life that was ended prematurely by the need to cut costs after the Gulf War. The A variant was the first into service, and incorporated some leading edge systems to enable it to fly low over terrain with little to no visibility. Due to the complexity of the systems, it was also equipped with a self-diagnosis system that could be used to test and report faults from within the aircraft without costly and time-consuming strip-downs, thus saving many hours in the hangar. The following variants showed the versatility of the airframe from buddy-buddy refueller to electronic warfare in the EA-6 Prowler, but the definitive variant is considered to be the later E, which was upgraded in the 70s with the TRAM (Target Recognition and Attack Multi-Sensor) turret that allowed it to drop laser guided munitions, further extending its usefulness. The Prowler was the last Intruder based airframe to be drawn down in 2009 and was replaced by the EA-18G Growler that took over electronic warfare duties. The Kit The A variant was the basic airframe for all Intruder variants that came after, with few changes to the aerodynamics, but plenty of changes to the equipment fits. Almost 500 were built of the A, and this is the subject of the kit. It arrives in a large flattish box with a painting of two Intruders flying over a mountainous area on the lid, and you wonder whether it's going to be one of those boxes that is way too big for the kit. Once you open the box, you find that it isn't, although there is a section at one end that it divided off to keep the canopy and other delicate parts safe from the mass of plastic in the box. The Intruder is also a surprisingly large airframe, with a long fuselage and large tail fin, which takes up a fair amount of room within the box. There are thirteen sprues of grey styrene, three of clear parts, a small fret of Photo-Etch (PE) brass, a bag of metal landing gear parts, two decal sheets, instruction booklet and two glossy sheets containing painting and decaling instructions. The detail on the parts is impressive, and the breakdown is that of a kit that has been designed to provide other variants, which have indeed just been announced for the 2014 year from Hobbyboss in the form of the A-6E and A-6E TRAM that I mentioned in the preamble. Good news for Intruder fans all round. Construction begins with the cockpit, with two nicely detailed ejection seats with PE seatbelts fitting into a cockpit tub that has substantial detail moulded in. The rear turtle-deck is also nicely detailed, although as you are told to glue it to the tub before it is fitted into the fuselage, getting the angle right might be tricky unless you offer it up to the fuselage and let it dry there in order to get it just right. The instrument coaming is also busy, and the instrument panel conveys a good likeness of the multi-layered nature of the real thing, although there are no decals provided for any of the panels for those that perhaps find the painting tedious or difficult. For no apparent reason the landing gear is built up next, and here HB have been clever and given the modeller a strong metal casting to act as the central support for the more detailed styrene landing gear parts, which should result in a handsome, strong depiction of the real thing that will stand up to the rigors of time, and the weight of any resin that you might add to your base model, because we all know that's sometimes quite tempting, don't we? The gear of a carrier based aircraft is always substantial due to the hammering it takes on a sometimes pitching deck, and this comes across well, particularly the nose gear with twin wheels and massive retraction link. The main gear centres are L-shaped and the end carries the two-part wheels, ensuring no problems with weight, while the styrene retraction jacks and outer-legs are purely cosmetic. In order to close up the fuselage, you need to make up the intake trunking amongst other parts, which goes full-length and includes the turbine face that one deck-crew member got to know intimately when he was sucked into the low-slung intakes on night-ops. The outer skin is separate from the trunking, making seam-fettling a little easier, and as they are only around 5cm long, it shouldn't be too hard to make them silky smooth. They are inserted through a hole in the front of the fuselage, necessitating the alignment of the outer skin with the fuselage side, which is just in front of the built-in crew access ladder. The instructions would have you install the aft fuselage mounted air-brakes at this time, but most modellers would probably wait until later for such a fragile part of the build. The detail within the bays and brakes is nicely done, and the brakes have the correct holes moulded in to allow air to bleed through when deployed. The nose-gear bay has separate sides to allow extra detail to be moulded in, and although the instructions show it being installed in the fuselage with the leg already attached, that isn't actually necessary. The arrestor-hook housing is added along with the rudder, which isn't glued to give some "wiggle", and the fuselage is closed up, then the radar that sits within the nose cone is added along with its bulkhead to the front of the fuselage, to be covered up later by the radome, which could be left open, but isn't that detailed inside out of the box. The Intruder's fuel-efficient wings are next, and as you would expect from a carrier-borne aircraft, they have a hinge-point to facilitate efficient stowage below decks. The wing inner portions have the exhaust bulges moulded in, plus the large flat gear bay sections, and have poseable flaps and slats, and pop-up spoilers on the upper surface, the tabs for which are simply cut off if you are modelling them closed. The kinked exhaust trunking is built up from a single part nozzle, two-part trunking and rear engine-face before being placed within the rear bulge at the wing root and enclosed in the other half of its fairing, and at the outboard end, a nice hinge-plate is added to a ledge within the wing that also has guides moulded in for the hinges themselves that pass through the plate. The inner wings are then mated to the fuselage sides, along a substantial mating area that includes the usual tongue and tab arrangement along the top edge. The outer wings have a similar hinge-plate added, plus poseable slats and outer flap sections, and a choice of two shapes of hinge for the clamshell decelerons at the tips of the wings, with one posed open with two deceleron parts, the other closed, using a single part to portray them at a near scale thickness. Clear formation lights are added to the front of each wingtip, and you then have a choice of using a straight linking rod for wings down, or an angled rod plus lots of ancillary linkages if you're posing it with the wings folded. The hinge-covers are also similarly different, with a single part for wings down, and two comb-like parts for folded. The APU on the top of the port wing root is shown deployed, but it wouldn't be difficult to close that up if you're minded, and the elevators, although they are of the all-moving type, are installed using the tongue and tab method, meaning that if you wanted to show them deflected, you'll have some work to do. The canopies are very nicely moulded with clear glazing and well-defined frames, which should make masking them pretty easy. The inside of the sliding canopy is fitted out with a "parcel shelf", retraction rails, a small instrument box on the centre rail, and an opening handle, plus a quartet of rear-view mirrors spread around the forward frame. The windscreen is fitted with a single part just off-centre on the frame that bisects the front screen, and both are fitted to the airframe after some interior painting. The radome that is mentioned earlier is capable of being mounted in the open position with a two-armed hinge that fits to the top and engages in matching slots in the radar bulkhead within the fuselage. A PE hinge fairing and two retaining clasps are added to the radome, but whether you feel the radome would need more work before being used in the open stance is entirely up to you. A simple thinning of the lip would be a good start, and as it's going to be difficult to see inside when the model is planted on the table, you could probably get away with just that. If you're posing it closed, just glue it on and add the PE parts, then you're done. The instructions advise you next to assemble and install the integral crew-access ladders before completing the outer skin of the engine nacelles, so perhaps skip forward over this step and come back to it later, unless you are planning on closing them up. It's not immediately clear whether the fit will be good if you close them, but if you feel it'll spoil the lines of your Intruder, it shouldn't be too difficult. The steps are a nice mix of styrene outer skin, PE side-frames and steps, with two more PE retention straps. The two steps within the engine nacelles are added from styrene parts, and of course this is repeated on the opposite side. If you skipped making up the ladders for now, the next job is to complete the engine nacelle outer skins, which is where your delicate ladders are likely to be rent asunder, causing much gnashing of teeth and wailing. Due to the Intruder's sub-sonic flight envelope, the intake trunking was simple and short, with the bulge of the engines contained by a large fairing that was removable for maintenance. This area of the fuselage is blank for ease of moulding, and the detail is added by installing an insert with separate auxiliary intakes added along the way, and the bulged door to the electronics bay sat between the fuselage mounted air-brakes, complete with a small transparent window. The main gear legs and their nicely detailed bay doors are added to complement the already installed nose gear leg and its doors, and these have closing mechanisms added as separate parts for extra detail. With airframe construction completed, the prodigious load-carrying capacity of the Intruder is demonstrated by a choice of weapons that hang from the two plyons on each wing and the centre-line pylon nestling between the two engine humps on the underside. The pylons make up from two halves, plus a pair of separate sway braces, which is a good start. The weapons are plentiful and varied, as follows: 1 x Centre-line fuel tank 4 x Wing mounted fuel tanks 2 x GBU-8 HOBOS guided bomb 6 x Mk.82 iron bomb 2 x M117 iron bomb 2 x multiple ejector racks 12 x Mk.81 small diameter bomb 12 x Mk.20 cluster bomb A diagram on the following page gives a suggestion for what each station might carry, but there's no substitute for checking your references for actual load-outs that were carried. There are no air-to-air weapons included in the box, so if you find a weapons load that includes them, you'll have to source some from the spares, or get hold of some of Eduard's excellent Brassin range of resin weapons. Markings The A-6A was in service during what's now called the hiviz (or variation on the spelling) period, with colourful tails, national insignia and black unit markings. Consequently, the decals are bright by modern standards, and with the tan radome, you'll end up with a bright Intruder on your shelf. From the box you can build one of the following: US Navy VA-115 Eagles, USS Midway 07/NF Bu.No. 155715 grey over white, tan radome, black tail with grey tip and yellow flashes on tail and fuel tanks. US Navy VA-35 Black Panthers CVW-9 USS Enterprise, 10/NG Bu.No. 152940 - grey over white, tan radome, black panther motif on a white circular background on the tail. Decals are printed by an unknown source, but are typical of Hobbyboss quality, with good printing, register and colour density, although there is a little over-printing of the yellow past the edge of the white background, and a very slight mis-register of the black that shows under magnification on the slime-lights on the fuselage sides, and the apparently undocumented wrap-around lights on the wingtips, which are shown on the decaling diagrams but not numbered. The stencils are shown on the same diagram as the unit and national markings, so at times it gets a little cluttered, but if you take your time, it shouldn't cause you any problems. The decals for the munitions are on a separate sheet, and the single page bomb painting and decaling diagram shows where everything goes. If you are portraying the Black Panthers airframe however, a quick check on the colour of the drop tanks reveals that they weren't painted in the same fashion as is shown on the diagram in the style of the Eagles scheme. It appears they were plain white in the pictures I have seen, but if you're not quite awake when you build and paint them, you could easily make that mistake. Conclusion This looks to be a promising model of the early Intruder, and certainly comes loaded with detail sufficient for a great many of us out of the box. The inclusion of metal gear leg centres, PE brass parts and plenty of modern slide-mould use gives it the edge, and once the A-6E and TRAM variants are available, the Intruder will be well-served by modern toolings in this scale. To get you in the mood, why not watch (or re-watch) the Flight of the Intruder, an oldie but goodie, with plenty of in-flight footage to get your enthusiasm going. Caution before clicking the YouTube link, as there's a little bit of bad language scrawled on the bomb passing the lens at the beginning of the clip. Highly recommended. Review sample courtesy of
-
For me, a quick build as close to OOB as ADHD allows. Eduard superfabric seatbelt 22 gauge needle for guns and pitot tube.(dropped the model and lost the pitot tube) styrene sheet,rod and tube details. Mr Color paint pastel weathering First up thinned trailing edges, shortened landing gear and added hub caps Thinned plate on rear of engine Tube added to engine intake and pilot seat trimmed. Cross eyed guns removed and panel lines filled. Pilot's office detail. Found a restoration here http://memorial.flight.free.fr/He162photouk.html Not the same aircraft, but loads of details and intriguing colours. Forced myself not to detail wheel wells With Airfix Fw.190 Black and White filter Garry c
-
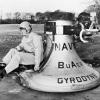
This was started in the Great Patriotic War Group Build. Still have the second figure to complete, and the base. The picture frame is plastic with plexiglass cover. Plan is to mix some celluclay (paper mache) for the surface, but not sure how well that stick. Maybe roughing up the surface will help. regards, Jack
- 24 replies
-
- 4
-
-
- BA-20 arnored car
- HobbyBoss
- (and 1 more)