Search the Community
Showing results for tags 'HobbyBoss'.
-
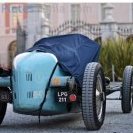
This was started in the Great Patriotic War Group Build. Still have the second figure to complete, and the base. The picture frame is plastic with plexiglass cover. Plan is to mix some celluclay (paper mache) for the surface, but not sure how well that stick. Maybe roughing up the surface will help. regards, Jack
- 24 replies
-
- 4
-

-
- BA-20 arnored car
- HobbyBoss
- (and 1 more)
-
Kit - Hobbyboss 1:48 Paint - All enamels Decals - CAM (Squadron markings), Aeromaster (all stencils) Extras - Quickboost resin seat, Weapons from Hasegawa weapons set & spares box. McDD F/A-18A Hornet VFA-15 'Valions' USS John F. Kennedy 1991 Built for the 'Desert Storm' Campaign/GB over at Modellers Alliance. Thoroughly enjoyed this kit but surprised at 'generic' cockpit details and total lack of transparencies for nav & formation lights - very odd. Exceptionally detailed landing gear which surprisingly dropped in to position without a fuss. No not as well fitting as the Hasegawa kit but not nearly as expensive either. Please feel free to make any comments, criticisms or ask any questions. Ian.
- 15 replies
-
- 27
-
-
Finnish Army BAB B armoured car (captured Soviet BA-20) Continuation War, Summer 1941 kit: HobbyBoss Soviet BA-20 Armoured Car Mod.1937 Decals: Star Decals 35-895 Finnish Tanks in WW2 figures: converted Alpine WSS crewmen, plus Hornet heads extras: DEF Models resin tires (for Tamiya GAZ car) Some dimensional/shape corrections done to kit, explained in the WiP. ---------------------------------------------------------------------------- A variety of these lightly armed cars were in use by the Finnish Army, exact number is not known, but at least 18 were on hand at the start of the Continuation War. They appear to have been used mainly as liaison/dispatch and command vehicles. regards, Jack
- 30 replies
-
- 30
-
-
 Hi all, This is the latest diorama that I have just finished entitled "Blitzkreig in the West" and is based on a German unit in May 1940 advancing through the outskirts of a ruined village, rounding up POW's and preparing for their next encounter. It has been on the go for over a year although it has sat idle at times whilst I worked on other kits and projects. It's by far the biggest diorama that I've attempted and I'm pleased with the outcome as well as pleased that it's finally (99.9%) finished. Below is a list of the kits used: Building: Miniart 36028 Tank: Hobbyboss 83813 Motorbike and sidecar: Zvezda 3607 Figures: Dragon 6478, 6347, 6196; Tahk T-35023; Stalingrad S-3534; Soga Miniatures 3531 All figures were hand painted including the insignia on the collars and sleeves and on some I added the improvised camouflage grass on their helmets that I've seen on photos from the period (very fiddly!) as well as making all the slings from scratch using lead foil and finally they all received a light dusting with Mig pigments to blend in with their environment. The Hobbyboss tank is my first proper attempt at air brushing as this is a new skill to me as well as the weathering. In keeping with the storyline behind the diorama, I wanted the tank to have a used and dirty look but keep the damage minimal. The scene is based around the Miniart kit with the added collapsed wooden floor scratch built using balsa wood and coffee stirrers and the strewn debris is a mixture of different sands, rubble and scale bricks. The burnt area is made up of white metal corrugated sheets and Mig pigments - Black Smoke and Ashes White. The slate wall was built one piece at a time. Thanks for looking and all feedback is welcome. Regards, Lee
- 16 replies
-
- 14
-
-
Soviet BA-20 Armoured Car Hobbyboss 1:35 History The BA-20 was then used in the early stages of World War II. The BA-20 armoured car was developed in 1934 for use by HQ staffs, reconnaissance and communications units. It was derived from the civilian GAZ-M1 car using its chassis, which was itself a modified version of a Ford design, produced by the Nizhny Novgorod-based vehicle manufacturer GAZ. Full production of the BA-20 started in 1935. The chassis was built at the Nizhny Novgorod factory; the body was built at the Vyksinskiy plant, where final assembly of the BA-20 occurred as well. The principal use of the BA-20 was as a scout vehicle. The BA-20's tires were designed to be resistant to bullets and shrapnel by the simple expedient of filling them with spongy rubber. A variant, the BA-20ZhD, could travel on railway lines by replacing the normal wheels with flanged metal rail-type wheels. The vehicle was exported to the Spanish Republican side in the Spanish Civil War, although the vast majority of BA-20s built served with the Soviet Red Army. They first saw combat in the conflict with Japan in 1939 on the Khalkin Gol river in Mongolia (see Battle of Khalkin Gol). The BA-20 was used by the Red Army in the Soviet invasion of Poland later in 1939 and the Winter War against Finland during which 18 vehicles were captured, designating them as PA-6, as well as the early stages of Operation Barbarossa in 1941. Production was ended that same year, with some 4,800 BA-20s having been constructed by that time. Some had flamethrowers instead of the DP-28. In common with most armoured cars derived from cars, the BA-20 was largely road-bound. The lack of all-wheel drive, high ground pressure, and low power prevented it from moving cross-country except on very firm ground. The armour was too thin to stop anything other than fragments or small-arms fire, and the 7.62 mm machinegun was not adequate to penetrate other scout vehicles. The Red Army produced very few wheeled armoured fighting vehicles in the war, but replaced the BA-20 with the BA-64B. The Model Having released several versions of the Russian six/ten wheel armoured cars, Hobbyboss have now released the first of the four wheeled vehicles. This kit is quite small and the box reflects this, adorned with an artists representation of a pair of vehicles travelling at speed on a dirt road, (dry, fortunately). Inside there are seven sprues and one separate part in a creamy beige styrene, one sprue of clear styrene, five vinyl/rubber tyres, a small sheet of etched brass and a smallish decal sheet. As usual the mouldings are superb, with no sign of imperfections or flash, but quite a few moulding pips to clean up. In comparison with the previously released BA-3 and BA-6 armoured cars this looks to be a nice “simple” build. Construction begins with the engine, which is a nice little representation of the real thing, just a shame it won’t be seen when the model is finished. The block is made from two halves to which the separate head and sump are attached, followed by the gearbox and bell housing. The ancillaries, such as the starter motor, idler bearing, alternator, fuel pump and filters are fitted, along with the drive belt and fan. The chassis comes as one part, making life a whole lot easier than the multipart chassis in the BA-3/6. The chassis is fitted with two crass braces of the mounting the gearbox, after which the engine assembly can be fitted. The wheels are next on the op list, with each tyre being fitted with inner and outer rims, brake assemblies. The front wheels also having steering mounts attached. The wheels are then fitted with their respective suspension beams, each of which are fitted with a pair of leaf springs, and the front fitted with the steering rack, whilst the rear suspension beam incorporates the differential and is fitted with the drive shaft. The wheel assemblies are then to the chassis, along with the exhaust silencer, gear linkages, and another cross beam and is put to one side whilst construction moves onto the body work. The single piece floor pan, which incorporates both front and rear wheel arches is fitted out with the headlights, storage boxes, seat squabs, gear stick, two piece seat backs and the engine firewall, which itself is fitted with the dashboard, coaming, steering column and wheel. On the underside of the floor pan, the petrol tank and battery box are attached to the rear, followed by the chassis assembly, followed by the exhaust pipe, and front mounted heavy duty crossbeam. The radiator is attached to its five piece mounting beam before being glued into position. The single piece armoured body is fitted out with the two front mounted vision ports, each of which is fitted with an operable hinge and can be posed open or closed, although there isn’t a lot of interior detail to see, so probably best to keep them closed. The access doors and engine hatches are then attached to the outside of the body, along with the towing eyes and pioneer tools. The modeller has the option of fitting a large aerial that fits around the top of the body for the command vehicles. The aerial is first fitted with the six support arms before being glued in place. The two front mounted radiator doors can also be posed in the open or closed position once the body assembly is attached to the floor pan/chassis assembly. The small turret is fitted with the single machine gun and it’s ball mounting and plate before the turret base is attached. The completed turret is then attached to the mounting ring on the rear of the body completing the build. Decals The small decal sheet is very nicely printed, with very little carrier film, and good opacity, (a good thing since they are all white). Whilst you get the option to build any one of five different vehicles, or more, if you include the various numbers provided, they are all in the same Russian Green overall scheme. I’m sure there are other schemes that the modeller can paint this vehicle in, it’ll just take a bit of research. Conclusion This is actually a very pleasant change when compared with the big six wheeler armoured cars. The suspension is so much simpler and nicer to build and on the whole a lot less of a bind. All in all a very nice little kit that most modellers could build in a weekend or less, depending on their abilities, great for keeping the mojo. Very highly recommended Review sample courtesy of
-
T-18 Light Tank Model 1927 "But Comrade, you told me to paint it, not to clean it" * This is the newly released T-18 from Hobbyboss. It's a nice kit, albeit with a few inaccuracies and a few simplified parts. It was originally going to be a quick out of the box build, but somewhere along the way it acquired a base, some figures, and somehow became an allegory on communist Russia in the '30's. The base is a vacform one from MiniArt, and the two figures are from Evolution Miniatures. The full build can be found here * Dio name courtesy of Andy, aka Sgt. Squarehead Thanks for looking Andy
- 26 replies
-
- 20
-
-

-
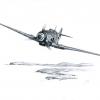
Here is my build of Hobbyboss new Saab J 32E Lansen. A kit with its errors, but that was far better than I expected. I have tried to capture the blue/green Swedish AF camouflage (also featured on Draken), where the blue turned almost turquoise. This Lansen was one of the last flying in regular service. It was modified for electronic warfare and flew until 1998. Here is ther WIP thread. But in brief: This is not a bad kit at all. Of course (remember that this is Hobbyboss), there are a number of pretty obvious errors. Most of them can however be fixed rather easily. But overall shape is good - it really looks like a Lansen, panel lines are great, and (almost) correct everywhere. Here is a short list of things that have to be corrected: -Nose shape is a bit wrong, but can be improved through sanding and by moving the nose cone panel line about 3 millimeters forward. -The part above the exhaust is far too long and too thick. This can be fixed easily in a way that makes 95% of all viewers to think that it is OK, but demands extreme surgery to fix perfectly., -Lansen had only one pitot tube, the kit supplies two. -The shape of the air intakes is a little wrong, but this can be adjusted to 95% perfection with a knife and some sanding There is something strange with the canopy. It just doesn't look right when it is closed, I think it is a bit too rounded and that the front part is a bit too long. Therefore, I decided to display it with open canopy, which demanded some extra cockpit detailing. The rear instrument panel is wrong for the E version (and actually, for other versions too...) and had to be replaced by a scratch-built one. In fact, cockpit is far too large(!) But if you can live with that, it still is very similar to a Lansen cockpit. Air brakes are included - great! It is a pity that they are too small and with a slightly wrong shape... I used Maestro Models air brakes instead. The electronic warfare pods are almost correct. When overall shape have its errors, details are often great. I added some details in the wheel wells: The kit also has some errors that are more difficult to fix: -The area on both sides of the front part of the fin (above and in front of the stabilizers) has wrong shape. -Wingtips (also on stabilizers) have a slightly wrong-shaped angle -The rear part of chaff dispensers should be a bit thicker than the rest of the pod. -The part behind the cockpit has wrong shape, the rear part of it should be wider (and not drip-shaped) -Decals are crap, and also wrong for a J 32E (The actual aircraft was a J 32B, but is preserved in flying condition after being modified as a E - or maybe a D target tow . Still, it never flew in these markings as a J 32E.). I used Maestro Models decals instead. If you want to have a Lansen in your collection, this can be a kit for you. If you want to build a perfect Lansen, avoid this one and turn to Tarangus instead. However, this one is much easier to build, fit is great, and most of the time it was a really enjoyable build. Thanks for watching!
- 15 replies
-
- 31
-
-
Dear Colleagues Another project for me to experiment with AK extreme metal paints was this 1/72 F-84E from Hobbyboss. I used aftermarket decals, filled-in the wing refuelling point (unique to G) and swopped the canopy for that from the old Heller kit. My main efforts were then scratch improving the cockpit. Also you need to drill in the nose guns! Still it only cost £2.56 on hobby easy! Had to carve out the nav lights on the wing tip tanks and add the bombs. Hope you noticed the added landing lights? Regards Andrew
-
 After the G-2 variant (http://www.britmodeller.com/forums/index.php?/topic/234992901-148-messerschmitt-bf109g-2-by-hobbyboss-released/) next HobbyBoss Awfulschmitt "Gustav" kit is a 1/48th Bf.109G-6 - ref.81751 Release expected in late August 2016. Source: http://www.hobbyboss.com/index.php?g=home&m=article&a=show&id=55&l=en No box art, just a picture for illustration. V.P.
- 9 replies
-
- 1
-
-
- 1/48
- Messerschmitt
- (and 5 more)
-
Hi folks,My entry is the Easy-kit boxing of the Mustang III,I have the extra decal sheet with markings for a PR version in blue with ID stripes on the fuselage.The kit should arrive mid week.Although a bit toy like most of the range builds up into a decent enough replica of the respective type and actual construction ready for paint can take only minutes,at £3;99 I'm not going to complain about the kit's shortfall's certainly not the best but equally not the worst. I am restricted to maybe two hours on Saturday and Sunday and a little time Monday morning due to work but hope to finish I,ll use my mobiles clock in any photo's. A review of said kit. http://www.internetmodeler.com/2008/march/first-looks/hobbyboss_p51c.php
-
So well I'm kind of throwing myself in at the deep end with this P-61. The only model I built in recently was a Revell FW-190 F8 which was maliciously scarred and killed of by my skillful hands (something involving heat and trying to give paint that heat burned look, didn't work out...). So I'm back with attempt numero two. I absolutely love the P-61 and in my eyes it's an absolutely awe inspiring aircraft. Besides the kit I bought myself a number of books as reference and I will pay close attention to the MAAM website for reference regarding the structural design of the P-61. I am not exactly sure yet which aircraft I want to be building but I want it to be something special and a P-61 that you don't come across that often. I really want to do an olive drab aircraft so for instance the 'Lady Gen' P-61 A5 is a very suitable candidate. This again poses a few problems because Lady Gen is, well, turetless! Oh my I see you thinking, how awful! A turetless A5 is going to require some very serious changes to the HB P-61B kit so I'm going to take my time to look in to the required changes. The cockpit will be the first place to start and I will draw out my plans this week so you guys can see what I'm talking about. I will be using this topic as a major reference regarding the changes to be made: http://forum.largescaleplanes.com/index.php?showtopic=45567 I did unbox my kit and I have done some test fitting of the wings, engine nacelles and the crew nacelle. So far so good. The plane is absolutely huge. Compared to an FW-190 picture this: It's about twice the wingspan, 62cm in total! Pictures will follow soon because it doesn't all work this well on my phone. Thanks for checking in, I'm committed now!
-
 Hi all! Well after over 2/3 months of work I can finally and proudly present my version of a VF-111 Sundowners F-14a. This is my first ever RFI and my second 1/48 model. As you will see if you haven't been following my WIP I have opened up a good few panels and decided to put a lot of the model out on show. The kit is out of the box but the Eduard kit does include a lot of goodies such as the cockpit, wheels, exhausts and some PE. All this combined with some scratch built details and you have the below. I hope you enjoy the photos...however I must apologies for the quality/angles/lighting. I do not have a photo booth/materials to create one, or the space for one so if you want to see anything in any detail that I may have left out just let me know on here and I will gladly take a picture and upload it! Ok so lets get to it. General Overview: Top side: From End: Underside: Other detail/feature shots: Extended Wings Glove vanes: As always with my threads all questions, comments, advice, critiques or just a bit of chat is more than welcome and encouraged!! Always happy to share my train of thought and techniques with anyone who is willing to listen to me. Thanks for looking! Ian
- 26 replies
-
- 33
-
-
IDF APC Nagmashot [Hobbyboss 1:35 History The Nagmashot or Nagmasho't is the first modern heavy Armoured Personnel Carrier (APC). It was converted from retired Sho't Kal (upgraded Centurion) main battle tank hulls, in response to the shortcomings of conventional APCs in combat. The name is a combination of the Hebrew term for an APC ("Nagma"), and the Hebrew word for "Whip" ("Sho't", which was the Israel Defence Forces (IDF) name for their upgraded Centurion tank, from which the Nagmasho't was converted). The concept that led to the creation of the Nagmasho't emerged from the fires of the 1982 Lebanon War, in which IDF M113 APCs unexpectedly encountered heavy RPG and ATGM fire, and suffered very heavy losses as a result. While the long-term solution to this dilemma was a comprehensive upgrade to the M113 (which soon resulted in what the US Army would designate the M113A3), the IDF also wanted an even more heavily-armoured vehicle for assaulting heavily-defended strong points, and one which could also be developed quickly as an interim until the new M113 variant arrived. It was soon realized that such a vehicle could be quickly developed by simply converting the hulls of retired main battle tanks already in the IDF inventory, in a manner not unlike the "Kangaroo" APCs of World War 2 (which were converted from such tanks as the M4 Sherman). The resulting design would be the first Kangaroo-type APC developed since the 1940s. Also the IDF had a number of intact hulls of Sho't tanks without turrets in the armour graveyards. The development of the Nagmasho't was surprisingly brief, and the first operational examples were in service by 1984. Replacing the familiar Centurion turret is a pyramidal casemate with a rectangular roof. There are two circular hatches at the front of the casemate roof which are hinged in the rear, and two rectangular hatches at the aft which are hinged in front, allowing four soldiers to stand in the hatches to observe all four quarters around them. The sides of the casemate have a distinctive flanging, probably for structural reinforcement, or to allow additional add-on armour to be fitted. Weapon skate mounts are fitted in front of each hatch, allowing personnel in the vehicle cover all four quarters around them with fire as well, if required. The skate mounts accept a variety of weapons, but were usually fitted with MAG 7.62-mm general purpose machine guns, Mk.19 40-mm automatic grenade launchers and M2HB 12.7-mm heavy machine guns are sometimes fitted as well. At least 4 000 7.62mm rounds were stowed inside the vehicle. Up to 8 passengers were carried, who ride in the passenger compartment under the casemate. The driver's position is unchanged from the Centurion series, with the obvious exception of not having a turret basket to interfere with entry to the main compartment. The vehicle commander usually rides in front, where provisions are made for carrying radio equipment, but there is no specially designated position for the vehicle commander. Entry into and exit from the passenger compartment in operational conditions was only possible through the roof hatches; not only was this a slow, and awkward process, but also quite dangerous in combat, as personnel on top of the vehicle were highly visible and exposed. However, the Centurion's belly hatch was retained, allowing the crew and passengers to exit safely from underneath the vehicle (or, should it roll-over, from "on top"). The armour of the Nagmasho't is essentially the same as that of the Sho't Kal hull, with the obvious exception of the casemate. The exact thickness of the casemate's armour has never been published, for security reasons, but it is presumably strong enough to defeat any small arms fire, shrapnel, and shell splinters. Spall liners are standard equipment on the Nagmasho't, and the track skirts provide additional side protection. The Nagmasho't may also be fitted with explosive reactive armour and additional belly armour for increased protection against mines, but both of these have rarely been seen in service. Also, as the Centurion series boast a V-shaped hull, the Nagmasho't has some residual protection from large-capacity landmines and IEDs as well. An automatic fire suppression system was fitted, but it is not likely that the Nagmasho't had an NBC protection system. Originally operated by the infantry branch of the IDF, the remaining Nagmasho't fleet was later diverted to the engineering branch, as the vehicle's lack of a rear door was considered a liability to mechanized infantry operations (soldiers entering or leaving the vehicle had to clamber on top of it, where they were skylined and vulnerable to sweeping fire and shrapnel). In the early 1990s most Nagmasho'ts were converted into the more heavily-protected Nagmachon and Nakpadon heavy APCs. At the same time Nagmashot's used by combat engineers were converted into PUMA minefield breaching vehicles. However few original examples of the Nagmasho't reportedly remain in service. Israel was the only operator of the Nagmasho't. This vehicle not been offered for export, and as it was succeeded in development by more powerful heavy APCs, and designed around armoured warfare philosophies largely unique to the IDF, it is doubtful that many potential buyers would want it anyway. Many may have been converted to later Nagmachon type vehicles. The Model As with the previously released Nagmachon, this kit comes in a similarly large box. The boxart shows a Nagmashot driving in the desert. Inside there are ten sprues and two separate parts, all in a beige coloured styrene, four of a brown coloured styrene, one sprue of clear, two etched brass sheets, twenty four styrene “tyres” and a small decal sheet. As we have come to expect from Hobbyboss, the parts are all very well moulded, with some very nice detail, no signs of flash or other imperfections, but there are quite a few moulding pips that will need to be cleaned off. The instructions are nice and clear with only a few operations per step. Although the tracks are still a bit of a pain to assemble. The build begins with the assembly of all the road wheels and the fitting of the separate tyres. Of course, these can be left off until after painting, which will alleviate the masking that would be required otherwise. The sprockets and idlers are also assembled at this point. The suspension blocks are each made up from six parts. The rear bulkhead is fitted out with two short lengths of track, a storage box, two grab handles, two steps and two towing eyes. Before any parts are added to the lower hull, there are a number of moulded sections that need to be removed and holes drilled out. Once these are done the bump stops are added to the hull sides, along with the suspension assemblies and two piece idler axles. The rear bulkhead is attached, followed by the skirt supports, three rear mounted, three piece towing hooks the two piece sprocket gear covers, the road wheels, idler wheels, return rollers and drive sprockets. The engine deck also requires some holes being drilled out before fitting to the hull. The exhausts, each made up from three parts are attached to each side rear of the deck. The foredeck is also attached, and fitted with the drivers hatch panels, which each have three piece vision blocks fitted. The tracks are made up from individual links, each connected to the sprue with four sprue gates. Fortunately these are very thin and shouldn’t take too long to clean up the 106 links per side that are required. Since the links require to be glued together it may be best to make up lengths of track before fitting, using only individual links to fit around the idler wheels and sprockets. If you want to, you can get away with only doing the sections of track that aren’t covered by the side skirts. With the tracks fitted the rear light clusters are attached and a pair of Jerry cans assembled and placed in the storage cage on the engine deck. Each of the two fenders are made up of the main length and a separate front mudguard section. Each fender also requires several holes to be opened up before they can be fitted with the wide selection of storage boxes, front light clusters and guards, more Jerry cans, racks and brackets for the forward mounted self defence systems boxes and two piece rear mudguard flaps. The casement, for want of a better word, is assembled from a single piece main section which replaces the turret of the donor tank. To this the inner panels are fitted and ERA boxes to the front edges, followed by the roof and the four hatches with their associated handles and vision blocks. The rear bulkhead oft eh casement is fitted with a two more hatches and a pair of aerial mounts, whilst on each corner of the casement there is sited a machine gun mount. The kit provides an M2 50 Cal machine gun and what look like three GPMG’s. Each machine gun comes in multiple parts with separate ammunition trays and boxes. The casement is fitted with yet more ERA boxes and the prominent strakes down each side. Further detail, such as hatch springs, aerial mounts and then attached to the casement roof before the structure is attached to the hull and the machine guns mounted. Lastly the side skirts are fitted to eh respective mounting beams and a pair of armoured panels fitted over the rear fenders. Decals The decal sheet is quite large, but contains only a few decals, as the prominent Israeli flag takes up most of the sheet, the rest are the number plates for two different vehicles. Conclusion Whilst this is another weird Israeli vehicle from Hobbyboss, it’s good to see them being released. They are so different looking, that once built will certainly be a conversation piece amongst you collection. Highly recommended. Review sample courtesy of
-
Soviet T-18 Light Tank Mod 1927 1:35 HobbyBoss At the end of the Great War the French FT-17 light tank was well-regarded, as it was the first true tank with a fully rotating turret and reasonable manoeuvrability, which were two things that the British tanks didn't have. The Americans used the design, as did Japan into the 1930s, and this Soviet light tank is also based on the same basic chassis, but with improved suspensions and a redesigned upper hull to mount a larger turret, which resulted in an enlarged upper deck that overhangs the tracks. The design went through some changes to counter the initial lacklustre performance of the original T-16 design, although the out-dated 37mm gun was retained, which although it wasn't capable enough to target and penetrate other armoured targets, could be loaded with shrapnel rounds that were quite effective against soft targets. It stayed in service until the early 30s as a training vehicle, as it was found to be unsatisfactory in frontline use. The Kit We have been treated to FT-17 kits in 1:35 of late, and HobbyBoss are slowly working their way through the more esoteric Russian early armour, so the T-18 turning up was just a matter of time. It is a new tooling, and comes in a small top-opening box with a card divider inside to protect the delicate hull parts. Cocooned within individual bags, some of which are further protected by a thin foam sheet, there are four sprues in a sand coloured styrene, plus three individual parts in the same colour, two in brown styrene for the tracks, plus a small sheet of Photo-Etch (PE), instruction booklet and a separate glossy painting guide. The kit seems nicely detailed, uses a smattering of slide-moulding to improve detail further, and parts breakdown is sensible, so should go together well with few issues. Construction begins with the road wheel bogies, which have the revised vertical travel suspension arms grouped in two sets of two, and one of three with the longer one at the front, that has an additional strut attached, reducing the initial deflection on hitting an obstacle. A set of return rollers that were added to keep the track from strumming are fitted over the road wheels, with the larger front idler wheel and drive sprocket at the rear completing the running gear work, until the installation of the tracks later on. The lower hull is tiny, so the addition of the rounded casemate below the turret gives it a rather top heavy look that is partially reduced by the fenders added to the sides. These mate neatly with the lower hull, and the front deck is completed with doors for the driver that form the larger part of the small glacis. The rear bulkhead has a row of holes drilled in its rear for engine cooling, which turned out to be insufficient in practice. This is replicated by a PE panel that is bent over the underlying plastic part, and it would be a good idea to anneal the PE in a flame to soften it before applying, and considering removing the styrene behind the holes for a more realistic look. The FT-17's unditching skid at the rear is carried over almost unchanged, and is made up from the skid surface plus a slightly simplified supporting framework. The hull is completed with some louvres on the rear deck, pioneer tools and a vision hatch for the driver, after which the tracks can be added. The tracks are held on the two brown sprues, and you will need 51 individual links per side, which have three sprue gates per link, but no ejector pin marks, making clean-up quite straight forward. Simply glue the links with liquid glue against a straight-edge, and then wrap the still soft track run around the wheels, dialling in the correct sag by packing the links to hold them in place. The detail on the outer surface of the links is excellent, and they should look good once painted up and weathered. Only the turret remains to build, and this is a fairly straight forward affair, as it has no internal detail to complicate matters. The upper section is dressed with the mantlet insert fitting into one facet of the front, receiving the hollow muzzled 37mm barrel, while the other facet has two machine gun barrels inserted in a small mount, both of which could do with their barrels drilling out to add realism. They also aren't shown on the box art, which instead shows a single, more Hotchkiss-like gun in a ball mount. A small raised "mushroom" cupola fits into the hole in the top, and the turret just drop-fits into the hull. Markings There aren't any! You can paint it Russian Green though, and the glossy guide shows you that it goes everywhere on the hull and roadhweels. I guess that because it was barely used, there aren't that many photos of any markings, so they erred on the cautious side and saved a few Yuan. Conclusion It's an interesting little project in itself, and if you have an FT-17 in your cabinet, it will look good as a show of progression that might generate the occasional question as to why a French tank (if you put some markings of your own on it) is in Russian colours. Shame there were no decals though, but it's quite keenly priced, so you can forgive them that. Highly recommended. Review sample courtesy of
-
AMX A-1 Ground Attack Aircraft 1:48 HobbyBoss The AMX was designed as a replacement to the Fiat G.91 and derivatives, and was the product of a newly create company called AMX International, which was a cooperation between Aeritalia, Aeromacchi and the Brazilian company Embraer. Each partner builds a portion of the aircraft, with the first assembled in Italy for flight testing in the mid 80s. After successful completion of testing, it started to enter into service toward the end of the 80s, as the A-11 Ghibli with the Italian Air Force and the A-1 with Brazil. The aircraft uses a license built Spey engine, which was chosen for reliability and ease of integration with the design, although later other engines were considered. It has been used substantially by both operators and has undergone a number of upgrades of the avionics over time. The two-seat trainer was completed in the 1990s, and many of the approximately 200 airframes are still in service, barring accidents and total loss incidents, of which there have been a few over the years, ironically one of which was due to engine failure. The Kit This mew tool from Hobby Boss arrives on eight sprues of grey plastic, a clear sprue, a small sheet of photo-etch, rubber tyres; and two decal sheets. Construction starts in the cockpit. First the ejection seat is made up, this has PE belts. The seat is put in the cockpit tub along with the instrument panel and control column. Once the seat is on the cockpit sides are added. This is then put to one side. Next up the undercarriage bays are built up. The font bay is a single part to which the 4 part leg is added the front wheel which is a separate hub abd rubber tyre is also added at this stage. For the main gear bays there is a two part leg, a landing light which attached to the leg, the main wheel & hub, plus two retraction struts. Once the gear bays are finished they can be installed in the fuselage halves. Before these are closed up the two part exhaust needs to be fitted inside. The trunking is one part so no seam to worry about. Once the main fuselage is together the intakes are fitted each side along with their attached lights. A note he is that the intakes in the kit appear to rounded and not as square as the real thing. They should be able to be squared up if the modeller wants my a little work. The HUD is made up and attached to the instrument cowling, this is then fitted in front of the cockpit. The front screen then goes over this. For the main canopy there is an internal frame to add, along with three photo-etch mirrors. The next stage is to make up and attach the wings. The wings come with separate flaps and slats which is good, and they can be positioned open or closed, however there appear to be no actuators present. The wings themselves are a single part to which the flaps and slats are added. Once made up they can be attached to the fuselage along with the vertical tail. The tail is a conventional left/right split and there are a pair of aerials to be added from the inside before you close them up. Moving on to the last stages of construction various aerials are added along with a pilots ladder if needed. The gear doors are added along with two prominent rear ventral air scoops for the engines. The gun muzzle is added along with the prominent re-fuelling probe. The arrestor hook is added along with the wing tip & under wing pylons. A wide variety of stores are included with the kit for the modeller to choose from. These are AIM=9P & AIM-9L missiles, MK82 and MK084 bombs, fuels tanks and GBU-12 guided bombs. Some aircraft seem to carry a targeting pod when carrying guided bombs which is not in the kit, but aircraft have been observed carrying the bombs only. A good you tube video I found while doing some research shows Brazilian Air Force aircraft carrying out weapons practice. This is a good reference as most of the time they are seen just carrying external tanks. Canopy The clear parts in the kit are thin and very clear. As always with Hobby Boss they wrap the clear parts in a protective foam which is a good thing to do. Decals There are two decal sheets in the kit. One provides markings for two aircraft, and the other the markings for the weapons. The two marking options provided are; A-1A 5530 Esq (Green over Grey camo). A-1A 5506 Esq (two tone grey camo). Conclusion This is good looking kit from Hobby Boss, despite the small error with the intakes it should build up into a good looking model. Recommended. Review sample courtesy of
-
French R35 Tank 1:35 HobbyBoss Designed by Renault, this was an interwar light infantry tank used by the French army in their unsuccessful defence of their homeland at the beginning of WWII, after which it remained in service with the German forces as a beutepanzer, where it was either used in second line service, or heavily converted to a makeshift gun carriage and used as a self-propelled howitzer. It was originally intended as a replacement for the diminutive FT-17, but due to the sloth in re-training their crews, they were still ill-prepared even on the eve of war. When Germany pounced, there were almost a thousand R35s in service, although they had been found unreliable, poorly armed to combat tanks, and with too little armour. All the remaining vehicles were taken on charge by the Germans and more than a little tinkering with cutting torches began. Some had their turrets removed to use as small gun emplacements, while others were thoroughly butchered to become tank destroyers, although in doing so the original chassis was horribly overloaded, leading to slow, breakdown prone vehicles such as this, that must have been loathed by their crews. By the end of the war a small number were left and used by the French until they were replaced with more capable tanks. The Kit It seems no subject is too off-piste for HobbyBoss, and the little R35 proves this, although it was important to the French at the outbreak of WWII. There are a number of options to make use of the basic chassis, which HB will naturally exploit to the maximum as you'd expect. The kit arrives in a fairly small box with a divider keeping the sprues from rattling about. Inside are seven sprues, upper hull and turret parts in sand coloured styrene; two sprues in a brown styrene containing the tracks; a sheet of Photo-Etch (PE) brass, a brass turned barrel, decal sheet, colour painting guide and black and white instruction manual. Someone made a mistake with the inner cover's sprue map, so a separate sheet was included to correct that goof. It shares a number of sprues with the catchily titled 5cm Pak(t) Sfl.Fgst. Pz.Kpfw.35R 731(f) that we reviewed here a few months ago, which shares the same chassis. The engine is first to be constructed, with a two part block that is heavily detailed with additional parts, a great many of which are absolutely tiny, which conspires to give you a very nicely depicted motor for your R35 chassis. Work then commences on integrating the engine with the lower hull, beginning with the sand-cast rear bulkhead, which has the idler tensioning devices and towing hook added, after which the radiator, cooling fan and ducting are assembled with the power-take-off wheel projecting from the rear of the box. The hull itself is made up from two side panels and a floor piece, into which the radiator housing, a styrene/PE stiffening plate and driver controls are added. The side panels are fitted out with three return-rollers and a final drive housing per side, and four bogies with two wheels per housing and a big suspension spring are built up. Two more solo bogies, two drive sprockets and two idler wheels are also constructed, and are installed on the suspension mounting points on the hull sides. At the same time the driver's seat, fuel tank and engine-mount bulkhead are ensconced within the hull, and the rear bulkhead closes up the rear. After adding a few more driver controls and their linkages, the drive-train is dropped into the hull, with a transmission housing added to the front, and driver-shafts to the sprockets complete the drive-train. Given their small size in 1:35, HB have decided to go down the link and length route with the tracks, and I can't say I blame them. The straight track runs are made up from six parts with a few links in between the curved lower sections, and twelve individual links at each end. Each of the individual links have three sprue gates, while the lengths have additional dead-end tabs that ensure against short-shot links, and also double as ejector-pin positions, saving the delicate detail from marring by mis-alignments. Unless you're going to the trouble of using metal replacements, these should do you proud with a bit of sympathetic painting and weathering. Give them a rub with an artist's pencil to impart metallic sheen where they get worn, and you'll never know they weren't metal. With the tracks in place, the full length fenders are added, along with a little stowage and a big bottle-jack on the right rear. The upper hull is detailed inside with the driver's instrument panel, plus a choice of actuator for his vision hatch, which can be posed open or closed. The final drive inspection hatch is added along with some PE parts, as is the lower part of the driver's hatch, with the upper section added in the open or closed aspect, depending on your whim. The upper hull is then closed up and a host of pioneer tools are threaded through their tie-down blocks to be added to the sides of the hull together with the silencer/muffler and exhaust, the feeder pipe for which comes from the rear of the vehicle. The small cast turret has the top hatch added, with a number of lifting and tie-down lugs around the edges, and the side view ports installed, before the main gun is slotted through the aperture, with its brass turned barrel. The rear hatch can be left unglued to open and close, and the turret is then completed by the addition of the floor with integrated turret ring. Twist the turret into place on its bayonet lugs, and it's done. Markings There are two options in the box for this kit, one in French service and one in German as a beutepanzer or war prize. You can build one of the following from the box: French R35 in brown/green camo, with a blue club in a white triangle on the turret sides German R35 in Panzer Grey with white crosses on turret sides and top hatch The sheet is small with good register and sharpness, but check the colour density with one of the decals you aren't using before you commit, as white decals can be precocious. Conclusion It's a small tank that's almost cute in 1:35, with plenty of detail included in the box. If it floats your boat, you should be pretty happy with what's in the box. Highly recommended. Review sample courtesy of
-
Hello, I have something new to announce: The HobbyBoss A-6 Intruder kits suffer from remarkably little problems, but one error is the ill-shaped fin tip. I've made a simple resin replacement part that corrects a few shape errors as well as improves surface detail. Here is a comparison between the stock kit fin and one with my resin replacement fitted: Installation is by means of a simple cut along the existing straight panel line. The resin part features a mounting tab that fits into the cavity between the fin halves. Available now at Hypersonic Models! More now stuff is on the way... Cheers Jeffrey
-
- 1
-
-
- A-6 Intruder
- HobbyBoss
- (and 1 more)
-
This was a deadline fail for the F-5 STGB and rather than send it to the shelf of doom, I’ve decided to finish it as normal WIP. Here she is, first colour on. New stuff for me: Panzer putty. It is some kind of silly putty clone and apparently is the answer to our camo problems. As this is a 3 colour scheme, it seems like the perfect alternative to endless tape masks. Now for a blast of Mr Color 337 and see if this works without lifting the previous paint. Beautiful stuff, no paint lift and lovely clean edges. Panzerputty? Ja! A day of drying , some micromeshing of the overspray and the intermediate blue goes on tomorrow. This may yet escape the shelf of doom . Anil Mit Panzerputty
-
 Yak-38 Photo-etch and Masks - For Hobby Boss Kit 1:48 Eduard Interior The coloured fret provides mainly cockpit details with new instrument panel, side consoles, ejection seat parts & belts, new HUD, rear cockpit panel; and cockpit interior parts. The brass fret provides details for rear cockpit bulkhead, ejection seat cushions, canopy frames, canopy sils, IFF aerials, control vanes, static wicks, and FOD guards. Exterior This set provides details for the undercarriage bays, prominent lift fan intakes, dorsal antennas, exhaust shields, inside panels for the gear bay doors, and parts for the pylons, missile rails, missile ends, gunpod, and rocket pods. Masks The mask set provides masks for the canopy and wheels. Conclusion These frets should enhance an already good kit. Recommended.
 -
Just started a Hobbyboss kit-the 1/48 Ta 152C-1. This is the original picture of the original aircraft. I will be using an eduard detail set. Cheers, John
-
Started this 1/48th HobbyBoss F-111A Aardvark December just over a year ago, this is easily the largest and most complex kit I have tried to this point. Why the F-111? I have always had a soft spot for 'McNamara's Folly' which started her life as an expensive failure but once she settled into service no other aircraft could carry out her mission of precision airstrikes over long ranges in all-weather conditions. I have happy memories of seeing F-111s based at Upper Heyford and Lakenheath on display at UK airshows, and sadder memories post 1996 of seeing rows of 'Varks bleaching in the sun at the David-Monthan 'boneyard' in Arizona. So, the kit. This was one of MJW Models special offers and with P&P included I think cost around £34 - superb value for a kit that builds to 18 inches long and 16 wide and, better still, it can be built with just about everything 'open, dangling and drooping'! I have built one HobbyBoss kit to date - an A-7A Corsair - and I am aware that there can be some accuracy issues. I can also confirm that the instructions often have to be treated with some caution. Fortunately I had several BM'ers willing to offer expert advice (which I sometimes ignored) and this overcame most of the problems. Here she is: The kit gives two colour options and I decided to go for 63-9770 which was the fifth F-111A built and wore the early white/grey scheme with nice large USAF markings, I think some of the very early FB-111A aircraft wore this scheme as well (though probably not into active service). I have tried to depict her as a typical F-111A at rest although the spoilers would not still be raised. I have shown the nosecone as separate from the aircraft, in reality it would hinge to one side but that was exceeding my patience so I took the easy way out. All paints were Humbrol enamels, decals from the kit. I still need to give a final spray with Klear. What to put on the weapons pylons was a problem as 63-9770 was used for development work and specifically the fitting of a gun in the weapons bay. In the end I wimped out and added MERs on the inner pylons (totally inaccurate for the time period) and AIM-9 adaptors for the middle pylons, both these came from the kit which contains one of HobbyBosses generic weapons sprues. One thing I did enjoy doing was building the forward avionics bays with the access doors open and also the radar; it looks a bit clunky here but the model looks good to me and I want to do more of this in the future. I did use part of an Eduard self-adhesive F-111A interior set in the cockpit and the extra detail really helped. Looks like the nose gear door is about to drop off! That's about it. Any mistakes or inaccuracies are mine but I have enjoyed putting this together in fits and starts and I do have an impressive model to squeeze into the display cabinet (another good reason for leaving the nosecone off!). Finally, many thanks to all who kindly commented, offered advice, or tried to raise my morale during the build! Michael
-
IDF APC Nagmachon (Doghouse II) Trumpeter 1:35 History With the success of the Achzarit [T54/T55 based] and Puma Combat Engineer Assault Vehicles, the IDF began looking around their armour graveyards for more refits. The most obvious choice was the large selection of Centurions falling apart and rusting away. These were rebuilt with a new engine and named the Nagmashot (circa 1983), the Nagmachon (circa 1980s) and the Nakpadon (circa mid 1990s). The main drawback of these vehicles was their lack of mobility and therefore, inability to support Merkava MBTs. Nagmachon is a heavily armoured personnel carrier fielded by the Israel Defence Forces. The Nagmachon evolved from the Nagmashot APC, which in turn was based on Centurion. It made its first appearance in the Lebanon Conquest, upsetting many Arabs who found their AT missiles bouncing off the APC's thick hide. The Nagmachon is an improved version of the Nagmashot and Sho't. Nagmachon is an acronym for Nagmashot and Machon. Nagmashot is an acronym for Nagmash and Sho't; Nagmash is an acronym for Noseh Guysot Meshoryan, Sho't being a whip, the Hebrew name for the Centurion main battle tank; Machon is Hebrew for belly. Head-on photographs of the Nagmachon disclose an additional layer (in some cases two layers) of armour plating on the underside of the hull. The turret is removed and the space replaced by troop seats, a raised superstructure, and hatches. Machineguns ring the superstructure, and the engine is replaced with a smaller, more efficient design, allowing a small door in the rear of the vehicle. The Nagmachon can be fitted with several devices in the front, including mine-breaching devices such as Nochri anti-mine system. Along with its heavy bully armour plate, this makes it ideal for breaching routes through mine-fields and booby-trapped areas. Therefore, it can be classified as combat engineering vehicle (CEV). The Nagmachon is very notable due to the elevated pillbox turret, an elevated armoured cabin with shooting-sights and 7.62 mm machine guns, enabling the troops inside to shoot soft targets without being exposed to enemy's fire. This feature makes it very efficient for urban warfare and security patrols. The features which make it ideal for mine-clearing and urban warfare were proven valuable when the Nagmachon was heavily employed in the Al-Aqsa Intifada. Beside opening routes for other AFVs and patrolling in hostile populated areas, it was also used to mobilize infantry and carry them in the Palestinian cities. Because of their elevated turret, Nagmachon CEVs supervised and secured armoured Caterpillar D9 bulldozers in dangerous combat zones and under fire. The latest Nagmachon vehicles have increased belly armour for mine protection and a distinctive armoured extension on the top, called the doghouse. Those features optimize it for counter-insurgency operations but reduce its capacity for traditional mechanized warfare. The Nagmachon weighs 52 tons, has a 750 hp engine, and carries a crew of 2 and 10 infantry. The Model The kit comes in a surprisingly large box, certainly bigger than Trumpeter normally uses for their MBT’s. The boxart shows a Nagmachon driving in the desert in the company of a Merkava MBT. Inside there are twelve sprues and three separate parts, all in a beige coloured styrene, four of a brown coloured styrene, two sprues of clear, two etched brass sheets, twenty four styrene “tyres” and a small deal sheet. As we have come to expect from Hobbyboss, the parts are all very well moulded, with some very nice detail, no signs of flash or other imperfections, but there are quite a few moulding pips that will need to be cleaned off. Of particular note in this kit si the comprehensive suite of bar armour which is all injection moulded and yet, very finely done. There really isn’t a need to replace this with etched brass, unless you are particularly picky about these sorts of details. The instructions are nice and clear with only a few operations per step. There doesn’t appear to be anything too taxing, with perhaps the exception of the tracks which I will mention in detail later. The build begins with the assembly of all the road wheels and the fitting of the separate tyres. Of course, these can be left off until after painting, which will alleviate the masking that would be required otherwise. The sprockets and idlers are also assembled at this point. The suspension blocks are each made up from six parts. The rear bulkhead is fitted out with two short lengths of track, a storage box, two grab handles, two steps and two towing eyes. Before any parts are added to the lower hull, there are a number of moulded sections that need to be removed and holes drilled out. Once these are done the bump stops are added to the hull sides, along with the suspension assemblies and two piece idler axles. The rear bulkhead is attached, followed by the skirt supports, three rear mounted three piece towing hooks the two piece sprocket gear covers, the road wheels, idler wheels, return rollers and drive sprockets. The engine deck also requires some holes being drilled out before fitting to the hull. The exhausts, each made up from three parts are attached to each side rear of the deck, whilst the four piece stowage rack is fitted to the centre. The foredeck is also attached, and fitted with the ERA blocks. The tracks are made up from individual links, each connected to the sprue with four sprue gates. Fortunately these are very thin and shouldn’t take too long to clean up the 106 links per side that are required. Since the links require to be glued together it may be best to make up lengths of track before fitting, using only individual links to fit around the idler wheels and sprockets. If you want to, you can get away with only doing the sections of track that aren’t covered by the side skirts. With the tracks fitted the rear light clusters are attached and a pair of Jerry cans assembled and placed in the storage cage on the engine deck. Each of the two fenders are made up of the main length and a separate front mudguard section. Each fender also requires several holes to be opened up before they can be fitted with the wide selection of storage boxes, front light clusters and guards, more Jerry cans, racks and brackets for the forward mounted self defence systems boxes and two piece rear mudguard flaps. The two fender assemblies are then fitted to the hull, followed by the revised drivers position, complete with viewing ports, large hatch, ERA boxes and bar armour. More bar armour sections are attached to the front of the engine deck, immediately aft of the “turret” pillbox position. The middle section of the pillbox is fitted with two large hatches which are detailed with viewing ports, handles, catches, vents, hinges and large springs which aid opening on the real vehicle. The upper section of the pillbox is fitted with four panels, two large panels fore and aft, which are fitted with armoured glass panels, steps, and grab handles, whilst the forward and aft quarter panels are each fitted with a machine gun and armoured glass. On top of the pillbox, two, three piece hatches are fitted. The top and mid sections of the pillbox are then joined together and the bar armour supports fitted. The faceted base is then assembled and fitted with ERA boxes, a two door rear hatch, two whip aerial bases, two ECM aerial bases and yet more ERA blocks. The top assembly is then glued to the base and fitted to the hull, before the bar armour is attached, along with their associated supports. Two large aerials are fitted to a separate base unit, before being attached to the rear of the engine deck. The larger of the two aerials is fitted with a PE part which will need some careful rolling and teasing to shape to get it to look right. The side skirts are assembled and are actually large ERA blocks for the first two thirds of their length, with the aft sections just armour plate, with the rearmost section fitted above the rear decking keeping the sprocket wheel clear of possible clogging mud and sand. The section just forward of the sprocket is fitted with a large three piece step, whilst on either side of the engine deck a three piece stretcher is fitted, completing the build Decals Whilst the decal sheet isn’t the smallest I’ve come across, there are in fact very few decals on it. The huge Israeli flag dominates the sheet and will require some stretched sprue or thread to attach it to the rear of the pillbox. There are three number plates and two lots of numbers, 070 and 038, but these aren’t mentioned in the painting guide. Conclusion As with a lot of Israeli vehicles this one is certainly an unusual design and will stand out from the crowd in any collection. The injection moulded bar armour is really well done, being really quite fine. If the kit builds like some other Hobbyboss releases I have completed, then it should be an enjoyable time for any modeller. Very highly recommended. Review sample courtesy of
- 1 reply
-
- 1
-
-
- Creative Models
- Nagmachon
- (and 1 more)
-
Leopard 2A4M CAN (Canada) 1:35 HobbyBoss The Leopard 2A4 models were the most widespread of the Leopard 2 family to be built. Featuring an all digital fire control system, and an improved turret. Following the end of the cold war the Dutch and German Armies had large stocks of these tanks which were now not needed. The 2A4M CAN is an upgraded Tank purchased by Canada from Holland. The Tank was upgraded for use in Afghanistan where the Canadians have played an important, if often overlooked part of NATO operations in the region. It was originally planed to upgrade these tanks with the longer L55 gun as used by Canadian 2A6M tanks, however it was found the shorter barrelled gun was more suited to use in Afghanistan. To improve armour protection applique armour such as that found on the new 2A7 tanks was applied along with slat armour to the rear of the tank. Unlike the 2A6M Tanks the slat armour is only on the rear of the 2A4M CAN. The Kit The kit arrives from HobbyBoss in sturdy box with the main hull and turret parts in a segregated end compartment. In addition to the two part main hull and two part turret you get 10 sprues of plastic, 22 small sprues of track links, two photo-etched frets and a 300mm length of brass wire. All the parts are crisply moulded with no sign of flash or mould defects. Of special note is the slat armour provided. This has been moulded quite thin and HobbyBoss actually protect this sprue in a foam layer to stop it being damaged. Construction starts with the wheels. Two return/idler wheels, two driver sprockets and 14 road wheels need to be built up. Each are two part with a poly cap being sandwiched in the middle. In addition four inboard and four outboard return rollers need to be built up. . Once the modeller is finished with the wheels attention turns to the main lower hull. what look to be additional armour plates are added to the lower sloped are and the vertical sides. A large additional armour plate is attached to the bottom. Both sets of return rollers are also added along with the mounting arms for the idler wheels and drive sprockets. The torsion bar ends for the road wheels are also added. The rear of the tank is then added along with all the remaining wheels. Next up the tracks are built. Each side consists of 80 links. The track sprues here contain 8 links per set. According to the instructions the track centres are removed and clipped together with a central linking part. Then the end caps are added while still attached to the sprue. Once attached they can be cut from the sprues. The instructions indicate no glue to be used. The tracks can then be attached to the lower hull. While this all sounds great in reality after completing 8 links it is not that straight forward. The small links which join the track links in the centre are difficult to handle, with tweezers they just ping off an become fodder for the carpet monster so I found its better to do them by hand. It is then best once the centre part is on to lie it flat and join to the next link. The outer end caps are best done one pair of links at a time as its nearly impossible to line up more than one set at a time. While frustrating to put together they do look the part once done. Next up the side applique armour panels are constructed along with various PE parts. Attention then moves to the upper hull. The rear part is added along with various tools on the rear decking. A large applique armour plate is added to the front surrounding the driver copula. The drivers hatch along with light fittings and mirrors are added. The upper and lower hulls can now be joined, and the side armour added. A tow cable utilising the brass wire can be added. Next the rear slat armour is added to the hull. Attention now moves to the turret. The gun, and gun mantle are built up and these are added to the lower turret part. Once in the top and bottom of the turret can be joined. The rear turret bins are made up and added, along with the side mounted smoke dischargers. The side applique armour for the turret is built up and added, along with the rear sections of slat armour. The hatches are added long with various fittings and the machine guns & mount. Lastly the aerial mounts are added. Once complete the turret can be added to the main hull. Decals There is a small sheet of the minimal markings these tanks carried, plus a larger sheet of black rectangles which seem to be all over the tank. Conclusion The quality of the kit is first rate. Although not a widely used variant of the Leopard family it is great to see this one kitted. Highly recommended. Review sample courtesy of
-
US GMC CCKW-352 Machine Gun Turret Version 1:35 HobbyBoss The CCKW was the mainstay of US forces transport during WWII, and was affectionately known as the Deuce-and-a-half due to its 2.5 ton load carrying ability. It was introduced in 1941 and was finally phased out in the 60s after years of solid service. It was developed from a design by General Motors for the French Army, had six-wheel drive, good reliability and as over half a million were built over the years, spares were plentiful. There were numerous variants with long or short wheelbases, and it was common for an M2 50cal machinegun to be mounted on a ring behind the cab to give additional self-defence capability when trekking through territory that was recently taken, but not fully cleared of pockets of resistance a common situation as the Allies raced to Berlin after D-Day. The Kit This is a revised tooling with additional parts, utilising a shorter chassis rail, and adding the parts for the machinegun mount to the box. If you have any of the other toolings, there will be a lot that's familiar, including the price! So far there have been a tanker, steel-sided and wood-sided variants, and I'll bet they're not finished yet either. The box is standard HB fare, and there is a small divided off area to keep the more fragile parts such as the slide-moulded cab shell safe from harm. Inside the box are fourteen sprues and the cab in sand-coloured styrene, a clear sprue, two sheets of Photo-Etch (PE) brass, a small decal sheet, a short length of copper wire, and a length of rather fuzzy-looking synthetic braided cord. The instruction booklet is printed in greyscale, while the single-sided glossy A4 painting guide is in colour with paint call-outs in Mr. Hobby, Vallejo, Model Master, Tamiya and Humbrol, although Humbrol and MM only have one exact colour match. The build commences with a nicely appointed engine that is fitted between the two chassis beams along with a number of cross-braces onto which the transfer boxes and drive-shafts are fitted together with the steering rack and exhaust system. A choice of front fender styles is given, while the rear is just a standard c-beam held on with sturdy brackets. Suspension is of the leaf variety, which is depicted well, supporting the axles and their various drive-input housings. The rear wheels are dual hub, so in total you will make up ten road wheels plus one spare, with all parts being styrene on this kit. The wheels are two parts each, while the hubs are multi-part with a poly-cap held between in the centre, allowing them to be taken off for painting. The cab floor receives the bench-seats, pedal box, gear shifter and steering column, which has a separate wheel, with the simple dashboard added to the underside of the cab shell after painting and adding the instrument decals. The shell fits over the floor, has windows added from the clear sprue, and a blanking plate for the circular top hatch added to complete it. There are a couple of ejection pin marks and raised part codes inside the cab, so you will need to hide these if you are going for a realistic cab. The crew doors have separate clear windows, winders and handles on both sides, and can be mounted on the cab in open or closed position by leaving their attachment until the engine cowling is in place. The two wings have integral running board/steps for the crew, and the cowling sides have cooling gills moulded in, plus a radiator core at the tapered front end. Lamps, mirrors and the front grille are added, and inside is a triangular support that you must bend up to a scrap diagram profile before installing it under the hood, which is another separate part that gives possibilities for exposing the engine. The turret ring and M2 are assembled and attached to the frame behind the cab, with the crew member standing on the cab seat. The flatbed is built up next with wooden textured panels, framework and sides. Upstands are positioned on top of the sides, and bench seats are added, braced against the shallow sides, then this is added to the chassis along with front and rear mudguards. A stowage box between the cab and flatbed is built up, and one spare tyre is fitted into the curved brackets before being lowered into place and joined by the cab, at which point the ring-mount and framework are slotted between the cab and stowage box onto a pair of lugs moulded onto the chassis. Two bracing struts add rigidity to the frame, attaching to the top of the metal truck bed sides. Markings Khaki is the colour, and the little decal sheet is almost completely white, holding three stars plus a few stencils, and the instrument decal adding a touch of black to depict the dials. Printing is up to standard, and HobbyBoss decals usually settle down well with a little solution. Conclusion A nice addition to the growing range of Deuce-and-a-half trucks, with the addition of the turret ring adding a little extra interest. Great for dioramas, or just to add to your display cabinet. Review sample courtesy of
- 2 replies
-
- 1
-
-
- Creative Models
- Deuce and a half
- (and 1 more)
-
Vickers Medium Tank Mk1 Trumpeter 1:35 History Despite being in general more conventional, in one aspect the Medium Mark I looked rather modern: instead of a high track run it possessed a low and flat suspension system with five bogies, each having a pair of small double wheels. The axles of these were too weakly constructed; as Major-General N.W. Duncan put it in his Medium Marks I-III: a perpetual nuisance. The axles were continually breaking and the path of the Mark I tanks was littered with discarded wheels". This was cured by switching to a "box bogie" in 1931. To ease repairs the suspension was not protected by an armoured covering. There were two vertical helical springs of unequal length in each of the five bogie casings attached to the hull. In front and behind the normal ten road wheel pairs, there was a tension wheel pair. Ground pressure was very high, even though at 11.7 tons the vehicle was not very heavy for its size. The engine was an air-cooled 90 hp Armstrong Siddeley engine derived from an aircraft type. Surprisingly the engine and transmission was distributed throughout the hull - with the engine to the left of the driver, the gearbox underneath the commander and final drive at the rear, which Duncan describes as "an unbelievable retrograde step in view of war-time experience". The Medium Mark B and the Mark VIII had introduced compartmentalisation to reduce the debilitating effects of engine noise and fumes on the crew. However with the Medium Mark I considerations of ease of maintenance took precedence. The engine drove, via a multiple dry-plate clutch, a four-speed gearbox. It had no synchromesh and switching between gears without excessive noise was a challenge to the driver. A propeller shaft connected the gearbox to a bevel box at the end of the tank which divided the power to a separate epicyclic gear for each track. These gears automatically provided extra emergency torsion to the normal first and second gear if the vehicle suddenly slowed down due to an obstacle or soft ground. The petrol tanks were at the very rear of the hull, so the fuel lines had to run along the whole length of the vehicle, pumping fuel to a secondary tank that fed the engine by gravity. The engine was lubricated and partially cooled by oil; leakage was common and the original four-gallon reservoir had to be replaced by a 13.5 gallon one. The tank could be electrically started, but only if the motor was already warm, so the first start had to be done by hand from the inside of the vehicle. Maximum speed was about 15 mph and the range about 120 miles. There was a cylindrical bevelled turret on top of the hull that carried a "Quick Firing" (shell and cartridge in one complete round) three-pounder gun (47 mm calibre) and four ball mountings for Hotchkiss machine guns. A novel, unique feature was a three-man turret. This meant that commander was not distracted with performing either the loader's or gunner's tasks and could fully concentrate on maintaining situational awareness. This gave a huge potential combat advantage, but went largely unnoticed at the time. Except for the Lago prototype, a predecessor to the Stridsvagn m/42, produced by Landsverk in 1934 no other manufacturer constructed a tank with a three-man turret until the German Panzer III. The practical importance of this feature is signified by the fact that later into the World War II, most of both sides tanks' designs either quickly switched to the three-man turret, or were abandoned as obsolete. There was no co-axial machine gun. There was only room to operate one machine gun from the turret; normally one gun was switched between the respective mountings as the guns were removable. The turret machine gunner doubled as main gun loader. In each side of the hull was a Vickers machine gun. There was one gunner to operate these weapons as well as being a mechanic. The shape of the Mark I Medium hull was very distinctive. The back was a simple armoured box; the front plate was high and perfectly vertical. Between them, from the armoured hood of the driver at the right of the vehicle six armour plates fanned out to the left, making for a complex hull geometry at that side. In the entire tank made an ungainly squat impression. The crew of five was only poorly protected by 6.25 mm plating, riveted to the chassis, barely enough to counter the threat posed by light machine guns. With its many shot traps the vehicle was unable to withstand even anti-tank rifle fire and it had a high profile. The internal lay-out worsened this vulnerability as the petrol tanks were inside the main compartment The Model It’s great to see an British interwar tank being released at last, and hopefully it’ll be the first of many. The kit comes in the now standard style of top opening box, with a nice depiction of the tank trundling along a country track. Inside you get eight sprues and two separate parts in the beige styrene favoured by Hobbyboss, four sprues of brown styrene, a medium sized etched sheet and a decal sheet. All the parts are very well moulded, there is no sign of flash or other imperfections, but you do get quite a few moulding pips that’ll mean a bit more cleaning up of parts. The moulded detail is nicely done, including the fairly prominent rivets on the turret and slab sided hull. The individual track links look like they’ll cause the build to slow down quite a bit as each link has three sprue gates to clean up, as well as each of the separate track pads, which have two gates each. Care and patience will be the watchwords when assembling. Construction begins with the assembly of the multitude of wheels, fortunately each of the small wheels are moulded as a single piece. There are two pairs on single short struts, two on long struts and ten quad bogies, each made up of ten parts. Each wheel assembly is then fitted into the track sponsons with the suspension plates attached to the top of each strut. The idler wheel axles are then fitted to each sponson, to which the six piece idlers are attached, then sandwiched with an outer panel. The side mounted Vickers machine guns are now built up, and whilst they are quite well detailed, each being made up from six parts, it’s all a bit of a waste as you won’t see any of it once they are fitted. The guns are fitted into the two piece ball, which in turn sandwiched between the outer panel and in internal socket. The lower hull is fitted out with the bottom panel, two sprocket axle plates, rear mounted door and four side hatches, along with the machine gun assemblies. Each sprocket is built up from six parts before being glued into place, along with the rear door step, several grab handles, a top mounted panel and a panel above each machine gun. There are two intake vents, a large square one that fits to the front of the hull and a round one fitted just in front of the engine grille, there is also a oblong hatch fitted to the right side front hull. Two further panels are attached to the hull, one just aft of the engine deck, the other in front of the turret ring. The two track sponsons are now glued to each side of the hull, along with a flat plate that attaches to the front glacis plate. The modeller has the option of two different styles of return rollers to fit, some research will be required to work out which was fitted to the specific being modelled. Each roller is made up from two wheels and a separate axle, before being attached to the hull, four per side. The rear section of the drivers hatch is also fitted at this point. A tie rod is then attached across the return roller axles and the rounded sides of the drivers position are glued into position and topped off with the hatch. The tracks are now assembled, each side requiring sixty five links. The track guards are then attached to the hull, with the port side one being fitted with the two piece exhaust pipe. The hull is then fitted with a host of PE track guard brackets, whilst the two four piece headlights are assembled, again with the option of two different styles, and fitted to the fronts of each guard. The upper turret comes as a single piece moulding and is fitted with two rear mounted hatches, five viewing ports, and the trunnion mount, to which the main gun barrel and underslung recouperator are fitted. The turret ring is fitted, along with the commanders and front mounted hatches. The model is finished off with the fitting of the turret and prominent headlight protectors to the hull. There is a slight disparity between the instructions and the painting guide, in that the guide shows the turret mounted Lewis gun fitted, and the gun is supplied in the kit, but there is no mention of how to fit it, even though there is a ball socket style lump on the rear of the turret roof showing its position. Decals Whilst the decal sheet isn’t the smallest I’ve come across, there are in fact very few decals on it. In fact one of the two options only has the front and rear number plates. The other option has these, as well as a unit and tanks codes for the turret, hull sides and rear hull, all in white, but no reference to which unit it belonged to in the notes. Both vehicles are painted in the camouflage colour of the day of Olive Drab. Conclusion This will be a great addition to any AFV modellers collection, beginning to bridge the gap between the Rhomboid WW1 tanks and the more modern tanks leading up to WW11. Apart from the fiddly track links, the rest of the kit looks like it should go together without too many problems. Very highly recommended. Review sample courtesy of