Search the Community
Showing results for tags 'Hasegawa'.
-
Hi all, I am new on this forum and this diorama is my biggest work, so far. The basic kits were the Hasegawa's old bf 109E and the Tamiya reissued Opel Blitz. During the building I used a lot of PE and detail sets, such as Eduard, Part, Hauler, SBS Model! Hope you like it! Thanks or watching! Cheers, Matyi from Hungary
- 44 replies
-
- 53
-

-
- messerschmitt
- bf 109
- (and 7 more)
-
F-15C Eagle Hasegawa 1/72 Since its introduction into service in 1974, the F-15 ‘Mig Killer’ has developed a fearsome reputation as an air superiority fighter. With over 100 kills to it’s name, half of them being with the Israeli Air Force, not a single F-15 has been lost in air-to-air combat. Despite the introduction of more capable aircraft in the 21st century, there is still a place for the proven F-15 on the front lines such was the foresight in it’s design some 40+ years ago. The need for a replacement to the F-4 was identified in the mid 1960’s to counter the threat of existing and new aircraft that were being designed by the Soviet Union. Initially, the request was for an aircraft that had both air and ground capabilities and considerably heavier and faster than the F-4, however this was changed to focus on air superiority in both close and long range scenarios following analysis of air-to-air combat in the US Air Force in the 60’s. With 4 manufacturers entering the competition to supply the USAF with an aircraft to meet their F-X requirement, the F-15 won with the decision being made in 1969. Powered by P&W F100 engines, it had a power –weight ratio greater than 1, low wing loading to improve manoeuvrability, a radar that could identify low flying targets amongst ground clutter and operate beyond visual range and had all round visibility for the pilot improving visibility significantly compared to the F-4. Not least, one of the lessons learned was that a gun is necessary, so a Vulcan M-61 cannon was installed. With the first flight taking place in 1972 of the F-15A, the first of 483 F-15C’s flew in 1978 benefiting from additional internal fuel, ability to carry the ungainly conformal fuel tanks, the APG-63 PSP radar that could be reprogrammed to suit new weapons, stronger landing gear to cope with a greater maximum weight and new flight systems. In 1985, the F-15’s coming off the production lines were to become part of the MSIP (Multi-stage Improvement Programme) that would allow ease of adaptation for developing weapons systems. Whilst the US are the largest operator of the F-15, first blood was achieved with the Israeli Air Force in 1979 developing an enviable reputation against Syrian Migs over Lebanon and went on to use the air-ground capability in the 80’s. During the Gulf War, the US followed up this success with their F-15’s again in combat with Mig 21’s, 23’s, 25’s and 29’s. Of the 39 air-air victories scored by the US Air Force in the Gulf War, the F-15C’s had claimed 34 of them. Over 170 F-15C’s will remain in service for many years to come yet. More recent upgrades to the aircraft are a new AN/APG Radar that link to the helmet mounted sighting system as well as the latest evolutions in armanent to ensure that the F-15 remains a potent weapon. As well as Continuing service with the US and Israeli Air Forces, the F-15 also continues to operate with Japan and Saudi Arabia. The kit With several kits on the market representing the F-15C, the later Hasegawa one of which we have here is regarded as the best of the bunch in terms of detail, shape and finesse although more challenging than some of the simpler kits as a result. The kit comes packaged in the usual top opening box with some great artwork representing an aircraft of the 57th Fighter Intercept Squadron USAF. On opening the box, we have 6 light grey sprues and a clear one which is bagged separately containing a total of 138 parts. First impressions are very good. Whilst there is some flash present, this is mainly restricted to the actual sprues with some very small amounts on some of the parts. X2 Assembly starts as per usual with the cockpit. There is some very nice detail in here. The side and main panels all have moulded in switch detail. If painting these doesn’t float your boat, sanding the detail off and using the kit supplied decals or pre-painted etch replacement is an alternative to consider. The avionics bay behind the cockpit has also received a generous dose of detail with the floor and side walls looking quite busy. The seat comes in three parts with a token effort on the seatbelts. This is in my opinion the weakest part of the cockpit so you may want to replace this or add some additional detail. With the tub assembled, the nose bay fits to the bottom and the two halves of the nose fitted together with the assembly inside. The instructions show the cockpit upper rear fairing to be fitted next, however you may decide to fit this later. Dry fitting is probably the best way to determine your preferred assembly sequence here. The intakes come next. Unlike the Academy kit, the intakes are somewhat simplified and stop short of the main wheel bays with incorrect but practical fitment of the front compressor blades too far forwards. With the intakes and ramps fitted, the main fuselage can be joined. Surface finish on the kit is excellent. The panel lines and rivets are recessed and quite restrained yet deep enough to accommodate both airbrushers and hair stick users without losing definition. On comparing the surface detail of the Academy kit and this, Hasegawa’s look much better, particularly where the various grills are represented. Next comes the flying surfaces. Again, the quality of the surface detailing is superb. There’s no option to lower the flaps in the kit, however the simple design on the F-15 mean that this can be easily achieved by cutting them out and repositioning them if you choose. Having reviewed some builds of the Hasegawa kit on the net, care needs to be taken attaching the nose section to the main fuselage. Take care to minimise any misalignment. As I mentioned previously, you may want to add the upper rear cockpit fairing at this point if you haven’t already done so if this helps getting everything lined up better. A similar challenge may be had when attaching the intakes to the fuselage too, so patience and plenty of dry fitting is the order of the day. The burner cans are represented with the feathers showing. Each can has the feathers made up of 5 parts that need to be glued into a circle so get your swear box at the ready ! Both the internal and external detail on the feathers is nicely detailed. For each feather section, there are 3 actuating rods, or 15 per can so being patient here will pay off. Alternatively stop for a while and open a beer if that’s your preferred technique ! The completed exhaust units fit into the rear fuselage, this will help on painting. The undercarriage is typical Hasegawa quality. Nicely detailed gear struts and wheel hubs are complemented by bay doors with interior detailing where they will be on show. There are two ejector marks on the inside faces of the main wheel tyres, however they are quite subtle and positive in profile so should be quite easy to remove. The canopy and airbrake can be positioned opened or closed. The rear canopy panel is fitted into the canopy then can be positioned on the hydraulic jack to show off the detail in the avionics bay. The canopy and windscreen are thinly moulded giving minimal distortion and quite unusually, there is no seam along the canopy centre line that will need sanding off which is a pleasant surprise. Whilst all the pylons and drop tanks are included in the kit, the weapons unfortunately aren’t. I find this disappointing as the kit is already one of the more expensive ones. If you haven’t got some surplus weapons, Hasegawa sell an additional weapons set (X72-9 Set V). Typical load out includes AIM-9 Sidewinder and AIM-120 AMRAAM. Overall, accuracy of the kit looks very good. Whilst I haven’t build the kit myself, there’s enough on the net to see that it looks quite accurate in its outline straight from the box. The decals The decal print is crisp and in perfect register with many sharply detailed stencils to add interest over all that grey !Four schemes are included: Aircraft 80-0033 57th Fighter Intercept Squadron – based in Iceland until deactivated in 1995 Aircraft 78-0518 18th Tactical Fighter Wing Aircraft 79-0027 32nd Tactical Fighter Squadron “Wolfhounds” – based in Netherlands until 1994 Aircraft 80-0021 36th Tactical Fighter Wing Conclusion What is included in this kit is the best 1/72 F-15C on the market if you measure 'best' by accuracy and detail. There's enough detail to build straight from the box for most modellers. If you measure a kit by value for money, it probably slides down the ranking due to the fact that no weapons are included and it has a higher price tag. It can be improved if you so desire by adding some cockpit coloured etch and aftermarket burner cans, but that is a matter of choice and budget. Review sample courtesy of UK distributors forUK distributors for
-
 After the One-O-Four (http://www.britmodeller.com/forums/index.php?/topic/234965275-148-lockheed-f-104g-starfighter-by-eduard-hasegawa-rebox-released/), Eduard is to rebox in the same way (with their usual add-ons) the 1/48th Hasegawa's Douglas A-4 Skyhawk kit. Source: http://www.eduard.com/store/out/media/InfoEduard/archive/2015/info-eduard-2015-01EN.pdf V.P.
 -
This aircraft was reportedly seen in a derelict condition at Phenian (Pyongyang) airfield by Soviet ground crew around 1950. The story is certainly not beyond possibility as there were many Japanese aircraft left in Korea at wars end, with photographic evidence some being pressed into service with the North and South. I based the colour scheme on the North Korean Tachikawa Ki-54 that was captured probably at Pyongyang. The kit itself is showing it's age, although it's not that bad. I only had trouble with the fit of the windscreen which too some mucking about. The mix of raised and engraved surface detail is accurate and quite nice. Humbrol Matt 27 steel and Tamiya Khaki drab are the main colours, sealed with some future with an oil filter of white and yellow applied. I added to that with different coloured pastels, MiG pigment and a black chalk wash for the under surface. I yellowed out the canopy with a make up brush and Tamiya weathering pigments. Decals came from some MiG 15 decal sheets. The base is the case of an old clock, glued together and painted with a cheapie rattle can of black. The dirt is grout left over from bathroom repairs, spread around over the base then flooded with water from an eyedropper and left to harden. I added some MiniNature grass tufts and couple things from the spare box to fill a hole.
- 14 replies
-
- 23
-
-
I would like to present my version of the IdolM@ster F-117A belonging to Yukiho Hagiwara. IdolM@ster started as a simulation and rhythm video game from Bandai. Essentially, a record producer gathers a group of rising pop stars and you would follow them as they rose to fame. When it went to an anime series, the pop idols were put inside different “mecha” jets and did battle. Since the anime series, the “mecha” jets have worked their way into the Air Combat games and some other computer games. Since the French Group Build will not recognize a Mirage from the IdolM@ster Air Force, I thought an IdolM@ster build might be better accepted here. I am trying to get out of my modeling funk with this aircraft and a P-38 in that group build. I have been woefully inadequate in both building kits, not even bought any (Now I know there is something seriously wrong), and haven’t been participating on this fine forum for about 3 months. These two builds will, I hope, keep me on track and back in the game. The kit is from Hasegawa and is 1/48. However, after I opened up the box and began looking at the sprues, this was on the inside of the bottom fuselage halve. Apparently, this is a Revell-Monogram tool from 2005 that Hasegawa has chosen to rebox for its IdolM@ster series of planes. And since there is very little time left in this group build, I need to get cracking. First the box art and sprues. Then the decals for the scheme I will be doing. Two very large sheets with a little over 100 decals The cockpit is the place to start as it is built up and then put inside of the top fuselage halve. For this kit, rather than a right and left fuselage half, there is a top and bottom. It is a basic cockpit with just 4 parts. The detail on the parts is adequate. Since I am more after the decal and paint scheme and most of the cockpit will be hidden from view, it should be adequate. I put it together and did some painting and it doesn’t look too bad. Prior to putting the fuselage parts together, the cockpit is inserted in the top half and some sort of maybe FLIR thing is put in just ahead of the cockpit. The bottom half receives its own FLIR and the nose wheel well. The wings are put together. And then one of the wings is redone as I was a bit sloppy in my alignment and needed to open it back up and reglue it. The tail planes are also glued together. The rudders are designed to be moveable. Right now, I will let that feature go, but if it causes some stability problems they will probably be glued in place. The wings have to be installed in the bottom half of the fuselage prior to the top half being put on. I started with the port wing. Then both the starboard wing was attached and the top fuselage half was put on. It is going to be a big boy for a 1/48 plane. I have put the P-38 I am building for that group build next to it. The P-38 wasn’t a small craft on its own, but it is dwarfed by the 117. There are seams to be filled at along the fuselage join. The nose section was really warped and fit poorly. I guess I could leave it and then say the plane speaks to the pilot and that is its mouth, but that would just be wrong. All the seams are fixed and the base paint is put on. I went with a deeper blue than the kit plastic as some of the anime shows an aqua color and some of the anime shows a dusty blue. Since the kit scheme is a bit showy and off the wall and is supposed to be feminine looking I went with the aqua color. Once the base paint dried, I painted the intake screens metallic and then weathered with a dark wash. Now, the decal scheme would have the intake screens covered with black decals. I will try my version first to see how it looks. If it turns out piggy, then I will use the kit decals. Now, the fun part of the build; the decals. Here are the top side decal instructions. Did I mention the entire instructions are in Japanese? Having built a couple of these already, I know the decals go on in layers. (Did you notice all of the decal numbers that have to go on?) There are some exclamation points on the scheme and some numbers are in red versus the rest in black. There are some instructions that roughly translated, I believe is: “Foolish American, put these on first!” So, the base decals are started. First up, the long swoopy wing stripes. And I run into my first problem. I am a creature of habit and there is a particular plastic tub I use to soak my decals. My problem, it is way too small for these decals. I rummage through all of the plastic ware and find a suitably large bowl. The port swoopy decal goes on along with a single swoop along the backbone of the plane from the canopy to the exhaust. And in doing so, I break off a piece of the inner swoop and then carefully reattach it. Next, the starboard swoop. And, this time rather than breaking off a whole line, I just break off a piece. I put that back together After I get both top single swoops that go along the fuselage spine aligned, I cut the pieces that attach to the canopy as I plan to have it in the open position. And here it is with the initial bottom layer decals Now, having done these kits before, the decals being so large and thick, have to be persuaded to go into place and behave as initially, they look like this I know I will be using about ¾ of a bottle of Micro Sol on this kit if it is like its brethren. Now, I have to beat the decals into the surface of the kit. So while I torture them into place (or me, don’t know which!) I will stop here. As always, all comments are welcome.
- 4 replies
-
- 1
-
-
- IdolMaster
- IdolM@ster
- (and 3 more)
-
So I'm trying to find an appropriate sidewinder for the RAF in the 80's. In the pic below is Revell's AIM-9L/M on the left, Hasegawa's AIM-9D family on the right and an unclear AIM-9 from the Hasegawa F-16 kit. It sort of looks like a combination of the two, so is this just a poor representation of the 9L/M or something else? Thanks in advance!
-
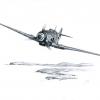
 One of the most colorful fighter squadron of German Luftwaffe was the "Jagdgeschwader 53". I have built some models from these with many work and effort. The color layout only decides in the end, even if the kit is very old or has lower quality. Some few months ago I was looking in my - actually from 23 volumes consisting (Die Deustche Jagdfliegerverbände" - and found in the part II (Sitzkrieg") "phoney war" an interesting template. It was a Messerschmitt Bf 109E-4, yellow "1" of 3. / JG 53 from OLtn. Wolfgang Lippert. On 23 November 1941, OLtn. Lippert baling out of his stricken aircraft, he broke both his legs when he struck the vertical stabiliser. He was captured and taken to a hospital. He died from an embolism after the operation without regaining consciousness. Wolfgang Lippert was credited with 30 victories. basic kit is from Hasegawa - a very old Bf 109E kit Decals from my private decal collection box corlor AGAMA/ XTRA Color changed parts: new position light on the wings (left/ rigth) new antenna wire and new aerial mast control cable rudder spindle vertical stabilizer the foto template my paper template in scale 1:48 Rollout:
 -
 Arrived: 1x Hasi P38J 1 x Velinden Update set 1 x True Detail Wheel Set 2 x CMK Allison Engines 1 x Brass Gun Barrel Set 1 x Eduard photo etch cockpit 1 x Canopy Masks 1 x Open Gun Bay 1 x ICM USAAF ground grew 1 x Wooden Base So from the decal sheet I am going to do Scat II Seriously now in a state of panic. All those bits were a good idea when I was ordering them
 -
 Hi all, My entry for this Group Build is going to be the Revell boxing of the excellent Hasegawa F4U-7 Corsair in 1/48 scale. These aircraft were used extensively by the Aeronavale during this bitter conflict and were operated from both shore bases and carrier decks, their good range and ability to carry a large amount of just about anything you could possibly want to drop on or fire at people making them very popular (with the French at least, probably less so the Algerians). Here are the usual "kit in bits" shots. Striking box art of the usual Suez marked aircraft. The contents and decals sheet laid out. A closer shot of the excellent Revell decal sheet. And now a couple of shots of the real thing to give some idea of the finish I am going to try and achieve, and to prove that they were also shore based, and very, very dirty! I hope that this choice of topic meets with the approval of the other group builders (there are some great topics on the go already). Any help and advice (and criticism) is always welcome. Thanks for looking. Craig.
 -
Hello all, Here is my entry for the GB: a 1/48 Hasegawa F-4E in the markings of the Islamic Republic of Iran Air Force. I chose this scheme as I read an article in a magazine a few months ago which discussed how IRIAF F-4E's had been attacking Islamic state fighters. The kit: The aftermarket: I'll be using True Details cockpit, True Details pylon set, Steel Beach FOD guards and FCM decals. I'd also like to add an Airwaves canopy set if i can get one. Great reference material: Plan to load her up with 4x AGM-65 Maverick and 6x Mk-82 bombs, which I hopefully have in the spares Dave
-
 Good day to everyone. First of all, I apologize for my English. I bought this set in February 2013. I saw a very unusual kit on the site hlj.com and I ordered it immediately. This is 1/20 scale model, it is a large size, especially in height. I would like to warn those who will buy - you will need shelf more than 25cm tall Kit itself is of the excellent quality, all parts fit together without fitting, many of the details do not require glue and remain mobile.
- 6 replies
-
- 7
-
-
- Hasegawa
- Maschinen krieger
- (and 4 more)
-
I gather there are a few people on BM who appreciate Egg Planes, and some who don't ... this in an RFI for those who do ... First up ... Bell Boeing MV-22 Osprey - 168238 / EG-00, VMM-263 "Thunder Chickens", USMC - Hasegawa Eggplane - OOB with additional home-made decals, brushed acrylics. Lockheed Martin F-16C Block 30 Fighting Falcon. Aircraft flown by Col. Dennis Swanstrom, Wing Commander 185th Fighter Wing, 174th Fighter Squadron "The Bats", #85565, Iowa Air National Guard. Hasegawa Egg Plane, home-made decals, Humbrol acrylic spray. McDonnell Douglas (now Boeing) F/A-18C Hornet - J-5011, 11th Staffel, 13th Fighter Wing, Swiss Air Force. Hasegawa Eggplane - OOB build with home-made / spares decals, brushed acrylics. McDonnell Douglas (now Boeing) F/A-18C Hornet - 164899 “Chippy Ho!”, VFA-195 “Dambusters”, US Navy. Hasegawa Eggplane - OOB build with Tamago decals, brushed acrylics. Curtiss P-40N Warhawk, 2106396, 502nd "Parrot Head" Fighter Sqdn, 337th Fighter Group - U.S. training unit, Napier Field, Alabama 1943. Hasegawa Eggplane. OOB buildwith mix of kit and home-made decals. Comments welcome as ever, including eggscruciating puns if needs be.
- 12 replies
-
- 18
-
-
 Thought it was about time to get another Harrier up for inspection (#23 in 1/48th) ... Harrier GR.5 - ZD319, MoD, Summer 1989 during Rough Ground Trials at Wittering - 1/48th scale Hasegawa kit. ZD319 was the second (DB2) of three development build aircraft and is seen here in its original GR5 configuration (she was later upgraded to a GR.7 before being used for spare parts). First flown on 31 July 1985, the aircraft was used for trials of the engine, systems and ordnance. The aircraft carried an interesting scheme during its early development which I have tried to replicate (more on this later) - it should be noted that the white aft-fuselage was so that link strikes showed during the abortive 25mm gun trials, there being quite some concern about the carbon fibre tail. During these various early trials, cameras were fitted to the aircraft. Three Photo Sonics 1-VN 16mm cameras were mounted under a CLBS-200 on each wing, facing inwards. In the Aden gun pods, there were 3 of the same cameras facing outboard to observe the release trajectory of bombs and fuel tanks and also undercarriage behaviour. The gun blast tubes were wooden replicas which could be removed and forward facing cameras fitted to observe rocket & missile firings or for filming the nosewheel. In 1989, ZD319 took part in the "Rough Ground Trials" held at Boscombe Down and Wittering. The objective, not unsurprisingly, was to see how the Harrier handled when taxying, taking off and landing on rough, unpaved ground. First generation Harriers regularly deployed "into the field" so it was likely that the second generation GR.5 would follow suit. Graham Tomlinson was the test pilot for these trials. Thus the scheme and the opportunity to throw some mud at the aircraft was too good to miss - I'm also indebted to Andrew Lawson who provided details and photographs of the aircraft at this time - Andy was taking the photographs during the trials. This model is based on the Hasegawa 1/48th scale Harrier GR Mk.7 “Royal Air Force” kit, albeit with a cast resin GR.5 nose from their GR.5 kit. I also added a resin MB Mk.12 ejection seat and donated CBLS-200 launchers from another kit. For the cameras I used 1/35th scale German gas canisters from Tamiya tanks - thanks Dave (Panzer Vor!). The kit gun pods were modified with some plastic rod for the gun blast tubes. The paint scheme is as follows. A base coating of Halfords white primer and the final white areas and undercarriage were over-painted with Vallejo Model Color White. Humbrol's Dark Sea Grey enamel, with a dash of white, was used for the top grey and Humbrol's Medium Sea Grey enamel used for the lower surface grey. The blue is a mixture acrylics, namely: Lifecolor LC08 Matt Pale Blue + Lifecolor UA098 Azure Blue + Vallejo Model Color White + Lifecolor Dark Gull Grey (FS36231) acrylic. I don't know the proportions, it was mixed by eye against photographs so is quite possibly wrong, but close enough for me. The CBLS-200 are Humbrol Dark Sea Green enamel and Precision Paint's Dark Roundel Blue. Vallejo Gold was used on the canopy. Other paints are as per previous Harriers (e.g. Humbrol acrylic spray aluminium. Decals were a mixture of home-made (e.g. serial no.), kit, spares and a few from Vingtor's "48-122 Harrier Test & Development #4" sheet. Humbrol Clear was used before and after decal application. The "weathering" was a mixture of artist pastels and Tamiya weathering powders, applied direct and mixed with Decalfix. A few things can be improved upon for the next onee (is it not ever the case?) Here she is in all her muddy glory ... Comments welcome as ever.
- 9 replies
-
- 26
-
-
- Harrier GR.5
- 1/48
- (and 1 more)
-
Inspired by a thread started by our model building hero, Procopius, about combining the Academy and Hasegawa Mustang III kits, I've decided to do just that. And not a moment too soon as the new KP kit is due to arrive any day now. I had a pair of Academy P-51B/C's in the stash already, and managed to find a bargain Hasegawa Mustang III double boxing. Finding that I had an entire afternoon to spare on Sunday while waiting for Micro-sol to do its work on another build, I got to work. This is an out of the box(es) build with no aftermarket planned, except decals. I'm using the Hasegawa fuselage, but decided on the Academy cockpit, as it seems a little nicer. It fit just fine with a little modification - the modified cockpit floor/radio deck is shown above the original in the pic above. Attaching the Academy wings was not too difficult. There seems to be some overlap, especially on top, so repeated fitting and sanding was the order of the day. I hope to do a metal finish on one of the builds. The plan is to use Mr Super Metallic on the wings, and Uschi pigments on the fuselage. With that in mind, I've done some experiments with the Uschi pigments on the now surplus Hasegawa wings and Academy fuselage, in order to see what best base coat is for them. It looks like it's going to be: primer, MM acrylic gloss Light Aircraft grey, then pigments. Looks like my experimental phase is still in full effect. Any suggestions are welcome!
- 130 replies
-
- 8
-
-
- 1/72
- Mustang III
- (and 2 more)
-
Hi chaps, I thought I'd show some recent finishes completed for a Spitfire-related GB on another forum. All were hand-brushed with Xtracrylix paint, over a coat of Halford's primer and finished with Games Workshop "Purity Seal" satin varnish. Firstly, the 1/72nd Hasegawa Mk VIII, finished as a machine from 457 Sqn RAAF in 1945. Decals from Almark, I think: Then we move onto the Fujimi Spit XIVe low back in the markings of 41 Sqn RAF, again in 1945. Decals from Freightdog: Finally, we have the Sword Spit IXe, finished as a "fighter bomber" from 66Sqn in late 1944. The underwing bombs are from the kit, the centre line bomb and bomb carrier is from an Airfix Hampden, with the bomb rack assembly being scratchbuilt. Decals were partly from the kit, but codes / serials were sourced from Modeldecal and Ventura sheets respectively: And the inevitable group shot: Comments welcome. regards, Martin
- 24 replies
-
- 33
-
-
Hi! Here's my Hasegawa Hawker Hurricane Mk.I built OOB except pe seat belts from Eduard. The model is painted using Gunze colours. Sorry for the lousy photos. I've used my mobile cam. Best regards Rune Haugen Norway
-
Hasegawa news:
-
 All done! many thanks to the many people who helped guide me in the right direction (especially with the colour matches) (tank152) and (Greased Lightning). The last photo shows an incomplete pic of the build. It is there to show the underside's weathering Cheers, John [/url] [/url]
 -
 Hello everyone, Here is the Hasegawa's MV-22 Osprey 1/72 kit that I finished a while ago. Really nice kit, great quality and very enjoyable to work with. I really recommend it. Sadly, I got some decals silvering, as I did not know those days about clear coating and Micro Sol. Anyway, I hope you like it! Best, Ricardo
- 14 replies
-
- 21
-
-
 Hi all, I am calling this finished. It's the old Hasegawa kit that's been re-boxed umpteen times. Generally an ok build, just a few hiccups along the way. I used Hi Decal sheet for the decals which are quite delicate bur worked ok in the main. Seats are from Airwaves and the weapons from my spares box. Thanks for looking! FF
- 20 replies
-
- 14
-
-
I spot something in the Hasegawa's Nuremberg pictures from Thomas Voigt. Two 1/48th kits announced for March-June 2015: a Lavochkin La-7 "156.IAP" and a LaGG-3 "Finnish Air Force". Hasegawa being now more a decals editor than a 1/48th aircraft new tool producer these must be repop. Origin of these two kits? Source: http://www.primeportal.net/models/thomas_voigt9/hasegawa/index.php?Page=2 V.P.
-
Hi everyone! Finally I did a photoshoot of my latest build - mother of all Zero's. Kit is - as you can guess - great and well detailed. Comes along nicely and quite easy. I've done some more work on cockpit as well, but in the end decided not to have it open.. I had some problems with the canopy. I didn't want to spend couple quids on masks and have been fighting with it for couple hours. At the end there were some mistakes unfortunately There are the pictures: Thanks. Bart.
-
I've decided to upscale and start work on my first ever 1/48 build - a RAN TA-4G. This is running in parallel with my yet-to-be-finished Bristol Sycamore and 1B Huey - both in 1/72 or thereabouts for the Sycamore. First up, as always, the cockpit. I've really enjoyed the additional detail available in 1/48, picking out all the raised detail on the control panels. I do have some aftermarket resin seats that needs some trimming to fit - a little too wide. I may, or may not use those. As it is, I've added a hose or two to the kit seats but have yet to paint the black bands on the ejection handle.The kit belts do look unconvincing though.
-
 Yes, and finally....... Well this is the kit I started some 2 years ago when I returned to modelling. It's been an on and off project, with a few others completed along the way first, and a house move.... Lessons learnt - I can't get Klear to be of any use on canopies - it looks a mess, although I'm please how well (and easily) the decal det cords worked. Hasegawa decals, well the limited use I've had can be good or bad. The kit set broke up just by looking at them - the second set stolen from another kit were much better, but still liable to break if not very thoroughly soaked, but they repaired easily enough. The drop down flaps aren't good. Vallejo light sea grey isn't! reverted to Tamiya colours which were much better, although I didnt fully overcoat the original Even old fat fingers can manage the fiddly bits, and cheat The carpet monster from the odd picking too. My masking still needs some refining, but I was very pleased with the oils wash on the panel lines. Oh and I hate the dusty look photos give the clear parts - I'm envious of the results other achieve. First attempt at weathering with the Tamiya sets - OK, but could be better and some places missed, but tbh, was a bit bored at the end and wanted it off the bench. (The A-10 and F-4 that have been on the go nearly as long beckon!) Overall I'm pretty satisfied with the result as only my second real kit in probably 30+ years, although have to say that in the time it's taken the stash has disproprtionately increased in size! Thanks
 -
Macchi C.202 Folgore Hasegawa 1:48 The Macchi C.202 Folgore (Italian for Thunderbolt) was constructed by Macchi Aernautica as a development of their earlier C.200 Saetta. The original C.200 features an air colled radial engine, however the C.202 would feature a licence built Daimler-Benz DB601Aa engine. This along with a redesigned more streamlined fuselage would bring the speed upto 372 mph it's speed and manoeuvrability were comparable with other fighters of the time. It did have its problems, chiefly that it was under armed and was susceptible to entering dangerous spins. In addition the radios and oxygen systems were highly unreliable often leading to 50/60% of pilots returning to base. Over 1100 were built, and as well as serving with the Italian forces they were used by Croatia during WWII, and after the war Macchi we able to sell some surviving aircraft to the Egyptians where they would be used in combat against Israel. The Italian Air Force used them in the training role until 1948. The Kit This kit was originally released by Hasegawa in 1995, and has been re-released in various boxing since then, the last being in 2006. For the release now Hasegawa have reverted back to the box art and decal options of the original 1995 kit. The kit arrives as 3 main sprues, 3 small sprues, and a clear sprue. As you would expect from Hasegawa the parts are well moulded and all the parts are crisp. Construction begins as with most aircraft, in the cockpit. The main cockpit is made up from the bottom section, two sides and the instrument panel. The seat is added, with the control column, a rudder bar, and some ancillary controls to the cockpit sides. Once the cockpit is completed it can be placed inside the fuselage, and this then closed up. The panel on top of the nose with the guns is added as a separate insert, and oil cooler are added; and also the tailplanes at this stage. The wings are the next major construction step. These are of a conventional lower one piece wing, to which the left and right top wings are added. The undercarriage bay must be constructed and installed before the top wings are added. Once complete the wings are added to the main fuselage. Once the main aircraft is built its on to all the small parts to finish off. The main landing gear is constructed and added. The lower radiator is added along with the tail wheel n the exhausts. One last item is the propeller. For this kit it is three separate blades which must be added to the hub. Finally the canopy is added. Decals As mentioned this new release brings the same decals as the original 1995 kit, for two option. A smallish decal sheet has the national markings and a few others as the aircraft did not seem to have much more in the way of markings. The options supplied are; 363-2 363 Squadriglia 150° Gruppo 53° Stormo, Italian Air Force (Blotch camo) CL111 Commander 153° Gruppo Italian Air Force (Ring camo) Conclusion This is good re-release from Hasegawa. The kit has not been available for a while now. Overall recommended if you want/need a C.202 in your collection. Review sample courtesy of UK distributors for