Search the Community
Showing results for tags 'Hasegawa 1/72'.
-
EA-6B Prowler VAQ-138 , Carrier Air Wing 3 on the Saratoga, 1977 1/72 Hasegawa kit with Aires cockpit and Reskit wheels Superscale decals Not a lot to say about this one, except that I bought the kit soon after it was first released (early 80s?) and has been in storage up to a few months ago. The decals were also of a similar age but still quite usable. The kit cockpits are very basic by current standards so I fitted the Aires version which is an intricate work of art in resin and photoetch. I must admit I didn't use all the resin and brass as it became just too tiny and fiddly. The resin wheels were nice but not significantly different from the kit offerings, though needed less clean up.
-
Good day, Here is my second posting of the year. The highlights of the kit are as follows………… 1. Colors used : A. AK Interactive Extreme White Aluminum ( main airframe ), Alclad Dull Aluminum ( highlighted panels on wings & fuselage ), AK Extreme Dark Aluminum ( cockpit armor plate ), Tamiya Yellow - Green XF-4 ( engine nacelles & horizontal tail ), Model Master Olive Drab ( tails & rudders ), Model Master Green Drab ( anti glare panel in front of cockpit ), Model Master Yellow Primer ( gear wells ), Mission Models Interior Green #34151, Tamiya Flat White XF-2, Polly Scale US Brown Special 2. Washes : Vallejo Dark Brown, Light Grey ( airframe ), Light Rust, Tamiya Black 3. Landing Gear : Tamiya Titanium Silver X-32, Vallejo wash : Black & Light Rust 4. Eduard windscreen mask ( Must have item for this kit!!!!! ) 5. Uschi Fine bobbin thread for radio antenna wires 6. Grey and black chalk pastels for additional weathering. I built this one straight out of the box. The Eduard mask set is an essential aftermarket item for this kit. Caution is foremost when having this one “sit properly”. I filled every possible void in the nose section with plumber`s putty and tiny lead fishing sinkers. A dry fit experiment resulted in the airframe being the dreaded “tail sitter”. After some thought, I decided to close the bomb bay and add a larger sinker and more plumber`s putty to hold it in place. Finally, the Mitchell sat right. Having this Mitchell sit right is the most satisfying part of the build process for me. With the glass nose version and open bomb bay, it would be difficult to pose the Mitchell in it`s natural state. The parts go together well and a little extra effort is always required for the finish of a natural metal / silver subject. This kit can be built into a nice representation with little experience however a bit more skill is required to have the Mitchell sit without the rear access ladder and step stool. Thank you in advance. Mike
-
Afternoon all. Have finished this just in time for the close of the F-15 Group Build. It's the Hasegawa F-15DJ desert aggressor boxing with the addition of Aires Exhausts, a Finemold AAM5 acquisition round and an Eduard ALQ131. Great kit to build (and over 30 years old as a tooling-shows how far ahead of the game Hasegawa were!) and despite the tricky and finicky paint scheme (a lot of masking) a great set of markings. Ralph.
-
Hi to all The model is the very old one, the only F20 in 1/72, so i will not bother explaining the plastic, because everyone is known. What I wanted to do is a test version with V-V Sparrow configuration. As soon as I saw photography in this configuration I was amazed that so big missiles were mounted on a relatively small plane. In addition, blue overall colour and story behind it was must for this build. So model was finished in Mercedes Blue RAL 7016 AK real colours. At the end, the totally oversized configuration, additional rails are made of styrene, the markings are laser printed, model heavy glossy varnished. I like how it looks at the end, I hope you too. Regards, and pictures at the end Referent pictures: Mercedes in same colour and heavy gloss appearance (picture is mirrored)
- 6 replies
-
- 16
-

-
- Tigershark
- Hasegawa 1/72
- (and 1 more)
-
Hi everyone, I am entering this GB with the F-104S from Hasegawa in 1/72. I am only doing this because I said I would. But I should not have! So far this year, I haven't finished a single GB build... And I am entering another one! Lunacy! But I like the F-104, so it is no hardship. The sad thing is that I like pretty much every single Century fighters, although I am not too hot about the F-102... Anyway, here are a few photos of the kit: There you are! It will be strictly an OOB build, with the exception of the seat belts and possibly the brake lines. Being Hasegawa, I do not foresee any waste of time cleaning up the plastic. I have noticed though, some breakage to be fixed, as some of the parts are so ridiculously dainty. But I was told dainty was good! So hopefully this kit will be finished on time. But I have said that so often in the past... Have fun! JR
-
Hallo all, A few pics of my recently completed Hasegawa 1/72 Typhoon in AMI markings of the 37 Stormo. The kit is great; I particularly like the stand supplied in early releases of this kit so that you can do it flying- shades of building models as a child! The kit benefitted from a resin seat and Lifecolour acrylic for the FS36280 that the Italians use for their modern fast jets. The decals were nabbed from the Italeri Typhoon kit, which I bought specifically for the wide ranges of decal options. Was rather taken by the checkerboard rudder marks, so went for that! Ralph
-
The Africa GB gives me a prompt to do some colourful and off beat subjects. The DP Casper Helicopters in Africa decal sheet offers some inspiring subjects. The Malian Hind really took my fancy. Using the old Hasegawa 1/72 Mil Mi-24 Hind D kit for this one, as I have had it in the stash for some time and it looks quite nice. Some reference pictures. http://defenceturk.com/index.php?topic=6429.0 Pictures of the kit and decals to follow
-
 I think it's time I dipped my toes into this STGB, stop procrastinating like an old mother hen and build one of my three stashed 1/72 Lancaster kits. All this good Lanc GB chatter has whetted my appetite to build one, and it's an opportunity to tick off another one of those modelling 'Bucket List' items that's been inside my head for ages. Now I cannot recall how old I was when I first read about Bomber Commands plans to send a force of Lancasters (Lincolns) across the Pacific to continue the war against Japan. I also recall feeling slightly disappointed when I continued reading and found out that this was all cancelled when the US shortened the war with their two Atomic raids against Hiroshima and Nagasaki. Since then (must have been 13 or 14), I've always wanted to build a proper 'Tiger Force' Lancaster and over the years have been collecting small pieces of historical notes to help me formulate what a typical TF Lanc would have looked like? Thanks to the internet and a wealth of excellent worldwide researchers, the fuzziness of a typical Tiger Force scheme has become quite a bit clearer and is certainly way ahead of any research that I could have come up with. Therefore, I'm quite happy to take Paul Lucas' latest opinions as published in a fairly recent edition of Scale Aircraft Modelling and kindly supplied to me by one of our great BM contributors Chris (aka @dogsbody). I'm still a little short on a couple of AM items that would make this project complete, however may still be able to get away with what I've already amassed so far. Being Australian, its a no brainer that I've chosen No. 467 Squadron as this 'Credible' WHIF build. The initial establishment of ten Tiger Force Squadrons to be based in Okinawa included No's 9, 617, 106, 467 (RAAF), 83, 97, 75 (RNZAF), 207, 419 (RCAF), & 428 (RCAF) Squadrons. I've read about No. 460 (RAAF) Squadron also being earmarked, however this may have been part of a secondary force to be assembled later on if required. Mr. Lucas writes that 467's Lancs would have been equipped with the 8000 Ibs bomb doors, no dorsal turret and FN82 rear turret with .50 cal US MG's. British Pacific Roundels where also specified and these had a dark narrow outline to show up against the white painted fuselage and top wing. Dull Red Squadron codes and serials were also documented as the colour to be used. OK, that's it for the main WHIF historical notes, let's now talk about the kit. For this GB build I've chosen Hasegawa's 1/72 Grand Slam Lancaster. I still have plans to build a version of this kit, so will keep all the other bits for another rainy day. Hasegawa's Lancs are quite nice and thankfully come with a few items that will prove useful for this build. The slight negatives about it are well documented and include and overlarge tail wheel, the canopy escape hatch is in the wrong location and an overall fairly basic cockpit. I'll source a new tail wheel, hopefully correct that cockpit hatch and will most probably leave the internal bits as is. The 8000 lbs bomb doors will be donated from the Airfix Mk.II kit (will need to source an extra set?) as will the FN82 turret which is spare. Ideally I'd like to add a set of Lincoln wheels and vertical tails however don't have these as yet. Might see if I can add a 'wants' post in the appropriate section. Apologies for the overly long intro, here's some photo's to see what's going on. There's plenty of references to confuse things so please feel free to check in from time to time to see how I'm getting on or (most probably) neglecting another started kit! Cheers and regards.. Dave
 -
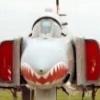
On 9 November 1950 Lt Cdr William T Amen, CO of VF-111 Sundowners, flying an aircraft from sister squadron VF-112 from USS Philippine Sea was leading a target CAP escorting Corsairs and Sky Raiders attacking the Sinuiji Bridges when they were attacked by a number of Mig 15s from the 139 Guards Fighter Regiment. In the course of the ensuing dog fight, Lt Cdr Amen fired at the Mig of Capt Mikhail Gratchev that subsequently dived vertically into the ground and exploded. This has since been confirmed as the first victory in jet vs jet combat, a feat originally credited to USAF F-80 pilot Lt Russell Brown the previous day. Decades later, access to Russian records revealed that though damaged, Lt Brown’s adversary successfully returned to base. Hasegawa 1/72 kit with Scale Resin nose correction and wheels, Starfighter Decals. I corrected the kits instrument coaming, cockpit rear deck and seat and added a gun sight and canopy demising pipes. Coastal Kits base. Built for the In The Navy group build. AW
-
Good Morning everyone I had this Hasegawa Tomcat with the livery of the VF-41 (Fast Eagle 107 - Fujimi decal for Su-22 killer) made in 2001-2002 , ruined by the matt coat then abandoned to its fate .. A couple of years ago I decided to remove the paint and repaint it better. For a period I continued the restoration of this tomcat in parallel with the construction of another one In these days of prohibition to leave the house I finally managed to finish the work
-
Hi, After picking up the hobby again in 2017, this felt like a much needed rite of passage: building the one kit I drooled upon as a kid. I'm happy with the result of this first try, even though I could have worked better on the front joint and tried some oil weathering before I decided to wrap it up. I managed to snag a few of the 90s boxings since, so this won't be the last cat on my shelves, I just had to leave myself some room for improvement 😅. Hasegawa Atlantic fleet boxing with quickboost seats. Painted with Mr Color. Decals are a mix of the box and a chinese Hobby Boss knockoff sheet (red hues are all over the place, although it's mostly hidden by my mediocre photography). Thanks for watching!
- 30 replies
-
- 53
-
-
- F-14A Tomcat
- Hasegawa 1/72
- (and 1 more)
-
Hi All, So December 1st is here in New Zealand (approx 1137 hours at time of starting this thread). My build is of an RNZAF P3B Orion pre Kestral and FLIR days This kit has been in my collection for eons, I made a start years ago but never got around to completing it - mostly because of the dearth of proper accessible markings As you can see the box is old and a bit battered Parts started long ago My love for the P3 Orion as in the Short Sunderland was passed onto me by my Dad who served with both in RNZAF 5 Squadron - my favorite photo of two gorgeous birds. This shows the P3B circa 1966/67 wearing "Silver Fern" Roundels In my book collection (a must for all 5 Squadron fans) is this book The beauty about this book is that in one of the Group photos is my Dad at NAS Moffet Field circa 1966. The arrow shows him at the rear of group My Dad is now gone, as are the Sunderland's, but the P3 we both love still soldier on My Build will be in the Hi Vis markings wearing the Kiwi Roundel and 5 Sqn Albatross on the tail Something similar to this photo link RNZAF P3B Roundels of Choice (thus far) Problem is that the set does not include the other "Required" markings, so I will likely go with "Old Models" decals as they have what I need Old Modesl Decals Lastly, a cool video of an RNZAF P3 taking a shower - I've actually see this happen in real life - it's so cool to watch RNZAF P3 Shower Thanks for stopping by - more later Regards Alan
-
The second finish of 2019: Hasegawa's near thirty year old 190 D? : Kit was bought at the Telford 2018 kitswap for £7 with frazzled decals and old style Eduard masks. Skys decals were used along with Mr Paint/Mr Color paints - main markings were masked and sprayed to avoid silvering issues. Some artistic license was used for the camo as the colours were a bit garish at first, but its done and in the cabinet, not my best but good practice nonetheless. The Hasegawa kit is an absolute honey, beautiful fit, thoughtfully engineered and lovely subtle detailing , if you have one in the stash, do yourself a favour and build it! I've bought two new kits so pleased that two were removed from the stash by the end of January-my resolution not buy anything till I finish an equivalent. WIP at: With the Airfix 1/72 FW190 from last year:
- 10 replies
-
- 27
-
-
- Skys Decals
- FW190D
- (and 1 more)
-
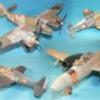
Prelude - In Australia, we celebrate Fathers day on the first Sunday of September. This happy day occurred last weekend and as part of my early morning gifts my two lovely children were good enough to get me a copy of Michael Vietch's "44 Days" and yet another sheet from my favourite decal manufacturer - DK decals. This sheet (72049) covers 29 examples of early P-40E Kittyhawks in RAAF service, many of which participated in the early battles against the Japanese during WW2. Hopefully this will be the first of at least two Pacific War GB entries. I will base this build on an early copy of Hasegawa's 1977 issued P-40E Kittyhawk. IMO, this kit still holds it's own shape wise. Yes, the cockpit is very basic, even for this period of release, however the outline is far superior than that of the later Academy kit which for some strange reason looks too fat around the nose. Special Hobby have recently released what looks like a nice new tooled kit, however I have three of these in the stash already, so might as well build at least one of them. To harness that extra bit of enthusiasm, I'll be reading the book whilst building the kit. The book's title is taken from the fact that for 44 days, this newly formed and somewhat inexperienced squadron were the only line of defence between the might of Japan's Imperial forces and the very possible invasion of Northern Australia. The battle line was drawn in the skies above Port Moresby and No. 75 Squadron grimly held on for as long as they could (44 days) until much needed reinforcements arrived. The "Tomorrow-Hawk / Never-Hawk" thread title is taken from members of the Australian Army based in New Guinea, who were under constant air attack from the Japanese before these Kittyhawks arrived. The Army had been promised adequate air defence, but when each day went by without any sign of these Kittyhawks, the somewhat disbelieving army folk came up with what they believed were more appropriate names (some of which cannot be printed)! Below are a few images of what I'm working with. I've already thought of a display base and I've plonked an earlier (and not well built) P-40N to give the impression of what this whole thing should look like in the end. I need to finish off my Classic Airfix GB build first, then will take to this good and proper. This should be a fun GB, so I'll look forward to everyone's builds as they all get going. Cheers.. Dave
-
Good evening For this Gb I will build the Hasegawa CF104 in the markings of an aircraft of the Royal Canadian Air Force based in Marville France in 1965 I will use the Belcher Bits decals sheet , a PE Eduard set , a Master pitot tube eand a Quickboost resin seat Some books The box art The sprues The decals I started today by placing the Eduard Instrument panel I also painted the landing gear the wheels .. Patrice
-
Joining you with this Hasegawa kit. Very reminiscent of an Esci 1/48 Kfir that I built whilst at school. It's those triangular recognition panels. Costing me $4 at Yeovilton Model Show in 2011. Might be a slowish start, I'm busy with MiB projects.
-
Hi ! Here's my latest build (started almost 8 years ago ) , the old Hasegawa Mirage F1c converted to a SAAF AZ. Rescribed, riveted and with some scratched parts. Most of the decals were home printed. The WIP here : http://www.cartula.ro/forum/topic/4700-mirajuri-sud-africane/
-
hi, some photos of a model particularly dear to me ... broken during a convention and repaired I hope you like it ciao Silvano old model and repaired WIP is Here https://www.flickr.com/photos/92879412@N06/albums/72157632748756374 ciao ciao...
- 28 replies
-
- 43
-
-
- Hasegawa 1/72
- F4 Phantom
- (and 1 more)
-
Bit of a rush job this one. Paint scheme is more challenging first appears. Used wash over a satin coat instead of a gloos coat so got a lot dirtier finish than i wanted. Varnish reacted with the paint in places as well. Think this was a kit i built just to get an "easy" build out of my system. Thanks for looking. Cheers!
-
Hi all, Hasegawas little Sea Harrier with ModelDecal Set no. 65. Brian.
-
Morning all, Another "Stealth" this one Hasegawas 1/72 built from the box using Humbrol Gloss Black Enamel. The last two photos are a 48th & 32nd "Stealth" Brian.
-
Hi all, Hasegawas ageing CF-18 sitting alongside the CF-5. Built out of the box and painted with enamels.
-
This will be the hasegawa tooling of the FM-1 in the guise of JV579 scheme which is currently being worn by The Fighter Collections Wildcat FM2.
-
Hello, Here you are my last built, this is the Hasegawa B26 C MARAUDER in french marking in 1945. I used super metallic gunze paint and decals from PT DECALS I hope you will like it You can see more on my web site http://aviapassionmaquette.free.fr/Aviapassion%20Maquette%20montage%20B26%20MARAUDER.html @bientôt Thierry
-
Hi All, a quick build between GBs. You can argue about the SCW colours all you want, there are all sorts of discussions about RLM63, but this is how I did it for a Condor Legion 109E from 2.J/88 in 1939. Kit: Hasegawa 1/72 Bf109E acquired at the Huddersfield show for £2:50 Decals: Exact-a-cal acquired from ebay for £2:20 (1968 vintage!) Uppers: Tamiya Sky Grey Lowers: Lifecolor RLM65 Other colours: Vallejo model colour and model air, xtracrylix, Tamiya, Humbrol metalcote. Final finish: W&N satin varnish Additions: Tamiya tape belts with scratched fine wire buckles, Revi gunsight from plastic strip/acetate, lead wire brake lines, aerial from stretched cotton bud plastic, rudder offset (doesn't really show in the pics). The decals are very thick and the wing roundels are white circles with the black over the top so they are extra thick. Decals were provided for the wing and fuselage black areas, but they are impervious to Micro decal solutions so I masked and sprayed them. I sprayed the fuselage roundels as well, hence the slightly ragged edge. The rudder cross is a decal. Pre and post shading was applied to break up the block colour but no more weathering was added, just Paynes Grey watercolour to accentuate the panel lines. Update: It was only when I reviewed the photos this morning I realised that I had left the masking on the small triangular windows at the bottom front of the canopy. This is now rectified. That's one less in the stash......


Wedge-TailedEaglePortraitRaptorDomains.thumb.jpg.41a306d3445a68f0f2df773e01776ea6.jpg)