Search the Community
Showing results for tags 'GWH'.
-
 Hi all, Well, here's (almost) the first duplicate entry into the Group Build - but Muzz has the decals for Red 40 (low-viz crest) whilst I've opted for Red 56 (Red / White crest) to be done as it was at RIAT 2015. To be made from the GWH Early boxing (which also contains the Late parts) plus some extras. First the box lid and the sprues and finally the goodies Eduard zoom cockpit set Caracal decals (now out of stock) Model Master turned brass static wicks Some Eduard Brassin pylons - much more detail than kit and aircraft was displayed with two empty pylons per wing A few resin bits left over from an earlier Eduard / Academy build Attack Squadron Polish detail set (resin aerials, cockpit extras and photoetch) This is going to be a busy time with From Russia and Made in Britain already ongoing, not to mention F-15 starting before this one finishes but hopefully I will get this finished by the deadline. Regards Mike
 -
(Admin, please remove if posting videos isnt allowed) The Kit The aftermarket Legend Productions ACES II F-15 seats DXM decals Olfa circular cutter + lots of masking sheet /tape (the silly amount of masking required which will become apparent latter in the build) Hasegawa hologram (for the HUD) Hasegawa JASDF weapon set (for the AAM-3) Hasegawa weapon set B (for the ALQ-131) The Plane http://www.airplane-pictures.net/photo/493488/92-8068-japan-air-self-defence-force-mitsubishi-f-15dj/ WIP pics soon to follow. Cheers Shane
-
Hello all, Here is my recently finished 1/48 Great Wall Hobby Mig-29, in the markings of the Hungarian Air Force in 2009. The build thread is here Extras used included Quickboost seat & FOD covers along with HAD decals. With my Slovakian Mig-29AS: Comments welcome, thanks for looking. Dave
- 13 replies
-
- 24
-

-

-
Mig-29SMT 1:48 Great Wall Hobby The Mig-29M is an improved Mig-29, and has all the improvements over the original aircraft that you would expect in the shape of reduced weight, more powerful engines, increased fuel load and more modern avionics. It also has new radar, a HOTAS control system and other such modern bells and whistles that are en vogue in the 21st century jet fighter. Why do you need to know? Well, the SMT is a retro-fit package that upgrades existing Mig-29s to a similar standard to the M, and includes a pronounced humped dorsal spine containing additional fuel that gives it a range of 1,300 miles on internal fuel alone. Incorporated in the package are seven hardpoints that can carry a variety of weapons that the M can also carry, with the possibility for future upgrades for weapons developed by foreign companies, which must be firmly aimed at their export market. The Kit GWH pleased a great many modellers when they announced their new Mig-29 kit, and they are slowly bringing out variants as time goes by, with this their latest offering showing marked differences from the other releases, which will broaden its appeal. The kit arrives in an end-opening box (I know! The trauma!), but inside is a tray in which all the parts are held, so fret not. You might initially think that there is a white card lid inside, but that is a separate box for the large fuselage/wings part to protect it against damage. Below that is a plastic carton with six rather cleverly slide-moulded weapons in, and under that are the traditional sprues, of which there are fourteen of various sizes, all in a mid-grey styrene. The clear sprue is both separately bagged and protected by a clear sheet that is mildly sticky, which prevents any damage occurring before it is removed by the modeller, or in this case the reviewer to take the photos. A sheet of Photo-Etch (PE) brass parts are bundled in the same bag as the decal sheets, of which there are two, both having thick yellow paper to protect the delicate decal surface. The instruction booklet is printed in black and white on matt stock, while the painting and decaling guide is on both sides of glossy A3 paper, folded in half to fit the box. As always with GWH you get a sense of a quality product even before you have started looking at the individual sprues. The instruction booklet cites Alexander Dramnikov and Yufei Mao as being involved with the project, which is good to see. The cockpit is first to be built, and it is well-appointed with a detailed ejection seat that has PE seatbelts and leg-guides, a floor panel and stick, to which the side panels are added after they are detailed with side console inserts. The main instrument panel is a single part with raised detail moulded-in, to which you add a sizeable quantity of decals once it is painted. There are 15 in all, with optional on and off decals for each of the two main MFD screens, which is clever. It is attached to the underside of the upper fuselage later in the build after preparation of the major parts. A two part circuit-breaker box is attached to the turtle-deck behind the pilot, plus a piece of PE to add more detail. The gear bays of the SMT are all built up from separate panels to ensure that there is plenty of detail, while the main bays have ribbing on the upper areas for additional strength. Drill out the hard-points if you are planning on loading weapons later, build up the twin tails, which have separate rudders and PE slime-lights, and then you're almost ready to close up the fuselage. The flying surfaces are all separate, and are trapped between the fuselage halves to remain free, but the slats on the leading edges simply fit into a curved slot at the front of the wing, so check that you have them at the correct angle on both sides before the glue goes off, or you'll be very sad when you notice they aren't. The fins are added to the top deck by drilling out the flashed-over holes from inside, which is another task you don't want to forget. Similarly, you also need to drill out the holes for the chaff and flare dispensers that sit forward of the fins. The kit includes a pair of very nicely detailed Klimov RD-33 ser.3 engines, which are placed within the engine nacelles before the outer skins and intake ramps are added. There is also a trestle stand included for one engine in case you wanted to display it outside the aircraft. The detail is that nice out of the box, that it would be a shame to hide them away. The intake ramps were re-designed for the SMT, and they are provided here in two halves each, to which you add the integral FOD guards in styrene for closed, and PE for open/stowed. The upper section of the trunking is moulded into the lower fuselage, so to avoid seam-filling, it's probably easier to put the FOD guards down as they would appear when on the ground under normal circumstances. Some small parts, aerials and blade antennae are added to the underside and around the nose, as well as a pitot probe on the end of the separate nose cone. No mention is made of nose-weight, but you'd be well-advised to place a good quantity in there to be on the safe side. The canopy can be shown open or closed by the addition of a jack on the rear deck, which props up the separate canopy, while the windscreen goes on over the PE HUD for which a small slip of acetate film is included, with the outline printed on for your ease. With the airframe substantially complete, the landing gear is built up, with detailed legs, single-part tyres, and separate hubs, which cuts down on any seam filling. Bay doors are all well-detailed, and if you like your in-flight models you'll be pleased to know that they fit in the open or closed positions. The airbrake on the Mig-29 is a weird-looking hybrid of umbrella/clamshell, and sits between the exhausts. The brakes project up and down around a central strut, which is well-depicted, and can be posed open or closed by the omission of a few parts. As a final thought, a crew access-ladder has been included on one of the sprues, which is another nice addition. Weapons & external tanks are supplied along with a collection of engraved pylons and adaptor rails, with the following supplied in the box: 2 x PTB-1150 fuel tank 4 x R-73 AA missile 2 x R-77 AA missile The missiles are slide-moulded for detail, and are protected by a vacformed plastic carton, which takes up quite a bit of space in the box. The detail is really good though, and is further enhanced by PE fore-fins on the R-73s, and the waffle-textured steering vanes on the R-77s. A full set of stencils and painting instructions are supplied for both the missiles and their pylons. Markings There are two schemes included on the decals in the box, but both wear the same modern grey/light blue/darker blue splinter scheme with grey undersides that I associate with the T-50 Pak-fa, with little to tell them apart other than their aircraft numbers on the intake sides. The boxtop subject has a slogan and its tail-code on the tail (duh!), and it is interesting to note that it looks like the boxart was commissioned and printed before the correct serial codes were decided upon, as if you look closely at the box, there is an ingeniously disguised sticker with the correct serial placed over the wrong one. If you sneak a peek at the smaller images, they still read incorrectly RF-92235, rather than RF-92935. From the box you can build one of the following: Red 23 14th Leningrad's Guards Fighter Air Regiment, RusAF Airfield Khalino, Kursk region, 2010. Red 08 14th Leningrad's Guards Fighter Air Regiment, RusAF Airfield Khalino, Kursk region, 2009. The decals are well-printed in China, with very fine stencils being the order of the day. Registration, colour density and sharpness are good, and the satin carrier film is cropped close to the edge of the printed areas where practical. The Completed Model Conclusion This is a thoroughly modern tooling of the SMT, and is a welcome addition to the GWH line-up especially as it has that distinctive spine. Add the PE and clever moulding techniques used, and you have a well-rounded package that should appeal to anyone with an interest in Soviet fast jets. I would have preferred some variation in the colour schemes and squadron subject, but the scheme supplied is at least eye-catching to make up for it. Highly recommended. Available from all good model shops online and on the high street. Review sample courtesy of
- 13 replies
-
- 11
-
-
Hello all, Here is my recently completed 1/48 Great Wall Hobby Mig-29 9-12 Late marked as an 'AS' variant of the Slovakian Air Force. The build thread is here Extras used included Quickboost seat, Quickboost FOD covers and an Academy donor kit for all the AS specific parts, including the decals. The kit itself is very good, with lovely detail. There are a few fit issues but hopefully i've addressed these in the build thread. The decals were a bugger to fit and required some creativity. With my Czech 'Splinter' Mig-21: Thanks for looking. Dave
- 13 replies
-
- 17
-
-
 Build #6 for the year, the Great Wall Hobbies TBD-1 Devastator in 1/48. This is Ensign George Gay's aircraft that he flew with Torpedo Squadron 8 at the Battle of Midway in 1942. Of the 15 Devastators of VT-8 that attacked the Japanese fleet at Midway, all were shot down with Gay being the only survivor. Torpedo Squadron 6 and 3 followed, losing 10 of 14 and 11 or 13 Devastators respectively. It would end the combat career of the Devastator, but Gay would go on to report the destruction of the 3 Japanese carriers to Admiral Nimitz, then fight at Guadalcanal with VT-11. After WW2, he flew for TWA for over 30 years, often signing his book 'Sole Survivor' with the words; "May you be as lucky as I was at Midway". The GWH's kit is nice in the box, it's not until you start to put it together that you find some problems. The interior, especially the instrument panels are tricky to fit, I didn't succeed with the lower half, but it cannot be seen anyway. The separate canopy sections are too thick to be positioned open, meaning you either have to buy the Squadron replacement, or use the full canopy supplied. The instructions depict two style of under carriage leg, loaded and unloaded, however only the unloaded leg is supplied in the kit. The decals are awful, with virtually no glue on them and they were almost impervious to decal softner. I had to soak the wing insignia in Mr Mark for AN HOUR!! before they would conform to the surface detail and even then, they started to crack. The paper masks supplied are also useless. That said, it's still the best TBD in 1/48 available. I've also decided to keep the aircraft cleanish. As far as I'm aware, VT-8 did not see much, if any action before their fateful mission at Midway. Thus their aircraft looked to be in rather good condition.
- 8 replies
-
- 24
-
-
- GWH
- Devastator
- (and 1 more)
-
 Now that the Su-7 is finished, my dad started the next Russian built aircraft. This time going more modern and exotic. Using the GWH kit with Caracal decals and doing a Myanmar bird.
- 74 replies
-
- 8
-
-
- GWH
- Caracal Decals
- (and 1 more)
-
I bought this kit on a whim at an RAF Waddington Air Show about 4 years ago and it has languished in my stash ever since. Discussions with my SIG members have led us to agree to display at Telford this year so our theme may well be New Zealand in 1/144th. My first entry is XH562 as zapped by the RNZAF when at Ohakea on a visit from its base in Cyprus. Nothing subtle about the the rather large Kiwi Roundels on the sides. The kit is by Great Wall Hobbies as is an absolute joy to work with, everything fits and I had to use absolutely no filler at all, which must be a first for me. The whole thing only took about a week with the longest part being masking the camouflage pattern on the top. I used asset of Fundekkals as all the necessary marking are included as are markings for another 20+ Vulcans. The instructions for the decals are downloaded from their site and are excellent, there is an awful lot more data than you would expect on a set of decal instructions and even surpass the old Modeldecal sheets. My only issue is that I think the nose wheel leg is too long giving the finished model as curious nose up attitude. I must remember to peel the window masking off !
- 6 replies
-
- 10
-
-
- Fundekkals
- 1/144th scale
- (and 1 more)
-
 T-33 Update sets & masks - For Great Wall Hobby Kit 1:48 Eduard The new Great Wall Hobby kit is a good one, however Eduard are along as always offering their update sets for the kit. Here we have 3 sets; Update, flaps and seatbelts. Update Set (49796) This is one brass fret and one nickel one. The coloured parts on the nickel fret are mainly for the cockpit including the main instrument panels, side panels and controls. Other parts in the set include new head rests and firing handles for the ejection seats, canopy coaming, For the landing gear you are supplies with new main wheel hubs, scissor links & tie downs for the main gear legs. There are scissor links for the front gear leg as well as links for the front gear well doors, and a new rear bulkhead for the front gear well. The main gear wells get new interior bulkheads. Finally there are a few fuselage panels to be replaced. Flaps(48903) This is one large brass fret which provides flaps, and wells for the kit. These are the type where all the parts are together and the ribs just have to be bent into position. Seatbelts(49797) This small fret provides a full set of coloured seatbelts for the aircraft. These are the new Steel belts from Eduard. They are etched from 0.1mm sheet, which looks like stainless steel because it doesn't rust, these new belts combine the best of both worlds. The resulting etch is thin at around 0.06mm, and the paint that has been applied after etching is included in that thickness. The paint itself seems to be more flexible too, and the designs have added details such as shadows printed near buckles and joints to give an added depth to the design. They appear less susceptible to fatigue and will stand up to repeated movements, and can be posed much more realistically due to the ease of bending of the surface. The paint is also a lot less likely to flake off at a sharp bend, which is a worry for standard PE belts. Masks(EX533) Supplied on a sheet of yellow kabuki tape, these pre-cut masks supply you with a full set of masks for the canopy, with compound curved handled by using frame hugging masks, while the highly curved gaps are in-filled with either liquid mask or offcuts from the background tape. Wheel Masks are also supplied. Conclusion These sets will enhance your T-33 model. Recommended. Review samples courtesy of
 -
Hi there! This time I release a fulcrum from Great Wall. 1990 version in GDR territory. I saw a discussion on this build here.Some of you like it,I appreciate that! Negative comments also make sense,that's ok.I have to admit a part of panel lines are over-emphasised,and the color is little different from the true one.I shall do more study next time. Thanks for your support again! Enough talk,Here is the pics,wish you enjoy it!
- 26 replies
-
- 15
-
-
The first new build for 2016. It's the McDonnell Douglas F-15B "Eagle" from Great Wall Hobbies. The kit I bought was supplied with the correction sets. So I have to take a close watch on the parts I use. I decided to do an early F-15B Isreali one , due to the fact that the other decal sheets are for later F-15 models, and no AIM-120's were supplied with the kit. For the first time I will leave the radar and some avionic bays open, just need to buy a couple of Israeli RBF tags. I hope it will turn out great. The first impression is that the box is filled up with parts. The box art: The build starts with the cockpit: The parts need some cleaning up: Looks like ejector marks.l And small pins. The seats are provided with seatbelts, but thas about everything. Beside the ejector marks, there is more to clean up: In the circle an example how the parts are attached to the sprues. And results in: Jan Remco
-
 I have had this lovely kit for several months now I picked it up at Milton Keynes IPMS show and have been desperate to start it and not had the time. Today I have started this lovely kit and wish to make a model of the Prototype B2 this will mean deleting the wings carrots , tanks and trimming the leading edge modifying the tail fin and intakes. I am using the Excellent article and Drawings by out very own Bill Clark from SAM August 2006. The Drawings are fantastic by Arthur L Bentley I wonder if there are Drawings for the B1 The initial B2 looked very elegant and similar to the B1 as I have made a model of XH533 the Prototype B2 Vulcan again being similar to the B1 I thought they would make a nice pair and I am fascinated with the early years at Farnborough. Cheers Rob
 -
Hi folks, You all know the beautiful Monogram kit built by Mr Shepherd Paine back in the days. Off course that one sets the standard and is a true beauty, inspiring me to make my own P-61A Black Widow fitted into a small Pasific Vignette. The idea is an engine overhaul after bad weather sand blasting the plane leaving a lot of chipped paint. I used the GWH kit L4802, a kit that has been debated with accuracy issues. Nevertheless it was a great kit with an over all very good fit. I really enjoyed buildning her even I if do find the trend with fitting the landing gears before closing the fuselage(es) very annoying. I added Eduards interior, wheels and engine. The fixed turret and the controls are from Lone Star. Painted with Gunze and Ammo paints using various Ammo products for weathering and chipping (hairspray technique, my very first try). There are some scratch built items such as the crane, the prop gear and the table. The prop blades are from True Details and decals from Zots. The truck is a Tamiya 2,5 ton 6x6 with Aber PE and an Vector engine fitted to the flat bed. The jeep is Hasegawa with leftovers from the Aber PE. The figures are mostly Aires from their new range. Various ground equipment from Brengun and Tamiya is spread around. Thanks for looking /Fred
- 29 replies
-
- 35
-
-
- p-61
- Black Widow
- (and 2 more)
-
My latest build, from GWH's great kit! More info here, hope you like it: http://www.modellingnews.gr/el/%CE%BC%CE%BF%CE%BD%CF%84%CE%B5%CE%BB%CE%B9%CF%83%CE%BC%CF%8C%CF%82-%CE%BA%CE%B1%CF%84%CE%B1%CF%83%CE%BA%CE%B5%CF%85%CE%AD%CF%82/mig-29-fulcrum-9-12-early-gwh-148 Someone please edit the title!!!!
- 23 replies
-
- 14
-
-
GWH Pit Road Vulcan B2 XL444 50 SQN 1982
robvulcan posted a topic in Ready for Inspection - Aircraft
Well I did not think I would get anything in ready for inspection this year, I am not sure but I think this is my first of 2014. I have been doing plenty modelling off site but had to complete something and was particularly drawn to photos of XL444 in her Wraparound scheme. The Kit was a Joy to build she is temporarily on Corgi undercarriage which I repainted as these are more accurate in height, stance and shape than the kit parts though a bit simple, Till I have finished my part scratched ones for her. I decided to tint the windows but have since noticed that its only the front 3 however it seems to add something to it I like. The paint is Revell Gelboliv (yellowish olive) for the green which was brush painted and the Grey is Hu164 From a spray can. Decals : Wolfpack for the roundels which are the right size unlike the kit ones. all the stencils are also wolfpack , Fundekals for the circular panels. So Here are the photos hope you like her. Cheers Rob Sorry for all the photos I was enjoying my new camera Comments both good and bad welcome as always. Cheers Rob and thanks for looking- 52 replies
-
- 22
-
-

Retooled parts for the GWH F-15B/D Kit
Caution Wake Turbulence posted a topic in Creative Models Ltd
Hello, as UK distributor for GWH, I was wondering if you have and information on the retooled parts that are supposedly going to be made available to people who have the F-15 kit: http://www.arcforums.com/forums/air/index.php?showtopic=273138&hl=f-15&st=0 Do you know if and when they will be forthcoming and how they will be distributed? Many thanks, Andrew -
Saw this build over on ARC and thought I'd share it. I've just got this kit, but somehow I don't think mine will turn out anything like this good! http://www.arcforums.com/forums/air/index.php?showtopic=274515&pid=2604576&st=0entry2604576 Andrew
-
Hi folks this is one I am very happy with its the Pit road boxing of the new Avro Vulcan B2 and a wonderful kit the only fault i can pick is the air intakes would be easier to paint if they had made the turbine fans a separate fitting. I managed to do the white inside but the engine faces are white too as i cant think how to paint them but as they are buried deep it does not matter that much. The fit was fantastic and this is the second one if have done and will be making more definatly. The model was painted with Humbrols already excellent but now significantly improved since coming back to the UK. spray cans. I cant believe how good these are at levelling out and giving a gorgeous almost indestructible finish. I used hu 163,165 for the top camo green first then grey with the help of blue tak, hu64 for the undersides, and hu 34 for the white patches and intakes, The radome and fin were hand painted with hu33 with a dash of flow improver from W&N AMAZING STUFF! Its nice to see a model of a vulcan that finally gets the vulcans sinister looking radome outline right the only company that nailed it before was frog. The exhausts were brush painted with the excellent citadel paints chain mail. Any way on to the model all comments and questions welcome. Here XM599 is seen with XL427 Thanks for looking I hope you enjoy this photo loaded post.
- 13 replies
-
- 4
-
-
- avro vulcan
- xm599
- (and 7 more)
-
 After the P-61, the next Great Wall 1/48th aircraft kit will be a Douglas TBD-1 Devastator. Announced at the Tokyo Hobby Show 2011. Source: http://happy.ap.teacup.com/applet/runchickens/2444_1/image V.P.
 -
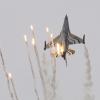
Hi everyone! Here's my next project being built for Issue 2 of Cold War Aircraft Modeller, Great Wall Hobby's stunning 1/48 MiG-29 Fulcrum. This is easily in the top two or three 1/48 kits I've ever built: the levels of detail are incredible and the ease of assembly, finesse and features all have to be seen to be believed! All of the items that you see here are 'from the box' I've simply painted up the kit parts ready for the pictures. I hope that you like them! Spence
- 26 replies
-
- 3
-
-
- GWH
- Cold War Aircraft Modeller
- (and 1 more)
-
Northrop P-61A Black Widow 1:48 Great Wall Hobby The P-61 has the distinction of being the first dedicated night-fighter, and was designed from the outset to utilise radar to intercept enemy aircraft in the dark. Its twin boom format, with two powerful Double Wasp radial engines propelling it (excuse the pun) to speeds that bely its large size. It first flew in 1942, and went into production in 1943, entering service over England in the summer of 1944, where it acquitted itself well advancing into Europe as suitable bases were liberated from the retreating Nazi forces. The A-model was first built with a turret on the central gondola, but this was deleted for the majority of the production run, being reinstated in the later B model. Later in the production run of the A model, hardpoints were added under each wing inboard of the engine nacelles to accommodate fuel tanks to extend the loitering time, however only 20 of these aircraft were made before the B model replaced it on the production line. The GWH kit is their second aircraft release following their successful Focke-Wulf Fw.189. It is a large kit, and arrives in a well stocked top opening box, with an attractive painting of an olive-drab machine strafing locomotive as it leaves a viaduct. Inside the box are nine sprues of mid-grey styrene plus four more circular spruelets containing the cowling flaps, a clear sprue, a separately boxed clear part for the nose radome, a Photo-Etched fret of parts, three small sheets of decals, a resin gun-sight attached to an addendum sheet, and of course a full-colour glossy instruction booklet. A glossy reproduction of the box art is also included for those of us that like to keep that sort of thing. There appears to have been a little confusion over the incorrect nose being supplied in early batches of the kit, but this has been resolved, and by the time you read this the right parts should be included in your box. Our review sample was delayed by the volume of initial sales, so don’t hang around if you would like one – they’re selling fast! The build begins with the large interior, with full detail in the front and rear crew areas, with only a small section in the middle of the fuselage gondola empty, where the turret mechanism would be (if installed on this edition). The pilot’s area is well detailed with multi-part seats for him and the navigator, further enhanced by a set of PE seatbelts. The rear Bulkhead is enhanced with additional parts, and the instrument panel has individual decals for the dials and PE rudder pedals to replace the moulded in plastic sections. A resin gunsight is installed to his instrument panel in an addendum sheet, presumably because this was missed from the sprues on the main production run. Under the cockpit is the gun bay, containing the four M2 Cannons and their support equipment, and the barrels all have slide-moulded recessed ends. The radar operator’s compartment has a forward facing instrument panel, and a swivel chair that again has a set of PE belts. The cockpit sidewalls are detailed with extra parts, including a pair of panels to hide the wing-roots, very similar to the earlier Fw.189. Paint call-outs are made throughout, and there are even a number of decals to detail the instruments on the side walls. The crew access hatch in the floor between the pilot and navigator can be posed open or closed, with the ladder extended or retracted into the hatch door, as can the radar operator's rear door on the underside. Once all this work is complete, the fuselage can be closed up, but the nose gear wheel needs sandwiching between the two halves if installed at this stage, but I would be tempted to adjust the location lugs to allow later installation to simplify masking and reduce the likelihood of damage to this delicate part. An addendum page advises you to put some nose-weight into the small space under the nav/gunner’s chair to prevent the completed model tail sitting. Other than filling the painted radome area with weight, this is pretty much the only part of the fuselage that is forward of the main gear legs, although it may be possible to glue more weight on the bulkhead behind the nav/gunner. The nose mounted radar is built up next, comprising 9 separate parts on a bulkhead that slots inside the nose of the fuselage. It almost seems a shame to hide all that detail underneath a coat of paint within the clear radome, but unless you want to expose it as a “cut-away”, it will disappear forever. The canopy of the Black Widow is stepped, with windscreens for both the pilot and the gunner. As usual with GWH kits, the canopies are crystal clear, and the framing is very well done, frosted over for easy recognition, and with some delicate rivet detail here and there. The large hatch above the pilot’s seat is a separate part, as is the side hatch for the gunner. The rear cockpit has a similar side-opening hatch in the bulged canopy, and the glazing is finished off with the transparent tail cone. There are no masks included with this kit, which doesn’t bother me in the slightest, as the Fw.189 masks were a bit of a let-down, and the complex curves would have made pre-cut masks a nightmare. The crisp canopy lines lend themselves perfectly to Tamiya tape and a brand new #11 blade. A few aerials and bumps are installed at this point, but they would doubtless bite the dust during the rest of the build, so are better left off to the end. The wings are full-length and include the top of the engine nacelle/boom, giving the assembly better strength at the expense of a couple of joints on the top surface. The wing halves are further strengthened by a number of ribs running chordwise inside each part. It’s difficult to see why these were added from a lay person’s point of view, but if fore-aft flex would have been an issue for the wings, it won’t be now! The full-span flaps are sandwiched between the wing halves allowing them to be posed retracted for flight, or deployed for landing. The P-16’s Spoilerons controlled the aircraft’s roll, and rotated out of the wing to reduce lift over that side, causing the aircraft to roll. These are depicted as PE parts, which can be displayed open, or closed by cutting off the triangular deployment mechanism. The interior of the bays have a little detail engraved, and the bulges on the underside of the wing are nicely detailed with rivets. The intakes for the updraft carburettor are moulded into the leading edge, and small inserts hide the join line, adding extra detail in the shape of vertical strakes. In reality these intakes are deeper, with detail inside that is outside the abilities of injection moulding, so correcting that would be down to an enterprising resin company. The two booms are built up around the gear bays, which consist of a pair of bulkheads at either end of an L-section bay. There is no detail on these parts, but a few ejector pin marks will need removing. Behind this structure the bay is open into the interior of the boom, which has lots of rib and stringer detail moulded into the inside. There are quite a lot of ejector pin marks here, so get your sanding tools ready for battle. The large bay door will show plenty of this interior, but it could be tricky finding detail pictures to fill in any blanks. A PE grille is installed just forward of the gear bay, and with a little care it looks like the main gear legs can be installed later in the build. The huge R-2800 Double Wasp engines are represented in full in the kit, with both rows of cylinders, exhaust collector ring and push-rods all in plastic. The ignition harness is supplied as a PE part, and is held in place by the gearbox and final drive. Here you have to choose whether you want to show the cooling flaps open or closed, as they are attached to the rear of the engine, and the exhaust stacks for the opened flaps will complicate painting somewhat. If selecting closed flaps it would simplify painting, as the exhaust stacks aren’t installed and the rear of the engine would be protected from any overspray. The cowlings are single pieces, and nicely detailed thanks to a bit of slide-moulding, although I have the suspicion that the rolled fronts are slightly out in profile, but nothing too serious. It’s surprising how little of the handsome engines will be seen between the prop boss and the cowling, so I’m sure some brave modellers will be tempted to cut the cowlings to reveal all that detail. Another little bit of slide-moulding means that the exhaust stubs all have recessed openings, and it would be a shame to consign those to the spares box. When bringing the main assemblies together, care must be taken to ensure that you include the small flaps inboard of the engine nacelles, as installing these later might be tricky. Here is where a source of major confusion occurs, as the diagrams show a traditional type locating tab at the end of each wing that fixes into a corresponding slot in the fuselage, but the plastic disagrees. Instead, the wing ends are open and affix to the root by butting up against some small ribs that should hold the wing and root in the correct position to avoid large steps. The ends of the wings have large buttressed locating pins to keep the wings from distorting, so everything should work well. My only concern is the long-term strength of this join, and how easy it would be to align both booms correctly as a result. The horizontal tail fits between the booms as the second boom is installed, and it also has a movable control surface. I suspect many clamps, elastic bands and pieces of tape will be the order of the day when bringing all these parts together, and slow-curing glue will give the modeller maximum flexibility. Once the wings and tail are together, the modeller must choose whether to fit the drop tanks inboard of the engine nacelles, and then go on to fill the slot for the outer drop-tanks, which weren’t fitted to the A-model, but aren’t mentioned as needing filling in the instructions. You may want to tackle this job earlier in the build before joining the wing halves. The Widow’s underside is a profusion of doors and hatchways, which are covered in one confused diagram. Take it slowly though, and it shouldn’t be too tricky, although the numbering of the nose-gear doors are reversed, which is covered on the addendum sheet. If you are closing the gear bays, you’ll need to snip off the attachment lugs, and the same is true of the rear accessway, which has some nice PE detail, which needs some thin styrene rod in between the two halves, but this is provided in the bag - a thoughtful touch. The landing gear itself is nicely detailed, and the wheels have blocked-tread, with weighted flats on the bottom. The spaces between the spokes of the wheels are hollow, allowing light to pass through, which is exactly as it should be. I sincerely wish that the GWH designers would enable the parts to be added to the bays later in the build though, as this would prevent a lot of hassle adapting the mounting or masking the legs during painting. The decals are nicely printed in China, and have good colour density, register and a thin carrier film. I usually have no problem with GWH decals, and don’t expect this sheet to be any different as long as they are applied to a suitably glossy surface. Mr Mark Setter from Gunze usually lives up to its name with their decals and lets them settle down nicely into panel lines and around detail. From the box you can build one of the following aircraft: “Lady Gen”, Florennes, Belgium, December 1944 “Sweatin’ Wally”, Myitkyina, Burma 1944 Lady Gen is Olive over grey, while Sweatin’ Wally is overall black, which a great excuse to try out Lifecolor’s new Blacks boxed set containing 6 shades of “black”. A second Stork logo is supplied separately from the “B” sheet, although I cannot find any difference between the two and only one is required for the port side of the fuselage, unless it is simply a backup for a tricky but important decal? Conclusion The release of a modern tooling of this impressive and malevolent looking aircraft is good to see, and although there have been some grumbling about shape issues, if they exist they don’t seem to jump out and scream “wrong!” to this modeller. I am due an eye test though! It seems that lessons have been learned from the production of the Fw.189, and the nacelles are much simpler to build and attach as a result. GWH’s continued use of slide-moulding to enhance their products is to be applauded, and the inclusion of a PE sheet is again welcome. The instructions are for the most part simple to follow, but the two addendum sheets make it a little more complex, and having to flip back and forth could lead to some mistakes. Clearly, the pilot’s gunsight had been missed off from the moulding, but its inclusion as a resin part taped to the addendum sheet is good to see, as many companies might have just ignored the fact and shuffled uncomrfortably when asked. Another great release from GWH, which has that “build me” factor in spades. I’m sure it won’t be long before the later models are released,with the longer nosed and turreted B-model looking favourite and hopefully an F-15A Reporter later on – the post war photo-reconnaissance variant. Their next new release of a 1:48 TBD Devastator will be with us soon, and also promises plenty of detail to keep us happy. Recommended Review sample courtesy of: