Search the Community
Showing results for tags 'Fw190'.
-

Practice building on a Lidl special - FW190
Quiet Mike posted a topic in Work in Progress - Aircraft
Hot on the heels of Mitsubishi Zero, another humble Lidl £5 Special. I don't mind making mistakes on these starter kits, while I rediscover a hobby I'd left behind with the 1980's. Presently I'm not a quick or prolific builder. I only get the modelling itch when the evenings draw in. Also, I'm of limited means (in ££ and space), and can't afford a stash. I have my heart set of a few 1:48 scale kits, early/prewar, like the Walrus, Spitfire and the Blenheim. I want to do these kits justice, so I'm hoping I can pick up on a few much needed new skills on these sacrificial little kits. Airfix FW190 1/72 by Mike, on Flickr I'd heard a few nightmare stories about the fit of this Airfix offering, so it's reputation preceded it. I was impressed with the detail though. I have always had a quiet snigger when I'd read others talk of the Carpet Monster - careless fools! Anyway, after cutting out the control column, and carefully putting it to one side while thinking that would be easy to mislay, I immediately lost it. It was the second part I'd cut off the sprue, a good start. I spent 10 minutes fruitlessly looking, and another 5 minutes making a crude copy, that was good enough. Airfix FW190 1/72 by Mike, on Flickr I struggled joining the fuselage halves together. Well not the halves exactly, but the engine and gun cowlings. I started at the back, gluing the rudder and up to the cockpit. When that had dried I fudged the rest together. I tried to make sure the cowlings were all level, but there were a few low spots that needed to be filled and then sanded. I tried, unsuccessfully, to keep the panel detail. Airfix FW190 A-8 by Mike, on Flickr Next up, some primer, to highlight those mistakes sanding the kit back into shape. I'm making this with the wheels down, so used the wheels up parts to roughly 'mask' the wheel bay interiors. I'm using an old Aerograph Super 63, and Ultimate Primer neat. Airfix FW190 1/72 by Mike, on Flickr Airfix FW190 1/72 by Mike, on Flickr -
Desperate days A 725th BS/ 45th BG B-24H, nicknamed ‘Extra Joker’ was attacked 23. August 1944 during a raid on Markersdorf airfield in Austria. Two FW190 of JG3 attacked them and in seconds a fuel tank was penetrated, almost instantly it caught fire and ‘Extra Joker’ plummeted downwards in a death dive and eventually exploded, taking all ten of her young crew with her. The kill was well documented as their photographer flew as guest on an other ship on this mission, to take photos of their plane. Shocked to see him friends fall to earth in flames, all he could do was to cover their death on film..
-
Here is a 1:48 scale Fw190 A9 that I finished quite a while ago but never posted here. It’s the old Dragon kit re-boxed by Revell. I have a few of these in the stash but had never actually built one before. Kit had the extra broad propellers and the cooling fan with extra blades as well as the A9 hood. Despite its reputation the kit went together well only the finicky fit of the nose/wings (6 parts coming together) being a bit of a challenge. Finished in the brown rather than green RLM 81 just for the pure hell of it. Aircraft belonged to Ofhr. Wilhelm Ade of 2/JG1 stationed at Twente airfield (NL) January 1945. He was the sole survivor of his unit when they got caught taking off 4th January. They were pounced by members of the Canadian 401, 411 en 442 Squadrons 401. Ade survived his crash and his period of time in hospital thereafter probably ensured his survival at a time when the Luftwaffe was being slaughtered. Decals form Kagero's JG1 Oesau (Pt II). I am slowly but surely getting my way through the aircraft featured in these books. regards Brian
-
I decided to pick this one out of my stash to give me something small to do. Plus I haven't built a WW2 German plane before so is a first. The Kit is a few yrs old now but quality is good. Here are the start pics for you . The cockpit looks dark but it actually isn't. Chris
-
Hello, I present you my last kit, I just love the fw190 but spetially the Dora, for some time i planned this one and it took about 8 months or so. The concept behind this one was to show the Jumo 213E engine, which characterizes the Dora series, viewed from one side and below in such manner that both technical detail and also it's distinctive nose shape could be seen. Modifications: it's the 1/48 hobbyboss offering. I used the Aires resine engine and quickboost flaps, among the many modifications where a lot of scratch building, just to mention a few, internal structure of the cowling covers, engine support struts, inner fuselage structure, auxiliary tank, radio and access covers, the cannon bulges , cannons and much more.... The kit was fully rescribbed and fully riveted with rosie, painted with gunze and valllejo acrylics. In full was a very rich experience and the first attempt to superdetail for my part, and i can't wait to tackle another german subject in such depth (the eduard g6 late is winking at me).... in the meanwhile i'm doing a ki 84 Hayate in 48... but it might take a while for that one to reach the skyes over my flat jejeje... hope you ike it.
- 11 replies
-
- 34
-

-
- 1/48
- jumo engine
- (and 1 more)
-
hi here is my fw190 F8 from tamiya kit paints are gunze acrylics
-
Evening all, Thought I'd share my latest completion, my first for nearly two years, and it really shows! Tamiya's 1/72 FW 190 D9. Being horribly out of practice meant I made a catalogue of errors with this one, particularly around the canopy framing which frankly looks awful, and my inability to get a nice, tight line finish from the airbrush without spatter means this falls into the category of looking good from a few feet, but its nice to have got something built and regain some enthusiasm after such a long hiatus... Tamiya 1/72 Focke Wulf FW 190 D9 by Shaun Schofield, on Flickr Tamiya 1/72 Focke Wulf FW 190 D9 by Shaun Schofield, on Flickr Tamiya 1/72 Focke Wulf FW 190 D9 by Shaun Schofield, on Flickr Tamiya 1/72 Focke Wulf FW 190 D9 by Shaun Schofield, on Flickr Thanks for looking, comments welcomed, Shaun
- 11 replies
-
- 27
-
-
Here is a few photos of a Revell 1:72 Fw190 A8 converted to an A7 of JG1. Not sure if it was actually a A7 as they were pretty rare but thats what the book says ........;) Decals were courtsey of Kagero's book on JG1. Finished the kit at the end of last year only getting around to making soem photos now. regards Brian
-
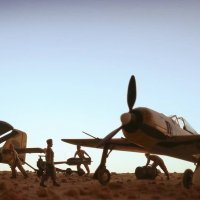
I won't dwell on the kit in much detail - as most here will have read thorough reviews or seen WIPs - but it's a real treat to build. Lovely detail, and nicely engineered. My only issues was that for some reason the top of the instrument panel ended up too high, and as a result the instrument hood (?) didn't fit. Took a bit of whittling. My fault I am sure. I don't have an airbrush, which has always put me off making planes which require the typical Luftwaffe mottling along the fuselage. But I do love the FW190, so doing a desert scheme seemed a neat sidestep of the mottling fear. I got the tropicalised Eduard resin cowling, which was my first resin aftermarket experience. I was a little surprsied that there were no instructions about how to fit it to the plastic kit. Not sure if I did it wrong but I ended up having to chop quite a lot of interior parts off to make it sit flush. Anyway - it's a lovely and detailed addition. Kit was painted with Citadel primer and tamiya rattle cans. All details brush painted. And then weathered with oil paints. Pretty happy with the result. And a kit I would recommend to anyone! I made up the markings, and used a fun spare of what looks like snoopy walking over Africa with a bomb... Think it was from an Eduard Bf108 kit sheet. Cheers, Bruce
- 20 replies
-
- 39
-
-

-
- eduard 1/48
- fw190
- (and 1 more)
-
Hi guys! When I took pictures of a another model, I also improved photos from one of my first Eduard models. This is a Fw 190A-8 kit in 1/72 scale, which I build few months ago. I added to this kit brassin fuselage guns (fit perfectly!), brassin wheels, brassin exhaust stacks and Master armament set with pitot tube. Model was painted with Gunze and Tamiya paints. Weathering I make with oil paints for artists, dry pigments from Ammo mig and Tamiya Weathering Master sets.
- 10 replies
-
- 22
-
-
Hey, here I present you my last build: Fw190A-5, Eduard 1/72 ProfiPack. I had added some extras to this build, her corresponding Flaps, some more details in PE, and the engine and fuselage guns, all from the same manufacturer. This is, for now, my very most difficult build because of the tiny of this size. The engine and the guns are so small for my big rude fingers! It was a challenge.... Well, I'm happy with the result. I have had some mistakes at the time to mount the engine, it was a lot of try and failure. The upper cowling cover also is a little bit bent from the correct line. Also there is some silvering in the decals. But it is not bad at all, for my short expertise. I have in my stash 4 more models in this scale, but I think I'm not gonna buy any other more at 1/72 because of mi sight!
- 26 replies
-
- 38
-
-
- butcherbird
- eduard
- (and 1 more)
-
 So guys and girls, Here she is. After almost seeing the darkness of the round archive (aka dustbin), she made it. The whole adventure can be followed in this WIP So I learned some stuff here. First how to prime with a spray can, secondly I will cut the decals following recesses next time and gloss coat them. Third I use an accryllic gloss and it is possible gluing parts after that coat with standard glue.I feel my painting skills have improved a bit and I like the highlighted effects like on the machinegun cover. The Revell kit is nice with good detail and looks good to me. I leave the accurency issues to those interested. It just has the gap at the wingroots as fault. The rest what is wrong is what I have done. The model only comes in a closed canopy variant and I took a spare from an Airfix kit. When I see what detail of the cockpit still is visible I will not do that again in this scale. Also I havent attached the extra machine guns. Though I needed to drill quite some holes, the holes for those guns arent specified. Carefull reading of the instructions could have saved me but when I noticed it was too late. Also I didnt attach the antenna wire because I couldnt find an attacment point on the copula. Experimenting on the spare copula made conclude that I will mess up the copula so I didnt try. It seems I have trouble with installing the legs of the plane also this time it was troublesome at least, dont look into the wheel wells! For the rest enjoy and feel free to comment. Greetings TC Sorry for double posting the link cant remove it
- 20 replies
-
- 23
-
-
Hey guys and gals I started with the Fw night fighter. First try for a mottle sheme, so lets go. Started with painting the interior. Revell provides nice detail here and I think it looks pretty nice. Gr TC
-
Hello Everyone, The Fokker Wolf 190 is one of my favourite WWII planes and I have been looking forward to starting this kit from Eduard. I really liked the last Eduard kit I made and this kit looks even better, the rivet detail on the wings and fuselage looks awesome so can't wait to see the finished model. I used Gauzy Agent, applied with a tooth pick to create the lens in the instrument panel. Almost completed cockpit, I will varnish it and then give it an oil wash next That's all for now,
-
 Hello guys; I recently finished this model. It will be a future part of a Mistel composition: FW190 A8 +TA 154. It's a complicated kit with bad fittings. It's out of box and I used Dousek's riveter. Tamiya's mix were used. Ta154 is on production. Cheers.
- 11 replies
-
- 13
-
-
-
Hello; Here's my latest built: Eduard's 1/48 Fw190D-13 W.Nr.836017 Stab./ JG 26. It's a great kit, but not perfect. The main colour is Tamiya and the decals are from the kit. I built oob. All comments very welcome. Cheers, Cristian Zarichta
- 15 replies
-
- 26
-
-
SO i was reading through "Luftwaffe Fighters, German WW2 Designs by Claes Sundin, and i came across the FW 190 A-5Y, it didn't say what modification it had. I as far as I know Y is not a standard German modification to any plane, can some one help me out and tell me the difference between the Fw 190 A-5 and the Fw 190 A-Y. Fw 190 A-5Y
-
Hello, this is my last finished model. Because of the university it took me a long time to finish it but I had fun in the process. This Eduard kit is excellent but it requires attention in the assembly because you can have problems of fitting later, even more if you use the aftermarket resin parts. Decals are great and the detailed level is high. I have included: Eduard PH parts to the cockpit and exteriors Eduard Masks Eduard Brassin fuselage guns Terrains Dark Earth from Ak interactive and WWS static grass (4mm and 2mm) for the base It was painted with the K4 paint set 2 for Luftwaffe Aircraft , and weathering and scratches were made with Gray and Blue Camouflage AK paneliner, K4 pigments sets and pencils. It represents the Fw 190A-5 Werk No. 2594 flown by Maj Hermann Graf CO of JGr Ost on Bordeaux, France, Spring 1943. .
- 26 replies
-
- 35
-
-
This is the first job I do in 20 years. I know it has a lot of flaws, but for the time I did not pick up a brush I'm pretty satisfied. He will form part of a diorama along with a Ju 87 R Stule from Revell to represent an aerodrome in the northern Algeria of Afrika corps. I hope you like it. Soon I will upload more photos of the Stuka and the diorama. Good flight!!!
- 11 replies
-
- 18
-
-
- Tamiya
- Afrika corps
- (and 1 more)
-
FW190F-8 Weekend Edition 1:72 Eduard The Focke-Wulf Fw 190 was designed by Kurt Tank in the late 1930s. His aim was to create a fighter that was not only fast and agile, but also reliable. It had a wide track undercarriage to improve ground handling and also utilised electric rather than hydraulic controls to reduce the risk of system loss in combat. The Fw 190 also marked a departure from aircraft like the Bf109 and Spitfire as it combined a 14 cylinder radial engine with a development of the NACA cowling system. This choice was crucial as it meant that the Fw190 would not create additional demand for DB 601 liquid cooled engines. It also allowed a low drag profile for such a powerful engine. Despite early teething problems, the Fw 190 first entered operational service over France in August 1941. It proved to be quite a shock for the RAF whose 1440hp Spitfire Mk.V, the best fighter available at the time, was outclassed in terms of firepower and all round performance, particularly at lower and medium altitudes. The Fw 190 F8 was a fighter-bomber variant developed from the A8 fighter, but with a revised supercharger for improved low-altitude performance and bomb racks under the wings and fuselage. Eduard have long been capable of churning out excellent kits, but in 2011, with the release of their Hellcat series, that they really set a new standard for plastic kits in the smaller scales. Since then, they have added several superlative kits to their lineup, including the BF110 series, MiG-15 and MiG-15UTI series and their latest release, the Spitfire Mk.IX. They are still adding to their range of Fw 190s though, the newest of which is the F-8. This version of the kit is part of the Weekend range, which means it omits the paint masks, photo etched details and and multiple decal options of the Profipack range in favour of a lower price. The kit itself is made up of over 200 plastic parts spread across of three sprues of blue-grey plastic (although a significant number of these are not used for the F8) and a single clear sprue with the now-familiar circular layout. The instruction book is a glossy, stapled booklet with full-colour painting diagrams. As you would expect from Eduard, the quality of the plastic parts is second to none. The mouldings are clean and crisp and there are no traces of flash or sink marks. The surface detail on the outside of the airframe comprises recessed panel lines and delicately engraved rivet and fastener detail. It looks absolutely superb. Eduard haven't skimped on the detail elsewhere either; sub-assemblies such as the cockpit are right up there with resin items when it comes to the quality and quantity of detail. The cockpit is truly phenomenal for a kit of this size, even without photo etched parts - in fact the only thing I would add would be harnesses for the seat. Once assembled, the whole thing can be sandwiched inside the fuselage halves along with the firewall and the basic-but-good-enough-in-this-scale engine. Setting the semi-completed fuselage to one side for a moment, construction turns to the wing. The lower wing is moulded as a single span, to which the main spar (which also forms the rear wall of the main landing gear bays) must be added. The other parts which form the structures and details of the landing gear bays must also be added at this point, prior to everything being fixed in place by the addition of the upper wing surfaces. If you wish to use the supplied bomb racks, remember to drill out the appropriate holes at this point. The ailerons are moulded separately to the rest of the wing, which opens up some possibilities for the diorama builder, as well as enhancing the level of realism. Turning back to the fuselage, the rudder is also moulded as a separate part while the tail planes are solid lumps. In common with other kits of the type, the upper fuselage forward of the cockpit is moulded separately (in this case as two parts with a third for the cannon barrels). Once the basic airframe is together, it’s time to fit the undercarriage and other finishing details. Each of the main gear legs is made up of two parts. The wheels themselves are made up of nicely moulded tyres and separate hubs. This should make painting them much easier. As this is the F8 version, you get an extra sprue containing a wide choice of ordnance including a drop tank, three different types of bomb and two different types of rockets and launch rails. A number of small parts are included to cover the final details, including the aileron balance weights and various aerials and antennae. The canopy deserves a special mention as there are different parts for closed and open options. Two propellers are included as well, although only one is needed for the included options. Because this is a Weekend edition kit, two schemes are catered for on the decal sheet – an FW190F-8 of SG-2, Hungary, Late 1944/early 1945 (as depicted on the box artwork) and an aircraft of Stab III/SG 10, Vysoke Myto, Czechoslovakia, May 1945. This aircraft is finished in an interesting scheme, with an RLM 83 fuselage, RLM 74/75 upper wings, and RLM 76 undersurfaces with a yellow rudder and band around the cowling. Four-view colour profiles are printed in the instructions, while there is a seperate diagram for the stencils. The decals themselves look thin and glossy, so hopefully they will prove easy to apply. Conclusion While we're not exactly short of kits of this type, there's no denying that Eduard have delivered the definitive kit of the Fw190 as well as providing a prime example of the kit maker's art. The level of detail they have packed in is as superb as the engineering is excellent, and the kit appears to be accurate in every major way. Highly recommended. Review sample courtesy of
-
I'm about to start building Airfix's 1/24 scale Focke Wulf 190 A5/6, a long cherished dream to build a 1/24 scale aircraft again. This will be only my second aircraft build in this large scale, and the first one was in about 1978 or 1979 when I was either 12 or 13 years old. Hannants lists a number of after market accessories for the Airfix FW190, and I'm sure none of them appeared until decades after the said kit first came out. The kit came out about late seventies or early eighties, but I'm sure the after market stuff manufactured by the likes of Aber, Master and Eduard didn't come out until the 2000s? It's great to have them to spruce up an old kit. I have ordered sets of guns and seatbelts to enhance the FW190, but does anybody know if there are aftermarket exterior panels available, such as those that cover the gun bays and the radio compartment to the rear of the cockpit? Hannants has in stock landing gear by Scale Aircraft Conversions for the Trumpeter FW190D, but does anybody manufacture landing gear for the FW190 A version? The landing gear for the D version is metal, and thus stronger. I've checked Scale Aircraft Conversions' web site but there is no landing gear for the A version. Could this kit also be enhanced with after market ailerons, slats, tailplanes and fin? There is always the possibility of course for the modeller to do scratch building where there are no commercial products available, but I don't think my skills stretch far enough for that. Or put it this way, I don't think I would be able to invest enough time to do it, on top of what could be a lengthy project just by building it OOTB. I would also like to insert the Airfix motor made to go with 1/24 scale aircraft in order to turn the propeller but this item seems to be out of stock everywhere now. If anybody knows where I might obtain one I would be grateful. On the other hand, there are other small motors available that will do just the same.
-
Hi all, this is Eduard's Fw190, out of the box, using the supplied decals. I got this after building the Airfix A-8, which I really liked the look of when finished. I'm using the same hangar (last time, promise!) A great kit, nicely detailed that fell together-recommended...(still not sure if I prefer the look of the Airfix though!) http://i68.tinypic.com/2wntxr5.jpg[/IMG Thanks for watching.. cheers, Dave
- 16 replies
-
- 23
-
-
Hello! After finishing my third model as part of the P-51 Mustang Group Build (link), I have decided to take some "risk" by taking one of the kits on my stash and try a few things I've been researching during a few months on the web and youtube related to painting and weathering techniques. I know that there are many other ways of finishing a model, but the ones I'm interested on are the following: - Priming - pre shading - post shading - chipping - oil washes - pastels The victim for this little project is a Focke-Wulf Fw190A-8 from Airfix in 1/72. Nice kit so far, not the best fit to say the least but it will serve the purpose. The paints I'll be using are only Tamiya acrylics, and I'm fully aware of the need of mixing these to approach to the RLM colors, but that would exceed the purpose of what I'm trying to do here. So I will only use the closest colors to my references, but I'm not trying to achieve any historical accuracy on this one. The primer is Tamiya grey and the silver for the chipping will be AS12 decanted and airbrushed. Clear coats will be future, X22 and XF86. For the chipping I plan to use liquid mask from Microscale products. Please feel free to correct me or suggest other ways and alternatives to do things at any moment. My intention posting this here is to have the chance to keep learning and I'm willing to know your opinions and ideas. So here are some shots of the process so far: Dry fit test and cockpit parts ready for painting: cockpit painted After first coat of primer So there she is so far, I'll update as soon as I have some progress. Thank you, Jorge
-
Fw 190F8 Profipack Edition 1:72 Eduard The Focke-Wulf Fw 190 was designed by Kurt Tank in the late 1930s. His aim was to create a fighter that was not only fast and agile, but also reliable. It had a wide track undercarriage to improve ground handling and also utilised electric rather than hydraulic controls to reduce the risk of system loss in combat. The Fw 190 also marked a departure from aircraft like the Bf109 and Spitfire as it combined a 14 cylinder radial engine with a development of the NACA cowling system. This choice was crucial as it meant that the Fw190 would not create additional demand for DB 601 liquid cooled engines. It also allowed a low drag profile for such a powerful engine. Despite early teething problems, the Fw 190 first entered operational service over France in August 1941. It proved to be quite a shock for the RAF whose 1440hp Spitfire Mk.V, the best fighter available at the time, was outclassed in terms of firepower and all round performance, particularly at lower and medium altitudes. The Fw 190 F8 was a fighter-bomber variant developed from the A8 fighter, but with a revised supercharger for improved low-altitude performance and bomb racks under the wings and fuselage. Eduard have long been capable of churning out excellent kits, but in 2011, with the release of their Hellcat series, that they really set a new standard for plastic kits in the smaller scales. Since then, they have added several superlative kits to their lineup, including the BF110 series, MiG-15 and MiG-15UTI series and their latest release, the Spitfire Mk.IX. They are still adding to their range of Fw 190s though, the newest of which is the F-8. This version of the kit is part of the Profipack range, which means it benefits from the inclusion of masks, photo etched details and a no fewer than five decal options. The kit itself is made up of over 200 plastic parts spread across of three sprues of blue-grey plastic (although a significant number of these are not used for the F8) and a single clear sprue with the now-familiar circular layout. Being a Profipack, photo etched parts and masks are also included. The instruction book is a glossy, stapled booklet with full-colour painting diagrams. All together, the impression is of a quality package. As you would expect from Eduard, the quality of the plastic parts is second to none. The mouldings are clean and crisp and there are no traces of flash or sink marks. The surface detail on the outside of the airframe comprises recessed panel lines and delicately engraved rivet and fastener detail. It looks absolutely superb. Eduard haven't skimped on the detail elsewhere either; sub-assemblies such as the cockpit are right up there with high end resin items when it comes to the quality and quantity of detail. The cockpit is made up of over thirty parts (including photo etched details), which is a truly phenomenal for a kit of this size. The photo etched parts cover obvious items such as the rudder pedals, seat harnesses and instrument panel and side consoles, although for the latter two items there are plastic alternatives. They really help to raise the level of detail a notch. Once assembled, the whole thing can be sandwiched inside the fuselage halves along with the firewall and the basic-but-good-enough-in-this-scale engine. Setting the semi-completed fuselage to one side for a moment, construction turns to the wing. The lower wing is moulded as a single span, to which the main spar (which also forms the rear wall of the main landing gear bays) must be added. The other parts which form the structures and details of the landing gear bays must also be added at this point, prior to everything being fixed in place by the addition of the upper wing surfaces. If you wish to use the supplied bomb racks, remember to drill out the appropriate holes at this point. The ailerons are moulded separately to the rest of the wing, which opens up some possibilities for the diorama builder, as well as enhancing the level of realism. Turning back to the fuselage, the rudder is also moulded as a separate part while the tail planes are solid lumps. In common with other kits of the type, the upper fuselage forward of the cockpit is moulded separately (in this case as two parts with a third for the cannon barrels). Once the basic airframe is together, it’s time to fit the undercarriage and other finishing details. Each of the main gear legs is made up of two parts, although you have the option of removing the plastic torque links and replacing them with photo etched versions. The wheels themselves are made up of nicely moulded tyres and separate hubs. This should make painting them much easier. As this is the F8 version, you get a whole extra sprue containing a wide choice of ordnance including a drop tank, three different types of bomb and two different types of rockets and launch rails. Alternative photo etched parts are provided for the ballistic tails of the bombs. A number of small parts are included to cover the final details, including the aileron balance weights and various aerials and antennae. The canopy deserves a special mention as there are four rear sections included; blown and unblown, with different parts for closed and open options. Two propellers are included as well, although only one is needed for the included options. Decal options are provided for a generous five aircraft: Fw 190F8 5./SG 77, Cottbus, Germany, early 1945. This aircraft is finished in RLM 74/75 over RLM 76; Fw 190F8 SG 2, Hungary, late 1944/early 1945. This aircraft is finished in a similar scheme, but with a temporary winter whitewash and a red cowling ring; Fw 190F8 1./SG 4, Piacenza Air Base, Italy, 1944. This aircraft is finished in RLM 79/80 over RLM 76; Fw 190F8 W.Nr. 584592, SG 2 or SG 10, Nuremburg, Germany, May 1945. Finished in RLM 81/83 over RLM 76; and Fw 190F8 SG 10, Ceske Budejovice, Czechoslovakia, May 1945. Finished in RLM 83 over RLM 76. Each option is illustrated with a four-view profile as well as detailed illustrations of the propellers or drop tanks where appropriate. The decals, which are printed by Eduard, look crisp, thin and glossy and the colours used are nice and bold. Conclusion While it may be a fairly uninspired choice of subject, there's no denying that Eduard have delivered the definitive kit of the Fw190, as well as providing a prime example of the kit maker's art. The level of detail they have packed in is as superb as the engineering is excellent, and the kit appears to be accurate in every major way. Overall this is a winning package and can be highly recommended. Review sample courtesy of
-
Hey guys, Finished this guy last night. A Focke Wulf 190 D9 of Jagdverband 44, it's iconic striping serves to distinguish the plane by friendly AA gunners as it was employed to cover the Me 262 when it was vulnerable during take off and landing (I think). I am quite happy with it. The kit is very good, nice crisp moulding, standard Tamiya. The plastic is maybe overly soft if I was to be really picky, but good to work with all the same. A small kit, still relatively well detailed for it's size even with everything being on one sprue. Also the decals are pretty thick (All except the crosses on the underside of the wings that are apparently very thin and I wish I had just painted because the white is still a bit visible) I painted the striping on, started with a white base across the whole underside, then with thinly sliced Tamiya tape (using the decals as reference) to mask the white stripes (this plane should be the band's logo). Then with the red, I was careful to under thin the paint for spraying so it came out quite thick and thus didn't run under the tape (It actually worked! I know I was surprised as well) Apart from that it was just a pretty standard little Fw! I recorded the full build of this which will also be posted along with the SU-2 and Norwegian Harrier GR1 that I recently shown on here to my Youtube channel as soon as they're pasted together (MURRODELS) Thanks for reading, what do you's think? Hope you's catch the videos once they're out, cheers!
- 4 replies
-
- 7
-
-
- Fw190
- butcherbird
- (and 1 more)