Search the Community
Showing results for tags 'Fokker'.
-
Fokker D.VI 1/32 Roden The D.VI is not as well known as other Fokker fighters of the Great War, but it sits chronologically between the DR.1 Triplane and the superb D.VII. In fact it was entered into the same Idflieg 'Fighter Competition' at Adlershof in January 1918. It was already outdated with its rotary engine unable to provide the power levels of the inline engined D.VII. However a small number of them found a niche as Home defence fighters, as they were able to start up and take off immediately enemy bombers were approaching, whereas the inline engined aircraft had to take time to warm up. The Roden kit is based on their earlier DR.1 Triplane kit, with a new set of biplane wings as the main change. It also has the advantage of almost no rigging. The LMG/08 Spandau guns are solid mouldings, but they also provide unjacketed ones for aftermarket etched jackets - I used some Eduard ones I had on a Fokker D.VII set. The fuselage is pretty much the same as the Triplane kit. It comes with a full set of lozenge decals, which I was bit wary of having found previous Roden decals to be problematic. But these are a quantum leap forward, a vast improvement, they were easy to use, settled down well, and the colours are pretty good. So forget any previous experience with Roden decals, these are really good! On with the photos: I added some brass etched stitching to the under fuselage centre line. Thanks for looking, John
-

Fokker Dr.I "Red Baron" 1/72 Eduard
Сергей Никитин posted a topic in Ready for Inspection - Aircraft
Hello hobby colleagues) Today I have one of my old assemblies for you. The plane of the "Red Baron" Manfred von Richthofen - Fokker Dr.1. I got the model from Eduard in Profi Pack absolutely by accident. And then he fell in love with this three-winged bug. The assembly was a lot of pleasure, although my Russian colleagues, modelers, scold this model. So, enjoy your viewing) -
 Fokker D.VII (OAW) Seven Swabians 1:32 Wingnut Wings Got a week off work so plenty of time to pull a 'big' build out of the stash and make a decent start. I've been itching to do the Wingnut Wings Fokker D.VII (OAW) for a while now, but had a massive problem in that I could not decide on which colour scheme to finish it in. It is a problem in a good way, because there are so many really attractive ones to choose from. For sure I want to do 3 OAW versions, Franz Buchner's and Willhelm Leusch's...... ...and the 'Seven Swabians' from Wingnut Wings own 'aftermarket' decal sets. I knew that if I chose just 1 of these schemes and stared the kit, I would regret not choosing one of the other 2! I solved this problem by dipping my hands deep into my pockets and ordering 2 more of the OAW kits. 'A modellers got to do what a modellers got to do' and I can't get enough of Fokker D.VII's. Anyway, good progress has been made, and this week has reminded me why I enjoy Wingnut Wings kits so much. This has been pure modelling pleasure, such a beautifully engineered kit. All this is out of the box, apart from the stretched sprue bracing wires & control runs, plus the ignition leads on the engine from black and yellow twisted thread soaked in white glue. Cockpit & engine bay; Daimler-Mercedes 200hp D.IIIau engine; Engine & Prop in place; In one fuslage half. Note the 'faded interior' side of the external lozenge fabric. Although this aircraft has a painted pale grey fuselage, it was delivered in lozenge fabric which was the overpainted on the outside. Wings will be covered with lozenge decals, but I have undercoated these with sutable base colours. A painted finish is essential to give the decals something to bite on to. The 3 builders of the D.VII (Fokker, Albatros, & OAW) all had their own distinctive cowling panels. I've prepared the OAW specific ones, and airbushed the insides with Citadel 'Runefang steel'. Next stage is to zip up the fuselage. Thanks for looking, John
 -
Modelling abhors a vacuum. After Wingnut Wings (WnW) demise (link) Meng is taking up the torch with a 1/32nd Fokker F.I, Dr.I (early & late) kit - ref. QS-002. Sources: http://www.meng-model.com/en/contents/59/290.html https://www.facebook.com/story.php?story_fbid=3079892082124095&id=195290177250981 V.P.
-
 Eastern Express has just released 1/144th Fokker F-27-200 kits - ref. EE144115-1 - Fokker F-27-200 Balair Source: https://hobbyterra.com/product/fokker-27-200-balair-eastern-express-144115-01.html - ref. EE144115-2 - Fokker F-27-200 Air UK Source: https://hobbyterra.com/product/fokker-27-200-air-uk-eastern-express-144115-02.html - ref. EE144115-3 - Fokker F-27-200 Finnair Source: https://hobbyterra.com/product/fokker-27-200-finnair-eastern-express-144115-03.html - ref. EE144115-4 - Fokker F-27-200 SAS Source: https://hobbyterra.com/product/fokker-27-200-sas-eastern-express-144115-04.html - ref. EE144115-5 - Fokker F-27-200 North West Source: https://hobbyterra.com/product/fokker-27-200-northwest-eastern-express-144115-05.html - ref. EE144115-6- Fokker F-27-200 All Nippon Airways Source: https://hobbyterra.com/product/fokker-27-200-all-nippon-airways-eastern-express-144115-06.html V.P.
- 20 replies
-
- 1
-

-
- Eastern Express
- Fokker
- (and 1 more)
-
 This is the 1/72 Roden Fokker D.VII (OAW Mid) kit, finished in the markings of Ltn. Rudolf Stark when he was commander of Jasta 35b in August 1918. Plenty has been written about Roden's Fokker D.VII kits and much of it is pretty uncomplimentary; most of it is also true. Although it looks very well detailed in the box and significantly more delicate than Eduard's example, very little fits without widening, narrowing, shortening, lengthening, filling, fiddling and fettling. The lozenge decals are brittle and unyielding to Microsol or Mr. Mark Softer, and even after plenty of both was used, along with very warm water, significant pressure was required to get the decals to conform, and that pressure tore and shattered many of the edges necessitating much hand retouching of missing lozenge. Roden's rib tape decals were completely unusable and split into varying lengths on contact with water, even after overcoating with two coats of Future/Kleer on the sheet. Eduard's newly released sheet of rib tapes, while intended for their recent kit, fit the Roden kit quite well, so they were used instead. The remaining Roden decals were variable, with the crosses and personal markings working quite well, and the codes and stencils silvering quite badly. There's around 120 decals on this model and, to be honest, finishing it became a chore about three weeks before actual completion, so the control lines remain unfinished for now and I'll return to them eventually. But the final result is quite pleasing and it looks good in the cabinet alongside Udet's 'Lo' and Berthold's winged sword examples, both of which I made years ago from the Esci kit. I built it alongside Roden's 1/72 Fokker Dr.I, finished in Vzfw Ulrich Neckel's Jasta 12 markings from April 1918. This kit isn't as bad as the D.VII with respect to fit and decals (no lozenge for example) but it's no shining example of state-of-the-art and was less frustrating but not completely trouble-free. Triplane aficionados may note that the upper support struts do not match the location of the lower struts. This was an error of my own making when I failed to increase the length of the cabane struts (they're about 2-3 mm too short out of the box), which threw out the wing geometry. Once again, I'll live with it; it looks OK in the cabinet. There are less frustrating kits of both of these aeroplanes offered by Revell and Eduard; choose one of them if you want a trouble-free build. But with better lozenge, care in building and a bit more planning, both of these can build quite nicely. I have a few more in the stash, especially the D.VII and I'm sure I'll build more down the track. Cheers, Jeff
 -
More precisely, here's one I started making around 14-15 years ago. It sat in the stash about a third finished until I pulled it out earlier this year, opened the Windsock Datafile on the Fokker Dr.I and spotted the colour profile of this aeroplane. It represents a Jasta 11 machine at Lechelle airfield in March 1918. The colour of the rear fuselage is speculative and, according to the Datafile, could equally be pale yellow. I liked the simplicity of Fokker turquoise so went with that option. The kit is the Roden 1/32nd Fokker Dr.I, built mainly from the box but with the addition of leading edge stacking pads and rivets around the cowling, both done with a punch and die, under-fuselage stitching made from small pieces of stretched sprue, and lead foil seatbelts with buckles from plastic card and some old etched brass from a Flightpath (I think) generic buckle set. The rigging and control lines are done with INFINI Model 1/32 Aero Black Rigging and Albion Alloys TB2 turnbuckles. Markings are a combination of the kit decals (many of which disintegrated in water and had to be pieced back together on the model) for the data placard, propeller logos and national markings, and masking for the pilot's personal markings on the rear fuselage. The bicycle is from the Tamiya 1/35 German bike riders set, as is the slightly modified figure, with a few uniform changes to make him look a 'little' more World War One. He's far from accurate but works quite well I think. The Alsatian was gifted to me many years ago by a fellow modeller when I originally set out to do this vignette. The barrels are solid resin but I have no idea of the manufacturer. Paints are Tamiya and Gunze Sangyo acrylics for external colours, and Humbrol enamels for details. The groundwork is done with Wilko brown wood filler, kitty litter and some fine railway ballast, all fixed into place with Johnson Kleer then painted, washed and dry-brushed. The grass is Jordan scatter fixed with diluted PVA, and the weeds are Heki moss. The groundwork was then flat-coated once the other fixed elements were glued into place. The vignette itself may not be accurate but it does look good in the case and it saves another model from the shelf of doom. Hope you like it. Cheers, Jeff
-
HA Models is to release a 1/72nd Fokker S.II resin kit. Source: http://www.hollandaircraft.nl/resin_kits.html Instructions: http://www.hollandaircraft.nl/F90 Fokker S.IIa.pdf V.P.
-
 Hey everyone! Well, here goes for my first build & first "in progress" post on this forum=> as mentioned in my very first introduction post, I'm back into modelling after about 10 years inactivity in the hobby and i chose Wingnut Wings Fokker E.II "Max Immelmann" as my very first kit to get things started again. Quite a challenge as there are many firsts involved with this build: first 1/32 scale model, first WW1 aircraft model, first time working with EZ line, first time working with turnbuckles etc. But i love the quality of this kit and with enough time and patience, i think i'll be able to turn it into something presentable. I also bought a couple of extra's with it which i read would be a real add on: 1/48 Gaspatch Type C turnbuckles for in the cockpit (this smaller scale looked better in the cockpit based on the pictures i saw in the construction manual). 1/32 Gaspatch Type C & One end turnbuckles Albion SilverNickel tubes 1/32 Master Spandau 08 1/32 Master ammunition feeder for Spandau 08 I'm a slow builder, so please bear with me. I'll try to post new photo's when i've made some progress. First photo's below are of the kit itself with some of the extra's + the first parts i'm currently busy with. The cockpit is coming along nicely with some EZ line used for the pedals + i've tried to paint some of the "wriggly" pattern on the engine cowling parts using a combination of Humbrol matt Aluminium and Testor's Chrome Silver. I don't use an airbrush as i've always painted by hand, so the smooth transitions between colours is rather difficult to achieve. But with a combination of acrylics, enamels, oils and inks, i should be ok for a decent finish of all the parts. Best regards, Dolf
- 17 replies
-
- 10
-
-
- 1/32
- Wingnut Wings
- (and 1 more)
-
Future One Man Model - 3D printed models - projects: Fokker F.XXII & F.XXXVI Source: https://www.facebook.com/permalink.php?story_fbid=1071302283066102&id=100005590215920 V.P.
-
Fokker E.V Lozenge (Limited Edition) 1:72 Arma Hobby The Fokker E.V was a German parasol-winged fighter which entered service during the final months of the First World War. The aircraft was delivered to Jasta 1, Jasta 24 and Jasta 36 in late July 1918. Leutnant Emil Rolf scored the first victory with the type on 17 August 1918, but was killed two days later when his aircraft's wing collapsed in flight. Following another similar failure, the wing failure was investigated and found to have been caused by poor construction techniques. Once remedied, deliveries continued, but with the aircraft now known as the Fokker D.VIII. Although relatively few aircraft were completed in time to see service, some were captured by Polish forces and employed during the Polish-Soviet War of 1919-20. This is the first Arma Hobby kit that I've seen, and I have to say I am extremely impressed. The plastic parts are as well-made and as detailed as anything I've seen from any of the big names such as Eduard or Tamiya. Panel lines are fine and crisp and there are no obvious flaws anywhere. The decals look excellent, while the full-colour instructions are equally impressive. The only downside is the box, which is about as robust as the box that comes with a Big Mac. Thanks to MyHermes, my copy is well and truly squished. Inside the frangible box is just the one sprue, as well as the decals and instructions. Construction gets underway by fitting the internal framework into the sides of the fuselage. The lower fuselage/cockpit floor follows suite, along with the pilot's seat, rudder pedals and control column. The level of detail is very good for the scale and diminutive size of the aircraft. The upper-front part front part of the fuselage is moulded separately and the forward struts for the parasol wing are moulded as part of this section, which should help with alignment. The pair of Spandau machine guns are very nicely rendered too. Further evidence of clever engineering is present in the landing gear sub-assembly. The fore and aft struts on either side are joined by a fine piece of sprue in order to ensure they are angled correctly. A small plastic jig fits between the port and starboard sides, thus ensuring everything lines up perfectly. Once the glue is set, the small pieces of sprue and the plastic jig can be cut away, resulting in (hopefully) perfectly aligned landing gear. The rudder, elevators and parasol wing are all solid parts, with just two struts used to support the tail and a further two to support the wing. The engine is a two-part affair and is very nicely done, while there is a choice of two propellers. The colourful decal options include: Fokker E.V 193/18 "002" 7. Eskadra Lotnicza, Lvov-Lewandowka Airbase, May 1919; Fokker E.V 158/18 "003" 7. Eskadra Lotnicza, Lvov-Lewandowka Airbase, April-June 1919; Fokker E.V 156/18, Jagdstaffel 6, August 1918; and Fokker E.V Jagdstaffel 8. As captured by the French Air Force. The decals themselves deserve special mention, particularly as this is what this version of the kit is all about. The sheet that contains the markings and stencils is excellent, but the real star of the show is the second sheet, which contains decals for the lozenge scheme. The sheet is superbly printed and the decals that represent the wood veneer parts are truly something to savour. Conclusion If this kit is representative of what Arma Hobby are capable of, then I can't wait to see what else they produce. This is a very high quality kit and it is immediately apparent that Arma Hobby have taken a lot of time and effort to produce a very detailed kit that should also be straightforward to built. The decal options are excellent too. Very highly recommended. Review sample courtesy of
-
 I have just finished this small group of a/c from the Finish AF, all build out of box. Dornier is the new Airfix kit with OWL conv. set, D.21 from MPM, an C.X. from AZ. Decals are all aftermarked. Seen during wintertime with skies. Rather dramatic story this one. Cheers Jes
 -
Here is my Roden 1:72 Fokker F.I which I built in 2006. It represents 103/17 flown by Lt Werner Voss, of Jasta 10, from Marcke, in September 1917. Lt Voss was shot down in this plane on 23 September in a lone battle with six S.E. 5as of No 60 Sqn RFC. The Fokker F.I was a pre-production variant of the famous Fokker Dr.I triplane of which there were only two built. It was built OOB and my notes point out it was a bit of a tricky build. The paint scheme came out very well by accident. I followed the suggestion of various sources that the olive streaking was over a light blue base. Humbrol 47 Sea Blue was brushed all over and I then started dry-brushing Humbrol 155 Olive Drab when I put too much and had to rapidly spread the paint. Due to the "slippery" surface of the glossy blue paint, the paint spread out streaking exactly as I wanted so I painted the streaks in this way. A coat of dry-brushed Humbrol 66 followed with another of Humbrol 155 on top to add texture to the streaking. The rest of the kit was also painted by brush and the matt varnish airbrushed. The decals were delicate and needed some trimming, as they were a bit oversize, and then some touching up with paint. Thank you for looking and, as always, all comments are welcome Miguel
-
After finishing the Nieuport I said I would do something other than a ww1 subject. I must truly be stuck on ww1 because I've just started two more. I Fancied the all-white craft of Herman Goering but also really wanted to try some of the lozenge camo. I couldn't decide so I thought why not build two at the same. Not sure which one to do along side Goering's but I can choose that later. First job: The upper wings had considerably too much chord, about 1.5mm which is a huge amount in this scale. So I sanded this off to correct dimensions. Also the wings have recessed rib lines which I of course replaced with stretched sprue, yep every single rib! Once sanded to shape it should look great.
-

Fokker Universal, VLE Vacufom 1/72
fjaweijfopi4j48 posted a topic in Ready for Inspection - Aircraft
A model from 9 years ago: The second vac for today, this time a rather unrefined kit by VLE. I checked right now and the kit seems to be listed, but not available, by Aviation Megastore, that is using photos of my model and my build to portray the kit, without permission or even a mere credit. Great business practices, I see. The Fokker Universal has highly significant historical value, was produced in large numbers in many variants, can be seen in skis, floats and wheels, and had such diverse and attractive liveries from many countries, that I honestly do not understand why it hasn't been kitted to a higher level yet more recently. We finally got a rather clunky Fokker F.VII from Valom (I posted one here), but no Universal or Super Universal. Me, I would love to see kitted a four-engined Fokker F.32: From the San Diego Air and Space Museum Flickr photostream: From Wikipedia: But again I digress. The Fokker Universal, the subject of this article, was the first American Fokker, designed by Robert Noorduyn and produced in New Jersey by the Atlantic Aircraft Corporation. Although it kept a number of Fokker design trade marks, it also incorporated some local know-how. Starting on 1926 more than forty were built, and a number of them went to Canada. Wheels, floats and skis were all comfortable shoes for the Universal. So here it is the Universal kit in 1/72, thanks to VLE Models, a rather simple an unsophisticated kit, but providing some extra bits. As you can tell by the images, there is a low count of vac parts and a number of details provided either as metal, resin or extruded styrene (struts) plus decals for several versions. The decals are of just passable quality and heck, there are a lot, but I went for my home-made brew. For the reasonably experienced modeler there are a lot of other versions livery-wise out there too, if you can print you own decals. Once the parts were extracted from the sheets and sanded down, minor adjustments were made to help their fit. The wing construction is similar to that of the VLE’s T-2, in having a wraparound leading edge that fits to a lip provided by the upper and lower wing parts. That lip or step has in this case to be reduced to the minimum expression in order to allow the LE to fit properly. Some panel lines were a bit undefined and had to be re-scribed. A certain amount of filler was also applied to deal with a few gaps. For most of the sanding I used wet sanding with wet-or-dry sand paper attached to flat surfaces (small and big). With the kit you get, besides the above-mentioned multi-decal options, floats, skis and wheels to dress your Universal in the appropriate attire. The cockpit area is also covered by the extra parts plus a bulkhead that closes the cabin area. You will have to provide a cabin interior according to the version you are building. A clear plastic strip is provided for the windows. It is covered, both sides, by a protective film. This is a simpler and smaller build than the same brand T-2, and things proceeded smoothly on. In the intermezzos I read out loud poems by Mark Strand, which, as it is universally known, always helps to tame the model parts and provide for a better fit. Next the interior was added with some structure that is visible from outside and that, in the case of the windows, will later support the transparencies. The fus halves were glued, and wing and stab added, then the metal part that accounts for the main frame of the landing gear, which, by the way, helps a lot with all those struts. Once dried, the joins and little faults were remedied with Milliput and putty. Metal control horns were added where necessary and little holes made for the minor parts and future rigging. Brass “Strutz” tailskid was added. The usual filling/priming/sanding cycle went on couple of times, and then the wing was painted to replicate the wood finish, using a combination of acrylics, oils and clear coats. A few photoecthed parts were added here and there. For the fuselage alu dope finish Humbrol 56 was used. The home-made decals were applied and then the rigging (kinda complex in this one, as the control cables are exposed). Struts were added and with engine, minor details and windshield it was done. Bear in kind that many machines exhibit minor differences in their strut arrangement, not only because of the skis or floats, but also among wheel-equipped machines. Variations can be noticed in rudder profile, cockpit area and the immediate wing surface directly after the cockpit. Exhausts have many alternate arrangements. The plane represented by the model is one of the two Colonial Air Transport Universals that were allocated to CAM-1, under contract with the U.S. Post Office. The strange registrations are due a short-lived system that was used at the time. The window on the door was covered. I opted to make my wing in wood finish, as many other Fokker were like that. -
Fokker D.VII OAW 1:48 Eduard Weekend The Fokker D.VII first appeared over the western front in the late spring/early summer of 1918, as the Great War was entering its final phase leading up to the November Armistice. Much has been written about it, but it was an outstanding fighter often awarded the accolade of being the finest such machine produced by any side in the conflict. It is also well known that it was the only aircraft specifically named by the allies in the Armistice agreement; such was its fearsome reputation as a killer. The Eduard Fokker D.VII has been around since 2005, and released in all major versions (Fokker, Albatros, and O.A.W). Much of the basic kits are the same but Eduard provides different fuselages on a separate sprue depending upon the version. In fact they supply two complete fuselage halves per kit. Although building the same aircraft, Fokker, Albatros, and O.A.W. each had their own variations, most notably in the front cowling panels and exhaust pipe location. And even within manufacturer, these features could vary, hence Eduard very welcome decision to provide two fuselage types per manufacturer. This is a much appreciated touch, as it makes building much simpler and easier. I find it sometimes irritating with other manufactures where you have to attach so many inserts and panel per version, that it is hard to get a neat airframe with everything flush, so full marks to Eduard here. I built this one from the Royal class boxing a few years ago. This latest release is a ‘Weekend’ edition which gives you a basic kit without the etched brass fret or kabuki masks of the top of the range ‘Profipack’ or ‘Royal Class’ kits. The simplified box art shows Jasta 19’s Wilhelm Leusch’s well known ‘Dragon’ scheme, and a side profile of Franz Meyers attractive MFJ III scheme. Lifting the box lid reveals the four familiar sprues, all of which are still as sharply moulded as ever and show no sign of flash or sink marks. The only change I noticed was that the usual olive coloured plastic has been replaced with a medium grey colour on three of the four sprues. Sprues A and B hold the wings and tail surfaces, with nicely defined rib detail. Also present are some interior parts and the Mercedes DIIIa engine. A selection of 4 propellers are provided, covering Axial, Wolff, Heine, and Niendorf types. Sprue C holds all the delicate parts such as struts, seat mountings, control column, rudder pedals, compass etc. Also included is Eduard's clever 'stitching' insert that fits in a channel on the fuselage underside, to represent the stitched fabric seam found there. Plus it has the benefit of hiding the fuselage join. Sprue D offers the manufacturer specific fuselage halves, other boxings have the Fokker and Albatros versions, but here we have the O.A.W ones along with the appropriate radiator and exhaust pipe. The Meyer machine uses halves 1 and 2 (with the semi-circle cooling gills) while the Leusch version uses fuselages 3 and 4 (with the long cooling gills). Meyer fuselage; Leusch fuselage; All the fuselages beautifully represent the fabric covering over the steel tube skeleton. There are subtly defined 'facets' of each section down the sides, which really need to be seen close up to fully appreciate. Decals. Most previous ‘Weekend’ kits I have seen offer only one decal option, but unusually we have two here. A. Wilhem Leusch, Jasta 19, October 1918. B. Franz Meyer, MFJ III, 1918. The welcome surprise is that a full set of upper and lower lozenge decals are supplied, along with a full set of rib tapes to go over them, in both salmon pink and blue. Having built many of these kits in the last 10 years or so, I can offer a few pointers to ensure a happy build; It is important to line up all the internal bulkheads to fit in their recesses in the opposing fuselage half, as the engineering is to very fine tolerances. Common sense really, but double check before committing to glue. Prime and paint the wings in a base colour such as pale blue underneath, and medium green on top. The lozenge decals need a painted surface to ‘bite’ onto and adhere properly. Putting them on to bare plastic won’t work. Glue all four undercarriage struts into the axle wing, and let it set before attaching to the fuselage. You can check right after gluing that the top of each strut finds its mounting hole on the fuselage, then put it aside. Depending upon final colour scheme, if possible attach the forward strut assemblies to the assembled, but bare plastic fuselage. This will ensure a strong join, and if like the two schemes here, won’t interfere with painting the final colours. Lozenge fabric colours are a minefield to wander in to, it seems everybody has a different opinion. I have a preference for toning my models down, just lightly. To this end I usually give lozenged surfaces a very light coat of thinned Tamiya ‘Smoke’, in one or two passes from my airbrush. I like the harmonised and blended look it gives, reducing the harshness of what can otherwise appear as a stark finish. It is however a matter of personal taste, and I offer it here as an opinion rather than a criticism. Conclusion. Eduards Fokker D.VII is one of the best 1/48 Great War aircraft kits ever produced. It assembles accurately and easily, and perfectly captures the look of the original machine. There is hardly any rigging (a cross brace in the undercarriage, and a few simple control cables), which further adds to its appeal for those who are put off by it. Stretched sprue will easily deal with this, and even a total absence is not very noticeable. It is in fact one of my all time favourite kits and subjects, and over the years I have purchased at least one of every release of it, from single kits, through Dual Combos, up to the beautiful ‘Royal Class’ edition. There are so many attractive colour schemes for the D.VII, many of them offered in the Eduard kits and even more can be found on aftermarket sheets. Very highly recommended. Review sample courtesy of Also available is a Wheel mask set
-
Valom is to rebox its 1/72nd Fokker F.VIIb.1 kit with Czech AF decals - ref. 72096 Source: https://www.facebook.com/208070375871052/photos/a.208144655863624/2137919979552739/?type=3&theater Box art V.P.
-
After the F-27 (link) Eastern Express is to release 1/144th Fokker F-50 kits Source: http://www.pas-decals.ru/forum/novosti/1078-novinki-vostochnyj-ekspress?start=405#36611 - ref. E144126 - Fokker 50 - ref. E144126-1 - Fokker 50 "Austrian" - ref. E144126-2 - Fokker 50 "Iberia Regional" - ref. E144126-3 - Fokker 50 "Air Baltic" - ref. E144126-4 - Fokker 50 "SAS Eurolink" - ref. E144126-5 - Fokker 50 "Virgin Australia" - ref. E144126-6 - Fokker 50 "Fly VLM" V.P.
-
Hi! We are about to launch new boxing ("Limited Edition") of the 1/72 Fokker E.V/D.VIII with decals for four new painting schemes. The kit should be available on 11th November (Armistice Day and Polish Independence Day) as this plane is legendary first operationally used Polish fighter. The kit is quite new but some of our Fokkers built from previous boxings have already been shown on the Britmodeller: Procopius' Fokkers Katurbo's Fokker Stanley Ipkiss' Fokker Boxart: All four schemes are lozenge-covered and the box includes excellent Cartograf sheet with lozenge, plywood and wooden propellers decals (both Heine and Axial propellers) while the second sheet is by Techmod, completely new with two 1919-war Polish and two Great War German frontline Jastas decals. Techmod marking sheet: Cartograf lozenge/wood sheet: Enjoy!!! Grzegorz
-
 Hi folks, Me again. I'm supposed to be beavering away putting the finishing touches to my Junkers 88 for the group build (a deadline which I've now missed) but instead I became distracted by putting the finishing touches to the little Airfix 1/72 Fokker E.II Eindecker. This is a new tool from Airfix and is a cracking little kit - especially for its size. The kit goes together a treat with the most fiddly bit being the rigging. Fortunately this was made much easier by using Uschi van der Rosten rigging thread and detailed rigging instructions by Airfix. The kit has been built OOB apart from the addition of some homemade tamiya tape seatbelts. I decided to finish the kit off with a bit of weathering and to put it onto a little vignette style base so it was easier to handle!! Hope you enjoy the photos below and as always your feedback and comments are very much appreciated.
- 22 replies
-
- 28
-
-
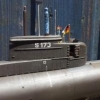
Fokker F-27, Air UK. 1/144 26 Models. This is the Eastern Express kit reboxed by Ray at 26 Decals, and offered at a considerably more reasonable price (£21 vs EE's retail price of £49.99), including a set of Rays' own Laser decals. It has the look of short run injection kit and definitely needs 'building', by which I mean parts need to be checked & fettled to get the best fit. And it needs filling and sanding along the way. That said, it does build into a nice little replica of the Friendship. The decals were laser printed on constant film, so needed individually cutting out, but they performed very well, and I really like this livery. 'With something else' A shortened Revell RJ70, also with 26 Decals on it A few words on construction. The kit actually comes with complete solid fuselage halves, a cockpit interior, and an optional clear part for the cockpit area. There won't be much point building the cockpit interior if you are going to put it inside the solid fuselage, as it will never be seen! Therfore I decided to use the clear section. Unfortunately there are no markings inside or the fuselage halves as to where you should cut, so I did it gradually, test fitting the clear part and cutting back until I had a suitable opening. It is not a brilliant fit, being too wide at the front end, but there is just enough material on it to sand it back and blend it in after gluing. This is the amount of solid area that needs removing from the fuselage halves. The next challenge was that the clear part is completely smooth and has no indication of the glazing panels. I put a sheet of clear plastic over the cockpit window on the decal sheet and a strip of Tamiya masking tape on it. I then made a set of masks matching the decals, and applied them to the clear part. Of course all this extra work can be avoided by not using the clear part and building it with the solid fuselage halves. Main airframe, filler was used! Not shown here are the props. They are fiddly to do as the spinners are in 2 parts with a back plate and forward spinner. You do get a choice of 2 different types of props though. I also replaced the 'towel rail' aerials on the fuselage underside with fine copper wire, and the above photos show I bent one during the photo session! I've straightened it out since. It is a nice little kit, but perhaps not one for the beginner. Thanks for looking, John
- 13 replies
-
- 31
-
-
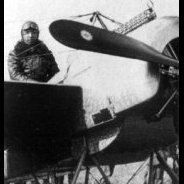
1/144 scale Fokker E.III belonging to Leutnant zur See Gotthard Sachsenberg sometime in 1916.
- 24 replies
-
- 33
-
-
After doing the 1/144 Albatros I've got the bug for small scale great war aircraft. I will be using the Valom kit which seem like a good base but much work needed. There isn't much other choice in this scale either. Starting with the cockpit...
-
I see that F-RSIN Plastic are releasing 1/144th scale kits of the Fokker F.28 at the forthcoming Telford show. Both the shorter fuselage 1000 and the longer 4000 in are shown in various schemes. I've always liked those little Fokkers, so I'm quite pleased. Question is, does the F.28 belong in the Classic or Modern section? Being as there are hardly any left in service, I chose classic even though it still seems fairly new to me. Dave
-
Hi all, this is my first post here. I am thankful for the opportunity to post my last finished model - Fokker E.V. from Arma Hobby /Junior Set/ - and the fourth model after my return to this wonderfull hobby. Propeller was painted using watercolor pencils.