Search the Community
Showing results for tags 'Firing Line'.
Found 3 results
-
In 2020 I built the 1/35 Dragon Conqueror Mk. II MBT. I also started on a accompanying figure - the British Soldier, 1960s 1980s Wearing Parka from Firing Line, but didn't finished it - until now. I hope you will like it. Let's roll some pictures: Genesys: And finaly in his 'natural' habitat: I tried to use the practice of black basecoting with white sprayed from above, but couldn't seem to get the hang of it so resorted to shading, drybrushing, more shading etc. Cheers Hans J
- 8 replies
-
- 17
-

-
- Firing Line
- 1/35
- (and 1 more)
-
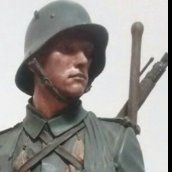
Another try in painting DPM (and eyes). The kit is from Firing line, called "British soldier Northern Ireland, 1970s" and it comes with 3 heads (one with Fusiliers Beret, one with Royal Scots Tam'O'Shanter, an this one with Glengarry). The figure is amazing, unfortunately my painting skills are way behind... Maybe you like it a bit... Cheers Tobby
-
Here we have the Stalwart Mark 2 from Dartmoor Military Models - These sold many of there Military molds to Firing Line who now produce the Stalwart under there banner. This model is based on the Stalwart that I drove for 3 years whilst stationed in Bunde before posting to Singapore. The model is a bit basic, but can be made into a nice model...in fact, when I bought it, it was the only Stalwart on the market....Tyres provided for this model, as with many of Firing Lines Tyres are too square and need to be beveled or made round. I drilled the centres out and place a nut and bolt through the centres and attached them to a chuck in a miniature drill.....and when the drill started, I applied sandpaper to the outer edges.as the tyre spun in the chuck I checked the roundness of the tyre until I felt it was correct. Wire tow ropes are made from the brass wire that you get in packets for hanging pictures on walls....as its brass and very stiff and reluctant to conform to bends I annealed it on the gas cooker first and then placed it where necessary along the contours of the cab sides. The wire was attached to the cab sides by drilling into the attachment points of real location tabs with a pin vice and securing using very fine split pins.....the pins do not enter the cab. The recovery cables ends on top of the cab and along the sides were secured in real life by rope....this is replicated by using thin wire stripped from spare cable in the garage. The recovery cable beneath the Stalwart were secured by large shackles, these I manage to replicate by using 3 link screw coupling from 00/H0....breaking in half and using the shackle from the end of the coupling. Windows are rubbish, so I managed to get some thin rigid acetate and hand carved the windows to fit frames using Jewelers glue. The indicators, lights and headlamps were all replaced with real lenses from "Little Cars"(a helpful member on this site) In the rear of the Stalwart, against the rear tailgate is to be found the poineer tools, shovel, Jerry can and splash board. This was used to extend the height of tailgate and its sides and prevent rough water entering the engine bay through the air outlet all along the floor of rear by tailgate. Mudflaps are removable.....brass tube was pushed into chassis after drilling holes and the flap which is attached to a piece of spare rod just slides into the tube. I did use Xtracrylix XA1814 British Deep Bronze Green..........lots of it.....than weathered to a light standard........these vehicles were inspected every 12 months and has to be spotless when presented for inspections at LAD or REME workshops.......it also depended on how "keen" the driver was to present a smartly turned out vehicle.....be it a Land Rover, Ferret or even a trailer on a Tank Transporter. All decals were sourced or hand made. Little white letters and numbers from 1/144 aircraft decal sheets and bigger numbers robbed from other kits. First picture is of the "The Star" or hero of the project.........09ER48 Hope you enjoy