
Search the Community
Showing results for tags 'Finished!'.
Found 19 results
-
Having been a long time fan of the Schneider trophy planes I always wanted a Crusader, and right here on good ole Britmodeller @greggles.w built Karaya’s 1/48 Crusader which impressed me greatly (his build – not the kit so much!) and again got me wanting to add one to the collection. If you are so inclined, pop over and see @greggles.w's build here:- My preferred scale for race planes is 1/32 because race planes are generally tiny. And it needs to match my Williams Bros kits. So currently scratch building is the only option, although I’m sure Murphy will bring one along as soon as I finish…. At least the fuz being circular should be a 5 minute job in the lathe. @greggles.w’s build was very useful in showing how to approach the more difficult aspects. So forget all the other stuff on the bench that needs finishing, push it all to one side …… LETS GO! This is what I am talking about, any excuse to show Laurent Negroni’s fantastic sketch from his Speedbirds website again:- I had already collected all the available photos (there aren’t many!) and a couple of 3 views neither of which agreed with each other very much. I chose to use this one as my main reference:- Comparing this 3 view with photos show its not without its faults, the upper front rigging attachment to the fuselage is too far forward, the front struts should be wider and angled back a bit more, the rudder is a bit small and the floats a smidge short, but otherwise looks good. I initially had no intention of doing a WIP so took no pics of the first stages, so pay attention as you have some catching up to do! It’s a multi media model(!) the floats and fuz are made from Ureol as its easy to work with, The wing is 3 laminations of 2mm styrene as Ureol tends to crumble where the sections get thin such as trailing edges. The fuz was made with a lateral join, this means its easy to machine the wing seat on the pillar drill table. It also means tailplane alignment is easy. The upper and lower sections were pinned with wire before shaping to ensure repeatable re-assembly. Aaaaaand the fuz blank was too long to fit between the lathe centres, oh bother. So after band sawing the fuz top and side profiles, I carved the square to an octagon, then 16 sides (I just looked it up, its a Hexadecagon – every day is a school day!) I then sanded off the Hexawhatever ridges and used circular drafting templates to mark the high spots and kept sanding until it was circular along its length. After the disappointment of not being able make it on the lathe, I was quite pleased with the result. The wing laminations were left for about a week to fully cure, the outline cut with Tamiya sprue cutters, then scraped with a wood chisel to get the aerofoil – followed by a good scrubbing with 80 grit then 240 and finally wet and dry used wet. The lamination contour lines made it easy to make it symmetrical. The fuz wing seat was cut with a 30mm Forstner bit after raising the nose to set the wing incidence, the ends of the gap were then squared off. A smaller bit was used through both halves to remove the bulk of the cockpit material, which conveniently provided a positive location for the wing after a matching circle of plastic card was stuck to the top of the wing centre section. But not before slicing 75% through the centre line with a razor saw and re-gluing to bend in the miniscule dihedral. The tail seat was cut by hand with a slight neg incidence as the plan. So enough blather, here is the resulting set of parts. The float profiles were again bandsaw’ed out, the top shaped, then the underside carved with a curved wood chisel and finished with 240 grit. To be able to get the 3 main elements to vaguely face the same direction a jig was required, some millimetre graph paper was stuck to 12mm MDF. I have found the problem with sticking the graph paper to corrugated card as a jig (Tyrrell 006), is that the graph paper gradually shrinks over a few weeks and what started as a nice flat base ends up like a potato crisp making it pretty useless. The tail feathers are two laminations of 20thou card. The spine is laminated from the same stuff as the wing, - a redundant B&Q styrene bath side panel! Nothing is glued yet, just held by friction, apart from the nose which is stuck on with blu-tack. The nose did fit in the lathe, and from the blank I carved out the cylinder bases, I found it very hard to initially visualise the final shape, but by marking out and carving away a little at a time and lots of referring to the photos eventually revealed something approximating the real thing. (after cocking up the first one……) Malc.
- 100 replies
-
- 26
-

-

-
- scratchbuilt
- Schneider Trophy
- (and 1 more)
-
It's been a few months since I've had a WIP thread. Frankly, I've just not had the energy to maintain a WIP thread. I've had a hard enough time just following the folks here who do interesting work! So I decided I will try to make the time and energy for a WIP for this project. I actually started this project back in April; I realized that the Begemot Yak-38 decal sheet I bought 6 or 7 years ago had Ukrainian decals on it. I'd bought the decal sheet to restore the 1/72 Revell Yak-38 I made in High School. Partially because I know I can do better now and partially because the off-register decals drove me crazy! I noticed that, even though I knew the correct colors for the nav lights, I somehow guffed this one up and switched the colors. Well, thanks to the magic of computer technology I can fix that: There we go... that's better. When I started this project I was going to use a HobbyCraft Yak-38 in the stash, but decided that it looked too inaccurate to continue. The side profile of the HobbyCraft is actually pretty close, but it fails miserably from any other angle because they made the main part of the fuselage a rounded off square in cross section, which really doesn't look right. The Revell isn't much better, because it is too skinny in cross section, and the nose is too long. But when considering the overall look of the model, the Revell to me seems closer to the overall look of the real thing than the HobbyCraft. I had already started the HobbyCraft and decided to finish it off, because a lot of the details I have to add to the Revell also had to be added to the HobbyCraft and this would be a good way to figure those out. I finished the HobbyCraft, but do not feel comfortable doing an RFI for it given current world events. Here is a good idea of the difference between the models: I thought that maybe grafting the cockpit and nose of the HobbyCraft on to the front of the Revell (after it had been split down the middle and widened) might make an even more accurate representation, but I couldn't figure out some of the details and was mostly done with the HobbyCraft at that point anyway. Apparently the AModel Yak-38 is the best representation in 1/72, but I've had no luck finding one. So here is a "Before" picture for the restoration: It wasn't terrible, but like I said I can do better now. I had to do some research about the colors. One of the appealing things about this scheme is the camouflage. It is a blue/gray patterned camo: Here are the colors they call for, with the underside on the bottom right: Looking for pictures of this airframe however, yielded pictures of a Ukrainian Yak-38 in an outdoor museum with much brighter colors (I can't post the picture here because I don't know the copyright status). I began to wonder which was correct. A lot of searching finally turned up a photo of this paint scheme when it was on an operational aircraft in the Soviet Union, and the color swatches above looked correct except for the underside, which seemed lighter in real life. Or at least the contrast was greater. (another picture I can't post... ). Once that was settled I had another dilemma. I couldn't find the lightest top-side color. Using some online tools, I found the nearest match in my collection, which looked fine when compared to the photo of the real life aircraft. So the colors I am going to use are now: You'll notice the underside color is now extremely close to the lightest topside color. I have since found a gray that is lighter and matches my photo better. It doesn't have an FS number, so I can't post a color swatch. During the last week, I soaked the disassembled model in simple green: I was able to remove all of the paint. So, my next step is to fill in the panel lines, which I also did on the HobbyCraft. It is a pain, but the lines are very deep on the body and they are inaccurate when compared to a schematic I have. I plan to pencil them in at the end. The rest of the build will be out of box, except for a seat and some wheel (both of which I also used on the HobbyCraft) and there will be some details I need to add, particularly around the mail wheels. I've been looking forward to doing this for a couple of months now so I'm excited to get started. The HobbyCraft Yak-38 took much longer than anticipated, so I'm glad to be done with it. On a side note, my pace may be slower than those of you who have followed my builds in the past may be used to. My wife's niece and her husband and 3-year-old are living in the room that my bench is in since they moved here from the midwest. They're only here until they get a house, but that is proving to take more time than we thought. The problem is, their 3-year-old's nap times seem to be at the same time I am free to get to the bench, so it has been a struggle to do much modelling. I am thinking about where to move my stuff in the meantime...
-
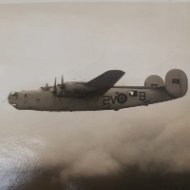
Who else stated this hobby as a young lad with a hope that one day they could build the fantastic 1/48 Tamiya Lancaster? At the time it was dream money and no one could ever afford one. As the years passed the relative price became affordable but it was an old and dated kit although some still cropped up at model shows finished to a superb standard. I would look at them and say 'one day'. Then along came HK models with a new rendition for only £100! A look in the box revealed a stunning kit so it was added quickly to the stash. Initial indications are that it is a superb kit with a great interior excellent detail and scope for more work inside. There must be many out there but I have not seen one built so this will be the first. My plan was to build the Lancaster in the Museum Of Transport And Technology (MOTAT) in Auckland, New Zealand. This is the only Lancaster I have been inside and it fits with my NZ theme. Looking at the kit parts I believe the model is actually based on the MOTAT Lancaster as the interior is very similar. The kit includes a bed and additional radio gear which were unlikley to be installed in the operational european bomber version but are visible on the pictures I took in MOTAT. Another clue is that the HK Models kit has a yellow hand rail along the steps from the flight engineers position into the bomb aimers station. This is unlikely to be present in this format on an operational bomber but is present inside the MOTAT Lancaster. After the war Lancasters were used by the French in the pacific as maritime patrol aircraft. When declared obsolete, 3 survived into preservation. These 3 Lancasters are now in MOTAT (Auckland NZ), Western Air Museum (Perth Australia) and one is with the Lincoln Aviation Herritage Center in the UK See edit). The additional radio gear and bed found in the kit would be more appropriate for these French Maritime patrol aircraft! So with the right parts in the kit I will be building the MOTAT Lancaster as it is big and certainly British. Colin
-
When I was digging for my Storch I found this kit I have had for years now. So time it was built. It is a RWD-8 pws Polish training plane. 1/48 scale This was one of Polands main training planes before the war. However there was 349 planes in the Polish airforce ranks when WW2 broke out. This will be a challenge for me. These strutted high wings are not easy for shaky hands like mine.
-
Hi Folks! This is my first Group Build so be gentle 🤣, I was originally going to enter with the Vulcan kit I picked up from a charity shop a while back as it was next on my build list anyway, but sadly when I dug out the box the price tag on it was £14.99, so that was out. I went and had a look in Dave Coley's "10 quid or less" section and found this mustang kit. Free tweezers and pen! The Moulding all looks really nice, with good detail and very little flash. I'll be giving them a good clean before I start though as theres a lot of mould release still on the parts. This will be my first 1/48 scale kit, all my previous aircraft have been 1/72, and it will also be the firt time I've ventured outside of the Airfix/Revell bubble so it should be fun and a new challenge. I will be a little slow starting on this properly as I've just had confirmation of our mortgage being approved on our new house so I'll be in the throws of a house move in the next few weeks, chances are the moddleing gear will be packed up in a week or two when I finish the kit ive already got in progress. /Rav
- 48 replies
-
- 10
-
-
Despite my having several projects going at once, I thought: "why not?" and started working on Valom's newly-released Vickers Valetta. I've been inspired by @tonyot and @71chally's builds to start one on my own, and do a couple things differently, like pose it with the paratroop door removed and secured to the cabin interior, and with some modest interior additions and modifications. For those unacquainted with the kit, Valom's Valetta is a short-run kit that has almost the look and feel of a larger run kit. The fit is quite good, and the detail excellent. My only gripes are: 1) the forward fuselage as it meets the rear of the cockpit transparency is a little too squarish, and looks more like that of a Viking than a Valetta, and 2) somehow the tail looks a bit short in height, though I've checked photos of the real thing and it seems to be ok. As this will be a C.1, i.e. a cargo aircraft (what we'd call a trash-hauler here in the States), I cut out the extra window, the navigator's astrodome top-side, and the paratroop door. I had to add a little extra plastic to reshape the forward area of the paratroop door. I've marked where I want the fuselage formers to go, and carefully labeled each one. I'll also install longerons and an overhead lighting fixture. The Valetta had a unique protective interior sidewall below the windows, probably to protect the internal aircraft structures. The kit provides a nice wing spar to divide the cabin, so my plan is only to detail the interior to that point, and only on the right side, where it can be seen by the casual observer. I have a surplus C-47 cargo floor for the cabin floor. I sanded the forward fuselage a bit aggressively to impart a more rounded shape. Unfortunately, in my effort to correct things, I made more problems for myself. I tapered it a little too much near the cockpit and now need to build it back up a little. I've decided to sand the cockpit eyebrow windows so that they blend better with the new shape. Unfortunately, there's not much clear plastic to work with, so I need to be really careful. My plan is to assemble the fuselage and cockpit, then carefully sand the joint forward of the astrodome until the roof appears more rounded. Built from the box, it's not bad, but it looks too flat to my eye. I added the nostril-like bumps on the nose, below. These are included with the kit as part #51, but do not appear anywhere in the instructions--which appear to have been a rush job of sorts. I sanded them down a bit to reduce their size and make them a little more flattish. They are pretty noticeable on Valettas. I also rescribed some areas that I aggressively sanded.
-
As already explained on my Albatross thread, mojo has been pretty low since Telford and it is only really today that I have felt like doing anything. Despite having a bench full of stuff to work on, I decided that a dedicated mojo restoring thread might help things along. I have always liked the film "They Who Dare", with the Lebanese Air Force Savoia Marchetti SM.79 aircraft being one of my favorite parts of the film. So, when I came across a dedicated decal sheet for Lebanese SM.79s at Telford, buying the sheet was a bit of a no brainer. I have a couple of Airfix kits of the type in the stash and over the years have collected the odd aftermarket set or two for the type. Thanks to the expertise of some other Britmodellers, a few outstanding queries regarding the Lebanese machines have been cleared up and I have even discovered that the correct paint, Bianco Avorio 5, is available This has duly been ordered. With the added bonus that I will be working using the old style Airfix "Locate and Cement" style instruction sheet (my favourite) and that the kit is one of my favourites from my childhood which will bring a large dollop of nostalgia to the build, there seems no good reason not to have a bash. So, with everything in place or on order let's have some fun...……. Thanks for looking Martian of the Lost Mojo👽
-
Going to give it a good go anyway; six Spits from 603 Sqn based at RAF Hornchurch. All Airfix, all in 1/72, using Xtradecal and Ventura decals for codes and serials. Plan to add XT-A, XT-B, XT-E, XT-H, XT-O, and XT-P, to the four I already have (XT-M, XT-R, XT-W, XT-Y). Ian
-
I would like to join this with my Dragon 1/48 Ju 188A1 torpedo bomber. This plane was one of the last Ju 188's in the war. They were sent to Norway in the last few weeks to attack shipping. By the time the war ended they had only done one or two missions without loss. I have started this plane, but haven't got very far. Haven't even finished the Cockpit. To be honest I may not get it done in time, but being here will help with it's progress. I have resin wheels and Metal gun barrels for this one on top of the usual PE and masks. The colour scheme will match the last torpedo bombers schemes. Which is quite different to what is shown here. The photo I have put up shows where I'm at with the project. Sorry it is a bit blurry I'm a bit shaky today.
-
Hi Chaps, I've finally got round to signing up for this Group build. Great to see so many Kiwi birds under construction. I'm still finishing a Fairey Baracuda in the 'Journeys end ' Group build and don't want to get too distracted but I've reached the point where progress slows for things to dry so with the Buccaneer out of the way it's time to move on with this. One built already as Kohimarama IX from the Aeroclub sheet, LDS Modellers current build topic. Seen here with Plonky at Gisbourne. 2 more in the last box, 1A and a D. Chosen scheme will be from the Sky Models sheet but using national insignia from Peter Mossong's Aeromaster sheet. There is a similar scheme on the Aeromaster sheet but some of the decals had been used when I got it 2nd hand. This picture is a classic example of what @LDSModeller was referring to about how decal manufacturers get Kiwi roundals wrong. I'm considering a derelict version at Ruhukia in 1946.... Colin
-
Dear all, this is my first installment here, on Britmodeller, and I thought that building a Spitfire would be an appropriate choice for this circumstance. The kit is the very well known Tamiya offering of the Spitfire Mk I in 1/48 scale of which several other builds can be found in this forum, surely all very well done. I am impatient to start mine to verify in person the reported high standard of the kit and also because this will be my first Spitfire model. Because the kit is so well documented, I will skip any presentation of it and start immediately with the pictures of the build. Nothing special was done so far, I just started with the fuselage sides adding some fictional wiring. I was addressed to a lot of interesting discussions, especially here, about which color would be the most appropriate for an early Spitfire. I learnt that a clearer shade of green might have been used, but eventually no certain color code could be given. The ubiquitous XF-71 indicated in the instructions looks dark in comparison with the few pictures available, hence I decided to lighten it up and arbitrarily went for a mix of 50% XF-71 and 50% XF-21. The first subassemblies are prepared, painted and highlighted with a wash. The parts left aluminium, are sprayed with Humbrol metallic 'polished aluminium' which in my view reproduces well an aluminium paint. Here the cockpit tub and two frames are posed with half fuselage to get a first impression of the interior. Indeed, the quality of the Tamiya parts is really good and a careful planning of the painting and of assembling is needed not to risk spoiling the nice level of detail. Finally, the tub with the frame that support the instrument panel and the assembly of the rudder pedals linkages is fit checked. That is all for now, thanks for any feedback, Daniele
- 33 replies
-
- 18
-
-
Hi Chaps, I have the opportunity to join in this GB as we are still locked down and my Buccaneer is progressing faster than expected. Initially I didnt think I had anything qualifying for this period then realised that this was appropriate. This follows on from my Fairey Fulmar in the Navy GB earlier but I won't be folding the wings on this one. I did manage to buy the correct kit this time as a lot of the resin is included. This is my second kit as I bought the Sierra Scale Vacform many years ago. The vacformed plastic is OK but the 'injection moulded' accessories leave a little to be desired. I think this is the worst example of 'Flash' seen in 40 years of modelling. I doubt I'll be using any of this but the Sierra Scale kit includes some excellent instructions with pictures and drawings so I'll get something from it anyway. Colin
-
Hi Chaps Just for bit of fun here's my next subject for this Group build. Which plane is next in the sequence? Colin
-
It is traditional for me to take a new project with me when I have my main holiday of the year and this year I decided that I would take the Heller 1/200 kit of the Fauvette 19th Century steam yacht. I am not sure how I came across this kit on a certain well known internet auction site but I was completely charmed by the kit and an example was duly ordered. As is my habit, I spent the time between ordering the kit and it's arrival, trying to research the subject with surprisingly little (read no) success. I found some paintings of a Fauvette yacht owned by a certain Eugene Perignon but there were some major differences between the kit's box art and the paintings. These included the type of rig, position of the funnel and the provision of a wheel house. All became clear(ish) upon the arrival of the kit. The instructions said that the kit was merely based on a yacht owned by M. Perignon and was intended to be a representation of the type of steam yacht of the period. Accordingly, I have decided to use the few paintings of Fauvette II, a subsequent yacht owned by M. Perignon to build something a bit closer to the prototype. Three paintings which may or may not be accurate plus an alien who does not know what he is doing, what could possibly go wrong? Anyway La Fauvette as per the kit looks like this: We need to try get to something a bit more like this: I bought in some pars from Master and some rigging thread of differing thicknesses and here are the sprue shots: I have no idea where the next couple of weeks will get me with this and I may well fall flat on my faces but lets see what happens. Thank for looking Martian 👽
-
Following discussions on other threads and the extremely kind offer of a set of beaching gear from Crisp (aka Ex-FAAWFU), I have decided that the time is right to get this previously stalled project underway again. The ever splendid Mrs Martian helped me get the kit and the relevant file down from the loft yesterday and I have been re-acquainting myself with where I was at with the project and what needed to be done to turn the Special Hobby 1/48 kit into a floatplane target tug. Before I halted work on the project due to the lack of a suitable beaching gear, I had pretty much sorted out the floats. These were taken from an old SMER Swordfish kit. As the main dimensions of the Swordfish and Blackburn Shark Floats, used by the Roc, were very close, most of the work had involved relocating the step. There was a slight difference in the shape of the chine but I have to decide a, if it is worth the work involved and b, if I decide that it is, how I am going to go about it. I have also to re-assemble some notes that went missing during all the domestic upheaval of last year. I have been making a list of jobs that need to be done on this conversion and in no particular order they are: 1, Plate over the kit wheel wells 2, Add correct fuel tank between cockpits 3, Construct target operator's position 4, Lower rear fuselage decking 5, Make strutting to support floats 6, Replace fairing under rear fuselage with a much larger item 7, Construct target towing apparatus 8, Possibly scratch build under fuselage drogue housing (unsure at the moment whether floatplane Rocs had these. Some land planes did and some didn't This is of course, in addition to such super detailing as we might chose to add along the way and we all know that my track record for avoiding this is less than stellar! Hopefully the model will be finished in the colours of 773 Squadron Fleet Air Arm when based in Bermuda before an airfield was available, if not I have a picture of a Roc in this configuration while under test and will go for that. Please note that the build might be a bit slow at first as I do have to give my builds for Telford priority at the moment. I know it seems a long way off but the complexity of some of the models I intend to take this year does not leave much leeway in my timetable. So join me then in what should be weird and wonderful ride (quiet Longshanks) and thanks for looking. Martian
-
Having driven myself to the brink of insanity with my Tracker build over the last few days and with more difficult stuff looming in the near future, I feel the need for a little light relief. By lucky hap, an item that fits the bill nicely turned up in my pile of Birthday presents a couple of weeks ago. Well, not so much luck really as every year, my wife and sister in law hand me a large wad of cash for Telford and tell me to go and buy my Christmas and Birthday presents. Even I can't be such a Muppet as to get that one wrong! The minute I saw this on the Big H stand at Telford, my grubby little mitt was clutching at an example. A whacky shape, great nose art (Bugs Bunny on a flying carpet), a smart Sea Blue Gloss paint scheme and the opportunity for some bonkers banter with some of my BM friends. What's not to like. I got some extra goodies that I felt might help the build along and hopefully I can make a start over the bank holiday weekend. Thanks for looking in and as always comments sensible or otherwise are always welcome. Martin
-
Another Spitfire to my collection and a 1/48th one by ICM. This one depicts a Mk.XVI TD138 of 317 (Polish) Squadron post war at Ahlhorn germany. Those who have the Eduard Profipack kit will know the details behind this subject. As mentioned my build is from the ICM 48th kit and decals from the mentioned Eduard kit kindly supplied to me by BMer Jaw! Many thanks John! All I added are the seatbelts from masking tape strips and some etch buckles from a set by Re-heat. All paints Xtracrylix and coated with W&N acrylic matt varnish diluted with some flow improver and airbrushed. I attempted to represent the overpainted larger roundels but they don't show up to well here or on the model and also I felt that I would spoil the model having got this far unblemished. But the rear overpainted sky band is OK.....ish. OI also kept the weathering to a minimum. I also added the underwing antenna under the starboard wing from a toothbrush bristle by the way. Thanks for looking and any questions I'll be happy to answer. Once again many tanks to 'jaw' for the decals and Neil Belkin for the extra seat parts supplied recently
-
 OK, after some delay.....This/these are mine: I've got several Airfix Sherman kits, a couple of their Lee/Grants and three of Stuzzar's excellent M4A2 conversion sets (turret, deck & mantlet). I'll also be picking up a couple of the Dan Taylor Modelworks etched frets and a trio of Millicast 75mm M3 barrels. My aim is to build a US M4 Early as used at the Kasserine Pass and a USMC M4A2 as used on Tarawa Atoll. Things at home are hectic at present, so update frequency will be highly variable.
 -
 HI all - she's finished at last. You can find the WIP here: http://www.britmodel...=234923967&st=0 In brief - fuselage lengthened, and main UC postions moved aft to give more rake. Brush painted with a mix of Aeromaster and Tamiya acrylics, detail painting with vallejo and Citadel. Kit decals used to represent VZ672 481 Q of 809 Sqn FAA on board HMS Vengeance 1951. A bit of light weathering applied, but nothing too much. ( yes the wingtip pitot tube is in the wrong place for an NF21- I realised after I'd CA'ed it in DOH!) Hope you like her. Jonners


.thumb.JPG.3498f40362ff13ebfc4b2e45abbd545e.JPG)