Search the Community
Showing results for tags 'Ferrari'.
-
Yeah, it's all I've been building lately. This 1/43rd 1987 Ferrari F1.87 is from Hi-Fi Automodelli. Box stock except for the addition of a racing harness. Tamiya paints, urethane clear. Very simple, clean, quick building kit. I love these late 80s turbo cars. They had nice, simple, clean lines....I guess the early 90s naturally aspirated cars did too though, so...
-
Here's a 1970 Ferrari 312B. SMTS 1/43rd, Clay Regazzoni, 1st-Monza. Box stock. Tamiya paints with urethane clear. SMTS kits tend to build themselves once painted. No complaints.
-
Finished this 1984 Ferrari 126C4 Formula 1 car recently. 1/43rd, Hi-Fi by Automodelli. Box stock except the addition of belts from food wrapper foil and some spare BBR PE hardware. Tamiya paints with urethane clear. I've got a number of these Hi-Fi F-1 Ferraris I'm slowly working my way through. They're simple but nice kits that don't present much in the way of problems except sometimes the decals are kind of dried out.
-
Today I finished this 1/43rd Starter Ferrari 312PB. It represents the car Mario Andretti and Jacky Ickx drove to win the 6 Hours of Daytona in 1972. Box stock. Largely Tamiya paints, acrylic and lacquer, with two part urethane automotive clear. The decals had dried out and a number of them shattered as I was applying them. I eventually wised up and coated the rest with Micro Scale liquid decal film. I love old Ferrari racing cars and these simplified Starter kits are loads of fun to build and paint.
-
Hello All, I'm calling this done. Finally got the decals on. All six of them! Apart from that front wheel, I am really pleased with this one. So, pictures: On the whole, I enjoyed working with this kit. It would however, seem that Italeri kits suffer from wheels that stick out a bit from the body. The same happened with the Lamborghini Diablo... Thanks for looking. Cheers, Alan.
-
Such is my appetite for modelling at the minute, I don't think the GB's I've entered are going to be enough for me. I've therefore decided to start a WIP for the F2007 which has been calling to me for quite some time now. Just to set expectations, I plan to dip in and out of the build over the coming months and it may even turn out to be a KUTA subject. Anyhow, the kit came with some aftermarket decals and I originally wanted to use the 'Marlboro' wording. However, I've decided to build the Kimi / Brazil configuration which, as many of you will be aware, was the 2007 winning combination in what was a 3-way down-to-the-wire battle for the Championship. Hence, I'll have to settle for the 'bar codes' The decals look like a project of their own!!
-
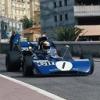
Here's the Ferrari F2007 that Kimi raced back in 2007 at the British GP. Not a bad build and went together well considering it's a Revell model.
-
Took a l-o-n-g time to get finished, but finally completed the Esci Ferrari 'Berlinetta' last week. Definitely not my best work and half of the reason for that is my own lack of skills, but the other 50% is down to the quality (or lack of) in the kit. That said, if you really want a 1:24 SWB in your cabinet, and I did, then other than finding a rare Italeri or Ultra-rare Gunze kit, then this is pretty much your only choice. OK enough talking here's some photos: Please feel free to make any criticism, comment or ask any questions. Thanks for taking the time to look. AFN Ian.
-
Hi, does anyone know of kits in say 1/32 or1/24 of racing cars from this era? Ferrari, Vanwall, Hawthorn, Moss, Ascari . Connaught even.... I can't find a single thing relating to these fabulous, beautiful cars.
-
Here's another build I am going to complete in 2017. This is a brace of Koenig Specials Ferraris that I have had on my 'books' for a considerable time: They are the 'Real Sports Car' series by Fujimi. They are both models that were started some time ago, one by my son (who was probably only about 11 at the time), the other by me. They then got abandoned for no particular reason. So without further ado, here are the pictures: The box art: The 'red' car sprues: The 'white' car sprues: And finally the two model bodies: As you can see, the 'red' car was painted red and then stripped. I had originally painted it with Humbrol gloss enamel (19), but I decided that the finish wasn't up to scratch, and needed some TLC, in this case stripping with caustic soda. I don't think that the 'staining' will come through when I re-prime (hopefully). I will be using zero paints for primer and top colour. As for the 'white' car, my son had painted various parts, but I have decided to strip the part-assembled model (mostly done) and re-construct it. The only issue I have for this is removing the front suspension & steering from the floor pan. I might just leave it there and attempt to work around the moving parts, i.e. the steering. I hope you enjoy this. Best Regards, Alan.
-
Just arrived, silly money but really wanted a 'full body-work' car to try...it will probably be ages before any actual WIP starts, but I know it is sometimes nice to see how the kit looks... It's huge! A lot of bodywork! I think the extra cost over and above the F1 models must be the wire wheels. The turning and machine work is stunning, and many many wires and sleeves, but no experience of building the wire wheels, so a bit daunting... Nice, many paged instruction book! Lots of PE parts here! ...and lots of spokes here! Less decals than F1 cars! Mesh, suede sheets etc... Very nice crisp PE... This small PE sheet is extra shiny (mirrors etc) Massive one piece body... Not that much resin parts apart from the main body - bonnet and boot are metal... Wheels and tyres are beautiful... Many bits! Spokes... ...and of course, my favorite bits - the loose bags of delicate metal bits! :roll: ...more to follow.
-
Completed the 458! Really happy about this one and love the colour! Thanks for watching! Mike
-
Hi this is my first post here. This what I'm currently up to I build this a year ago and boxed it away so with the mojo back on it I started the kit again The last time I left off I just finished the cockpit area partially So I started on the front suspension first and done painting it Once it was done I assembled the gearbox and the engine at the same time. and here it is so far the cockpit and engine has been glued together. Now is left is the body parts which I'm doing at the moment
-
Here we go again with an Italia! Hope this one goes better then the last 458. The box: Instructions: Parts: Going for some Novitec Rosso wheels by HobbyDesign. That kit does not come with tyres... Bought and 'ugly' Aoshime wheel set and used those tyres. Much Cheaper then buying tyres from HobbyDesign. Quick setup: And started with gettingthe parts ready for primer and markingthe mould lines. Going to paint this one Tour de France Blue by Zero Paints. This build wont go fast, working on it in the evenings when I get home from working in my appartment. Thanks for watching! Mike
-
this is my third model still alot to learn, great kit but a few things i should of been more considerate of in the build over all im happy with the overall outcome used hobby design etching parts, scale production carbon fibre, zero paints and vellejo for some detail parts. next build 918
- 5 replies
-
- 5
-

-
- ferrari
- ferrari 599
- (and 1 more)
-
Just started the new Tamiya Ferrari FXX K kit with Photo Etched and Carbon Fibre Decals released at the same time as the kit. The kit is just stunning, Tamiya keep improving on perfection, a lot of parts in the box The car itself is a $3 million track car, 100 made and sold by invitation, based on the La Ferrari road car , there are some good Youtube videos of the car running at Spa. I bought the kit from Frome Model Centre, fully recommed. The paints i will use will be Zero paints from Hiroboy and Tamiya paints . Started by building the engine, a V12 Hybrid and chassis, Getting all the body work ready for painting in the process of removing the pin ejector marks on the underside of the engine cover Waiting for some wiring to arrive from Hiroboy before i an do anymore to the engine bay.
-
Finnished the Ferrari California yesterday. Feels good to finaly finnish a model again! With the closed top version: The colour is Ferrari Grigio Ingrid. Everything but the wheels is painted with Zero Paints. The wheels are Zero Paints black with a gloss clearcoat and a coat of Alclad Chrome. Thanks for watching! Mike
-
Finaly decided to put my Ferrari 458 back together. I build this car 5 years ago so it has it flaws but I just can't put it away. It spent a long time in pieces in a box... It kinda fell off the shelf while cleaning... The pieces... And this is how she looks now. Not 100% but good enough until I can build models in my new place Thanks for watching! Mike
-
Hi this is my second ever model, picking up tips from forums and the scale modeler you tube channel, i have built this Revell Ferrari model, i have used zero paints for the main interior colour and all of the exterior and some vallejo for the interior accessories i have used is carbon fiber and photo etch parts looking for some feed back already picked up some advice on the lights and weel position which i will take into my next build Chris
- 12 replies
-
- 5
-
-
- ferrari 458
- revell ferrari
- (and 1 more)
-
 Heres a few models ive made over the last 6 months or so. First up, two Tamiya F1 kits, the 1/20 scale Ferrari 640 and Williams FW11. The Ferrari went quite well, only really the nose doesnt quite fit properly, it doesnt quite meet up with the panel surrounding the suspension arms. I used Halfords Vauxhall Flame red, looks ok but im not really bothered if its not 100% right. The Marlboro decals with Mansells name on were plain with no "marlboro" on them so i printed some on decal paper and added it, looks much better imo. Im still getting to grips with spraying paint and theres some signs of orange peel. Also added a few photo etched screw heads to the side panels for a bit of realism. The Williams gave me alot more trouble. Firstly the panels around the front suspension leave unsightly gaps so i decided to do as ive seen others do and stick these to the main body and fill the gaps, then cut down the suspension in half. After lots of sanding i think i got it right, not really noticable. The biggest problem were the decals, the originals had yellowed slightly on the white so i bought a set from Indycals, these werent so great. I had major trouble trying to get the decal flat enough with no creasing around the small bumps above the suspension and i probably made an error as they didnt quite fit together right. So i decided to leave the original ones in the sun for a few days to try and bleach the white bits. I then stripped the decals and applied the tamiya ones. These were much better and although i never got them prefect even after tons of microsol im happy with them. Last problem was the engine cover, its a bit warped and doesnt quite sit right. As someone pointed out to me i shouldve checked at the start I tried putting it on and holding down with a rubber band and it helped a bit but you live and learn. Also i used a Tamiya photoetched seat belt set and a few PE screw heads on the rear wing to cover the join points. Ive decided to do a TV cars theme and i started with Revells Starsky & Hutch Ford Gran Torino(1/25). A nice little kit with not majorly over detailed but some nice dashboard decals to give a woodgrain look, the stripe was in 3 parts and a bit tricky to get lined up. I made a mistake with the headlights and the glass clouded up. But here it is, again im still happy with it . To go with the TV theme i have a Aoshima LA chips kawasaki 1000 police bike, ive never done a motorbike and want to do it justice so i thought id buy another bike to practice on first. So i bought the Tamiya Yamaha XV1000 as its quite cheap. The instructions say to paint the fuel tank and side panels maroon but i wanted to do something different, as you can see. The only problem with doing the stars and stripes would be the stars. But my mrs makes hand made greetings cards and happened to have a die that popped out some stars, although not perfect and they are rounded on the ends rather than sharp i think it looks ok.(although im not sure if i put too many stars on?) So thanks for viewing. (And if you read all that, well done )
 -
 Hello everyone! Been a while since I posted anything and made a model... Difficult for me to build models when it's cold since I have to paint outside... Since it's been 7 months that I build a model I decided to build almost the same model as my last one, a Ferrari California. The open top version this time. The box: This one will be painted in Ferrari Grigio Ingrid. Started with marking the mould lines. And made a template for a carbon fiber decal at the back. Thanks for watching! Mike
 -
One of the few models where I have not added any lights to. I really had a close look but I did not think I would have the patience to add any with such little space to work in. So this is the finished article. Despite the pictures it does have a glossy sheen to it but I need to study and work harder at improving that side of things. Looking at KonaDawgs finished kit I lost heart, as his finished model is amazing. I've never had the patience regarding polishing and have tried a few short (cheap) cuts but it seems I will have to invest in the decent materials and just sit and polish and buff, sit and polish and buff, sit and polish and buff,sit and polish and buff......... The good thing is that I am getting used to airbrushing and the final body coats are looking acceptable. So, hopefully on my next build (the 1:24 scale Revell Schlingmann HLF 20- possibly with working lights) I may perfect the polishing side of things. Anyway, thanks for viewing my pictures and I look forward to any feedback.
-
 Ok so as teased and subsequently chosen in my Delta WIP, I bring you the Build/Review of the ModellingMaster Transkit for the Hasegawa Ferrari 328 GTB/GTS. The Transkit is to build the Ferrari 308 GTB Group 4 rally car built by Michelotto and challenged mainly by the Pozzi team through 1981 to 1983. And by other teams and privateer's afterward. The Car was transferred into Group B for 1983 like many other Group 4 cars. However it fell foul of the new classes and regulations, namely the ones regarding wheel width. The new Group B classes regulated the maximum width of the wheel depending on the class on which the car competed in. The classes were divided by the engine capacity. The other regulation change for the new class was that bolt on style over fenders were disallowed unless homologated on all 200 production cars. Seeing as the Ferrari was originally homologated into Group 4 where they were allowed. The base car was the standard 308 which didn't feature them. This didn't really affect the cars too much as like previously stated they couldn't use the wider wheels. The final regulation that hit the Group B version was that the Michelotto built cars featured the new 4v heads. Another thing that was lost. However to compensate the new 308 Quattrovalvole was homologated into Group B to remedy this. History lesson over and now back to the transkit. There are 2 versions available to order from ModellingMaster. Website here: http://modellingmaster.com/lang/ru/ferrari-308-gr4-rally/ Version 1 is the one I have here, which is the red and blue Pioneer livery used mainly on the Monte Carlo and Tour de Corse rallies of 1982. Version 2 is the all blue Pioneer livery which ran on many ERC events, but the one featured on the decal sheet is for the Tour de France Automobile of 1982 and features different wheels to version 1. As usual I've collected many reference pics of the car on the specific event I plan on building. Which to clarify is the 1982 Tour de Corse. I've created a folder on my phone with all the pics I've come across in. I've also downloaded all the build and finished pics from the development build over on Automotive forums here: http://www.automotiveforums.com/vbulletin/showthread.php?t=1069713 To use to supplement the instructions. Right lets start shall we. Firstly this is the box you get. Nice and sturdy and will definitely survive shipping and 'handling' Upon opening the box you are presented with this: I will state that I had a fettle of the body shell when I first got the set a couple years back, and so the thin film in the windows has been removed as well as the braces that help support the rear opening for the engine bay. So lets unpack everything shall we First you're presented with a full colour painting and decal placement chart and the instructions. The instructions themselves are stapled in the corner and fold out like so: Now I'm not a fan of this type of instruction. It takes up a larger than necessary space when laid out flat like I have here. And if the pages are folded over each other then it is quite easy to lose track of which side to go next. I found myself confused a couple of times when reading through, familiarising myself with the build sequence. The final thing that lets the instructions down is that aside from the odd missing arrow, the printer used was clearly running low on ink and as such a lot of the diagrams are hard to follow. A few thorough readings should have everything cleared up however, so it is only a minor grievance. On the back of the instructions is the parts list: Now the only addition I would make to this is to label any multiple parts with the amount you should get in the set. Moving onto the most important bit. The Resin. And boy do you get a lot: Yes it is all resin. Most parts are cast in a white resin that looks very much like plastic, even under close examination. There ae some minimal parts cast in the usual beige stuff. Now I have another couple of ModellingMaster Transkits. The first being all of the classic beige resin and one I brought after this one being all of the white stuff. So obviously I caught the transition lol. The only problem with the white resin is it's hard to distinguish between it and the white plastic of the kit once parts are off the sprues. Not a major problem for me as I will be working in small sections with few parts at a time. But something to keep in mind. So lets take a closer look at what you really get. First up is the clear parts for the rear side windows and lights: Next is some engine parts, rollcage, louvers and the auxiliary lights: Here we have the seats, rear bumper and the main lights in the popped up position (you also get the option to have the lights down): The wheels are copies of the Hasegawa Lancia Stratos wheels with correct Michelin slick racing tyres. You also get a spare with the centre bore and wheel nuts drilled out. In this bag is the bonnet, engine cover, front end, front lamp pod and the rear chassis supports: We also have the body itself and the Chassis: The decals are spread over 2 sheets. Presumably one is common to the 2 versions available. [/url] And up close: Finally you get a nice small fret of Photoetch to compliment the build: So all in all it looks to be a very nice and detailed transkit, and you should end up with a very nice model at the end of it. The Transkit is still available to my knowledge and is made to order. After this build and when money permits I fully intend to purchase the second version. The next update will be the first steps of my build and I'm hoping to continue the step by step approach. I will be taking my time with it as it's my first time using resin on such a large scale. Wish me luck TTFN Ashley.
 -
Hi everyone Well, for a change I am posting pictures as I actually build a kit and, for once, I have NOT added any lights (like most of the kits I post). I just hope it turns out ok and worthy to be shown on the 'Ready for Inspection' section. I'm still getting used to going fully airbrushing using Acrylics. The results are far superior to hand painting (in my opinion) and cleaning everything is so much easier. I look forward as always to anyone's opinion and hope to keep you interested in following my build. Thanks for viewing. First, the Powerhouse
-
Completed the California today! Good Revell kit, no real problems with this. Only the decals could be a bit better, but for €5 you can't really complain about it. Also removed a part of the side windows. The colour is Ferrari Grigio Silverstone from Zero Paints. The wheels are from C1 models. *fixed the rear window after pictures* Mike