Search the Community
Showing results for tags 'Falklands'.
-
 I have both the Airfix HAR.3 and HC.4 boxings of their new 1/72 Sea King. As my preference is generally to do combat aircraft, is it possible to backdate either (or both!) of these kits into Falklands War machines? If so, what would that entail?
 -
(EDITED) Hello folks After being pointed out in the right direction regarding the shape of the bombs (we all make mistakes ) here are the 3D renders with the corrected shape for our EXPAL BR-250 (free fall) bombs and BRP-250 (parachute retarded) bombs, which will be available in early July. Set 1: BR-250 (2pcs each) set 2: BRP-250 (2pcs each) Price: TBA Distributors worldwide encouraged to contact us at [email protected] All the best Thanks for looking Amaru
-
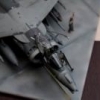
 The British Aerospace Sea Harrier is a naval short take-off and vertical landing/vertical take-off and landing jet fighter, reconnaissance and attack aircraft; the second member of the Harrier Jump Jet family developed. It first entered service with the Royal Navy in April 1980 as the Sea Harrier FRS1 and became informally known as the "Shar". Unusual in an era in which most naval and land-based air superiority fighters were large and supersonic, the principal role of the subsonic Sea Harrier was to provide air defence of Royal Navy aircraft carriers. The Sea Harrier served in the Falklands War, both of the Gulf Wars, and the Balkans conflicts; on all occasions it mainly operated from aircraft carriers positioned within the conflict zone. Its usage in the Falklands War was its most high profile and important success, where it was the only fixed-wing fighter available to protect the British Task Force. The Sea Harriers shot down 20 enemy aircraft during the conflict with one lost to enemy ground fire. They were also used to launch ground attacks in the same manner as the Harriers operated by the Royal Air Force. I have the Dogfight Double version of the kit - looks a nice kit, similar to the latest GR3/GR7/9 releases by Airfix, looks to be a newer tool? Will be built out of the box, although I do have some extra decals (Modeldecals sets 65 and 66) to build any SHAR from the Falklands....it may be prudent to to the aircraft pictured if I am going to build the skyhawk too at some stage. Funny thing, Pilot seems to be WW2 vintage! I shall use the skyhawk pilot in this case. Looking forward to building both Britain's last fight and last Bomber, the Buccaneer....also in Fleet Air Arm markings!
- 64 replies
-
- 5
-

-
- SHAR
- Sea Harrier
- (and 3 more)
-
Hello! This is the first 'proper' build i've done for a few years, I'm rusty but back with vengeance. Far from perfect re: paint job, but it's a notorious kit to build. I've neatened up the cockpit and airbrake since I took these pics too. Can't wait to get my hands on the new tool Airfix kit! Up next: 1/200 Vulcan in anti flash. If anyone can tell me what image extensions i can use here, i'd be grateful. They all reject for me! In the meantime, pics here: http://postimg.cc/gallery/2lgjzw3xg/31c2f0a1/ Chris
-
 1/72 scale Victor K Mk2 XL163 RAF Marham History, Construction number HP80/66 Awaiting collection 15/05/1961, delivery date 07/02/1962, to Handley-Page Ltd 14/01/1969 then Hawker Siddeley 20/05/1970 for conversion to K2 standard, l/f? 01/07/1986 to St Athan store, to St Athan 29/09/1986 for Battle Damage Repair Training as 8916M, scrapped during 12/1991 by Hanningfield Metals, Stock, Essex "An order was also sent out to the remaining Vulcan Squadron to go on to a War Footing and in a show of force 4 Vulcans were deployed to Wide-awake Airfield at Ascension Island and from there the then longest bombing missions took place. Code named Black Buck, their mission was to deny the Argentinians the use of Port Stanley Airport to their Mirage Fighter jets with 21.000LB's of bombs. One sole Vulcan XM607 Piloted by Sqn Leader Martin withers which was the standby aircraft for the first mission after its sister aircraft XM598 piloted by John Reeve suffered a ruptured windscreen seal in flight and couldn't pressurize. The first raid was successful and placed a bomb right in the centre of the runway. The missions themselves would not have happened if it wasn't for the Victors of 55 and 57 sqn refueling the Vulcan on its route as well as refueling the Victors its self, one specific Victor XL189 piloted by Bob Tuxford gave most of his fuel to XM607 and left with the bare minimum fuel to get back with." The Vulcan was over its normal maximum take-off weighteach carried, as well as extra equipment like the DASH 10 and a chemical toilet, a highly experienced Air to Air Refuelling Instructor (AARI) from the Victor tanker force who would fly the Vulcan during refuellingand fuel usage was higher than expected. As a result of the fuel demand and problems in flight with refuelling, two of the Victors had to fly further south than planned, eating into their own reserves, and one of these, the last Victor to refuel the Vulcan, was past the last refuelling bracket before turning home. Tankers had to be sent south to refuel these Victors so they could reach Ascension. A total of 11 Victors were used to support Black Buck One: XH669, XH672, XL162, XL163, XL188, XL189, XL192, XL232, XL511, XL513 and XM717 XL163, 57 Sqdn, with two wing roundels (copyright prevents posting) ( http://www.57-630sqnassoc.org.uk/forum/viewtopic.php?f=7&t=8353 ) On ascension (copyright prevents posting) ( http://www.abpic.co.uk/photo/1402175/ ) This kit was a "pig" all bent and distorted, raised panel lines etc. etc. I can't scribe but I can sand and boy did this kit need sanding AND filling, the wing needed steaming, it needed heavy duty clamps (carpenters type clamp, that's what I used them for originally! ) to pull the fuselage halves together, everything went up a few notches for tooling to build this thing. I learnt loads while building this, I am used to 1/72 fighters this thing would dwarf most 1/48th kits and even some in 1/32, the wing span is close to a 1/24 spitfire. All techniques I know for assembly went out of the window on this! I used tamiya green/grey and humbrol acrylic white as the tamiya pot looked a bit empty for this job! First go with humbrol acrylic, I must say this, I painted the white before I steamed the wing, the paint held up. The only things I added were a couple of vanes/fins on the fuselage, the centreline one just aft of the cockpit was replaced as it was severely damaged during sanding, otherwise it's out of the box. It's a simple finish but it wasn't without a great deal of effort. Decals, standard format onto gloss with 50:50 Matt/Satin humbrol topcoat, revell decal soft. Box option. This is the first of my V bomber fleet, hopefully I will be able to achieve the remaining aircraft to complete the line up. This type truly has a remarkable history.
- 41 replies
-
- 31
-
-
A few pics of my recent Italeri Hu5 Wessex with Eduard PE.. Regards John
- 19 replies
-
- 26
-
-
First RFI for ages from me, in fact I finished this kit a while ago but not built much since, I did this as a post-war Falklands based Harrier as I wanted to arm it up with some Aims, think it looks quite mean with these. Aftermarket bits included resin seat, intakes and outer wheels to spruce up the old kit! Anyway, here she is...
- 11 replies
-
- 18
-
-
Evening, Another one now clear of the bench! This is Airfix latest incarnation of the Harrier GR.3, a lovely kit with the only flaw being the fin is slightly too short. There is a resin drop-in replacement now available to correct this, however on my build there's a bit of a tale of woe here! As soon as I bought this I couldnt wait to start it, and decided straight away to cut the fin and extend it with sheet plasticard myself (no resin available at this point). All went well, the fin was corrected using a 1/72 scale drawing, and progress continued apace until I was about to start decalling. When I looked at the paint guide again I realised what the niggling issue was that had been at the back of my mind since the fin surgery........I'd cut out the fwd RWR antenna and hadn't put it back in! Arrrggh.... I ended up taking the fin out of another Airfix GR.3 (yes I bought more than one, and by now had a replacement resin fin!), carefully cutting out the RWR along the panel line and splicing this into a notch cut in my now painted build. Fortunately I managed to minimise the damage to paintwork and a quick re-spray of the top of the fin put me back on track. Anyway her she is out of the box, including the decals, apart from a LGB and a 1000lb bomb from the Revell Tornado GR.1, to liven up the warlord - Please feel free to leave comments or suggestions, good and bad. Thanks for looking. Rgds, Eng
- 16 replies
-
- 22
-
-
 Here`s another model from my Falklands collection - Argentine Super Etendard in 1/72. Made from old Academy`s kit. Eduard`s PE set was used. Some modifications have been made: nose is a little longer and has a bigger angle, Exocet`s pylon is taken from Heller`s kit, ladder and the electronic pod under the fusselage were self-made, flaps were cut off etc. Decals are mix of Academy, DP Casper and Xtradecal sets. It`s my interpretation of Super Etendard number 3-A-202 before Exocet attack, May 1982. Best regards, Alex
- 15 replies
-
- 37
-
-
- super etendard
- falklands
- (and 1 more)
-
 Hi everyone, welcome to my first WIP thread. I decided on this kit for two reasons: 1) I like the subject matter, the Harrier is a fond favourite of mine. The 1/72 GR3 was the second model I ever bought so it only seems fitting that it's the second attempt in my second modelling life. and 2) It was in the Airfix sale... As with my 'Post-Mortem' thread in Ready for Inspection, I'm hoping this will act as a reference point for other new starters who may be having similar problems with their builds. I'm also hoping to draw on the vast experience of other members who, I must say has been both useful and inspirational in my other build. Kit From what I've read, this is a particularly old kit. Raised panel lines and lots of flash to be trimmed. I'm going to practice some filling and sanding so the lack of recessed panels isn't too much of an issue for me. Build It's not going to be a quick one, so I'll be posting updates every week. It's going to be OOB with no aftermarket parts or anything too fancy. I'll be airbrushing with Humbrol enamels with a cheap-o Revell Starter Airbrush. Like I said, I'm going to use this opportunity to develop some filling and sanding skills for future builds with a real focus on getting a nice even and polished finish. I'll be finishing it with No. 1 Squadron markings and livery, although I am tempted to have another go at the lighter underside. We'll see... I think I might need a bit of luck with this one, so any hints, tips or suggestions before I get on with this would be very much appreciated. Update pictures at the end of the day Here I go...
- 4 replies
-
- 2
-
-
- Harrier GR3
- 1/48
- (and 2 more)
-
This is the gazelle that was one of 2 that was lost in the 1982 Falklands war killing its crew. The aircraft has been rebuilt as a memorial to the brave airmen link here C Scale kit supplied by a fellow britmodeller (sorry I cant remember who but thanks go out to him) tried altering the rotor blades to make them look better those who know the kit will know what I mean and the cockpit has a large amount of modelling licence. not sure how to do the dipoles on the front? any ideas welcome. Normal proviso best seen from 5 foot away. Rodders
-
IA-58A Pucara "Falklands War" - Special Edition Special Hobby 1:72 The FMA IA 58 Pucará is an Argentinian manufactured (by Fábrica Militar de Aviones) Counterinsurgency (COIN) and ground attack aircraft. It is of a low wing monoplane design with twin turboprops and features a conventional twin seat configuration. The aircraft is able to operate from forward locations featuring unprepared airfields where needed. The Pucará was developed in the mid 1960s from an Argentinean Air Force requirement for a COIN aircraft. The aircraft was originally called the FMA IA Delfin, however this was later changed to The Pucará. The engine chose to power the aircraft was the Garrett TPE331/U-303. From a requirement in 1966 progression was swift. An unpowered glider first flew very late in 1967 with a test flight if the powered aircraft in late 1970. Development then took a further couple of years with the Garrett engine being replaced with the Turbomeca Astazou. The first production aircraft took to the skies in late 1974 with deliveries beginning in early 1976. The Pucará was delivered to the Argentinean Air Force, with others users being Uruguay, Colombia, Sri Lanka and the Royal Air Force via the A&AEE at Boscombe Down. Operationally the Argentinean Air Force first used the aircraft in its intended COIN role against communist ERP guerrillas in late 1976. Arguably though the Pucará is most well know for its role in the Falklands War of 1982. Following the Argentinian invasion of the Falklands in early 1982 the Pucará was one of the few aircraft suited to operating from the smaller airfields in the Falklands. The aircraft operated from Port Stanley, Goose Green, and Pebble Island. The Pucarás were armed with their internal four 7.62mm machine guns, 2.75 inch rocket pods and unguided bombs. Two Pucarás were to claim the only Argentine Air to Air victory when they shot down a Royal Marine Scout Helicopter during the Battle for Goose Green. The Pucará proved to be a tough aircraft and at least one was seen to absorb multiple 30mm cannon rounds before being brought down. One Pucará was bought down by a Sea Harrier, One by a Stinger Missile and one by Ground Fire. Nine further aircraft were destroyed on the ground via a combination of bombing attacks and special forces raids. Following the end of the war 11 aircraft were captured with six being returned to the UK. These were evaluated for a time at Boscombe Down before going to museums and collections were they remain. The only other use of the Pucará in anger has been during the civil war in Sri Lanka. The aircraft were used between 1993 and 1999. During this period three aircraft were destroyed during combat missions. The Pucará remains in service with Argentina and Uruguay. Since 2009 the Argentinean Air Force have extensively overhauled the aircraft. Avionics and airframe modifications have taken place, along with new engines. With these modifications it is expected the Pucará will serve until 2045, but only if the Argentinean Air Force can overcome Economic and bureaucratic issues which are delaying the modifications. The Kit The kit arrives in a standard open-ended box from Special Hobby. The must be trying to economise as the box is plain white with a cover glued on so you can only open one end. The kit comes as three sprues of grey plastic, once clear sprue, one bag of resin parts, one photo etched fret and one plastic film (for the instrument panels). The plastic feels a bit gritty to the touch and the engraved panel lines are light, there are some large ejector towers on some parts, which will need to be removed (all typical of Special Hobbys earlier moulds). Construction of the airframe is a fairly standard layout. You have two main fuselage halves, but at the front there is also a lower fuselage part, which attached to the cockpit floor and provides the attachment point for the wings. Construction begins shockingly with the cockpit! A pair of resin ejection seats is provided and these are dressed up with PE belts and buckles. The instrument panels are complete by sandwiching a plastic film between a plastic part and the PE panel. Additional PE panels are provided for the side consoles. PE parts are also added to the coamings for the front and rear cockpits. Once the bottom cockpit floor is added to the front underside fuselage part the side consoles and instrument panels can be added. Once this is complete the read bulkhead is added. The left and right fuselage parts are glued together and the front underside piece added. The next step is the completion of the wings and engines. The wings are traditional construction of upper and lower parts, with the wheel wells being placed inside the engine nacelles before they are closed up. The upper parts longer than the top as the lower centre fuselage section contains part of the wing. The wings and tail planes are then added. There are no locating pins for these, and the tail planes are a straight butt joint so care will be needed. Next the engine nacelles are completed. There is a resin part for the front face, and another for the exhaust. To finish off the landing gear can then be assembled and added to the model, along with the gear doors. The underwing pylons are assembled and added. The propellers are then made up. Care will be needed here with alignment as each has three separate blades and there is only a butt joint to attach them to the hub. Once the props are added the comings and ejection seats are added to the cockpit and the canopy secured. Canopy Only a one-part canopy is supplied to be used in the closed position. The canopy is clear and has no distortion. Photo-etch A small Photetched fret is provided. Most parts on this are for the cockpit in one way or another. Parts are provided for the main instrument panels and the side consoles. Full belts are provided for the ejections seats. Additional parts are provided for the landing gear and some tail aerials, static wicks and the canopy windscreen wiper. There are two parts despite reading the instructions for what seems like hours I just plain cannot identify! Decals Decals are provided for four aircraft. A-511 IA 58A Brigada Aera III / Groupo 3 de Ataque Based in the Falklands 1982. Flown by Major C Tomba and shot down by Lt CDR Ward 21/5/82 with the pilot ejecting and becoming a POW. Aircraft in the Light Brown/Light Green/Light Blue camo with Yellow recognition bands. A-549 IA 58A Brigada Aera III / Groupo 3 de Ataque Based in the Falklands 1982. Aircraft captured and returned to the UK. Now at the Imperial War Museum Duxford. Aircraft in the Light Brown/Light Green/Light Blue camo with Yellow recognition bands. A-520 IA 58A Brigada Aera III / Groupo 3 de Ataque Based in the Falklands 1982. Destroyed on the ground by special forces 15/5/82. Aircraft overall aluminium. A-568 IA 58A Brigada Aera IV / Groupo 4 de Caza Based in Santa Cruz, Argentina 1982. Aircraft was deployed over the South Atlantic. Aircraft overall aluminium. Conclusion Despite it being an earlier tooling from Special Hobby this kit is still a good one. The inclusion of resin and photoetched parts means its not for the beginner; however for the more experienced modeller who has never used these mediums it could be a good introduction to these media. Overall recommended. Review sample courtesy of
- 7 replies
-
- 4
-
-
- Special Hobby
- IA-58
- (and 2 more)
-
Hi folks, This didn't make it in time for the Helicopter II group build but I've kept going and now it's done! It's the Italeri Wessex HU.5 done as XT480, which I believe was involved in the rescue of survivors from Sir Galahad. I used this image for colour and some detail reference, as well as a collection of walkarounds. The kit goes together OK. Quite a bit of flash/burrs on the edges of parts and I thought when I dry-fitted that it was going to be a disaster, but removing the locating pins from the fuselage halves allowed things to line up properly. The nose wasn't bad either - some putty needed underneath and to clean up some seams, but the big zig-zag seam is where the nose cone lifts up for maintenance access so I left that one alone The main problem is the cockpit glazing, which really doesn't fit well at all - I had to glue it to the frame on one side, hold 'til it set, then do the other side with a fair bit of pressure. I used some big files and a lot of putty to re-build the fairing (which is still wrong - it should continue the straight line of the glazing rather than end in a fillet) but at least it doesn't have a gap now. I added three antennas on the rear fuselage which weren't in the kit, some piping to the hydraulic reservoir on the main rotor head, fire extinguishers and wiring looms in the cabin and cockpit, a map/document box, overhead blinds, rotor brake, etc. etc. Also rearranged the seating in the cabin and provided it with a plywood floor. The kit cockpit is pretty nice, especially the collectives and the IP, although I stuffed that up a bit - I thought I'd got the fit right but it bowed away from the backing so the instruments look a bit weird. Oh well. In a sense XT480 isn't a great choice as the kit only provides white stencil decals and they should be black, and the typeface for the serial and XQ code letters is much too modern/too bold. Oh, and most of the stencils are the wrong size! I opted to work with what I had since I was trying to finish for the GB, and cut up/faded various decals to try and get things as close to accurate as I could. The paint is Tamiya - a mixture of olive green fading to darker olive green at the bottom, and olive green plus khaki drab at the top. It's a wee bit darker in real life than in the pics, I think. I had a couple of varnish disasters (frosting/cracking) which I mostly recovered from and did some weathering with MIG washes, AK stuff, and pigments. To do the painted-out crests behind the cockpit I cut masks from post-it note (following the pictures not the decals, which in this case were too small) and blotted paint through with a cotton bud. The scariest job was probably stringing the antennas, but it turned out to be OK once I got into it: This all sounds a bit grumbly but honestly I did enjoy myself (except maybe for the varnishing). It is a surprisingly challenging kit though, given how incredibly glowing all the reviews are, but I'll chalk that up to inexperience on my part. And while you could do a lot more work to fix the accuracy issues than I did, it does look like a Wessex! Thanks to everyone who commented on the build, and particularly to Colin and Smudge for their expertise and encouragement in adding the various extra bits. Cheers, Will
-
This is a bit of a better late than never entry - but it's quite a long group build so hopefully I'll be OK. I've been dithering about what to build and finally settled on the Italeri Wessex. It actually nominated itself since of my various helicopter kits this one has had the most parts fall off the sprues in transit. They're still in the bags though! Looks rather nice in the box, and is a little bigger than I was expecting. The instructions are nice and clear too from what I can see. Hope to make a start sometime this week. If it goes well I'd quite like to do a second build, but I'm easily distracted so no promises there Cheers, Will
-
OK, for those of you that don't know. I finnished reading the book "Vulcan 607" a few months ago, the story of the first Black Buck raid of the Falklands War. I was so inspired I am invisioning an airborne diorama of the 2nd last refueling bracket. On finishing the book I went out the next day and bought my first 1/72 kit in some thirty years - the Revell HP Victor. I have since been sourcing a 1/72 Avro Vulcan, one deal has fallen through (post payment :x ) . I have gained some XM607 decals from a local friend, and a "Dash-10" ecm pod from a fellow i-modeler (thanks David). Today I received my XH558 boxed Vulcan from Jumblies Models (hence this post ). I am now just waiting on my 2nd Victor to arrive from New Mexico (USA) next week (third Evil-bay auction), and then I have pre-assembly at Wideawake Airfield (my man cave) just sharing, as I am starting to love this project........
-
Hello all, my first post at this great forum! Maybe this has been discussed before, but I didn't really find exactly the answer I wan't from prevoius threads. I want to do an Argentinian Dagger A during the Falklands/Malvinas war in 1/72. I plan on getting the PJ Productions injection molded Mirage III E or Mirage V BA/BR. I know the Dagger/Nesher is a copy of Mirage V, but how similar are Mirage IIIE and Mirage V BA/BR? So the main question, if I want to do an Argentinian Dagger in 1/72, is it best to buy the PJ Productions Mirage IIIE kit or Mirage V BA/BR? Are there any differences in the two kits regarding sprue content, or is it just the decals that differ? I know High Planes has released a Dagger, but that is not an option since it's harder for me to get and it's a more expensive resin kit if I'm correct(?). Cheers! /Jesse
-
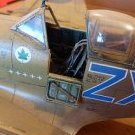
Hi, This is my A-4C Skyhawk from Fuerza Aerea Argentina - grupo 4. Model is Hasegawa. The scene takes place on june 8th, 1982 on San Julian airfield just before departure for attacking RFA Sir Galahad already damaged. The plane raises the HMS Invinsible mark, and is loaded with three BRP 250 with drag chute. Enjoy ! Thanks for looking, Nicolas
- 44 replies
-
- 12
-
-
Hi all Have just got round to photographing this one. Not much to say about the kit that has not already been said. I really enjoyed this build seem to be developing a liking for 1/48 helicopters. Finished with humbrol enamels and oil paint washes, also first time I have used ez line. Thanks for looking Jon
-
 Well, I always wanted to build aircrafts of Falklands subject, and after a 1/48 Sea Harrier from Tamiya, I decided to build a T-34C Mentor, used by Argentina during the war. Unfortunately, the two available kits of Mentor in this scale are not good, so I made a lot of scratch work to improve the kit. The complete build pictures and comments can be found here, at IPMS-Rio de Janeiro website: http://www.aprj.com.....php?f=8&t=3036 Some pics during the battle: The finnished model: I hope you appreciate !
 -
Hi guys ive been off the scene for about 6 months due to various reasons but im back now and wanted to share with you what i think is exciting news. I do not know if this has already been broken on here but there appears to be a new 1/144th scale plastic injection moulded avro vulcan which for me is fantastic news as im sure it will be for many who think the airfix is too big or the dragon too small.(i think not for either but anyways) this model looks fantastic to me here is a link to the test shot models http://www.amiami.com/top/detail/detail?scode=TOY-SCL2-14156 I have just picked 1 up off ebay and when it lands here i will do a review/build of the new kit. cheers Rob
-
hi i have a 72 scale airfix b(i)8, bought it as was going to stick argentinian decals from falklands era, hadnt realised the canopy/engines were diffrent, how can i convert as i cant find a b2 (Canberra B Mk.62) in 72 scale.
-
 Hi, I've been working on this model almost a year now. It's a kitbash of a Eduard Mirage III CJ and a Italeri Mirage III EA. Since 2012 is the year of the 30th anniversary of the Falklands War, I thought I'd do a Falklands War aircraft. I bought a load of books, and some kits (A-4's, SHAR, Harrier Gr.3). This is the only one I've managed to finish so far... The kit itself was a clone between the better detailed Eduard Mirage III CJ and the poor Italeri Mirage III EA. As the Eduard Mirage III CJ is far superior in detail, and looks very similar to the Mirage III EA, I decided to bash the two together using the Italeri cockpit section and the Eduard kit from the area around the intakes and to the rear. I've scratched the weapons stations for the Magic AAMs and used a spare look-alike for the centreline station for the R-530C missile. The droptanks came from Italeri, however I scratched the fins in card. The Magic missiles are from the Esci Mirage 2000 box. I also made the various antennae needed on the fin, back and in front of the cockpit. Decals used were the new Falklands print from Aztec (highly recommended, as it has the toned-down Argentinian markings) and some from Aerocalcas and stencils etc. from Eduard and Italeri. As the engine is different on a III EA than on a III CJ, I used a Wolfpack Atar 9C resin part for the engine section with exhaust. I also used a Pavla MB mk.4 ejection seat and a metal pitot from Master. With regards to the paint; I had a small crisis, as I had pictures of the fin being overpainted in brown to cover som ID panels (probably in yellow). I had no pictures that were good of the top side of the wings, which some also claims were painted with the ID panels and then overpainted. I decided to do the fin, as I had good pictures of this, but not the wings. I used WEMs FS36622 grey, FS 34079 dark green, FS 34102 green olive drab, and grey-toned white for the antennaes. Undercarriage were painted with Alclad. I used RAF Dark Brown for the ID panels. EDIT. Forgot FS30219 tan. I hope you like it, and any comments are welcome - also constructive critque!
 -
First time I've done this and I'm reluctant to post lots of detailed CU pics because I'm really not a good modeller - and this one proved very difficult. I got back into modelling a few years ago largely inspired by the thought of reproducing some aircraft of the Falklands War, of which I was an interested spectator in the UK at the time. Thought I'd concentrate on Argentine aircraft since they employed a greater variety of types than our forces, and although I have always been a huge fan of the Harrier, I was put off doing one of those in 1/48 (my chosen scale) after reading lots about the difficulties the few available kits presented. Anyway, I ended up building a few other things instead, and this is my first Falklands War model! (My build rate is incredibly slow - I'm busy, and I have other recreations.) I acquired the Hasegawa kits on Ebay for the A4B and A4C Skyhawks, plus the Hobbycraft "Falklands" A4Q kit which I plundered for [1] some of its rather good decals and [2] the bomb, which is a good rendition of the 250kg EXPAL bomb carried by FAA A4C and other aircraft - this is intended for my A4C[P] when I get round to it. As a relative beginner, not very skilled, I made life even more difficult by trying paint masks for the first time - I wanted to do my A4Q as 0660/3-A-307 as piloted by Capitan de Corbeta Alberto Jorge Philippi in the May 21st attack on HMS Ardent, and wasn't aware of any suitable decals. Ian at Adastramasks.com was very helpful, and masks were neither as expensive as i'd feared nor as difficult to use - though I was nervous at first. The masks proved especially good for the main serials, and those anchor symbols on the wings - the Hobbycraft decals proved tricky to get lying flat. (The Hobbycraft decal for the blue/white tail flash was also too awkward, wouldn't lie down: I airbrushed the blue and white, then used a cutout "sun" symbol decal.) The kit in general I found a bit of a bugger! Hasegawa's reputation notwithstanding, the fit of some parts was not perfect; and this plane in 1/48 has lots of bits hanging off it that are difficult not to knock off, damage, lose (and so on) despite arranging the workflow carefully so the awkward tiny bits go on last... I destroyed the refuelling probe! Fortunately I was able to cut off the tip and epoxy it onto some very fine alloy tube I found, just the right size. These A4s have a distinctive dorsal radome: I made mine from Milliput, moulded and sanded to shape, then stuck the red nav light on top made with a scrap bit of clear plastic. The ring antenna on the vertical stabiliser is fine lead wire. I might have overdone the weathering: I consulted various reference photos very carefully and sought to reproduce stains, dirt etc religiously; and I thought that with lots of intensive flying in bad conditions, those planes would be dirty. This aircraft and its mission. HMS Ardent was on isolated picket duty in Falkland Sound and had already been damaged by FAA planes that day when Philippi's trio of Escuadrilla 3 Skyhawks arrived: these guys were more skilled than their Air Force colleagues at attacking ships and they had the correct weapons, US Mk82 snakeyes. (Burden et al in "Falklands - The Air War" say four of these bombs - Luis "Der Grunepunkt" on here says three bombs and I suspect he's correct.) Philippi and his wingman Jose Arca hit Ardent a fatal blow and she sank later. Coming off the target, they were spotted by two Sea Harrier patrols, one from 801 Squadron that had insufficient fuel to engage, and another from 800 Squadron. The latter destroyed all three Skyhawks, Capt. Philippi's aircraft being hit by an AIM9-L fired by Lt Clive Morrel in XZ457; Philippi ejected and survived. This engagement appears to have taken place in late afternoon (-ish) so my "dawn raid" pic showing 0660 bombed up and ready to go is probably a romantic misconception! I'll try to make a better job of my FAA A4C/P, with the experience gained from this sometimes vexing build.
-
 War for the Malvinas / Falklands Part 1 Decals Aztec Models - 1:48 & 1:72 Following a long standing dispute over the sovereignty of the Malvinas / Falkland Islands, war officially broke out 30 years ago on 2nd April 1982 when Argentine forces invaded the Islands. In response the British sent a task force to counter the invasion and fight to recapture the territory. The battle that followed was a challenge for both sides. For the British, the challenge was deploying a force so far from home with limited land platforms to supply the effort. For the Argentineans, despite occupying the Islands, only one airfield out of the three (Stanley) was paved but it still wasn't long enough to operate the fast jets from, so they had to carry out their attacks from the Argentine mainland. The British only had 42 Harriers to counter the attacking aircraft which comprised approximately 50 air superiority fighters and 70 attack aircraft. Initial attacks on Stanley were carried out by Vulcan bombers in the historic Black Buck raids successfully completing 8000 mile round trip missions from the British airfield at Ascension. The war caught the world by surprise and indeed created some challenging political situations where some nations officially backed Britain's interests, but were none the less committed to supporting the Argentineans with the technology that they had supplied to them. Initial attacks on British ships were carried out by A-4 Skyhawks, Mirage III's, Canberra's as well is Israeli supplied Daggers. The initial Daggers fared well boosting pilot confidence in the aircrafts ability to survive modern combat but later a Canberra and a Dagger were lost to defending Sea Harriers. On a subsequent combat between Harriers and Mirage III's one Mirage was shot down and another was damaged. Short of fuel, it tried to land at the Argentinian occupied Stanley airfield but was shot down by friendly fire. Although night combat air patrols were performed by the Harriers, they were deemed too valuable during the day role to make a major commitment during the dark hours. Following the initial Canberra loss, subsequent missions for this type of aircraft were only performed by night. The A-4's and Daggers continued in the Strike Role where as the Mirage was used as decoys to lure the Harriers away from the attack aircraft. Lack of A-A missiles and refuelling capabilities limited it's potential other than in this role. After a successful recapture of South Georgia by British forces, the full effort was turned to the Falklands. 74 days after the invasion by Argentinian forces, the islands were recaptured and the Argentinian forces surrendered. The conflict cost the lives of 649 Argentineans military personnel, 255 British and 3 civilian islanders. The pack Aztec have provided these decals in two scales, 1:72 (set D72-048) and 1:48 (set D48-048). The decals come on three sheets with two colour and two B&W sheets of instructions. I'm really impressed with the amount of individual aircraft that are catered for in this set. If you enjoy building your models with themes and have been looking to do a Falklands one, then you'll be very happy with this set. The aircraft you can build are: British Sea Harrier FRS.1 800 Sqn - XZ457, ZA193 Sea Harrier FRS.1 801 Sqn - XZ451, ZA175, ZA190 Sea Harrier FRS.1 809 Sqn - ZA177, ZA192 Sea King HAS.2, 825 Sqn RN - No. 97 Lynx HAS.2, 815 Sqn - XZ247, XZ691, XZ720, XZ728 Wasp HAS.1 - XT429, XS539 Argentinian A-4Q 1 ANAS Argentine Navy - 3-A-301, 3-A-304, 3-A-305, 3-A-307, 3-A-309, 3-A-312 (with selection of pre & wartime colours) A-4P Grupo 5 de Caza, Argentine Airforce - C0207, C-222, C-228, C-236, C-242 Canberra 2BS, Argentine Airforce - B-108 (Not included in 1:48 set) Mirage IIIEA Argentine Airforce - I-018, I-019, ? MB339, Argentine Navy - 4-A-115 Pucara, Grupo de Ataque 3, Argentine Airforce - A-506, A-528, A-537 Sea King SH-3, Argentine Navy - 2-H-233, 2-H-235 Lynx, Argentine Navy - 3-H-142 The Reference Material The instructions have lots of good and a few bad points. There is a wealth of information about colour schemes with plenty of side profiles and painting tips, for example explaining the variation in colour that can be found on the camouflaged Skyhawks. There are also photographs of the real aircraft and information about who flew the aircraft which makes for an interesting read. The slight downside is that the profiles are quite small and there is a lack of 3 view profiles, so you will probably need some support reference material to assist applying some of the decals. How readily available this support information is to come by, I don't know, so some replies from experts with good reference links would be most welcome. One of the things I really like is a paint chart for the aircraft contained that shows the paint numbers for the different paint manufacturers in comparison to the BS number - Humbrol, Model Master, Tamiya & Revell. Clearly a lot of research has gone into creating this set by Aztec and they've really tried to squeeze as much value into the set as possible reflected by the fact that you can build up to 38 aircraft from the set ! The Decals The decal sheets are jammed with detail, and very fine detail it is. There are three sheets that contain not only the aircraft markings, but a wealth of stencils. On the whole, the register is very good and the colours sharp. The British high vis roundels suffer a slight overlap of the blue and red colours which is visible if you look closely. There are some small British low vis roundels where the pink part is very slightly off centre to the surrounding blue. How noticeable this will be when on the kit I don't know. I'm trying to be objective and critical here as is the responsibility of a reviewer, these really are minor issues in the overall excellent quality of the pack. In Aztecs intent to get as many decals onto a sheet as possible, care will need to be taken cutting the decals from the sheet as they are quite close together. I normally use a pair of scissors, but for these I would use a sharp scalpel knife. Conclusion With the 30th Anniversary of the Falklands war and the recent release of the Airfix 1:72 Skyhawk, this is a timely and exciting release by Aztec. There's a few minor issues as I've mentioned above, namely the aircraft profiles and the British roundels, but you don't get much more value crammed into a pack of decals than this. Clearly there are some key aircraft missing from the pack, Wessex, Argentine Hercules and Vulcan stand out, so I suspect Part 2 will be just as welcome as this. As mentioned in the review, the Canberra isn't included in the 1/48 set. If you have the remotest interest in the Falklands conflict and build in either 1/72 or 1/48th, you really need a pack of these in your collection ! Review sample courtesy of Available direct or from most large Model Retailers
 -
Air War Over The Falkands Book by AIRfile I was particularly pleased to receive this book for review as I served as a member of the Falklands Task Force in 1982 and saw a few of these aircraft types 'on the ground' so to speak. Firstly, one cannot help but notice the mis-spelled title "Falkands"; an error during typesetting and openly admitted by the printers. This has subsequently been corrected in their reprint. Having now read the book I would like to use an age-old phrase "Don't judge the book by its cover" The book's format is A4 portrait, softback, and consists of 73 actual pages of data and full colour illustrations. The work has been compiled by Neil Robertson and illustrations are by Peter Scott. The information contained within have been extensively researched by a number of contributors including: Ricardo Caballero; Jan Forsgren; Nick Greenall; Tony O'Toole; Diego Rojas; Glen Sands and David L. Veres. Content There is a short preamble, with contents, followed by a two page introduction; giving a basic run down of the events which led to the fighting. This is followed by two main sections, each deals with the two countries aircraft and provides colours and markings at specific periods of the conflict. British Aircraft This section contains 38 pages of illustrations coupled with data of 92 British aircraft, including: Fixed Wing - Harrier; Vulcan; Victor; Nimrod; Hercules and Phantom. Rotary Wing - Chinook; Wessex; Wasp; Scout; Lynx; Sea King and Gazelle. The illustrations are well presented in either of two formats: 4 different aircraft profile views per page, or 4 views of a specific aircraft to 1 page (except with larger aircraft such as Vulcans etc.). Each illustration has a few lines of text detailing the aircraft, its squadron and pilot and the particular time period in which the illustrated colour and details were referred to. This can be quite useful if wishing to build a kit during a specific period during the conflict; it is interesting to read how some aircraft had different colour schemes throughout the period from the start of the war until their return home. Argentinian Aircraft Just like the British section of this book, the Argentinian element covers 92 specific aircraft represented over 37 pages. Aircraft types illustrated include: Fixed Wing: Mirage; Dagger; Skyhawk; Pucara; Canberra; Hercules; Friendship; Super Etendard; Turbo Mentor; Aeromacchi MB-339; Tracker; Lear Jet; Neptune; F-86 Sabre; Skyvan and even a Boeing 707. Rotary Wing: Puma; Agusta A-109; Iroquois; Chinook; Sea King and Lynx. There are so many different types of aircraft, serving Army; Navy and Air Forces, covered in this book and the colour demarcations shown mean that more than one of the same aircraft type could be built with different markings, camouflage or weapon loads etc. Conclusion This is a very nicely illustrated book, with sufficient textual information to help the modeller choose and paint some specific aircraft from the conflict. I believe the 4-view colour plans/profiles will be especially useful when deciding aircraft, squadron, markings and even weapon loads when building a kit. Having colour illustrations of 184 aircraft in one publication will, I suspect, make this a source document for modellers of aircraft during the Falklands/Malvinas conflict. This book really does tick the boxes for me, from a modeller's view, however if there is one extra element that I would like to have seen, it would be identifying the FS or BS colour numbers for the various camouflage colours but I'm sure I will be able to get that from other sources. This is the fourth in a series of well presented and visually pleasing books aimed, I believe, more for the modeller rather than historian. As such this is a fine publication which should become a valuable modelling source for a long time to come. I very much recommend this to anyone interested in building models of either British or Argentinian aircraft during the Falklands/Malvinas war. Review sample courtesy of Buy it Now Kindly mention Britmodeller.com to the supplier when making enquiries or orders .