Search the Community
Showing results for tags 'FW190'.
-
Focke Wulf Fw190F-8 1:48 Hasegawa History Arguably one of the best fighters of the time, the Fw 190 was widely used during the Second World War. A total of over 20,000 were produced, including some 6,000 fighter-bomber variants. The 190 remained in production from 1941 until the end of the war, going through multiple redesigns. The Fw.190 made a name for itself as a true Luftwaffe workhorse and was used in a wide variety of roles, including a high-altitude interceptor (especially the Fw.190D), escort fighter, fighter-bomber and night fighter. When the Fw 190 started flying operationally over France in August 1941, it quickly proved itself to be superior in all but turn radius to the Royal Air Force's main front-line fighter, the Spitfire Mk. V. The 190 wrested air superiority away from the RAF until the introduction of the vastly improved Spitfire Mk. IX in July 1942 restored qualitative parity. The Fw 190 made its air combat debut on the Eastern Front in November/December 1942; though Soviet pilots considered the Bf 109 the greater threat, the Fw 190 made a significant impact. The fighter and its pilots proved just as capable as the Bf 109 in aerial combat, and in the opinion of German pilots who flew both, provided increased firepower and manoeuvrability at low to medium altitude. The Fw 190 became the backbone of the Jagdwaffe, along with the Bf 109. On the Eastern Front, and was versatile enough to use in Schlachtgeschwader (Battle Wings or Strike Wings), specialised ground attack units which achieved much success against Soviet ground forces. As an interceptor, the Fw 190 underwent improvements to make it effective at high altitude, enabling it to maintain relatively equal with its Allied opponents. The Fw 190A series performance decreased at high altitudes (usually 6,000 m (20,000 ft) and above), which reduced its effectiveness as a high-altitude interceptor, but this problem was mostly rectified in later models, particularly in the Junkers Jumo 213 inline-engine Focke Wulf Fw 190D series, which was introduced in September 1944. In spite of its successes, it never entirely replaced the Bf 109. The Fw.19 F-8 was the most mass-produced variant of the Fw.190F series, based on the Fw.190A-8. The Fw 190 F-8 differed from the A-8 model in having a slightly modified injector on the compressor which allowed for increased performance at lower altitudes for several minutes. The F-8 was also fitted with the improved FuG 16 ZS radio unit, which provided much better communication with ground combat units. Armament of the Fw 190 F-8 was two 20 mm MG 151/20 cannon in the wing roots and two 13 mm (.51 in) MG 131 machine guns above the engine. According to Ministry of Aviation acceptance reports, at least 3,400 F-8s were built, and probably several hundred more were built in December 1944 and from February to May 1945. Dozens of F-8s served as various test beds for anti-tank armament, including the WGr.28 280 mm air-to-ground missile, probably based on the projectiles from the Nbw 41 heavy ground-barrage rocket system, and the 88 mm (3.46 in) Panzerschreck 2 rockets, Panzerblitz 1 and R4M rockets. The Model Originally released in 2011 this kit has now been reboxed by Hasegawa, this time with a new set of decals and a different weapon load. The box artwork shows this well with a representation of the aircraft banking to port with the large bomb on its centreline. The styrene inside the box is of the usual Hasegawa fare, nicely moulded with fine panels lines, no sign of flash and only a few moulding pips on the seven grey sprues of varying sizes and one sprue of clear styrene. Instructions are not as clear as some of their kits but are certainly usable. Spread over thirteen operations, the build begins with the cockpit which consists of the tub, with the rear decking integrally moulded, separate seat, side consoles, rudder pedals, and joystick. The instrument panel requires the details to be sanded away so that the instrument decal can be applied. Alternatively you could use the individual decals found on the Airscale products, and keep the surface details. Seatbelts are not provided so these will have to be sourced from elsewhere or assembled out of Tamiya tape. With the cockpit completed it can be affixed to one side of the fuselage, along with the trim wheel on the starboard fuselage side wall, after which the fuselage can be closed up. The main undercarriage bays are made up of the front wing spare face, wheel wells and central bracing structure. The bay assembly is then glued into position on the single piece lower wing. The upper wing sections are then fitted to the lower wing, the machine gun bulges are then fitted to the their respective positions on the upper wings, followed by the upper nose decking and horizontal tailplanes. With the fuselage almost complete, it’s on to the engine and cowling. The cowling consists of upper and lower sections, two side pieces, front section and an internal intake part. Putting the completed cowling assembly to one side, construction of the engine can begin. The valve rods are attached to the combined cylinder banks/bulkhead. There is not much in the way of detail for the cylinders, but to be honest there won’t be anything seen once the cowling has been fitted. With e valve rods in place, the gearbox back plate is fitted to the front of the engine, followed by the gearbox, into which a poly retaining part has been added, followed by the fan disc. The completed engine is then attached to the forward fuselage, along with the exhaust pipes on either side and finished off with the cowling.. With the fuselage upside down, the undercarriage can be attached. Each main undercarriage assembly is made up of the main oleo, separate scissor link single piece wheels and gear bar door. The tail wheel also has a separate single piece wheel which is attached to the tail wheel oleo and supporting structure and finished off with the attachment of the other side of the wheel yoke. The main undercarriage assemblies, once fitted into position are completed with the attachment of a retraction jack for each leg. Additional parts fitted at this point include the wing root gun barrels, boarding step, outer wing panels, and the centreline bomb rack which is made up out of two front halves, a single piece rear section and completed with the fitting of the four crutch pads. The bomb itself is assembled from the two nose halves, two tail halves, two separate fins and the tail ring. Part of the lowest fin needs to have a section removed to give the required ground clearance. The bomb can then be fitted to the carrier. The final sub-assemblies of the build are the propeller, (consisting of the single piece propeller, back plate and spinner), optional styles of canopy with alternative armour plate supporting structure, three piece gunsight, and windscreen which can then all be fitted to the model. Lastly the pitot probe and wing tip nav lights are attached, Decals The decal sheet is very well printed by Hasegawa themselves, in good register, nicely opaque and slightly glossy. Surprisingly full swastikas are included, so I don’t think this kit will be on sale in Germany, although they are placed on the sheet in such a way as to be easily removed. The are full stencils for one aircraft and the option of two aircraft markings. Fw-190F-8 A3+18 11./KG200 March 1945, RLM74 and RLM 75 over RLM 76, with RLM75 mottle on the fuselage sides. Fw-190F-8 A3+LV 11./KG200 1945, RLM74 and RLM 75 over RLM76 with no mottling. Conclusion This is another nice re-release from Hasegawa and well up to their usual standards. The detail is very nice straight out of the box, and apart from the addition of seatbelts shouldn’t really need anything else. The unusual fin arrangement of the 1000kg bomb makes it a little more interesting and will make a nice addition to any collection. Recommended Review sample courtesy of UK distributors for
-
 Fw190A-8 Etch & Canopy Masks for the Airfix Kit Eduard 1:72 The new FW190 from Airfix is a great kit and generally well received in the community despite some niggles that have been covered in builds and reviews. Eduard are always on the case looking for ways to improve kits and they've released these sets. Fw190A-8 Etch detail (Set 73493) As you would expect, the cockpit gets plenty of attention from this two fret pack with some self adhesive pre-painted etch. Both front and side panels are provided in painted etch, as are the seatbelts. A nice little touch is the inclusion of some BMW badges, although you'd better have your Optivisor at the ready or your best specs to handle these! Included on the unpainted fret is the armoured head rest and rear cockpit combing. The flaps on the Airfix kit are not included and somewhat unusually, are not split between the upper and lower halves of the wings. Instead, they are solid lumps with the whole trailing edge fitted to the upper wing. As such, a lot of plastic needs to be removed to fit the etch flaps included here. The flap rear bulkhead has an intricate multi angled shape and looks like it may require a suitable tool to do the bending. As such, if you don't have one of these, building the flaps as per instructions may prove difficult, so please consider this. The gear bays get some rewarding improvements and the oleo scissors and brake lines are included for the main gear legs too. Other features included are trim tabs, various aerials and drop tank collar. On the whole, it looks like a comprehensive set but those flaps may prove fiddly. For more information, see HERE Fw190A-8 Flexible Paint Masks Eduard have now released this to take the pain out of painting the tiny canopy and wheels. Conclusion Two great items for any fans of the new Airfix Fw190. The etch gives a great boost for the detailing ability of the kit, however I think the flaps could of been engineered in a somewhat more user friendly way even if it did mean a slight compromise in accuracy. Review sample courtesy of
 -
So here is my entry for the GB. Its the new tool Airfix 1/72 Fw-190 A8. This one is the gift set version, so has different markings, and I picked it up for the extortionate sum of £4.99 in Aldi a couple of weeks ago. Its going to be built OOB except for a couple of additional decals on the tail plane.
-
Hi all, You join me at the end of what (to be honest) was a reasonably uninteresting build. That's not to say the kit is bad, the kit is superb IMO! It's taken a while to build this little kit due to the amount of time spent researching the subject, however, it is now nearing completion Used some spare PE belts in the pit Ben
-
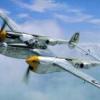
This one was a spur of the moment build from a picture I found online, it took a lot of researching and there is a fair bit of guesswork involved. I couldn't find out what colours to used so I used my default green/grey Humbrol 163/164. Anyway, here's the real thing And here's my effort IMG_6296_zps402c6e5b by Ben Standen, on Flickr IMG_6297_zps80c5ec05 by Ben Standen, on Flickr IMG_6298_zpsa32216ad by Ben Standen, on Flickr IMG_6301_zps970c87fa by Ben Standen, on Flickr IMG_6302_zps1a0d5b4f by Ben Standen, on Flickr IMG_6303_zps3c507c0d by Ben Standen, on Flickr IMG_6304_zps4776aa5e by Ben Standen, on Flickr IMG_6306_zps8a301301 by Ben Standen, on Flickr IMG_6307_zps7cae5c11 by Ben Standen, on Flickr IMG_6291_zpsc19ed00f by Ben Standen, on Flickr IMG_6292_zps540bfbec by Ben Standen, on Flickr IMG_6293_zps97dd6c33 by Ben Standen, on Flickr IMG_6294_zps6c95de18 by Ben Standen, on Flickr IMG_6295_zps02f0d933 by Ben Standen, on Flickr Overall I'm pretty pleased. Maybe the colours aren't the correct RLM, however there are no colour photos or veterans to tell us what the real colours were. I have a Spitfire XIVe that I'll make in 41sqn colours and I'll put them both in a diorama of Kastrup (Copenhagen) in May/June 1945. Regards, Ben.
-
My next project... I have no info at all on this aircraft, all I know is she must have been caught by 41sqn before being repainted and havibg raf markings slapped on. Unusually, I couldnt find ANYTHING via google! Anyone got any info on this curious bird? Note: I don't own this image, I also don't know who owns the copyright as the website it was on didnt mention Regards, Ben
-
The new Airifx A02066 Focke-Wulf Fw190 F-8/A-8 will be available December 10th for us to buy! Details on Airfix's Face book page: https://www.facebook.com/photo.php?fbid=10152092232426271&set=a.80699376270.112940.65102591270&type=1&theater Julien
-
Got this as a birthday pressi and wanted a quick build OOB build after the hastle i had with the last build (lanc), as daft as this sounds it was the bright colours that drew my attention to this , Hope you all like didnt really do a WIP so only a few picts,,
-
 Well this one was ten years in the making. I started it and then went to university, New Zealand etc. and only finished it last month! I must have had a very relaxed approach to sanding and filling back then as the seams are awful but I painted it up anyway. I did attempt a scratchbuilt engine rear/oil header in place of the incorrect 'dimply' wheel wells. Historical accuracy is out of the window - I had some EagleCals decals for a D-11/13 and I really liked the scheme so did it despite the kit being a D-9. Paints are all humbrol/xtracolor enamels and some oil wash, with white for the fabric control surfaces. Radio mast long broken off in storage and haven't bothered to replace it! The decals sheet reckoned top colours of Dunkelgrun and Grauviolett on the wings although I reckon that is rubbish considering the fuselage colours so went with Grauviolett and Lichtgrau. Feel free to correct my wild guesses! Thanks, Chris
 -
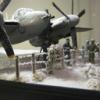 Hello and good morning, This is my first post and I am relatively new to the forum. My name is Ed and I recently got back into modeling when during a house move my fiancée discovered a few unbuilt kits sitting in a box left over from my childhood. She persuaded me I should have a go at building them - Now I've rediscover the model making bug and thought I'd share my pretty amateurish results with you all. I'm a member of a motoring forum and through a mutual member both here and there, decided I should post up my efforts. Hope you like. All comments appreciated. Regards, Ed Finial result - Display cabinet. Ikea cabinet with 3 additional shelves with individual shelf lighting (Christmas pressie) P-40 Kitty Hawk FW190 Mosquito P-38 P-51 Duck (0n water)
 -
I bought this kit with a view to entering the Fw190 group build, but before the GB started I realised I wouldn't have any modelling time spare to be able to even start the kit. It's this weekend edition: I started this build about 4 weeks ago, and I progressed pretty quickly, getting the cockpit tub, engine & ammo storage assembled & painted up, as well as the wheel bay. However, I've been stalled for the best part of 2 weeks now as I'm not looking forwared to getting the fuselage halves & wings together. I've seen in the WIP's of the STGB that assembly can be a pig, and sure enough dry fitting the parts so far has put The Fear ™ into me a bit. I probably doesn't help that this is the firt Eduard kit I've tried to build. I though that posting a WIP might give me a bit of impetus to carry on. This weekend I painted up some lionroar PE belts, and fitted them to the cockpit, so hopefully that will get the ball rolling again. In the mean time, with the sun out, here's where I am so far: Cheers Chris