Search the Community
Showing results for tags 'FUJIMI'.
-
My latest completed.... Well I did actually finish this a couple of weeks ago but I'm terrible at pointing the camera at my models for some reason. Good at pointing the camera at real planes whenever I see them, funny that! German Air Force Alpha Jet 41+39 JBG43 NATO Tiger Meet - Kleine Brogel 1985 This is the Fujimi 1/72 kit. It has some nicely represented panel lines but in other areas comparable to old Matchbox kits. Extremely basic cockpit & very thick clear one piece canopy. I did have a Pavla vacform canopy intended for the Heller kit but in the end decided to use the kit canopy & took the razor saw to it & cut it up into sections. As I needed to reinforce where the canopies are attached, I drilled & attached brass rod to represent the telescopic canopy rams, this made for a secure support and attachment. I added side consoles from scrap plastic & used Pavla MBB Stencel ejection seats. The only thing I should have addressed was the arrestor hook which looks like a walking stick attached to the rear end, which I might sort out at a later date when I can be bothered! For decals I used a HaHen decal sheet (Thanks Harald if you're looking!) which provided the cockpit decals & fitted nicely. His German Air Force Alpha Jet decal sheet had everything I needed for this particular airframe which attended the 1985 Tiger Meet at Kleine Brogel. Photographic reference from; "The 25th Anniversary NATO Tiger Meet" Coen Van Den Heuvel & Jac Van Tuyn Osprey/Motorbooks International An obligatory Master brass pitot was used as well as some brass tubing for the Mauser gun. All paints used were from the Hataka paint range, Mig PLW wash & Xtracrylic matt. Thanks for looking
- 22 replies
-
- 46
-

-
- German Air Force Alpha Jet
- 1/72
- (and 1 more)
-
Here's one I completed a couple of weeks ago. Used Airwaves seats and decals from Starfighter decals as a Desert Storm machine. Cheers 20200630_144825 by bryn robinson, on Flickr 20200630_144831 by bryn robinson, on Flickr 20200630_145019 by bryn robinson, on Flickr 20200630_162409 by bryn robinson, on Flickr 20200630_144751 by bryn robinson, on Flickr 20200630_144713 by bryn robinson, on Flickr
- 10 replies
-
- 31
-
-
Hello All, I have had this one on the back-burner for years. I have finally decided, what with the FIAT 500 nearly done and another couple of cars nearing completion as well, to resurrect this one. It's the Fujimi 1/24 246 Dino. It's one of their 'enthusiast' kits, meaning loads of fiddly tiny parts. I have already done a couple of the Porsche enthusiast kits and apart from a few niggles, they went together well. I just wish I knew where I had put them in the loft for safe keeping. I started it a while ago and then put into storage, where it got forgotten for a long while. I have painted all the major body parts in Halfords' 'Broome Yellow'. It has come out quite well, even gloss cover and no serious imperfections. This is the dinky little engine: I have put a few more parts together since these photos were taken. I am planning to add ignition leads as it looks a little bare without. Thanks for looking, Alan.
-
With the Lincoln done, it's time to make a serious start on the Scout. I've started with the old Fujimi 1/50 Westland Wasp kit, which isn't too bad in outline but is low on detail. As many here will know, the Wasp differs from the Scout primarily in the undercarriage and rear tail areas. I've removed the offending undercarriage support areas and antenna lump from the lower fuselage and cut the rear part of the fin away (saw disc on the Dremel works wonders!). Unfortunately, it's left a rather ragged hole which I'm going to have to fill after joining the halves permanently. There are a lot of rivets on this kit and, in this case, I need to retain them as much as possible as they are quite prominent on the real aircraft being domed rivets, rather than flush (pretty much the standard for helicopters due to their low speed). I reckon some of the bits I cut off the Lancaster for the Lincoln conversion will fit the bill nicely, as they already have rivet detail on the plastic but if not, I've bought some stick-on rivets to add later. I'll use the same for the fin and (possibly) the horizontal stab, both of which will need to be made from scratch. The instrument panel is extremely basic and incorrect, so I'll build a new one from plasticard using my new punch set from MicroMark and the excellent Airscale decals. Scratchbuilt instrument panel is in progress, as are the internal mods needed. I'll be tinting the upper canopy windows with Future and blue food colour, too.
- 103 replies
-
- 12
-
-
I built this a while ago, but never got around to photographing the finished kit, so here is it. It's the old Fujimi 1/72 scale A-6A Intruder. It was built straight from the box using the kits original decals. It went together really nicely with very little filler needed. Back in the 80's Fujimi were my favourite kits. I used Vallejo Model Air paints. Hope you like the pictures. And for those that are interested here's the link to the build -
-
I picked this kit up last year but upon opening the box was a bit disappointed. I found to be much simpler than I was expecting, more akin to a scaled up 1/24 kit. Anyways, in looking to distract myself from the pair of B-25s lingering on my bench I decided to give it a whirl. One of the first things I noticed when I opened the box is that the kit uses stickers instead any decals for the various markings as well as the IP. Starting with the engine and front drivetrain, I noticed a fair bit of flash as well as odd marks in the mouldings. There's this odd bend moulded into the driveshaft which if it was 1/1, wouldn't work very well. I'm thinking I may swap it out. That's it for the moment. Carl
-
I started this model on the weekend, oblivious of the GB. But before I omit such a gorgeous plane I thought it is better I just post an entry and ask for forgivess later. It will be mostly an OOB, although I may slap some aftermarket decals on the plane. @rob85 please confirm if this level of work is acceptable for the entry.
-
Hello all, my final build for this GB is the Fujimi IJN Matsu. This was very kindly sent to me by @PeterB last week. He has told me that the model is a bit of a hybrid, as it does not have a rounded transom, but a squared-off one which was on the later Tachibana class, and has the bridge and foremast of the early Matsu class. I will build it as it comes in the box, so it will be a Matsu-ish. Anyway, the box and contents: Note that there are not too many parts! The instructions look to be well drawn, and with English text: I have had a look at my upgrade sets which I have left over from a couple of my other projects, and I may be able to improve some aspects of the look. Now, although the instructions are in English, the paint guide on the back of the box is decidedly not: It suggests an overall grey finish, but as I cannot read the text, I am not sure. However, in the instructions there is an English section which shows this: This states that the decks were linoleum colour (light brown). Now, this gives me to wonder if I should follow the written guide, and have something a little more colourful. Peter has also suggested that some references say that some Destroyers did have lino decks in some parts, painted over in others. There are tie-down strips all over the main deck on this model, so I may well do an all-over linoleum, and try to get the brass effect for the tie-downs. I have given the hull a good spraying with Tamiya Grey Primer, and this time I am also going to try to add the scuttles. After completing the Hibiki earlier, I think a ship looks wrong without them. This model too has none moulded along the hull sides. That is it for now, more soon with luck! All the best, and thanks Peter for the model, you are a 'Top Chap'! Ray
-
Big thanks to Rui Silva for creating a GB Banner that include all the nordic countries. By asking for it and promising to participate in the GB makes me obliged to get a F-16 out of the stash and give it a go. It's been quite some time since I built and finished my last kit but I'll give it a try. The subject is a F-16A, pre-MLU, Fujimi 1/72 kit. The Norwegian F-16s have a rather simple camo, and weathering is also not that prominent due to regularly cleaning 🙂. The decals does not include the squadron fin flashes so I probably will manage without. Otherwise my squadron of choice would have been the 338. Well, here are some pictures:
-
I've got tired of Japanese airplanes in the same color schema (dark green/IJN grey) so decided to do something different. This is old kit from the 80s. Kit was ok, panel lines were lightly recessed - should've probably rescribe them but I didn't want to put much accent on it anyway. I thought it would look better in plain orange color. First time I've tried to use pre-shading on a model - I thought it would look nice with orange color. Also first time I painted anything orange. I used black color for pre-shading but probably would have needed to use grey - it took me 6-7 coats of orange paint to make it look ok. And after all of that you can't really see much of pre-shading on the photos - trust me it looks better in real life 🙂 I also think I went too much on exhaust stains.
-

1/72 Douglas A-4E "Ahit", Heyl Ha'avir
Creepy Pete posted a topic in Ready for Inspection - Aircraft
Hello, Here's my just finished 1/72 Fujimi A-4E Skyhawk. I used Armycast decals (very nice!) to do it as an ex-US Navy A-4E with 110 Squadron in 1973, before it got the extended tailpipe and DEFA guns. I added some M117's from Brassin on the MER on the centreline, the LAU-10's on the wings are from the kit. The green, brown and grey are Humbrol, the sand color is ModelMaster. Thanks for looking, I hope you like it.- 10 replies
-
- 33
-
-
My RF-4C is finished. I'm not 100% happy with this (when am I?), tied weathering with oils for the first time on an aircraft with mixed results. Having said that, this model has sat part built for at least 15 years (maybe even 20), and the kit itself dates from 1985! So all things considered I suppose I shouldn't be too critical. It's a definite 4 footer, doesn't look too bad sat on the shelf next to the far superior Revell RF-4E. This marks the 6th completed kit of 2020 for me! Decals are Xtradecal and depict a bird from the 1st TRS, 10TRW based at RAF Alconbury, 1982. They are very thin and not very sticky. More than once I found part of a decal stuck to my finger as I was handling the model. Edit: Just realised I forgot to turn off the compression when I resized my pics, so they're a bit grainy. This is how the model looked after I pulled it from the shelf o'doom and dusted it off A few weeks work later.... It now joins its brothers, Phour Phabulous Phantoms. And another two from the box o'doom. These both date from the late 90s when I first returned to the hobby. At least I've improved my skills slightly in the last 20 years!
-
Back in around 1970 I came across the Japanese 1/700 scale waterline ship series, which was a collaboration between 4 of the main Japanese kit makers – Aoshima, Fujima, Hasegawa and Tamiya, intended to produce examples of just about all classes of ships operated by the IJN during WWII. Initially each company was allocated a particular class and built at least 2 - one early and one late version. In the case of smaller classes such as Carriers and Battleships they usually built the whole lot. Later they introduced a small number of British, German and US ships, and other companies joined in such as Trumpeter and Matchbox. I built a lot over a 10 or so year period then gave up. However, there was one ship I needed to complete all the main IJN light cruisers – a Sendai class, and about 10 years ago I got one. I now intend to build it as part of this GB. There is not much in the box but it will give me something to do in between the various stages of my EA-6A. A little background seems appropriate. In very general terms, before WWI cruisers fell into 2 groups – large, heavily armed “protected or armoured” cruisers and the smaller “unprotected” cruisers with little or no armour and smaller guns. By the end of the war they mutated into 3 groups. The armoured cruisers generally were reduced in size and restricted by treaty to 8” guns max – these were the Heavy Cruisers. However some countries also built even larger versions which were Battlecruisers. The unprotected cruisers became Light Cruisers with max 6” guns. One of the more successful wartime classes of light cruiser were the British “Town” class and the follow up C Class, and the IJN brought out their own versions starting with what I will call the Tenryu Class – there is some debate about class naming with authors varying on which ship name to use! All the following data is from Anthony Watts Ian Allan book “Japanese Warships of WWII” of 1966 – length is between perpendiculars (pp) not waterline, displacement is standard not full load, ie no crew, stores, fuel and ammo. The 2 Tenryu's of 1918 were small ships of 3230 tons, 440 ft long pp and armed initially 6 single 5.5” guns and 6x21in Torpedo Tubes (TT) – I say armed initially as armament changed on all ships over a period of time. They were followed a year or so later by the 5 ship Kuma Class – 5870 tons, 490 ft pp, 7x 5.5” and 8x24”TT, and a couple of years after that the 6 ship Nagaras – 5170tons, 490ft pp, 7x5-5” and 8x24inTT. Following the one off experimental Yubari the last of the “Town”/C Class variants was to be the 6 ship Sendai class, but only 3 were build due to a combination of tonnage restrictions in the Washington Treaty and the decision to build something more modern. Their particulars were 5195 tons. 490ft pp, 7x 5-5in and 8x24inTT. The rearrangement of the boilers and turbines meant that they had 4 funnels instead of the three in the preceding classes. More once I start. Pete
-
I'll bet we've all built a dog of a kit once or twice in our modeling lifetimes. You know the kit that everyone disparages? The one you've read described as "unbuildable"? Yeah, that kit. Well, this is one of those I guess. 😉 I bought this old Fujimi 1/48 kit at a model close-out at a Michael’s craft/hobby store many years ago. Since I only paid a few dollars for it, when I finally got around to building the plane I decided to try a bit of customizing. The build was quite a while ago now. The exhausts were originally molded into the fuselage sides. These were cut out, the opening squared and cleaned up and the small vertical braces added. The exhausts were taken from a Pro-Modeller Me-410. I rather clumsily opened up the cowl flaps and added the deflector above the starboard exhausts and fabricated another small scoop for the upper fuselage and the retracting footstep and radio aerial. The “down gear” indicators were also added to each wing, and brake lines were added to gear legs. The cannon barrels are hypodermic tubing from the farm and ranch store. The decals are from AeroMaster Reich Defense Pt.VI-Doras 48-109. I added a bit of detail to the cockpit, including cutting the characteristic hand-holds on the sides of the instrument panel cowl, added seat harnesses and a placard for the pilot’s headrest. “Black 10” of II.JG26 was abandoned at Celle, spring 1945. This aircraft wears an unusual scheme of RLM82 and RLM81 over RLM75. The paint is all Model Master and Humbrol enamels shot with my Paasche H. I’ve read some scathing criticism of this kit on the ‘net. Some comments said it was under-scaled (1/50?) and suffered from shape issues as well. That is all probably true but it does look okay on the shelf with its Luftwaffe siblings. It was photographed out at the Cameron airport. Thanks for your interest and feedback! 😀
- 21 replies
-
- 34
-
-
Hi everyone. This will be my contribution to the GB. It’s a recent release of Fujimi’s A-4m by Hobby 2000. Decals are from cartograph which will be a big improvement over Fujimi’s decals. It also comes with painting masks made from black vinyl which are like Montex masks. I will start this after the P-51 GB. Cheers Allan
-
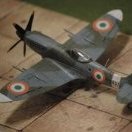 I have been on a Spitfire building binge. Here is a quick conversion of the 1/72 scale Fujimi FR XIVe kit to a FR XVIII. The kit comes with an enlarged rudder and short of pulling out some calipers to take measurements, simply eyeballing and comparing it to the the Aeroclub and MPM rudders, it looked right and I thus decided to leave it alone. The main mod was drilling the 2 ventral camera ports under the fuselage. I did not mess with the wing panel lines . The build was actually very straight forward and fun. I used the excellent book "Spitfires in the Sun" as my reference for markings to build this as HS637 of No. 15 squadron Indian Air Force based out of Ambala in 1951. The airplane still carries white ID wing tips from the J&K war. All colors are Tamiya. Comments/suggestions/questions are always welcome! I hope you like this quick build: Thank you for looking!
- 14 replies
-
- 27
-
-
- Fujimi
- Spitfire FR XVIII
- (and 1 more)
-
 Here is my 1/72 Phantom FGR.2 XV423 "D", 23. Squadron RAF, RAF Stanley, Falkland Islands 1983/84. Old Fujimi kit made "out of the box", except resin ejection seats (Pavla) and Sidewinders (Eduard). Decals are based on Print Scale`s 72-285 set. Thanks for watching! 😊
- 33 replies
-
- 69
-
-

-
So, I started this model back in 2017, lost interest and left it half built. I came back to it a month or two ago, completed the building of the kit and again lost interest. However I managed to finish it a couple of weeks ago now. Had some problems with fit, notably the canopy, the rear side joins near the burner cans and the sparrow missiles. Decals were another problem here and there, particularly on the Phoenix Missiles, for some reason after I had them on the missiles almost all the stencil data decals came off and rolled up on me as I was trying to handle the missiles to apply microset (or is it sol? The red one)! Lost the 2nd vane on the dorsal area also, I was so close to not losing any small parts! I also managed to scratch/damage some of the MRP insignia white paint I put down, during handling, whilst painting (and possibly decalling), I'm calling it weathering/bird strike! There is some oil weathering on it, but you can't really see it in these photos, and it didn't turn out quite as good as on my Airfix 1/72 A-4 Skyhawk (although I fogged the canopy on that one so hey ho). If I were to build this kit again, I'd buy a Master brass pitot for the nose (I had a terrible time with the kit supplied part, it still isn't attached properly or straight!) and try to get the canopy to fit nicely, or fill the gap, before painting commenced... Due to limited space, and my camera not being very good I found it quite awkward to get the photos I wanted and I'm not really sure why, so these are the best I could do at the time... Thank you for looking.
- 10 replies
-
- 41
-
-
 I know what you've all been thinking. All this sci-fi stuff is all well and good, but when are we going to see some Scandi Noir? Well I'll oblige! I recently binge-watched the Danish/Swedish noir drama Bron/Broen, aka The Bridge. The Swedish protagonist Saga Noren drives a rather lovely 1970s Porsche 911S in an unusual olive green-mustardy colour. I can't find a photo that I can be sure I can post, but here's a youtube video showing the star of the show auctioning the car a year or two ago: I love this car - whilst cars aren't my usual thing (I probably last made a model car about 35 years ago) I had to build this one. Somehow I didn't feel the same pull to the battered people carrier driven by her Danish counterpart Martin Rohde! The car in question is a 911S from the late 70s. Fujimi does a 1/24 1969 911S which is the right body shape but some of the details aren't right for this particular car - mainly the bumpers, but a few other things like the wing mirrors are differently. However they also do a 1/24 1980s Carrera which is the wrong body shape (the flared wheel arches stand out as the main difference) but has all the other details needed. So a bit of kit bashing is in order. Here's the box shot of the 911S kit: And here are the bodies of the two kits side by side - the 911S is on the left: In the top photo you can see that the front wheel arch extends a bit further down on the 911S than the Carrera - this is due to the bulkier bumper on the Carrera - and I need to trim it back to match the profile of the Carrera so the bumper will fit. Similarly the bonnet needs to have the Carrera's profile and the simplest thing to do here seems to be to cut out the two bonnets and stick the Carrera's bonnet on the 911S. Then the bulkier sills on the sides of the Carrera need to be transplanted onto the 911S. So here's where I'm up to - I've transplanted the bonnet, removed the excess plastic from the wheel arch, and removed the sills ready to graft on the parts from the Carrera: cheers Julian
 -
 I'm tryng to follow suite and post most of the finished model pictures here. You can follow the build here: Comments are welcomed Ran
 -
 Joining you with this Fujimi 1/72 Recon Spitfire. Which cost me £8 at IPMS Avon show in 2017. A view of the parts. Building this option, with invasion stripes. Hosts have been consulted , and adjudicated on the eligibility of this build.
 -
August 2019 marks 50 years since the Westland Sea King entered service with the RN - what more excuse do I need ? This is the 1/72 Fujimi kit, with a few small mods/enhancements, but essentially "out the box" apart for the decals, which come from Modeldecal and represent one of the shore-based 819 Sqn aircraft from RNAS Prestwick (HMS Gannet) that spent much of the Cold War protecting the SSBN fleet on its way in and out of the Clyde estuary, as well as becoming the busiest SAR flight in the country. I also modified the weapon load to be a full set of Mark 44 torpedoes suitable for shallow water in the 1970s (the kit provides a mix of 2x Mk.44s and 2x later Mk.46s). and finally, with the rest of my Sea Kings... FredT
- 29 replies
-
- 44
-
-
 Finished. Decals let me down a bit with them being so old. Lots learnt during this but overall pretty happy. I'm especially pleased with the paint finish which I think is pretty damn incredible Not too bad for my first car in approx 28 years Build thread here for those interested. Cheers guys! Homer
 -
 #24/2019 My father´s latest and last? contribution to his captured Bf109 theme this year. Had a Hasegawa Bf109 F/G fuselage lying around from an abandoned project. Then he had the idea to play Frakenstein and fusion it with a wing and undercarriage from Fujimi. (Had still two Fujimi kits in our stash that he won´t build) After some work the wing fit perfectly. Seatbelts from Eduard, Russian star decals from the sparesbox, translucent JG3 decal from an old Aeromaster sheet, brake lines with lead wire and EZ Line, the latter was used for the antenna wire too. MRP RLM74/75/76 for the base camo, AK Real Color AMT-7 Blue and MRP AMT-4 Green for the overpainted areas. Build thread here https://www.britmodeller.com/forums/index.php?/topic/235060494-under-new-management148-messerschmitt-bf109g-2-soviet-airforce/ The model shows an aircraft of JG3 that was captured in the Stalingrad area by the Soviets. Sources differ, some say JG3 I. Gruppe, some II. Gruppe, either end of 1942 or early 1943. DSC_0001 by grimreaper110, auf Flickr DSC_0002 by grimreaper110, auf Flickr DSC_0003 by grimreaper110, auf Flickr DSC_0004 by grimreaper110, auf Flickr DSC_0005 by grimreaper110, auf Flickr DSC_0006 by grimreaper110, auf Flickr DSC_0007 by grimreaper110, auf Flickr DSC_0008 by grimreaper110, auf Flickr DSC_0009 by grimreaper110, auf Flickr DSC_0010 by grimreaper110, auf Flickr DSC_0011 by grimreaper110, auf Flickr DSC_0012 by grimreaper110, auf Flickr DSC_0013 by grimreaper110, auf Flickr DSC_0014 by grimreaper110, auf Flickr DSC_0015 by grimreaper110, auf Flickr DSC_0016 by grimreaper110, auf Flickr DSC_0002 by grimreaper110, auf Flickr DSC_0003 by grimreaper110, auf Flickr DSC_0006 by grimreaper110, auf Flickr DSC_0007 by grimreaper110, auf Flickr
 -
 Hi all, Finally, I have the next one wheeled out of the paint shop. I had some delay because the white star decals I needed went out-of-stock. She is an F-86F-30 with the -40 wing, as supplied to Venezuela from US stocks in the late 1950s. You will have seen an earlier iteration of this machine when I built her around five years. I chose to build her again as I like the markings. These markings are of the earlier type, i.e. without the “wings” on the roundels. These gradually changed from 1958 following the January 1958 attempted Military coup. She is “8C36” in the older serial system, indicating the 8th aircraft of “C” Flight and is seen here (below) while awaiting delivery from McClellan AFB. The aircraft, like all the FAV Sabres, was assigned to Escuadron de Caza No. 36, Fuerza Aerea Venezolana, known as “Los Diablos”. The Venezuelans ordered 22 Sabres from the US in 1955. Some eventually went on to Bolivia to be the last operational Sabres anywhere in the world. The kit is the Fujimi which, in my view, is the best F-86F available in the scale despite being long in the tooth now. It has some drawbacks, not least of which is the fact that the wing doesn’t have the separate Leading Edge flaps. As you can see, I cut these and built my own. I’ve chosen to load her up with tanks too, appropriately, as shown in the image below. Apart from the seat, the inner tanks and the decals there are no another aftermarket extras on her. So, what did I do/use?. Well: 1. Kit – Fujimi F-86F-40 1/72. I removed the starboard inlet behind the wing which was a feature of the -40, rather than the -30. 2. Aftermarket – Pavla seat, Red Roo tanks 3. Decals – Aztec Juicy Jugs set for the roundels, Detail Decals (US-109) 1mm white stars, home-printed the serials etc, and the rest were from the kit. 4. Paints – overall Humbrol Metalcote Polished Aluminium (27002), with some 27003 Steel added to vary panels. Others paints used were: Humbrol Insignia Yellow, Insignia Red, Matt Black, Aircraft Grey (140), Light Grey (147), Colourcoats Insignia Blue. Finished with Humbrol Satincote. 5. Washes and Weathering – a mixture of Humbrol Dark Grey wash, Flory Dark Dirt, Tamiya Weathering powders. Prismacolor silver pencil for scratches etc around the canopy. Here she is. A few mistakes along the way but I hope you like her: Martin
- 38 replies
-
- 64
-


.thumb.jpg.ba34a9f6ddce411193946dbdcc7b5fe8.jpg)