Search the Community
Showing results for tags 'Egg plane'.
Found 8 results
-
OK. Normally I don't build in this scale But look what I found. I could not resist it. I finished the Avro 504 from Smer so I continue with quality models. I especially like that there is no doubt where the decals should go. The dual radiators are a nice touch. A perfect model to keep my vision that 1/48 planes are no good. Almost less detail than 1/72 etc. (Esci's Viggen apparently made a big impression in my childhood). This one is actually in 1/50 so I can uphold my claim that I don't build in 1/48 I will remove the engraved markings but I think the file was too rough. It removed to much material. The wing tip decreased by almost 10 mm so I could just as well do the same with the other one, but then the bottom wing was too long so it also got a reduced span. I also removed every second rib Time to attach the wings I made a new fuselage for it. The span may look a bit short. A plastic egg and a 1/48 scale Viggen nose make up the fuselage frame. Then the tail was then filled with plastic strips and a large amount of filler and Magic Sculp. A lot of filler will be used for this build. Do you think that I can get Tamiya as a sponsor. But a small problem arose which I was almost prepared for. The nose feels too blunt. I had problems deciding on how to turn the egg. The pointed part forward or backward? I choose to point it to the back because it would look most like the Albatros fuselage. Turning it the other way would probably made it look to fat at the rear. But with a good saw you can overcome everything. I think the answer to the problem is to cut another egg. Adding the pointy part to the blunt nose should do it. I did choose a large plastic egg for my build so it will be larger than Hasegawas Egg plane series. Instead it will fit in with the Revell series of the Fünfdecker, Messaschnitzel and the Spitsfire.
-
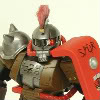
My first WIP thread. So lets see how this goes. When I got back into modelling last year (Covid/Lockdown/Furlough......argh!), I made a couple of "Egg planes". Always wanted to add the Tiger Spitfire to that collection. So....... On top of the standard kit, I wanted to try and add a bit more detail, so I bought the Retro wings Cockpit detail kit to add to it. So with the box opened and sprues laid out i have this to play with. Note - You get stickers and decals with this kit, I will be using the decals. Now, as you can see from the pictures above, this Spitfire is designated a RF-K code. Nothing strange there, however my late Dads initials were RKF. This got me thinking, do I make this Spitfire a small tribute to my old man. The man who got me into Modelling, and my love of Aircraft, which has then me to the job I have? Seems too much of a concidence to miss. Not decided to keep it as RF-K which would have been assigned to 303 Squadron......... Or, change it to RK-F, while the RK squadron code prefix was assigned to 131 Squadron in 1939, it was never actually used. When they were reformed in 1941 and had Spitfires, they used the NX Sqaudron Prefix. Saying that, a bit of poetic licence always helps us. So, will see how this build goes, and try and share it with you all, while being something that bit different than the normal aircraft build. Thanks for looking
-
As I've finished "Missouri Armada" with a bit of time to spare before the Lancaster STGB I thought of killing the time with the egg plane I bought on a whim a few years ago Should be a nice quick build and a bit of fun at the end If I don't do it now it will probably sit there untouched for more years Ian
-
I totally forgot to give an update on this: http://www.britmodeller.com/forums/index.php?/topic/235024842-scrambled-eggs/ Three models that started as the short nosed FW190A Right now I'm trying to finish 12 Hasegawa eggplanes.
-
Things are going slow with my Albatros egg plane so I'm starting on another one. I SAW a completely different aircraft in my FW190 egg plane so I brought out the SAW. I added a left over nose from a Roden He111C and smoothed things up with Magic Sculp. The tail was cut off and a piece of plastic tube inserted between the parts. The space between them was filled with plastic strips. A new fin from a 1/72 kit replaced the FW190 fin. I am using the the wings from the same kit, but they need to be deformed a bit to look right. A piece was cut from the wing tips but I think the engines look a little thin for an egg.
-
I've had that Sea Harrier done for ages, and something about it always struck me as off.....but I couldn't tell what. NOW I see I've got the roundels on the nose, not the intakes! ((Picard face-palm royale))
-
747 egg-plane suitably modified. Its proper stand is drying in the paintbooth, so this is a teaser....
-
You may have seen my extensive WIP on this beauty (all 2 posts of it!), if not why not have a laugh and look? I decided in the end not to bother with all that tedious camoflauge and went for a Sea Harrier look with slightly incorrect markings (who cares- it's a flying egg!) Have a crack at one of these, there are loads in the range and they're a lot of fun to do - nice break from all the serious stuff that goes on.