Search the Community
Showing results for tags 'Eduard'.
-
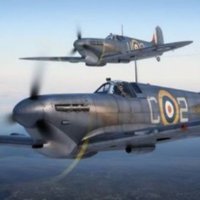
My modelling subjects are varied but it is always something about each one that captures my interest and takes me on a path of research I love. And this like the others is no exception. A fondness for RCAF Spitfires and the crews that manned them. Gathering up the usual kit with aftermarket extras, it was finally time to start this. It was started in late August and now to the point of the final decals, weathering and topcoats. It is coming together more or less as I had hoped. But first a short intro to the pilot. F/Lt Andrew Boyd Ketterson of Montreal, KIA 4th of March 1944 while taking part in Ramrod 623. Ramrod - Short range bomber attacks to destroy ground targets, similar to Circus attacks. The internet provides access to the RCAF Operational Record Books of various squadrons with key information. His aircraft on that day, Spitfire IXc MJ306 and was taken on by 412 squadron in November 1943 making this a later build IX. F/Lt Ketterson flew this aircraft most frequently since it's arrival to the squadron and had "HOT-BOX" painted on the forward panel. A wise modeller was quoted once as "Research, time well spent". And this fits the bill. Most internet uses of an edited version of the following picture of Ketterson state the aircraft as MJ306 VZ*K, including Robert Bracken's book, Spitfire-the Canadians. But the un-cropped version of the image clearly shows the individual aircraft code is not a K but looks to be an M. The usual cockpit prepping with a few extras applied, including the Snapshot Barracuda IX cockpit upgrade and some fine beading wire added. Tamiya cockpit green with shadowing and highlighting. Trying a technique to simulate the sheathing applied to the propeller blades. Taping off where the sheathing was attached and painting on a heavy coast of Vallejo Model Color paint, color choice not important, just shown for contrast. Painted and weathered with the usual colours and hopefully showing evidence of where the sheathing was positioned. Yes it may not be in scale but shown for effect. Ultracast exhaust and one piece upper cowling used. Thinned Vallejo "Buff" used for the lighter colour of the exhaust staining. Bare Metal Foil used on the wing root before painting and my attempt at chipped and eroded paint work. Wing walkway stripes masked off and painted on to give a diminished look. Wing roundel painted on using Tamiya Masking Sticker and Olfa circle cutter. Small touch ups applied after to show field maintenance. New aircraft codes cut and airbrushed. Exhaust staining. Work continues and a few more weeks the final reveal will be ready. Thank you for looking in. Craig.
- 14 replies
-
- 21
-

-
- Eduard
- Spitfire IXc late
- (and 1 more)
-
I'm really pleased to be able to support @TEMPESTMK5 and join @RidgeRunner as a co-host for the Mustang STGB - I reckon it will be the highlight of the STGB calendar this year. My own build for the GB to use Eduard's Mk.IV Profipack to build "out of the box" 3 Squadron RAAF Mustang IVa KH716 as based at Fano, Italy in late 1944/early 1945. Here's the familiar sprues, with the beautifully detailed parts:: And here's the paint/decals call-out showing my scheme, which features the unit's iconic Southern Cross on a light blue background tail markings.: KH716 was flown by 3 Squadron's CO at the time, Squadron Leader Murray Nash DFC and Bar. Here's an Australian War Memorial image of the real thing (note the underwing bomb): The official caption reads: "FANO, ITALY. 1944-12-16. NO. 3 SQUADRON, RAAF. SINCE THE ALL AUSTRALIAN FIGHTER BOMBER SQUADRON IN ITALY HAS SWITCHED FROM KITTYHAWKS TO MUSTANGS, THEY HAVE BEEN CARRYING OUT LONG RANGE RAIDS OVER YUGOSLAVIA IN SUPPORT OF TITO'S PARTISAN TROOPS AS WELL AS CONTINUING TO BLAST ENEMY STRONGPOINTS ON THE NORTHERN FRONT IN ITALY. PICTURE SHOWS THE SYMMETRICAL LINES OF THE MUSTANG FIGHTER BOMBER WHICH IS PROVING VERY POPULAR WITH THE SQUADRON." This will be the second of my occasional 3 Squadron RAAF themed builds, after a Kittyhawk I'm currently finishing up in the (already finished up) Desert GB. If all goes to plan I'll also do a F-35A and a Mirage III in 3 Squadron markings in those STGBs later in the year. So I'm looking forward to building this one and doubling my 3 Squadron collection! But I'll have to be patient and likely won't make a start until a little later in the GB as I have two other GB builds on the go. But I wasn't going to miss this one! Cheers, Gerard
- 13 replies
-
- 15
-
-
 F-86F-40 Sabre Upgrade Sets (for Airfix) 1:48 Eduard The new Airfix Sabre has been out for a wee while now, and in their usual style, here comes a batch of upgrade sets for you to drool over. Eduard's new range of sets are here to improve on the kit detail in the usual modular manner. Get what you want for the areas you want to be more of a focal point. As usual with Eduard's Photo-Etch (PE), SPACE and Mask sets, they arrive in a flat resealable package, with a white backing card protecting the contents and the instructions that are sandwiched between. Detail Set (491298) Two frets are included, one nickel-plated and pre-painted, the other larger fret in bare brass. It starts with a comprehensive overhaul of the ejection seat, which is very much different afterwards, having a pair of raised sides that make it look a bit like an arm chair; a more realistically shaped headbox; a set of more accurate foot plates that are folded up to shape and fitted in place instead of the moulded-in kit steps. The instrument panel is sanded back flat and has a two-layer pre-painted main panel and another centre panel installed. The same is done to the side consoles, but the removal of material includes reducing the height of the consoles to 8mm before applying the new parts on top, on the sides, and on the side walls, including a detailed throttle quadrant with protruding levers. Behind the pilot on the rear deck, the soft and ambiguous kit detail is augmented by numerous parts, then a shaped head-armour panel with fitments is glued in at an angle behind the seat headrest. In the canopy a single rear-view mirror is provided, needing your shiniest silver paint to give it some realism. The nose gear bay is built under the intake trunking, which has some ribbing moulded into it, which is first upgraded with rib-top details and the removal of a run of straight wires. The bay walls have some triangular fillets removed, then have details and surface skins fitted to the rear face before it is joined to the bay roof. The gear leg is updated with a PE oleo-scissor, and a support strut has additional details applied to the visible surface. When the bay is together and is inside the fuselage, additional panels and wiring looms are inserted to complete the overhaul. The main bays are left as provided, but the gear legs are augmented with new oleo-scissors and links between the Y-shaped captive bay door, which will require some short lengths of 0.6mm rod from your own stocks to complete. In the gun bays to the sides of the cockpit, a bump is first removed from the front corner, then new skins are fixed to the front and rear bulkheads before inserting the three .50cals on each side, which have been upgraded with detailed tops to their breeches after removing raised areas from front and rear. The bay doors in the kit are thicker than the real thing, which is fixed by the new two-layer gun bay doors included in the set, which also have appliqué parts fixed to the inner side. Before gluing the two layers together, they need to be bent slightly to shape to match the curve of the fuselage, which can be done by pressing the annealed parts against the kit doors and tweaking them until they sit flush with the fuselage during test fitting. The last area to see improvement are the air-brake bays found on the sides of the fuselage. The bays are left as-is, but the brake panels are replaced entirely by a totally new assembly that is made from a curved piece of PE for the exterior skin, laminated to an inner skin that is bent to shape to give it thickness. The hinge-point is buried in a hole in the inside skin, and a number of stiffening parts are fitted along the length of the inner face to form the pivot-points at the front of each brake. Each one is then glued in place once painted using the original actuator strut. The result is a much more in-scale look to the assemblies. Zoom! Set (FE1298) This set contains a reduced subset of the interior, namely the pre-painted parts that are used to improve on the main aspects of the cockpit, as seen above. Whatever your motivations for wanting this set, it provides a welcome boost to detail, without being concerned with the structural elements. SPACE 3D Printed Cockpit Decals (3DL48083) The Eduard SPACE sets use new 3D printing techniques that lay down successive layers of different colour resin, creating highly realistic almost full complete panels that are supplied on a decal sheet. They can depict metallic shades, plus glossy, satin and matt colours too, which really ups the detail on everything they print. In addition, a small sheet of nickel-plated and pre-painted PE is included for the aspects of the set that lend themselves better to this medium, such as seatbelts and rudder pedals. The PE sheet has a set of four-point crew seatbelts with separate comfort pads under the buckles, plus levers for the throttle quadrants on the left side console. The decals require removal of the kit panel and side console moulded-in detail, after which they are replaced by superb new consoles, the throttle quadrant base, sidewall instruments, and the main instrument panel, which is in two parts and has a PE lever protruding from the left side. Seatbelts STEEL (FE1299) These belts are Photo-Etch (PE) steel, and because of their strength they can be etched from thinner material, which improves realism and flexibility in one sitting. Coupled with the new painting method that adds perceived extra depth to the buckles and other furniture by shading, they are more realistic looking and will drape better than regular brass PE. As well as a set of four-point crew belts, you also get comfort pads underneath the buckles. Masks (EX887) Supplied on a sheet of yellow kabuki tape, these pre-cut masks supply you with a full set of masks for the canopy, with compound curved handled by using frame hugging masks, while the highly curved gaps are in-filled with either liquid mask or offcuts from the background tape. In addition, you get a set of hub/tyre masks for the wheels, allowing you to cut the demarcation perfectly with little effort. Masks Tface (EX888) Supplied on a larger sheet of yellow kabuki tape, these pre-cut masks supply you with everything above, but also give you another set of canopy masks tailored to fit the interior of the glazing so that you can paint the interior and give your model that extra bit of realism. Highly recommended. Review sample courtesy of
 -
 Hello everyone! Here is my second kit of the year which I finished last weekend. It is Eduard's 1:144 scale Supermarine Spitfire LF.IXc representing MJ250/UF-Q, of No. 601 "County of London" Sqn., RAF, regularly flown by F/O Desmond Ibbotson, from Perugia, Loreto and/or Fano, Italy, summer 1944. It was built mostly OOB and was built together with the other kit from the dual combo boxing which is taking longer because if its more complex paint scheme. These kits are simple but very nice though, sadly, they lack cockpit detail. I decided to add some detail in the cockpit by making the rear bulkhead and seat only, the most visible elements. I used a spare Beacon Models Spitfire Mk.I part as a template and scratchbuilt the section with plastic card, stretched sprue and an etched seat from a Brengun set. I added harnesses from masking tape. I added some small sections of flat sprue to the cockpit sides to act as a support to attach the bulkhead. A bit of trimming was needed but the part fitted nicely and makes a big difference. My other additions were a rear-view mirror above the windscreen (sprue from etched parts with Kristal Klear) and the underwing probe (from stretched sprue). The kit was fully painted, weathered and varnished with brush. A photo I found of this machine shows it readying to take-off with another one and both are kicking up dust. Engine exhaust stains are clearly visible too so I made this kit a little on the dirty side. Sadly, there was no bomb to put slung underneath as seen in the photo. 601 Sqn was involved in attack missions at that time. Nevertheless, I'm very pleased with the kit and in a metallic finish, it really looks different from any Spitfire I have built so far in any scale. Thanks for looking and, as always, all comments are welcome. Miguel
 -
 Good day fellow modellers! I would like to present you my the latest model in a few words and a few more pictures. Criticisms, comments and suggestions are more than welcome. Spitfire Mk.Vb, 1/48 Eduard, 11149 (Eagle's Call Dual Combo) Pilot: Lt. Dominic S. Gentile, Debden-Essex/England, August 1942. Level of details: EXCELLENT! More suitable for a 1/32 scale! After famous Tamiya's Spitfire series in 1/32, the second place is certainly occupied by Eduard's Mk.V Spitfires! Accuracy: I did not make precise measurements, but I would say that Eduard has done a superb job here as well. On the Internet, didn't find any objections in this regard. And when we are talking about accuracy of the details, just worlds of praise. FIT: Almost flawless. First of all, I would like to point out that I am extremely satisfied with the fit! Parts with extremely complex geometry fall into place without need for a puty! I used puty in very small quantities at only 2 places: the upper cowling of the engine (given in two parts) and the connection of the lower wing with the fuselage. But Eduard's plastic made sure that everything was not ideal, which caused a slightly obtuse dihedral of the lower wings. The problem was easily solved by applying masking tape in order to stretch up wings to the right angle when assembling the body and the wings. Decals: A new type that gives the possibility of double treatment: as standard decals and as transfer decals. In both cases they worked great! If you prefer to peel off decal film, do it after 24 hours at least and after that (the peeling) immediately protect the decals with varnish. Decals have responded wonderfully to gunze's decal setting solutions. The box: Attractive with a brief history of RAF and USAAF units in which American pilots flew Mk.V Spitfires. There is also a review (of a few sentences) about each plane that is the subject of this Eduard’s boxing. The illustration is in the newer (already old) Eduard manner for limited editions - it's just a illustration of the plane (great one) with a symbolic, graphic background. Painting and weathering: I used Gunze C colors (standard RAF shades C361, C362, C363, C368) and the camouflage was done freehand (no masks at all). Weathering was done in the following order (conditionally): chrome silver (partly), chipping fluid, first layer of camouflage, marbling technique in several colors (used stencils for that), final camouflage, sponge technique, chipping the paint, wooden crayons, protective varnish, decals, protective varnish, powder pigments, protective varnish, panel wash (Tamiya), protective varnish, oil painting wash and final varnish. FINAL IMPRESSION: Absolutely for every recommendation! As far as I'm concerned, it's only the first in a row, and I'm not even an die hard fun of Spitfires! The model made for review purposes for online magazine Maketar plus (https://www.maketarplus.com/) and obtained by courtesy of Eduard. ...the few references photos (internet sources, for discussion purposes only): And "few" photos of details...
- 26 replies
-
- 63
-
-

-
This is my latest build, Eduard's 1/72 Bf 110. This was overall an enjoyable build and resulted in my first proper Luftwaffe build in over 5 years, it was also my first attempt at battle of britain luftwaffe camo. The model was painted with Ak Real Colors acrylics and was weathered with Abteilung 502 oils and Tamiya enamel washes and weathering powders. This was a weekend edition kit, but Eduard PE was used along with decals from another boxing of Eduard's 110. Quickboost exhausts were also used. The FuBl antenna on the underside of the fuselage was scratch-built using brass rod and uschi standard wire. This was also my first proper attempt at doing exhaust stains with an airbrush, I used Ak Real Colors Nato Black. Happy modelling to all! Anna
- 16 replies
-
- 56
-
-
 Eduard is to release a new mould from the 1/48th Focke-Wulf Fw.190A. Source: http://www.detailscaleview.com/2015/11/new-products-from-novemberfest-2015.html 3D renders V.P.
 -
My apologies for a very last minute entry for the GB, but for a number of reasons this is the first model that I have picked up for several weeks and with a few projects abandoned mid-build, it could be regarded as a mojo restorer. I am hoping that this quick build will get me back into the swing of things and push me to completing those too. Anyway here are the photos of the bag and its contents. by John L, on Flickr by John L, on Flickr Off to wash the parts before making a start now. John
-
One of the projects I started in lock-down 3.0 is ICM's 1/32 Sea Gladiator. I've been meaning to start a build log, so here is progress so far. I have an asthmatic in the house, and use enamel paint, so spraying indoors is out of the question. I'll need to wait for better weather before any paint goes on. I decided that I wanted to use this opportunity to dry-fit assemble as much of the model as possible, in preparation for disassembly and a primer coat when the weather warms up. I'm also using the Eduard photo-etch sets, AIMS etch set and Aerocraft Models brass struts and landing gear. Although overall this looks to be a really outstanding kit, there are a few areas of the depiction of the cockpit that I do not like: 1. The cockpit behind the seat has been blanked off. The real aircraft had an open structure behind the seat bulkhead. 2. Opening up the area behind the seat bulkhead means that the cockpit framing needs extending aft, and this area needs detailing as it is very visible. 3. The seat seems crude. I started with the seat. This is the AIMS photo-etch seat with brass details and coil springs made from wire. I soldered this mainly, though the brass rods and coil springs are glued. I still need to add the brake lever: I prefer the AIMS seat to the Eduard one, though the latter isn't bad. I built the extension to the cockpit from plastic tube and strip. The compressed air bottles are from the spares box with lead leads: The support for the harness strap wires is from Eduard and fits like a glove. Various knobs and levers are a combination of AIMS and Eduard. And with the seat assembly resting roughly in place: That's all for now....
- 12 replies
-
- 8
-
-
- AIMS
- Aerocraft Models
- (and 1 more)
-
 Spitfire LF Mk.IXc MH 712 "Pat" from 302 (Polish) Squadron during its operations in France after Overlord (summer 1944). I painted this Spitfire last autumn and since then it was waiting for weathering and some final detail. Finally some two weeks ago I sat down and painted scratches, worn paint and exhaust residue as per photos and some dust and streaking. She was painted with paints suggested here - it is a mix of humbrol, revell and Vallejo acrylics. I consider it done, Photos are a bit washed out but the weather is not really photo friendly lately. WIP thread: here
 -
In the Czech Modelforum it's mentioned that after the 1/48th MiG-21, Spitfire and Bf.109 families, Eduard has as long term project the North American P-51 Mustang in the same scale (http://www.britmodeller.com/forums/index.php?/topic/234974169-148-north-american-p-51-mustang-family-long-term-project-by-eduard/). But as another possible project, the Eduard's Boss, M. Sulc, has also mentioned the Hawker Hurricane! Maybe more news at the yearly Eduard's Novemberfest 2015. Wait and see. Source: http://www.modelforum.cz/viewtopic.php?f=1&t=68170&start=5865 Strange considering Airfix is working on a new tool 1/48th Hawker Hurricane kit (http://www.britmodeller.com/forums/index.php?/topic/234972972-airfix-148-hurricane-mk1/). If not a Hurri then another British subject Mr Sulc? Like a Hawker Tempest or a family of Griffon powered (Mk.XIV...) Spitfire by example... V.P.
-
 Hi All, So yes I know you may or may not be thinking "he's got two carriers on the go what is he doing starting something else!". Well truth be told is because of a recent purchase I made which builds into a grand (well I think its grand) plan. More on the purchase below and you can see it in the photo's. Some time ago @ArnoldAmbrose made a suggestion on my 1/350 Dunkerque build that I could do one of each of the treaty battleships as a collection. Im not sure how serious it was but Jeff - the idea took hold well and truly! So I've been gathering kits and extras as a result, still much to get but enough now to make a start. The one frustration is no available injection kit of Nelson or Rodney in 1/350 but we can hope. I think when we think of naval arms races we often think of WW1 but it was well and truly underway before WW2 as well, just not in the numbers as twenty five years before. The plan is that this thread will be the first in the series that I'm hoping to do over the next few.....um .....years. So far i've got hold of the following in the stash; Admiral Graf Spee Strasbourg (having built Dunkerque0 Littorio Scharnhorst 1940 Richelieu Prince of Wales To add North Carolina and Alabama/Massachusetts (although i have some detail bits for them). In some ways Nelson and Rodney sit outside of this as they were outside of this build up towards the second world war, existing almost in isolation. Im pretty sure this lot will take quite some time as I juggle life and hobby, not to mention the other things i have to build as well! I wanted to make a start though. I picked up Strasbourg for a steal the other day (£40) and want to build her desperately as i love the French ships but the first in the line of treaty battleships was Admiral Graf Spee (AGS). Not that she was a battleship at all of course, the word pocket always added to any introduction of her and her class was later reclassified as heavy cruisers. I've been doing little bits and pieces on the kit over the past 12 months or so, pulling it out when I wanted to stick bits of plastic together/first try colourcoats paints by brush. This is the Academy version, and imho it's not great, its not terrible but its a real mixed bag. I chose it over the trumpeter as I thought it had better lines but its certainly not great in terms of engineering. It has some parts that are nicely detailed, others that are bland and it doesn't go together seamlessly shall we say! A few photo's of where I'm at and what I have to use: Whilst watching the very disappointing rugby yesterday I began drilling out scuttles, id previously started then changed my mind, filled and then changed my mind again hence the filler smear at the bow. Seams - seams everywhere! Luckily the detail sets will correct lots of the very soft detail. Im surprised really each time i think about this one. Academys Warspite is great, clean and crisp moulding - AGS by comparison is just a bit messy. Sets from Eduard, MK.1 and Master barrels for her; I still need a deck for her - the plastic one is alright but has a noticeable join so I'll try a wooden one, and her AA guns are woeful so need replacing! So that's where I'm at. My carriers will continue to be the main focus whilst I get them over the line but my hobby evenings are normally Tues, Thurs and a bit on the weekend and AGS will take one of those slots. Thanks for stopping in, S-boat
- 54 replies
-
- 13
-
-
- Treatise on Treaties - Preface
- Mk.1
- (and 1 more)
-
In August 2020, Eduard is to release in August 2020 - just in time for the 80th Anniversary of the BoB - a new tool 1/48th Supermarine Spitfire Mk.I limited kit - ref. Source: https://www.eduard.com/out/media/InfoEduard/archive/2020/info-eduard-2020-01.pdf V.P.
- 720 replies
-
- 5
-
-
- Supermarine
- Spitfire
- (and 1 more)
-
This weekend at the E-Days 2013 the box art picture from the Eduard's future 1/48th Messerschmitt Bf.109 G-6 kit. Source: http://www.master194.com/forum/viewtopic.php?f=3&t=78075. V.P.
-
Thanks HKR 👍 Eduard worked in secret on a new kit and tomorrow it will be announced 7PM (Warsaw Time) UPDATE - It'll be a family of 1/48th Mitsubishi A6M "Zero" Source: https://www.modelforum.cz/viewtopic.php?f=1&t=95280&start=33390#p2448351 V.P.
-
Greetings. I'm not sure I chose the right forum section, but the topic in general is aviation. I am not indifferent to radial piston aircraft engines, and although my favorite scale is 1/72, I wanted to have the engine in a larger size, well detailed, and this is exactly what the work in question is about. Resin engine from Eduard, designed for Revell's 1/32 scale Fw-190. Quite worthy to be a separate model. The quality of the set is 4+; if you make it a separate model, you would like to improve some aspects. The etched spark plug wires had to be completely replaced with wire, and at the same time the distribution ring-ramp had to be redone. Pushers made of metal tubes, and much more. But for the most part the kit is excellent, the resin just needs cleaning up in a lot of places. Metallic paint by Tamiya LP and Alclad, Mr.Color, hand painted mostly by Vallejo. *Sorry for the automatic translation
-
 It seems like I've hit a bad patch recently, with a work/life balance that was not really balanced. It seems that too much stress at work really isn't good for you...who would've thought? The trip to the doctors office actually showed a low steady heart rhythm, good exercise regime but high blood pressure. It's probably not related at all to the Valom Bristol Firebrand that I'm wrestling with over at the Salty Sea dogs GB While the doctor is requesting more data and me collecting said stuff for a few weeks, I decided to go clean up my workbench. It was stacked about 5 projects deep (2 P38, a Firebrand, a P-47, and a F-16 was found, together with some pieces of Lansen, Viggen and a few other bits). I'm sure that this has never happened to anyone else, and I'm completely unique in this aspect. Anyway, the cleanup was fairly quick, nothing was binned and all of a sudden I found myself with a nice and tidy bench. What now? Puttying the Firebrand? Decaling a swing-wing? Masking a P-47? No! Don't ever finish stuff, that could only lead to ruin, so instead I brought forth this. Much better! Well molded, oodles of detail, a few extra bits and bobs as well, and apparently a mostly stellar fit. So, caution thrown overboard, and the snipper started to work on the wheel bays. That's quite a few bits to build up the bays!! This was also a shot of primer, and a base coat of interior green, like so. A dark wash in the will do nicely I think! Main fuselage also got a lick of paint while the airbrush was loaded with the correct colors. Looking at the rear of the fuselage, I've only seen this amount of raised and lowered rivets on one other kit. That would be the 1/24 Tiffy that I built (more than) a few years back No oil canning on the Eduard Tempest though! But for 1/48, this is awesome.
- 32 replies
-
- 17
-
-
Eduard is to rebox in June 2020 the hasegawa 1/72nd Martin B-26 Marauder kit - ref. Source: http://www.kitreviewsonline.de/eduard-pressekonferenz-in-nuernberg/ V.P.
- 46 replies
-
- 10
-
-
-
 Hello folks here is my completed Spitfire from the last year's local exhibition dedicated to our former airman W/Cdr Jaroslav Hlaďo. My local modellers club took part in the exhibition with model kits of the aircraft on which gen. Hlaďo flew during his long career in the RAF and Czechoslovak Air Force. I contributed with this Supermarine Spitfire Mk.IXe, TE 524, JT-5, Planá u Českých Budějovic aerodrome (former DU-F, No.312 (Czechoslovak) Squadron RAF). It was a fast and easy build without any modifications and improvements of the kit, built only for the exhibition purposes. I quite enjoyed it because it brought old friends together after a long time... So here she is:
 -
Hello All, It’s been a while but I’m back and wanting to get my mojo back and after some help please. I’ve got a 1/48 Eduard Mig-23MF/ML Bedna boxing and I would like to add some Eduard resin to the kit. I’ve looked at Hannants, and Eduard do two different versions of the intakes, wheel wells, undercarriage and exhaust. One set for the MF and one set for the ML. The boxing I have lists both MF/ML in the same box and looking at the instructions there are only one set of intakes, undercarriage wells and wheels but two exhaust. My question is, can I get away with just buying the MF set of items and these will suffice for the ML also, or are there big difference between the two? I’m not sure which scheme and mark I want to build yet as I am just looking at options. I’ve studied the aftermarket pictures on Hannants and the Eduard website and can’t really see much difference between them, but they have different part numbers listed. Many thanks for your help and advice. Ashley
-
.thumb.jpg.d3635a7ef6507d35f372dd09671fe96f.jpg) The Finnish Air Force bomber command had a total of 23 Ju 88 A-4's. The bombers were bought from the Luftwaffe and they arrived in Finland during the spring of 1943. I built my model from a 1/72 scale Revell kit. The Finnish markings are from a S.B.S decal set. The model depicts the plane reg. JK-256. The bombers arrived in Finland in the Luftwaffe splinter camo and with the German markings on. In a hurry to get the bombers into action the three colour Germa camo was not overpainted but only the Finnish markings were attached to the wings and the fuselage. The German Balkenkreutzes on the under sides of the wings were hastily covered with white paint but the black ones on the upper side of the wings were left uncovered. For the splinter camo I bought LF Model's masks and for the german dark green, black green and light blue camo I used Xtracolor RLM paints. However, I must frankly say that I am disappointed at the outcome and at the too similar hues of the two greens. To my eyes they are almost indiscernible. I don't know if the Xtracolor dark green and black green paints are simply too similar. But what can you do! The FAF planes during the so called continuation war also carried the yellow eastern front identification stripes in the wings, the fuselage and under the engines. The cockpit of the plane is a real green house. There are dozens of tiny window panes and without the Eduard masks it would have been a nightmare to paint the frames. Otherwise the model was easy but rather time consuming to build.
The Finnish Air Force bomber command had a total of 23 Ju 88 A-4's. The bombers were bought from the Luftwaffe and they arrived in Finland during the spring of 1943. I built my model from a 1/72 scale Revell kit. The Finnish markings are from a S.B.S decal set. The model depicts the plane reg. JK-256. The bombers arrived in Finland in the Luftwaffe splinter camo and with the German markings on. In a hurry to get the bombers into action the three colour Germa camo was not overpainted but only the Finnish markings were attached to the wings and the fuselage. The German Balkenkreutzes on the under sides of the wings were hastily covered with white paint but the black ones on the upper side of the wings were left uncovered. For the splinter camo I bought LF Model's masks and for the german dark green, black green and light blue camo I used Xtracolor RLM paints. However, I must frankly say that I am disappointed at the outcome and at the too similar hues of the two greens. To my eyes they are almost indiscernible. I don't know if the Xtracolor dark green and black green paints are simply too similar. But what can you do! The FAF planes during the so called continuation war also carried the yellow eastern front identification stripes in the wings, the fuselage and under the engines. The cockpit of the plane is a real green house. There are dozens of tiny window panes and without the Eduard masks it would have been a nightmare to paint the frames. Otherwise the model was easy but rather time consuming to build. -
I welcome everyone with my next crafts - F6F-5 and F6F-3 (aka Hellcat Mk.1) from Grumman. Eduard's set has been known for a long time, so I tried to collect all the more or less significant additions/alterations in the photo, so as not to write a lot of boring text. Perhaps the most unpleasant thing about the kit is the need to rework the landing gear niches and rear pillar, correct the joints of the steering elements (given as jointing), and reduce the thickness of the canopy. The rest of the improvements are standard. At the same time, I assembled two models from the Double Kit - the F6F-5 and the British Hellcat Mk.1 (aka F6F-3), so many of the operations are identical. Decals for the F6F-5 are from Techmod, for the Hellcat Mk.1 - standard ones from the kit. The identification marks are mostly painted. Two words about stands: – For the F6F-5, a mock-up of a hangar catapult was made, the kind that were used at one time on American aircraft carriers. I made it myself, mainly from polystyrene. The manufacturing process is also shown in the attached photographs. - For the Hellcat Mk.1, the base from the Eureka XXL was taken as a basis; all that remained was to paint it. Sorry for the automatic translation, enjoy watching.
- 23 replies
-
- 53
-
-
-
Hi all, I wish everybody a happy new year for a starter I am proud to present to you almost freshly finished Wildcat from Eduard. this is the only build to have been carried to an end this year for multiple reasons (like... life!) but I for sure enjoyed every minutes of it. Let it be noted that 2023 was the year of the arrivals of babies in my household but also of me setting up my workshop in our house after a 6 year hyatus. All I can conclude so far is that my eagerness to build models is back and even bigger than when i put it aside. here comes pics of the said model from which you can find more "in progress" pics here : I won't say it is perfect, quite far from it even, but I reached a satisfactory point where I dont feel like picking it up from the shelf to do more on it. I would greatly appreciate any comment or improvement idea since I used plenty of new-to-me products (AK paints, AK weathering washes, AK pencils,...) since many items did not like being stored for an extended period of time. next to come will be a bf-109 in its winter coat as a step toward italian camouflage
-
 Supermarine Spitfire Mk.Vb Trop, EP706 'T-L', Plt Off. George 'Scewball' Beurling, 249 Squadron, Ta Qali, Malta, October 1942. This is my latest build in my Malta themed series, George Beurling's 249 Squadron Spitfire Vb. Subject; Supermarine Spitfire Mk.Vb Trop, x2 .20mm Hispano Suiza cannons and x4 .303 Browning's. Manufacturer; Eduard Profipack Scale; 1/48 Kit number; 82156 Aftermarket; Aero Master decals, the Vokes filter was kindly supplied by a friend as not included in this boxing. Paint; Exterior, upper, AK Real Colour RAF Middle Stone and Dark Earth overpainted with custom mix of RAF Extra Dark Sea Grey and XF8 Flat Blue. Lower, mix of XF23 Light Blue, XF19 Sky Grey and XF2 Flat White. Interior AK Real Colour RAF Interior Grey Green and Xtreme Metal Aluminium. LP5 Semi-Gloss Black and LP65 Rubber Black. Xtreme Metal Burnt Metal and Gunmetal. Various Tamiya X and XF and Posca pens for detailing. Primer; Mr Surfacer 1200 Varnish; AK Gauzy Shine Agent and Tamiya X35. Weathering; Flory Dark Dirt and Grime wash, Abteilung oils, Ammo North Africa pigment and Tamiya weathering palettes. Extras; Prym Knitting Elastic for the antenna wires.
 -
Tamiya 1/72 scale Japan Torpedo Boat; OK so old kit been in the stash for a while so thought this will be my Thursday Night at the model club project some of my builds are a bit fragile for now so this will be easy to transport and work on for that one night a week my time. I Won't be using the power units this will be a static model. Parts and bits of extra PE Can you tell I have more time on my hands now. Stay SAfe beefy
- 58 replies
-
- 14
-
-