Search the Community
Showing results for tags 'Eduard'.
-
 Beaufighter Mk.VI Upgrades (for Tamiya) 1:48 Eduard The Tamiya Beaufighter has been with us for a while, but despite this fact, it is still considered a very good kit. Eduard's re-vamped range of sets are here to improve on the kit detail in their usual modular manner. Get what you want for the areas you want to be more of a focal point. As usual with Eduard's Photo-Etch (PE) and Mask sets, they arrive in a flat resealable package, with a white backing card protecting the contents and the instructions that are sandwiched between. Update Set (49868) Two frets are included, one nickel plated and pre-painted, the other in bare brass. A complete set of new layered instrument panels and side consoles with control levers are the primary parts on the painted set, with new rudder pedals; aerials, intake mesh, landing light details, and main landing gear bay internal structure also supplied. Zoom! Set (FE868) This set contains a reduced subset of the interior, namely the pre-painted parts that are used to improve on the main aspects of the cockpit, as seen above. Whatever your motivations for wanting this set, it provides a welcome boost to detail, without being concerned with the structural elements. Seatbelts STEEL (FE869) In case you don't already know, these belts are Photo-Etch (PE) steel, and because of their strength they can be etched from thinner material, which improves realism and flexibility in one sitting. Coupled with the new painting method that adds perceived extra depth to the buckles and other furniture by shading, they are more realistic looking and will drape better than regular brass PE. Landing Flaps (48938) The flap bays of a model are usually moulded closed, but this set allows you to take a scalpel to the trailing edge of the wings, removing the lower section and thinning the edge of the upper wings, plus removing a little material in the wing root on the fuselage halves. The split bay and flap are made up from one main part each, with ribs that are twisted and folded back to vertical, after which stringers are added. The flap part of the assembly is then folded to shape and a single rib is added to obtain the correct angle of 60o as shown in a scrap diagram. The four completed sections are then applied to the pre-prepared apertures, and when glued into place give a convincing depiction of the flaps in their deployed positions. Review sample courtesy of
 -
Good afternoon gents, Spruebros landed a 190A-4 on my front porch on Friday, so of course I started it. Actually, this is the very first time I've ever done that. Normally a new kit gets explored, but then put into the stash to await a later build date. Some of those "new kits" are actually still in the stash. Not the 190A-4! I started snipping parts from the sprues and built up everything I could that didn't need paint. The new tool 190 kit is a lot of fun. Things fit well and are engineered well. It feels a lot simpler than the Spitfire or 109, but still has plenty to enjoy. What engine!? Ahh... the fit of the wings/fuselage/gun bays!! So nice. Here is what I'm going for: Cockpit without weathering: The PE is not the blue-ish color from other eduard RLM 66 PE sheets, but it's more gray, but still doesn't match my go to RLM 66, Tamiya German Gray. So I painted over the PE to get the colors back. The kit also has nice molded IP and cockpit sills/consoles. I'm going to use those next time instead of PE. I cut a hole in the frame under the cowling so I can add the exhaust stacks in later. Cut away: And once the pit was done, then I just started glueing pieces together! Thanks for looking!
- 26 replies
-
- 14
-

-
Jasta 18 Vol. 2 Raben's Ravens - 1:48 Pheon Decals Eduard 1:48 kits. August Raben took command of Jasta 18 im March 1918.Like many German commanders he sought to build an 'esprit de corps', and ordered the application of a striking livery to all of Jasta 18's aircraft. The noses back to the cockpit were painted in bright vermilion red, the rest of the fuselage back to the tail in white. The top of upper wing was in red, and later the top of the lower wing also. Some aircraft also received red lower surfaces of their wings. Each also had the symbol of a Raven (Raben in German) as a unit marking, and individual pilots chose their own marking to go alongside. Thus marked, Staffel Raben went to war and achieved notable success, with something between 112 and 126 victories by the time of the armistice seven months later. By this time they were equipped with the superb Fokker D.VII which were of course painted up in the flamboyant red and white scheme. This decal set from Pheon was released in 2013 and reviewed here. Ever since, I planned to build at least one of each aircraft type and with a few days off at Christmas have finally got around to completing the set. I would still like to add a couple more of the Fokker D.VII's to the line up if I can obtain the kits. The beauty of these 1:48 sets is that you can build several of them as I have done here, as they they don't take up much space. It reminded me how good the Eduard kits are as well, I still have quite a few in the stash and this project has got me building more of them now, after being diverted on to Wingnuts Wings 1:32 kits for several years. Pfalz D.IIIa - Ltn. Hans Muller Albatros D.Va - pilot and serial unknown Fokker Dr.I - 479/17, Ltn. August Raben Fokker D.VII (OAW) - serial unknown, Ltn. Hans Muller The only one I modified was the Albatros, as the Eduard kit has undercarriage legs that are too short, resulting in a 'dumpy' look to the way it sits. Details are at the end of this post. Nex up, I am working my way through Jasta 18. Berthold's Boys. A Pfalz is already under construction, and I have some Alabatros D.III's & D.V's waiting in the stash. Using a Wingnut Wings Alabtros as a reference, I measured the undercarriage legs in that kit, and converted the result from 1:32 to 1:48. This showed the Eduard 1:48 legs to be 3mm too short. It is not much but it makes a huge difference to the sit of the finished model. Lengthening them could have been problematical, as the upper position of the legs needs to remain as it is, in order to meet the fuselage mounts in the kit. Leaving them on the sprue in order to hold this position, I cut the lower 'U' shape off and inserted 2 3mm lengths of plastic strip. Left to harden, the extensions were later sanded flush and blended in. The work will later be mostly hidden by the undercarriage bungee cords that are wrapped around this area. Comparison with an unmodified kit (top) and the modified one (below). The difference is subtle, but very noticeable in real life. Happy new year everyone! John
- 18 replies
-
- 27
-
-
Messerschmitt Bf 109E-3 1:48 Eduard ProfiPACK The Messerschmidt Bf 109 is one of the iconic aircraft of WWII. The E-3 appeared as a result of the Luftwaffe looking to improve the performance of the 109E. The airframe received some structural improvements and and it was armed with two MG17s above the engine and two cannon (one in each wing). A total of 1276 E-3s were built. The Kit As a ProfiPACK kit, the kit comes with 2 sheets of photo-etch and a sheet of masks, the plastic is on 4 main sprues with a small clear spure. Construction begins in the cockpit area. Side wall detail is added in PE and plastic, some parts including the control column are added to the cockpit floor. As well at this time the main radiator under the nose is built up and installed into the fuselage half. The seat and other controls are added to the cockpit floor and this can be added into the fuselage half as well. Next the engine is built up. A full engine is provided if you want to leave the covers off same additional detailing might be in order. However if putting the ocvers on then it still has to be built up to hand the prop and exhausts off if nothing else. The engine can then be added to the firewall behind which the instrument panel and areas to mount the machine guns is added. Once complete this can also be added into the fuselage half. With the final addition of the made up tail wheel the fuselage can then be closed up. The engine exhausts can then be added as well as the nose machine guns. Next up the wings can be assembled. hey are of a conventional type with a single part lower and left/right uppers. The main gear bays are installed into the uppers before closing up the wings. The slats can then be fitted. The wing radiators are then made up and added to the wings. Following this the flaps and ailerons can be added and positioned how the modellers wants them. The fuselage can then be added to the wings. Following this the tailplanes and rudder can be added. The tail control surfaces are moulded in so cant be positioned, but the rudder can be. The main wheels are then made up and added to the legs, and the gear doors added. The cowlings can then be added and the propeller made up and fitted. Small parts are fitted to the glazing and then these can be fitted as well. Decals Decals are in house from Eduard and should pose no issues. There is a main sheet and a supplemental sheet for the stencils, markings are provided for 5 examples; Uffz. Karl Wolff, 3./JG A 52, Pihen/Calais, France, August 1940 Oblt. Josef Priller, Staffelkapitän B 6./JG 51, France, Autumn 1940 Obstlt. Hans-Hugo Witt, Geschwaderkommodore C JG 26, Dortmund, Germany, April 1940 1./JG 2, Bassenheim, Germany, May 1940 3./JG E 51, Mannheim-Sandhofen, Winter 1939-1940 Conclusion This is a welcome welcome release from Eduard of an earlier variant of their excellent Bf 109 family of kits. Highly recommended. Review sample courtesy of
-
Petlyakov Pe-2 1:48 Eduard The Pe-2 has been described as comparable to the British Mosquito. Developed as a bomber the aircraft filled the roles of heavy fighter, ground attack, reconnaissance and night fighting. It was particularly well known for its ground attack role. The aircraft was actually designed in a prison! In 1937 Vladimir Petlyakov had been imprisoned on allegations of delaying the design work on the Tupolev ANT-42. While in prison Petlyakov was placed in charge of a team to develop an escort fighter for the ANT-42. Following lessons learnt from the Germans the Soviets ordered a re-design of this fighter to a bomber. Stalin was impressed enough to free Petlyakov and allow his name to be used in the aircraft designation. In service the Pe-2 flew very well once the crew struggled to get it airborne. It apparently took a great deal of strength to pull up on the elevators, so much so that with female crews it was common practice to get the navigator to help! It was also found in practice that the dorsal armament was insufficient. The 7.62 machine gun was replaced by a 12.7 one and this increased survival from 20 missions to 54. In total over 11000 aircraft were built. During WWII the aircraft was used by the Soviet Union and by Finland who gained captured examples from Germany. Post war the aircraft continued to be used by the Soviets and their satellite states long enough to gain the NATO reporting name of "Buck". The Kit As well as making their own kits Eduard are making a name for releasing other manufacturers kits with their own Eduard parts and decals. This is such a kit using the Zevezda plastic. In addition to the plastic Eduard have provided two sheets of photo-etch, resin wheels, propellers, and a full set of masks. Construction starts not in the cockpit as one would expect but out on the left wing. Here a complete open engine is provided which can be displayed open, but need t be built up even if you are going to keep the cowls on. Twin cylinder banks are added to the main crankcase with exhaust manifolds and other ancillary parts added on. Intake parts, filters and exhaust are then added. The engine bearing frame is also made up for the engine. The engine is then installed in its frame ready for installation onto the wing. Meanwhile both the wings are built up with the addition of engine areas, landing lights and flaps being added. There is no provision to drop these, though the flaps should be no problem. The leading edges of the out board wing sections are separate so there will be no seam to contend with. For each wing the landing gear frames are built up and added at this point. Next up the undercarriage fairings are built up and installed. The wheels and gear doors can now be added though I suspect most will leave these until much later on. For the right wing a dummy engine nacelle is made up and added, and for the left wing the completed engine is added. This now completes the construction of the main wings. Construction now moves to the main fuselage. The internal frame work for the cockpit is built up and installed in the front. The main rear bulkhead is installed along with the rear fuselage gun positions and other internal parts. Here PE replaces many of the kit parts. The seat and other frame parts are added into the rear position. The bomb bay and its bombs is now built up and installed between the cockpit and rear gun position. The pilots seat is also then built up and installed. Once all the internal parts are in and the tail wheel is installed the main fuselage can be closed up. Next up at the rear of the aircraft the tail planes are made up and installed. Here there are separate movable surfaces, but the rudders are fixed. The main wings are then attached at this stage. The engine exhausts are then added. Back to the front of the aircraft the upper defensive gun behind the cockpit is made up and installed into position. Moving to the undersides the crew entry hatch is installed. Additional PE parts are provided for this to leave in the open position. The ventral gun position is also built up and installed at this time. The bomb bay doors and tail wheel doors are now fitted. To finish up the glazing is added along with PE aerials. The propellers are made up and added. Here resin props are provided for use on two of the marking examples. Full masks are provided for all the glazing and wheels in the kit. Decals The decals for the kit have been designed by Begemot so we can be assured they are accurate for a Soviet subject. The decal are printed by Cartograf so should pose no problems at all. Five schemes are provided.=; Pe-2, later production batch, serial number 3/220, 161th Guards Bomber Regiment, 2nd Guards Bomber Air Corps, VVS RKKA, Winter 1943/44 Pe-2, later (post 205th) production batch, Generalmajor I. Polbin, CO of the 6th Bomber Aviation Corps, VVS RKKA, Germany, 1945 Pe-2 later (post 359th) production batch, 1st Guards Bomber Air Division, VVS RKKA, Germany, 1945 Pe-2 later (post 359th) production batch, flown by Senior Lieutenant E. Sedov, 40th Bomber Air Regiment, Soviet Navy Black Sea Fleet Aviation, August 1944 Pe-2 post 205th production batch, 36th Guards Bomber Regiment, 276th Bomber Division, VVS RKKA, Leningrad front, December 1944 Conclusion This is another great release from Eduard of an important of sometime overlooked Soviet aircraft. The plastic is great and the addition of the Eduard photo etch, resin and great decals make this a kit to be very highly recommended. Review sample courtesy of
-
 L-29 Upgrade set & wheels 1:48 Eduard Brassin - For Eduard / AMK Eduard offer us two new resin sets for the new Eduards kit or even the AMK Boxing, Upgrade Set (49870) This is two sheets of PE, one coloured and one plain. Upgrade areas in this set includes, Ejector seat parts, canopy framing, cockpit sidewalls, front instrument bay, flap bays and flaps, fuselage access panels, under carriage bays, gear doors, and speed brakes. Wheels (648374) This is a new set of wheels for the kit, both mains and the front. Also included us a new fork for the front wheel. As is standard for Eduard painting mask are provided as well. Review samples courtesy of
 -
Aero L-29 Delfín 1:48 Eduard ProfiPACK Designed in Czechoslovakia in the 1960s, the Delfín was a two-seat military jet trainer used by the Warsaw Pact countries that is still in operation with some countries and in private hands today. It is simple in construction and cheap to operate, with a good safety record due to its pleasant handling characteristics, which endears it to the cost conscious and anyone wishing to stay alive. Over 3,600 were made, and due to their use by the Soviet Air Force, they were dubbed "Maya" under the NATO reporting coding. As well as flight training, the Delfín is equipped with hard points to allow it to be used in weapons training, which has inevitably led to it being used in action on occasion most notably during the Yom Kippur war, but also in other "low level" conflicts over time. It has been gradually replaced by the L-39 Albatros, but still finds use with private operators for air racing, experimental flights as well as joy-rides. The Sasol Tigers in South Africa fly the L-29 as an acrobatic team, and the low cost of ownership has made it a popular entry into jet-powered flying. The Kit As well as making their own kits, Eduard are making a name for releasing other manufacturers kits with their own Eduard parts and decals. This is such a kit using the AMK plastic. In the box there are five sprues of medium grey styrene, a small sprue of clear parts, a Photo-Etch (PE) brass sheet, square decal sheet and a glossy instruction manual with painting instructions on the rear pages. The quality feel extended to the sprues, which are individually bagged in resealable clear foil bags, with the exception of the weapons sprues, which share a small bag. The tooling is good quality, with perhaps only the engraved panel lines appearing a shade wider than I would have liked, although by the time they are primed and painted, it probably won't notice. Construction starts with the cockpit, and a pair of ejection seats are built up from a two-piece frame to which the seat cushion and back cushions are added. Colour PE parts are added b Eduard if you wish to use them. The rear-seat has the canopy breaker framework removed, so make sure you place it in the rear cockpit once you're ready. The copckpit is a single tub into which the central bulkhead and instrument panels fit, along with the front coaming and two control columns that reflect its trainer status. Decals are supplied for the instrument panels, or you can use the newly supplied PE parts. New PE parts also replace the moulded in cockpit side details. A pair of ejection seat rails are added to the back of each cockpit area, the rear set being cut shorter and adding a pair of shrouds around the rear-seater's shoulders. The nose gear bay has to be built up next along with the single engine exhaust, as both of them are trapped inside the fuselage with the cockpit. The exhausts have a fine pen-nib tip to them, which is well moulded, with the exhaust trunking made from two halves and a rear-face to the engine itself at the end. The cockpit sidewalls are moulded into the fuselage halves, and are well done with a single extra part added to each side before the cockpit is installed. The nose-gear bay is also detailed with ribbing, plus various pressure bottle that add some extra interest and colour, as they are painted light blue. The fuselage closes around the three assemblies, with the cockpit rear having an insert behind the rear seat, and the engine supported by moulded in bulkheads with cut-outs that ensure it is correctly seated. Eduard's bunny pops up to remind you to add nose weight under the cockpit to prevent a tail-sitter, but if you plan on leaving the nose bay closed, you can add more there too. A clear blast-screen fits between the two cockpits, framed by a very delicate hoop that is built into the fuselage halves, so take care handling! The wings have the flap sections removed, and if you plan on modelling them retracted, all you need to do is remove the actuator rods from them and glue them in place. If you plan on having them deployed, leave the rods on.The intakes on the Delfín are in the wing roots and are simply curved into a central tunnel to feed the engine. The intake lips are moulded into the wing roots, and a curved part with splitter is then added into the gap behind them. The splitter plate is added to the sides of the fuselage, and a shield-shaped hole in the side of the fuselage allows the intake trunking to disappear into the darkness never to be seen again. Pitot probes are moulded into the wing halves, and I'm probably going to knock those off with my clumsiness too. A clear landing light is added to the underside of the port wing and formation lights are added to both wing tips, after which the wings are glued to the fuselage, with surprisingly short tabs but a large mating surface that make it wise to check everything it aligned properly before you leave the wings to set up. The main gear bays are moulded into upper wing skins, and detail is good, although some additional wiring would probably add more life. The mouldings are quite large, but there don't seem to have been any sink-marks on the upper surface, which is nice to see. There are a few shallow sink marks on the flaps though, but as they're on a flat surface, that shouldn't take more than a few minutes to resolve. The L-29 has a T-tail, which has a single full-width elevator, which is represented as a separate part, as is the rudder, which is made up from separate halves. This gives plenty of options for offset surfaces that give the aircraft a more candid look once complete. The landing gear parts are well detailed, with twin brake hoses running down the main legs, separate hubs to the main wheels, and retraction jacks that key neatly into both gear legs and the bays. The nose gear has a Y-shaped location/pivot point, plus a long retraction jack that extends high up into the nose. Gear bay doors are also well detailed, with the outer mains captive to the gear legs and inner doors hinging toward the centre line with retraction jacks added. The nose gear bay has a sliding rear door that sits flush with the underside of the fuselage, and a front door that hinges forward to deploy the gear, and then closes behind it. The Delfín has scabbed-on air-brakes that sit on the fuselage skin, and hinge out to slow the aircraft down using retraction jacks that sit within a small bay on the side of the fuselage. This is represented well by a pair of styrene parts with moulded in lightening holes on the inner face that sneakily hide some well-placed ejector pin marks. There is a bit of flash here on my example, which I will cut off using a new blade on my scalpel, so nothing untoward. The hinges are PE parts that affix to the leading edge of the brakes, and slot into two small depressions on the side of the fuselage. A pair of drop-tanks are provided for the underwing plyons. The canopy and nose bay cover can be posed open or closed, with the nose bay cover hinging forward on a substantial tab. The canopy is supplied as a three-part arrangement, with a fixed windscreen glued to the front, a side-opening front canopy with optional retaining strap if you pose it open, and a sliding rear canopy with a small bulkhead behind the cockpit opening. All parts are well moulded with defined framework, and are crystal clear, so with careful masking and painting should perform well. Markings The L-29 was used by a wide variety of operators, so the choice of marking is quite wide. Eduard give us a choice of 5 schemes. There is a main decal sheet, with a large stencil sheet as stencils vary between the marking options. There is also a small supplemental sheet. All decals are printed in house and should cause no problems. 3246, 3rd Flight, 1. Fighter Regiment, Planá Air Base, Czechoslovakia, 1969-1970 4902, 11. Fighter Regiment, Žatec, Czech Republic, 1993 79, Tactical Air Services, N179EP, Reno AFB, United States of America, 2009 1597, Egyptian Air Force, Bilbais, Arab Republic of Egypt, Late Eighties 3250, International Fighter Pilots Academy , Košice, Czech and Slovak Federative Republic, 1993 Conclusion A welcome release from Eduard of the great AMK plastic with some nice Eduard additions. Highly recommended. Review sample courtesy of
-
Hi, this is the eduard bf 109 e, as most bf 109 e's that went to the med arrived in European colours and were painted in theater using Italian colours. I have painted it in the following colours rlm 65. Giallo mimetico 4 and Verde mimetico 2. Added a Resin cockpit and wheels, and a quickboost prop.stretched sprue aerial. Rlm colours by extracolor Italian colours are colourcoats,exhaust stains are pastels, Comments welcome, thank you for looking nick
-
AN/ALQ-184 (short) and AN/ALQ-131 (shallow) ECM Pods (648363 & 648362) 1:48 Eduard Brassin Electronic CounterMeasures (ECM) has become a staple of modern air warfare, with survivability of an attack as important as being able to take out the enemy. Rather than build all this complicated electronics into each-and-every new design, a pod that takes up one pylon on the host aircraft can provide all the necessary equipment, and as it simply needs to interface with the avionics, it is much easier to change or adapt without hacking about the aircraft's structure. As usual with Eduard's resin sets, they arrive in the familiar Brassin clamshell box, with the resin parts safely cocooned on dark grey foam inserts, and the instructions sandwiched between the two halves, doubling as the header card. AN/ALQ-184 (short) ECM Pod (648362) Developed from the AN/ALQ-119, this modern pod is usually seen on an F-16, and is more tubular in shape than the above, although it does have a gondola under the main body for additional equipment. There is a single resin part in the box, with four small PE plates that affix to the port side of the pod, with a spare of each just in case. There are no shackle or crutch pad details moulded into the top of the pod however, so if your kit (or aftermarket) pylons don't include these, you might need to consider fabricating some if an accurate connection is needed. This pod is also covered in stencils (with some printed silver included), which are catered for on a separate sheet, with a page of the instructions devoted to their placement, with paint colours called out in Mr Color codes. AN/ALQ-131 (Shallow) ECM Pod (648363) Flown on a number of Cold War and modern jets such as the F-4, F-15 and F-16, as well as the doughty A-10 since the 1980s, this box is designated by Eduard as "Shallow", even though it differs little from the "Short" -184 model below, mainly because there is a "Deep" variant with more internal space available to pack additional equipment into. The set contains just three resin parts on two casting blocks, with the largest being the body, which resembles an aerodynamic tube with an angular box-like extension along most of its length. The two smaller parts are the pair of shackles to which the pylon grabs on to hold it in place on the aircraft, and these are attached on the top surface of the pod. A decal sheet is included for the myriad of little stencils that cover the slab-sides (with some printed silver included), and colour call-outs are in the usual Gunze codes, with a choice of all-over Olive Drab, or Olive Drab with grey undersides. Review sample courtesy of
-
 Casting around for something to do during the mid-winter (in Oz) break, I came across this which I picked up at the recent local model show: As well as the kit, which includes some resin parts for the cockpit, there was was also this Airwaves conversion kit: Whoever had originally owned this kit had already prepared the plastic parts, so that hard task was already done: So ideal for my second conversion, and a relatively swift build (although not finish - more about that later). The fuselage and wings went together well. I glued in the nose with plenty of superglue gel. I also painted the cockpit parts, although I am a bit uncertain as to the colour. I assumed, being post war, it would all be black, but after checking the internet it looks like that may not be so. It appears the sidewallls. May have been black and the other parts would be interior grey-green. Anyone have some advice for me? The wings needed a bit a bit of a spacer between the wheel wells and the top surface to ensure everything lines properly. Now as to markings, this may be a quick build but the finish will be delayed as I soon discovered that there are limited options in 1:48 for a Tempest Mk II. I found a copy of Model Alliance 1/48 Hawker Tempest Mk.II/F.2/F.6 Post War # 489021 on-line, but that will take a few weeks to get downunder. Plenty of time to choose a scheme I guess.
 -
THE SSV NORMANDY REMEMBRANCE FLIGHT (link here for what this is.) Liara T'Soni: Supermarine Spitfire Mk. VIII Dr. T'Soni could not be reached for comment; the design was provided by a personal friend, Matriarch Aethyta. The choice of aircraft was inspired by the Spitfire's reputation as both beautiful and deadly. Slight customisations include a piloting VI of unknown origin, and additional armaments from stock. This is another that's been sitting half-finished on my bench for an age. This kit is by Eduard, which means it has around eight million parts. You get a wonderfully detailed model with those eight million parts though. I b****cksed it up in a couple of areas, but generally I'm actually really pleased. The paint mask for the wing and the nose text - they are painted on, not decals - was done using the laser cutting tool on my 3D printer. It worked pretty well, but the edges are a bit fuzzy due to unburnt bits of glue sticking to the edge of the masking tape. Subsequent experiments with the vinyl cutting tool have given even better results, so expect to see that on the next one. Still trying out weathering techniques - I've run into a bit of trouble with polishing yet again so no glossy finish on this one. The final weather was done with oil paint and Tamiya panel line accent colour, and a lot of wiping off. I clearly still need to get the gloss better though, as it's way too dirty. I may attack it with some spirits over the next couple of days before the oil paint dries. Love that exhaust staining though, never tried it before. Mods are minimal - cockpit detailing was done using the photo etch included in the kit, with the addition of Glyph, Liara's VI personal assistant, who pilots the plane and is visible in the cockpit photos. Glyph just consists of a piece of transparent sprue melted into a clear bead and painted with transparent paint. Overall the cockpit looks good, I'm quite happy with it but I'm itching to put more wiring and other scratch built detailing in the next one. The extra wing cannons are turned brass. They're actually 1/32nd scale .50 cals, but at 1/48 scale they look the part for 20mm cannons.
-
P-51D 250Lb bombs & Uncuffed Propeller 1:48 Eduard Brassin - For Airfix Kit Eduard offer us two new resin sets to supply 250lb bobms and a new uncuffed Propeller for the new Airfix kit. 250lb bombs (648369) These are a two bomb units with PE fins and vanes. There is also a small decal sheet with markings. Hamilton Standard Propeller (648360) This is a new Hamilton Standard replacement prop unit with uncuffed blades.. The blades are individual and seat into the top of the hub via a provided jig. When this is removed from the pour block the modeller will have to drill a locating hole in it. The unit is then fitted to the base and the spinner added. A small PE part is then fitted to the front of the spinner, as it is a small part 3 are provided as its a given the carpet monster will claim at least one! Review samples courtesy of
-
Fortress Mk.III Upgrade sets 1:72 Eduard - For Airfix Kit Eduard offer us Front Interior Set (73616) This set has both a colour nickel fret and a traditional brass one. Parts are provided for the side panels inside the nose, the bomb-sight & mounts, hatches, machine gun barrels, mounts, ammuntion boxes & feed chutes. Radio boxes, electronics boxes, the doorway back to the cockpit, front access hatch, radar parts, and mounts inside the astrodome. Rear Interior Set (73617) This set has both a colour nickel fret and a traditional brass one. Parts are provided for the inside fuselage, equipment racks and mounts, bulkheads, doors, racks, radio operators compartment, crew doors, crew toilet, hatches, waist machine gun barrels, mounts, ammuntion boxes & feed chutes, and the rear gunners compartment with sight. Exterior Set (72659) This set is one larger brass fret, and one small one. Parts are included for the inside of the engine nacelles, firewalls, cowl flaps and the wiring harness for the engine. The openings in the wing leading edges are replaced as are various grills and hatches. There are brake lines for the main landing gear and new wheel hubs. New ends are supplied for the turbo chargers and new external aerials are included. Unique to the III are some parts around the wait guns windows, scoops to improve cooling airflow for the electronics inside, and additional aerials. MasksThis set provides masks for all the glazing and wheels. Review samples courtesy of
-
Bf 109F Essentials 1:48 Eduard Brassin - BigSIN In this set Eduard offer us the 109F cockpit, wheels, control surfaces and pitot tubes. Cockpit Set The set gives you a complete new cockpit including sides and floor which will fit into the model with some work being needed on the kit moulded details. A mix of resin and PE goes into this to create a small model in itself. There is the option of using a one part instrument panel, or a multi part one using the PE & film supplied. Though lets be honest if you are going to the time, trouble, and expense of this set then it really has to be the multi part affair. Control Surfaces This set has has the rudder, tail surfaces and flaps in resin. Balance horns are also supplied in resin. Trim tabs are supplied on a small pe fret (not pictured). Wheels This set has the two man wheels with separate spoked hubs. The tail wheel is moulded with its strut in a stronger type of resin. Bf 109F&G Pitot tubes This set has three replacement pitot tubes in resin to replace the kit parts. These will I suspect be more susceptible to damage than the kit parts despite looking more realistic. Review samples courtesy of
-
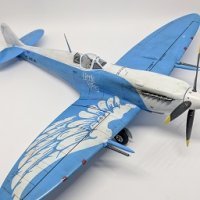
Hello Folks This is my latest off the bench and represents a few firsts for me. - First 1/32 in a long time, - First time using MRP paints, - First time using Montex masks. - First time using a turps based panel line wash. Eduard(Hasegawa) P-40N A29-607 BU-G as flown by Sqn Ldr John Waddy, 80 SQN RAAF . All but the kill tally and tail code are painted on using Montex masks. Kit stencils. I love the MRP paint and will use it again. The Eduard kit gives you resin wheels and exhausts and some etchy goodness. Hope you like my BU-G. Cheers Andrew P.
- 39 replies
-
- 67
-
-
Here is what has been keeping me busy over the holiday period, back to work tomorrow so I will be back to real work and pattern making when I have time in the evenings. However I really do need to do more personal model making. Basically straight out of the profi boxing painted with Mission RLM 76 and varnish and weathered with True Earth washes and paint fades etc. Still need a little more practice, but fairly happy overall.
-
 H8K2 Emily Photo Etch 1:72 Eduard Announced last year, Hasegawa's all-new Emily seems to be quite a mysterious beast. The teaser pictures (see the thread in the Rumourmonger forum) look excellent, but I haven't seen one appear in the Ready for Inspection forum and the kit doesn't even seem to be available from most of the better know UK-based model retailers. I managed to find one available from a UK seller on ebay, but so high was the price that Paypal Credit was offered as one of the options to purchase! Nevertheless, Eduard have decided that the new flying boat will sell in sufficient quantities worldwide to justify the production of a veritable slew of photo etched detail parts. H8K2 Emily Cockpit Interior There are three sets for the interior of the aircraft. First up is the cockpit set. In the usual Eduard style, this includes both pre-painted and unpainted parts. Included on the fret of painted parts is a new multi-layered instrument panel, a multitude of parts for the sidewalls and harnesses for the pilot and co-pilots seat. On the unpainted fret are complete replacement seats, a new cockpit floor, rudder pedals, more details for the sidewalls and bulkheads, as well as the ladders that leads from the flight deck to the interior of the aircraft amd to the observation bubble atop the cockpit. H8K2 Emily Nose Interior A seperate set caters for the extreme forward part of the fuselage. Parts are included to cover the main bulkhead that seperates the nose from the rest of the aircraft, we asll as a nifty door which can be posed in the open or closed position. An access door to the outside of the aircraft is also included, which will enable the modeller to show off a little more of the exquisite detail. Coverings for the floor surfaces are included, as well as lots of details for the sidewalls and the nose gun. H8K2 Emily Rear Interior This set includes details for the mid-rear part of the fuselage. Included on the fret is a door for the bulkhead, replacement coverings for the floor, as well as the raised structure directly underneath the turret. A host of smaller details for the sidewalls are also included on the fret. Details for the upper turret and side blisters, including parts for the machine guns and seats for the gunners are also on the fret. H8K2 Emily Exterior The single large fret contains the ignition wiring for the engine, as well as frames for all of the many windows on the outside of the airframe. Also on the fret are replacement hinges for the aelerons, the use of which will necessitate removing the kit parts. There is some seriously nice detail for the landing gear/beaching assembly, as well as parts for the nose radar antennas and smaller details for the bombs and torpedos. H8K2 Emily Maintenance Platforms If you bought Eduard's sets for the Italeri Short Sunderland, then you'll be familiar with this set. Two unpainted frets are included, which together hold parts for two maintenance platforms per engine. The platforms themselves fold down from cavities in the leading edge of the wing, and inlcude steps are restrining cables. They will certainly add something different to the finished model and I for one think they look excellent. H8K2 Emily Pre-cut Masks for Fuselage Conclusion If you've given in to temptation and splashed out on Hasegawa's fine new kit, then you probably won't think too much of extending your investment to include some aftermarket details. Together, these sets include pretty much everything you could want in order to super-detail the new kit. Overall this set is up to Eduard's usual high standards and can therefore be recommended. Review sample courtesy of
 -
MiG-29 SMT Photo Etch and Masks for Zvezda Kit 1:72 Eduard Trumpeter aren't the only model company releasing state of the art kits of modern Soviet/Russian subjects. Zvezda have a long tradition of producing accurate, buildable kits of these subjects, and their MiG-29 kits are no exception. Well received by the modelling community, the kits are accurate and compete well with the (also very good) kits from Trumpeter. Now Eduard have released a set of photo etched parts to complement the MiG-29 SMT variant. This set includes two frets of photo etched parts. The first fret contains pre-painted parts for detailing the cockpit and includes harnesses, pull handles and a cushion for the ejection seat, as well as details for the instrument panel, cockpit sidewalls, control column, rudder pedals, canopy and HUD unit. A range of pre-painted electroluminescent strips are also included on the fret. The second fret is unpainted and contains further parts for the cockpit, such as the rear cockpit decking, as well as details for the rest of the airframe. The landing gear gets hydraulic lines and a mud guard, there are the automated guards for the engine air intakes and afterburner flame holders for the other end of the engines. There are also details for the missile rails, which is helpful if you wish to finish your model without a full load of weapons. Smaller details include a host of small aerials and plates to dot around the airframe. MiG-29 SMT MiG-29 SMT Zoom Set MiG-29 SMT Pre Cut Masks Conclusion This is a sensible and worthwhile upgrade for Zvezda's rather excellent kit. It includes all of the extra details that you would want, with the added benefit of the cheaper Zoom set if you just want to jazz the interior up a bit. Recommended. Review sample courtesy of
-
Eduard Seatbelts IJN Fighters - 1:72 Eduard
Paul A H posted a topic in Aftermarket (updates/conversions)
Seatbelts IJN Fighters 1:72 Eduard This set contains twelve sets of harnesses for Imperial Japanese Navy types. Included are four sets for late-war Mitsubishi fighters, six lap belts for Nakajima fghters and two sets for Kawanishi fighters. If you don't want to spend a lot of time or money on aftermarket bits and bobs, a simple seat harness can still make a big difference to a kit's cockpit, particularly in this scale. This set should prove to be good value if you manage to use all of the belts. Recommended. Review sample courtesy of -
Photo Etch Detail Sets for Hasegawa P1Y Frances/Ginga 1:72 Eduard Eduard seem to be busy enough keeping up with all the new releases from the likes of Airfix, Revell, Trumpeter etc., as well as producing their own stuff. Occassionally, however, they find the time to address some of the omissions from their not-inconsiderable catalogue of aftermarket goodies. This is the case with this new set of photo etched parts and masks for Hasegawa's P1Y Frances. I still think of the Hase Frances as a modern kit - and I suppose it is - but even I must admit I was slightly surprised when I checked back and found the kit was first produced about 20 years ago. How time flies! P1Y Frances/Ginga The set is a classic slice of Eduard, with two frets used to cover the entire airfame. The first set is pre-painted and includes a lot of parts for the cockpit. Included are parts for detailing the instrument panel and sidewalls, as well as throttle controls, radio gear and harnesses for the crew seats. The second fret is much larger and includes detailed liners for the inside of the fuselage around the cockpit, as well as parts for detailing the landing gear, bomb racks, bomb bay doors and the ballistic tails of the bombs themselves. Ignition wiring for the radial engines is also included on this fret. P1Y Frances/Ginga Zoom Set The zoom set contains the first fret from the above set, with a correspondingly lower price tag. Ideal for those who want to jazz the cockpit up without spending a lot of money. P1Y Frances/Ginga Pre-Cut Masks In the usual Eduard style, this set includes masks for the canopy and both the main and tail wheels. Sometimes these sets are a bit of a luxury, but in the case of the Frances, it's almost essential thanks to the intricate framework of the canopy. Conclusion If you have Hasegawa's kit of this sleek and handsome aircraft, then you'll be able to move it to the top of the 'to do' pile thanks for Eduard's handy new sets. The masks in particular are a very welcome time saver. Recommended. Review sample courtesy of
-
Su-34 Photo Etch and Masks for Trumpeter Kit 1:72 Eduard Eduard seem to have tracked the release of Trumpeter's new line up of Russian jets in 1:72 fairly closely, as each time a new kit has been released we haven't had to wait long for a set of photo etch and masks. There is even a growing range of high-quality resin hardware to hang off the bottom of your chosen kit. This month is the turn of the Su-34 Fullback to receive the Eduard treatment. Su-34 In the usual Eduard style, this set comprises two frets of parts. The first fret contains pre-painted parts for detailing the instrument panels and side consoles, as well as cushions, harnesses and grab handles for the seats. Also on this fret are parts for the rudder pedal and a new Head-up Display Unit. The second fret is unpainted and contains parts for detailing the inside of the canopy, as well as a particularly complex arrangement of parts for the afterburner flame holder. Also on this fret are parts for the engine air intakes and parts for detailing the landing gear bays. The rest of the airframe benefits from the provision of a range of antennas and static discharge wicks. Last but not least is a part for the large chaff/flare dispenser unit. Su-34 Zoom If you don't fancy losing your mind trying to assemble the world's most complex afterburner flame holders, then you have the option of picking up the zoom set and jazzing up the cockpit a bit. A good option if you've spend your housekeeping money on the kit. Su-34 Pre-Cut Masks This set provides pre-cut paint masks for the canopy and all of the wheels. If you've used Eduard's pre-cut masks before, you'll know that they are a real time saver. Conclusion These sets are a handy upgrade for the new Trumpeter kit. If you've committed a not-inconsiderable sum of money to purchasing their latest box of plastic, then it might just make sense to make the most of it by indulging in a little aftermarket as well. Overall, this looks like a nice little upgrade and can be recommended. Review sample courtesy of
-
 After a longer WW1 pause, finally my dad started a new one, an addition for our homeland collection, only two Oefffags so far. DSC_0001 by Reinhard Spreitzhofer, auf Flickr DSC_0002 by Reinhard Spreitzhofer, auf Flickr
 -
GBU-43/ B MOAB 1:72 Eduard The GBU-43 MOAB (Massive Ordnance Air Blast, or 'Mother of All Bombs' if you have a propensity for chaps and cowboy boots) is a large air-dropped weapon, developed by the Air Force Research Laboratory for the US Air Force. The bomb is carried by specialist variants of the C-130 Hercules transport aircraft and is guided to its target by GPS. The bomb has only been used once in combat, mainly because of the significant risk of unintended civilian casualties that accompanies the use of this type of weapon. Eduard's MOAB is a decent-sized kit in itself. The kit comprises eighteen resin parts and no fewer than five decent sized frets of photo etched brass. The main body and wings of the bomb case separately to the nose cone and tail unit, with the prominent grid fins case individually. The resin is quite simply superb, with flawless detail and casting. The photo etched cradle/platform is a much more complex affair, with lots of folding and gluing of small parts of brass. In fairness to Eduard, they have sought to simplify the construction process by maximising the use of folds to reduce the part count, but I'd be willing to bet that even the most hardy folder of small brass parts will be wishing that Eduard had tooled a sprue of plastic parts for the body of the cradle. Persevere, however, and you will be rewarded with an impressive item, particularly if displayed next to a MC-130E or H. Decal options are included for a museum example and an in-service weapon. Review sample courtesy of
-
Bf-109 E-1 Eduard ProfiPack. Was build simple out of the box. Thanks for looking, and Merry Christmas!
-
Hello; Here's my latest built: Eduard's 1/48 Fw190D-13 W.Nr.836017 Stab./ JG 26. It's a great kit, but not perfect. The main colour is Tamiya and the decals are from the kit. I built oob. All comments very welcome. Cheers, Cristian Zarichta
- 15 replies
-
- 26
-


.thumb.png.6e11fc11af5645499ae76cb59fcfb788.png)