Search the Community
Showing results for tags 'Eduard'.
-
 Beaufort Mk.I Löök (674001 for Airfix) 1:72 Eduard This set contains a combination of pre-printed resin and PE parts to quickly and efficiently detail up your cockpit. There is a single resin part that replicates the instrument panel in front of the pilot, with glossy faced dials already painted for you on detailed black resin. The fidelity of the printing at this size and scale has to be seen to be appreciated, and stands up well even under 2.5x magnification. Additionally, the PE set of four-point belts for the pilot, plus a Y-shaped part that you fold in half to replicate a lever found on the right of the instrument panel. Review sample courtesy of
 -
A-1J Skyraider Update Sets (for Tamiya) 1:48 Eduard Another older kit from the Tamiya gets the modern Eduard treatment. The 1:48 Skyraider from Tamiya is another of their kits that were awesome when they were first released, and are still pretty good almost 25 years later. We’ve got new technologies to improve these kits with now, and Eduard are renowned for grabbing those technologies with both hands to improve our models. Eduard's new range of sets are here to improve on the kit detail in the usual modular manner. Get what you want for the areas you want to be more of a focal point. As usual with Eduard's Photo-Etch (PE), Löök and Mask sets, they arrive in a flat resealable package, with a white backing card protecting the contents and the instructions that are sandwiched between. The resin sets arrive in the new shallow Brassin cardboard box, with the resin parts safely cocooned in bags, and the instructions folded around acting as padding. Brassin Wheels (648761) Kit wheels are generally in two halves, which means you have the resultant joins to deal with, possible mould-slip issues on single part wheels, and sometimes less than stellar detail due to the moulding limitations of styrene injection technology, especially in the tread department. That's where replacement resin wheels come in, with their lack of seamline and superior detail making a compelling argument. They are also usually available at a reasonable price, and can be an easy introduction to aftermarket and resin handling, as they are usually a drop-in replacement. This set includes three resin wheels, a 3D printed tail-wheel strut and a sheet of pre-cut kabuki-style yellow masking tape that allows you to cut the demarcation between tyres and hubs sharply and with little effort. Once the parts have been liberated from their casting and printing bases, they are drop-in replacements for the kit parts, with massively improved detail, especially around the tyre sidewalls, tread detail, and the brake housings on the rear of the hubs. Each wheel also has an element of sag engineered into the tyre that is suitable to an operational aircraft, without looking like it’s got a slow puncture. The rear strut for the tail wheel is removed from its printing base with nippers, a sharp blade or saw, and provides exceptional detail over and above what’s possible with injection styrene. Löök Pre-Painted Resin Set (644165) This set contains a combination of pre-printed resin and PE parts to quickly and efficiently detail up your cockpit. There is a single resin part to replace the kit instrument panel in front of the pilot, with highly effective gloss varnish simulating the glass covering painted over the dials for you on black resin. Additionally, the PE set contains the four-point belts for the pilot, complete with pale grey comfort pads that protect the pilot from the buckles. Seatbelts STEEL (FE1291) These belts are Photo-Etch (PE) steel, and because of their strength they can be etched from thinner material, which improves realism and flexibility in one sitting. Coupled with the new painting method that adds perceived extra depth to the buckles and other furniture by shading, they are more realistic looking and will drape better than regular brass PE. It includes a set of four-point belts for the pilot, complete with pale grey comfort pads that protect the pilot from the abrasion of the buckles during operations. You might have noticed they’re identical to the Löök set above, so bear that in mind if you’re planning on opening your wallet for multiple sets. Highly recommended. Review sample courtesy of
-
Luftwaffe Rudder Pedals WWII PRINT (648778) 1:48 Eduard Brassin Although this set arrives in a flat package, the directly 3D printed parts are safe ensconced inside a clear plastic clamshell box inside the package, which also has a sticky pad inside to prevent the parts from rattling about. The parts are printed resin, attached to the base via thin tendril-like fingers that are easy to cut off and sand the little upstands away, leaving them ready for action. This set contains six individual rudder pedals in extreme detail that has been directly 3D printed with no casting involved. This gives you enough pedals to create three pairs, and they will be very useful if your kit is less than well-represented in the rudder pedal department, as is often the case with injection moulded styrene. When I say extreme detail I mean it literally, as the pedals are printed with all the perforations integral to the real parts, plus the foot straps that keep the pilot’s feet from lifting off under G, as well as the mechanism behind the pedals that transmits the movement of his feet to the flying surfaces at the rear of the aircraft. These parts will come in incredibly handy if you are building one of the many glass-nosed aircraft that were in the Luftwaffe arsenal during WWII in my favourite scale. Highly recommended. Review sample courtesy of
-
Hallo, gentlemen! I am currently building an F4F-3 (no, not the Eduard one...) as a machine in the ill-fated VMF-211 at Wake Island, and a sudden doubt crept in. How were the propeller tips painted? Tri-color, Yellow, or nothing? From the well known photo of the wrecks, the cuffs are undoubtely unpainted metal, the blades are Black also at the front, but no hint of the tips can be discerned. If any, that they were left in Black like the blades. However, the (in its time) well researched YellowWings Decals decal sheet (which I am using) suggests Tri color, and even supplies decals for that (rather big... almost a quarter of fifth of the blade...) Conversely, the new Eduard kit decal sheet comes with none of that, and a glance at the instructions sheet shows that it has no indication whatsoever (instead, the blades themselves have a raised panel that would indicate the Yellow tip?) What is the general knowledge on the matter? Thank you very much, Fernando
-
 Hello everyone, I’d like to share my finished Eduard Messerschmitt BF109F-4. I made a build in progress post here. This is a wonderful kit and I really enjoyed it. Thanks for looking. Tom I also made a build video for anyone interested;
 -
Seems a long time since I posted a WiP, and indeed it is - I have been very unproductive since the start of the pandemic, for various reasons, but at last one kit (out of the 4 on the go) is coming close to a conclusion. Its Eduard's 2021 Weekend boxing of their Airacobra, and I am going for the box-art scheem, Pat-Riot II There are no photos of the early stages, suffice to say the cockpit is standard but with a Quickboost seat and a Yahu IP to liven things up. There was a lot of dry fitting and in the end I used a piece of sprue to spread the fuselage and reduce the gaps at the wing roots Cockpit overall looks good, the after market seat certainly adds to it Wings on, and as usual its out with the re 3M putty to solve the gaps - love this stuff, quick to dry, and sands so easily to a smooth finish I decided to fully rivet again - it seems to add something even if strictly the effect is over-scale. All panel line and rivets were washed with black now, before painting Then it was out with the underside colour, tbh the box art looks so close to RLM76 I decided to use that and broke out an old bottle of Tamiya - no primer, all straight on to the plastic to make the most of that panel line wash For the topside, I used MRP Sabbia (the Italian Sand colour), with just a slight dash of yellow & red to make it more fleshy, over some pre-shading - this is after the first coat And this is the final effect, a little lost under the lights Decal time! 2021 boxing, I hear you muse, does that mean it has the new decals with the removal carrier film? I wondered the same, and turns out it does! Give them 24 hours to dry and be very careful with a cocktail stick and broad grip tweezers and this really does work. Here's the serial number with carrier removed for the painted on look. Much easier than masks But don't worry if you don't fancy trying it, even left on these are some of the best decals with a carrier film that very nearly vanishes - here is the other side with the carrier film still on: Mot of them will come off in one peice, such as this stars and bars piece, the stencils though are getting all a bit small, and the sheer quantity increasing the risk of damage, so I am only removing the more obvious of those That brings things mostly up to date, there is a Kitty Hawk 1/32 version of the same also under way as a nice comparison, though that will be done in a European or Eastern Front scheme, will get a WiP of that going soon.
-
Royal Navy & US Navy Watertight Doors WWII SPACE (3DL53011 & 3DL53012) 1:350 Eduard The Eduard SPACE sets use new 3D printing techniques that lay down successive layers of different colour resin, creating highly realistic almost full complete panels that are supplied on a decal sheet. They can depict metallic shades, plus glossy, satin and matt colours too, which really ups the detail on everything they print. It was first used by Eduard to create fabulous cockpits and other details for aircraft, but the designers at Eduard have been experimenting with other uses, and have come up with this one. As usual with Eduard's Photo-Etch (PE), SPACE and Mask sets, they arrive in a flat resealable package, with a white backing card protecting the contents and the instructions that are sandwiched between. Watertight doors have been an important aspect of safety in modern warships since steel became the dominant building material, helping to keep any flooding from spreading between areas of a ship, and potentially saving the ship and its crew from a watery grave. They are often visible on the exterior surface of ships’ superstructure, and are often neglected by kit manufacturers, either as raised flat areas, or as simplistic outlines, especially in older kits. This pair of sets probably won’t be the last, and they depict the doors open, showing the frames and the complex interior surface of the doors, complete with closure mechanisms where appropriate. Clearly, British and American maritime engineers had a different idea of what the safest method of preventing flooding was, and that’s why there are two sets, with the US Naval set having two types of door design. Each set has seven rows of fifteen doors, totalling 105 doors in total, which should be enough for a few projects. They have been printed in greys and blacks so that they can be applied to a pre-painted model, and if you want to also depict the interior, you can either cut through the kit wall, or use a deep black paint such as Stuart Semple's Black 3.0 or the more expensive Musou Black to give the impression of a dark, shadowy interior. Royal Navy Watertight Doors WWII (3DL53011) US Navy Watertight Doors WWII (3DL53012) Conclusion A very useful addition to your maritime detailing arsenal, particularly if you have older kits in your stash. There are also going to be life rings and other useful exterior details added to the range in due course. Highly recommended. Review sample courtesy of
-
EA-18G Growler Upgrade Sets (for MENG) 1:48 Eduard Meng’s new series of Super Hornet kits now includes a single-seater -E, twin-seater -F, and the latest Growler, which is an electronic warfare variant of the airframe, packed with hardware in underslung pods to disrupt enemy operations and ease the way of their allies on difficult missions over enemy territory. Those three kits are impressively detailed, but you can always improve on styrene perfection with other media. Eduard's new range of sets are here to improve on the kit detail in the usual modular manner. Get what you want for the areas you want to be more of a focal point. As usual with Eduard's Photo-Etch (PE), SPACE 3D printed and Mask sets, they arrive in a flat resealable package, with a white backing card protecting the contents and the instructions that are sandwiched between. The smaller Brassin resin sets arrive in the new shallow cardboard box, with the resin parts safely cocooned in bags, and the instructions folded around acting as padding. EA-18G Update Set (491288) Two frets are included, one nickel-plated and pre-painted, the other in bare brass, plus a small slip of acetate sheet with HUD glazing shapes printed on its surface. A complete set of two new layered instrument panels that are full of MFDs complete with deep lustrous green screens; side consoles with added levers for both cockpits and additional instrument boxes for the bulkheads, and even a button-studded front for the control column. The floor of the pilot’s area has a combined interior skin and rudder pedal box, and just above it on the coaming is a new PE HUD with twin acetate films cut from the included sheet to replicate the glazing. The turtle-deck behind the pilots is augmented with additional parts, requiring some small lengths of 1.2mm rod; the windscreen is finished with a horse-shoe lip; with another on the canopy that has rear-view mirrors included, with more for the rear-seater; the canopy is further upgraded with a wiring harness inside the rear, sidewalls to the interior with a row of hooks to close the canopy, and a detail skin at the very rear that will only be seen if the canopy is posed open. The exterior is then updated with a brand-new four-layer nose gear bay door with additional PE hinges and actuator attachment points, plus a small area bowed outward by using a ball-pen from the other side; the rest of the landing gear bay doors are fitted out with actuator-points; the built-in crew access ladder has the option of being deployed, by removing the detail and adding a shallow bay, plus a short door that hangs down, and the ladder itself, which is made up from twin-layered sides and folded-over rungs that are joined together and attached to the interior of the new bay, and uses the kit’s stay plus two more from the PE set, one V-shaped, the other with a square attachment patch that stands out at an angle. The weapons pylons are fitted with attachment surfaces so that if you leave any/all of them empty, as is often the case in real-world instances, the detail will be suitable for inspection. The final parts are wiring and hoses for the landing gear legs, one for the nose gear leg, and two each for the cranked main gear. There is also a small equipment box added to the side of the nose gear bay, just for completeness. Zoom! Set (FE1288) This set contains a reduced subset of the interior, namely the pre-painted parts that are used to improve on the main aspects of the cockpit, as seen above. Whatever your motivations for wanting this set, it provides a welcome boost to detail, without being concerned with the structural elements. Seatbelts STEEL (FE1289) These belts are Photo-Etch (PE) steel, and because of their strength they can be etched from thinner material, which improves realism and flexibility in one sitting. Coupled with the new painting method that adds perceived extra depth to the buckles and other furniture by shading, they are more realistic looking and will drape better than regular brass PE. As well as the two sets of crew belts, you also get a set of the pull-handles between the pilot's knees that gets him out of there in case of an emergency; anti-flail leg straps; a replacement headbox detail insert on both sides of each seat, and a number of stencils for the sides of the seats. Ejection Seats (648773) This set arrives in a small Brassin box, and contains the parts necessary to complete a pair of highly detailed ejection seats for your model. Each seat is supplied as a main element, to which the seat cushion is affixed. A resin umbilical hose is fitted to the left side of the seat, and a full set of four-point crew belts are supplied in painted PE for the pilots, along with some small parts to fit to the seat’s sides and some anti-flail leg restraints to protect the crew in case of ejection, after pulling the stripy new handle between their knees. It’s worth noting that where it is needed, the PE has been painted on both sides so you don’t have to faff about matching colours if shiny nickel can be seen on completion. Wheels (648774) Kit wheels are generally in two halves, which means you have the resultant joins to deal with, possible mould-slip issues on single part wheels, and sometimes less than stellar detail due to the moulding limitations of styrene injection technology, especially in the tread department. That's where replacement resin wheels come in, with their lack of seamline and superior detail making a compelling argument. They are also usually available at a reasonable price, and can be an easy introduction to aftermarket and resin handling, as they are usually a drop-in replacement. There are four wheels on separate casting blocks in the flat-pack set, plus two separate hubs for the main gear wheels. All of them are drop-in replacements for the kit parts once removed from their blocks, and to assist you with painting, there is a sheet of pre-cut kabuki-style masking material included (not pictured), to help you cut the demarcations perfectly with little effort. Masks (EX876) Supplied on a sheet of yellow kabuki tape, these pre-cut masks supply you with a full set of masks for the canopy, with compound curved handled by using frame hugging masks, while the highly curved gaps are in-filled with either liquid mask or offcuts from the background tape. In addition, you get a set of hub/tyre masks for all the wheels, allowing you to cut the demarcation perfectly with little effort. Masks Tface (EX877) Supplied on two sheets of yellow kabuki tape, these pre-cut masks supply you with everything above, but also give you another set of canopy masks tailored to fit the interior of the glazing so that you can paint the interior and give your model that extra bit of realism, which will be especially useful if you have the PE upgrade set, as it provides you with canopy interior details. Highly recommended, one and all. Review sample courtesy of
-
P-47D Razorback & Bubbletop Update Sets (for Tamiya) 1:48 Eduard If you thought you’d missed out on the wave of super-detailed aftermarket parts using new technology for your older kits, you might be right in some situations, but if you have one of Tamiya’s still excellent P-47D Thunderbolts, whether it’s the Razorback, or the Bubbletop with the cut-down fuselage to improve rearward vision, you’re in luck. These relatively old kits still hold up incredibly well given their age, but any styrene instrument panel can be improved by aftermarket that is pre-painted or printed in the correct colours to begin with. Add to that a set of paint masks to keep your canopy in pristine condition, and you’ve got a great way to upgrade your kit relatively quickly and easily. The cockpits of the two variants of the Thunderbolt were subtly different, so both the sets are broadly the same, but with those minimal changes between them, which seems to extend only to the instrument panel, they still build essentially the same. The masking sets are vastly different from the windscreen aft, as you will be able to see in the drawings below. P-17D Razorback & Bubbletop SPACE (3DL48077 & 3DL48078) The Eduard SPACE sets use new 3D printing techniques that lay down successive layers of different colour resin, creating highly realistic almost full complete panels that are supplied on a decal sheet. They can depict metallic shades, plus glossy, satin and matt colours too, which really ups the detail on everything they print. In addition, a small sheet of nickel-plated and pre-painted PE is included for the aspects of the set that lend themselves better to this medium, such as seatbelts and rudder pedals. The printed sheet contains the beautiful instrument panel, with copious additional decals for the side consoles, stencils and sidewalls after removing the moulded-in detail, while the PE includes a set of four-point pre-painted seatbelts with comfort pads under the buckles; a raised stand for the floor with a decal with some controls on the floor; wiring loom on the sidewalls linking various parts together; backup ring sight on the gunsight with a bead externally in front of the cockpit, and adjustment ratchets on the rudder pedals, where you are also told to drill holes in the bottom of the foot pedals. Externally, there are a pair of circular mesh grilles for the intakes in the nose; stencils for the main gear legs, and a fuel cap for the flattened fuel tank often carried under the belly. The difference between the Razorback and the Bubbletop extends only as far as the former has a cut-out in the top centre of the panel, while the latter has the notch in the styrene panel covered over with additional informative stencils. P-47D Razorback (3DL48077) P-47D Bubbletop (3DL48078) Tface Masks (EX881 & EX882) Supplied on a sheet of yellow kabuki tape, these pre-cut masks supply you with a full set of masks for the canopy both inside and out, with compound curved handled by using frame hugging masks, while the highly curved gaps are in-filled with either liquid mask or offcuts from the background tape. In addition, you get a set of hub/tyre masks for the wheels and formation lights, allowing you to cut the demarcation perfectly with little effort. P-47D Razorback Tface (EX881) P-47D Bubbletop Tface (EX882) Conclusion It’s great to see these sets coming out to improve the cockpit of these ageing gems of kits that many of us have in our stashes already. I was tempted to get a Tamiya Bubbletop now, even though I built the Academy kit some years ago when Eduard reboxed it. Highly recommended. Review sample courtesy of
-
A couple of years ago I bought Hasegawa’s Spitfire IXc in 1/48 scale (you can’t have too many Spits and for me this is the fourth one). After having got the kit I became aware of the heated discussion concerning the error in the length of the kit's rear fuselage, it being 2 mm too short. Well, despite the flaw I didn’t want to throw in the towel. Instead, I built the kit which was of very good quality and a pleasure to assemble. As far as Spitfires are concerned I think more than everything has already been told countless times by experts on these pages. So, I won’t put my spoon in that Spit soup. My model depicts the fighter of the Polish Fighter Squadron No. 316 named "City of Warsaw" (in Polish, 316 Dywizjon Myśliwski "Warszawski") The fighter NH214 of the squadron code SZ-G was the personal mount of flight commander Aleksander Gabszewicz. The register number of this particular fighter, NH214 is at the rear of the fuselage. In another picture the register code BS433 apperars in a Spit with the same squadron code of SZ-G. Not being familiar with the marking systems of the RAF, is it so that the code SZ-G was in use in multiple Spits of the 316 squadron? When building the model I followed the painting instructions of the kit. Afterwards, I have become doubtful of the right colour of the landing gear leg and the rim. Were they really metal coloured? Additionally, I do not know if I chose the right type of rims for my model. Should they have been spoked instead of the disk type ones I used? Well, anyways here is my model, not too weathered and painted with Xtracolor enamels in the normal three tone camo.. As to the Hasegawa decals were thick and brittle. In the building process I managed to ruin a couple of decals and decided to order the Techmod ones for the same fighter. Another aftermark product I used was Eduard’s photo-etch set for the cockpit. I also cut out the cockpit door and left it opened.
-
Eduard Su-25 Wheels (648780 for Zvezda) 1:48
Mike posted a topic in Aftermarket (updates/conversions)
Su-25 Wheels (648780 for Zvezda) 1:48 Eduard Brassin Kit wheels are generally in two halves, which means you have the resultant joins to deal with, possible mould-slip issues on single part wheels, and sometimes less than stellar detail due to the moulding limitations of styrene injection technology, especially in the tread department and even more so on older kits. That's where replacement resin wheels come in, with their lack of seamline and superior detail making a compelling argument. They are also usually available at a reasonable price, and can be an easy introduction to aftermarket and resin handling, as they are usually a drop-in replacement. These wheels are patterned for the new Zvezda kit although it could equally be used for the Kopro or Monogram kits, adding incredible levels of detail to the landing gear and its prominent front mudguard, with almost drop-in replacement parts. Inside the shallow Brassin box are three resin wheels on separate casting blocks, all of which have a slight sag at the bottom to replicate the weight of the aircraft, a 3D Printed mudguard in one piece with fabulous detail and finesse, a small Photo-Etch (PE) sheet with two parts on, and a sheet of pre-cut kabuki tape masking material to allow you to cut the demarcation between tyres and hubs with little effort. The three wheels are drop-in replacements for the kit parts, offering improved detail over and above what is achievable with injection moulded styrene. The mudguard is 3D printed, and will need to be clipped off its printing base, after which you add the bottom guard using one of the PE parts that you should bend to fit the shallow curve of the resin part. There is a spare in case you mess one up or lose it. The colours are called out in Gunze Aqueous and lacquer codes using their H and C numbers. Very highly recommended. Review sample courtesy of -
 Greetings Friends- Its been a while for me posting here. I had alot of health issues that stopped modelling. My cateracts getting worse, and so its hard to see. So in response, I decided on a simple all one-color project! Here is an Eduard 1/48 Bf109G10 in a NJG11 Night Fighter scheme in the Eduard kit. It was a splendid kit and built really great. This scheme is called a Mosquito Hunter and is all RLM76 with white markings and makes a cool looking model. As I said, I can't see very good, so I am sure there are areas I goofed up, but hey, it looks great to my bad eyes! I built this from box with the only modification being adding a CMK Bf109 pilot designed for the Eduard kit. This resin pilot was great and fit in easy! I wish Eduard would offer pilots for their kits as they offer everything else. A Pilot adds life to any model... Enjoy and let me know what you think!
- 14 replies
-
- 41
-

-

-
Delete duplicate post!
-
Hello ! Something finished from my bench, right from the shelf of doom. Its Eduards Siemens Schuckert D.III kit ( the new tool ) as a Weekend Edition kit, started some three years ago before i lost the interest in WWI aviation. It is completely out of the box including the lozenge decals and the rip tapes for the wings. The only addition were turn buckles from Gaspatch and two cross hairs for the Spandau machine guns stolen from other kits pe sets. The seat belts are simply made from tape. It was build just to see if these massive decal work which took a whole week and the rigging is fun. After all it was but needs some more perfection. Markings are for a Jasta 15 aircraft, Chery-les-Pouily, July 1918 No weathering. I have tried to show a factory fresh aircraft. A resin engine would have been the better solution. It has still not the flare signal holder on the starboard side and i have no idea about the aileron control. Maybe something to add at some time. Eduards "Flugzeugstoff" known as lozenge looks in their SSW D.III Weekend kit much better as in the Profi Pack Edition but its still regarded as inaccurate. Application is very good. Turnbuckles are from Gaspatch. The rigging material is Ez Line. Fiddly ! A picture taken during final assembly. The propeller is still primed in a dark brown shade. Photos were taken on a piece of cardboard in the garden. Thanks for watching Bernd
- 12 replies
-
- 28
-
-
-
F4F-3 Exhausts & F4F Gun Barrels (648766 & 648769 for Eduard) 1:48 Eduard Brassin We’ve just reviewed the super new tool Wildcat from Eduard, and this is one of the many aftermarket sets that they have released at the same time for those that want to increase the level of detail over and above what’s achievable using injection moulded styrene. Although the sets arrive in a flat package, the directly 3D printed parts are safe inside a clear plastic clamshell box inside the package, which also has a sticky pad inside to prevent the parts from rattling about. The parts are printed resin, attached to the base via thin tendril-like fingers that are easy to cut off and sand the little upstands away, leaving them ready for action. F4F-3 Exhausts PRINT (648766) The sticky pad in this set holds two exhausts on its print base, which have super detail and are totally hollow, with crisp detail around the lip and along the weld-lines. There is a tab to fix the parts to the kit in a drop-in manner, once they have been prepared and painted appropriately. F4F Gun barrels PRINT (648769) Although the very early Wildcats only had four .50cal machine guns, later output had their armament increased to six, although with no extra bullets in the magazines, doubtless leading to some frantic clicking and the lucky escape of a Zero on occasion. This set contains six barrels with hollow muzzles and recesses to depict the holes in the cooling jacket all over the sides of the tubes. Once removed from the base, they’re a simple drop-in replacement, and although tiny, the detail is exceptional, just like the exhausts above. I couldn’t resist cutting one free just to see if the hole went all the way through. It didn’t, but it looks deep enough for our needs. Highly recommended. Review sample courtesy of
-
F4F-3 Wheels Early & Late (648767 & 648768 for Eduard) 1:48 Eduard Brassin We’ve just reviewed the super new tool F4F-3 Wildcat from Eduard, and this is one of the many aftermarket sets that they have released at the same time for those that want to increase the level of detail over and above what’s achievable using injection moulded styrene. As is now usual with Eduard's smaller resin sets, they arrive in a shallow Brassin cardboard box, with the resin parts safely cocooned in bags, and the instructions folded around acting as padding. F4F-3 Wheels Early (648767) This set includes two main wheels with cast-in hubs in grey resin, and three choices of tail wheels, their fairings and yokes. There is also a sheet of pre-cut yellow kabuki-style masking material (not pictured) included along with the instructions to allow you to cut the demarcation between wheels and tyres cleanly, and with little effort. Once removed from their casting blocks the wheels are all drop-in replacements for the kit parts, and each has a slight weighting moulded into the bottom of the tyre to simulate the pressure of the aircraft. F4F-3 Wheels Late (648768) This set is slightly different, as in addition to the two main wheels and three tail wheels in resin, there are also two insanely delicate-looking spoked hubs that have been 3D printed and are safely ensconced inside a clear clamshell box with a sticky pad, plus a small fret of Photo-Etch (PE) containing two flat hubs in the same bag as the masking material. You choose whether to use the spoked hubs or the flat ones during the build, but it would be a real shame not to use the spoked hubs as they’re so attractive. Again, all wheels have a flat-spot on their bases to simulate weight. Highly recommended. Review sample courtesy of
-
Hawker Tempest Mk.V Series 2 (82121) 1:48 Eduard ProfiPACK The Tempest was a development of the Typhoon, originally called the Typhoon II, it was envisioned to solve any and all of the issues that bothered its designer Sidney Camm. The main difference was a much thinner wing which reduced drag and improved aerodynamics of the laminar airflow. The wings could accommodate 20mm Hispano cannons that packed an enormous punch, and lent itself to the low-level attack role that it was designed for. The engines intended to power the aircraft were the Centaurus, Griffon and Sabre IV, and initially the Rolls-Royce Vulture, which was terminated early in the design phase, leaving the three options going forward and necessitating substantially different cowlings to accommodate their differing shapes. The Mark V was split into two series, with the Series 1 having the Sabre II that had a similar chin intake to the Typhoon and many Typhoon parts, while the later Series 2 used fewer Typhoon parts and had their cannon barrels shortened so they fitted flush with the leading edge on the wings. A few of the early Mk.Vs were used as test beds, while other marks were developed alongside it, such as the Mk.IIs with Centaurus engines and a cylindrical cowl; Mk.VIs which had a very short production run; the Mk.III and Mk.IV that used a two types of Griffon engine and didn't see service, and later the TT.Mk.5, which is where a lot of Mk.Vs ended their days towing targets. The Kit This is a complete 100% new tool, and shouldn't be confused with their older Tempest V that's been around for a while. It arrives in the standard ProfiPACK box, with a brand new painting on the front showing two Tempests in flight. Following on the heels of their recent Spitfire, 109 and 190 toolings, the Tempest is packed with surface detail that is at the leading edge of moulding technology and skill. The interior is similarly well detailed with pre-painted PE instrument panel and seatbelts amongst other parts. Inside the box are five sprues of dark grey styrene, a circular sprue of clear parts, a separate clear spure, a sheet of pre-painted and nickel-plated Photo-Etch (PE), a set of canopy masks in yellow kabuki tape (not shown). The series 2 kit contains almost the same plastic as the series 1 kit reviewed here. Construction begins in the cockpit, which has a solid floor and framework sides, exposing the interior of the fuselage behind, which has been detailed by the designers inside the fuselage halves, showing great attention to detail. The seat, control column and rudder pedals are fitted to the solid areas, while the instrument panel and side consoles are suspended from the framework sides, which fit between the front and rear bulkheads, the latter being armoured and supporting the seat with a small framework of parts. The pre-painted belts are attached to the seat before installation, and more PE is used in the side consoles, resulting in a very neat and well-detailed cockpit. Before the fuselage can be closed around it, the interior area needs to be painted black, the simple tail-wheel bay needs constructing, and the complex radiator intake is built up from a substantial number of parts, which are shown with the correct order noted for your ease. The final parts for the cockpit interior are fitted to the fuselage sides at this point, so that they show through the framework once it is installed. The lower wing is a single full-span part, and as you would expect the upper wings are separate parts that have the landing gear bay roof detail moulded in. The sides of the bays are added along with some detail parts in both bays, at which point the wings can be closed up, inserts go in the leading edge for the cannon openings. The whole assembly joined with the fuselage, and once the tail with its separate rudder and elevators are fitted, that's the airframe ostensibly complete. The cockpit aperture is over-large, which allows an insert to be dropped in after it is fitted out with detail parts specific to this variant, the elevators and cannon barrel inserts are added to the wings, and it's then time to build and fit the landing gear. The tail wheel has a two part strut with Y-shaped yoke and separate two-part wheel that has an anti-shimmy groove moulded in, and two bay doors plus actuator for when the leg is retracted in flight. The main gear wheels have a large two-part balloon tyre, and separate hubs for both sides to obtain the most detail. There is no tread, so hiding the seam on the tyre's contact patch will be easy. The gear legs are a single part each, and have a complex single-part retraction jack that extends inboard into the bay, with large captive bay covers on the leg, and smaller inner doors that fold toward each other on the centreline. A drop-down stirrup is fixed to the underside of the fuselage for the pilot, a pitot probe added to the wing. On the topside the two-part canopy is attached, with the opener having a styrene insert for added detail that latches into the track, with a whip-antenna just behind its furthest point when open. The four-bladed prop is a single part that is attached to the back-plate and spinner cap, then glued to the front of the fuselage along with a pair of exhaust stubs, which don't have hollow tips. Take care to select the correct prop for your build option as they do differ. The canopy masks also include a pair of dots for the tail wheel, and tread-plate masks for the root of each wing that will be useful to cover up an initial squirt of black before you begin painting the main colours. For weapons anything you want as long as it is rockets are included in the kit they are on the sprues in the shape of eight unguided rockets with moulded-in rails of the simplified and more traditional early types, plus eight separate tail fins, enough for one set of rockets. Markings There are six decal options included with this ProfiPACK edition, and due to this aircraft's service and duties, half of them are shown in D-Day markings, with the familiar black and white invasion stripes that stopped them getting shot at by their own people. The sheet is combined with a set of stencils. Decals are by Cartograf, which is a guarantee of good registration, sharpness and colour density, with a thin gloss carrier film cut close to the printed areas. From the box you can build one of the following: JN803, No. 486 (RNZAF) Squadron, No. 122 Wing, B.80 Volkel, the Netherlands, October 1944 NV994, No. 3 Squadron, No. 122 Wing, B. 112 Hopsten, Germany, April 1945 NV994, No. 3 Squadron, No. 122 Wing, B.152 Fassberg, Germany, June 1945 JN862, No. 3 Squadron, No. 150 Wing, RAF Newchurch, Great Britain, June 1944 NV708, flown by W/Cdr. John Chester Button DSO, DFC, CO of No. 123 Wing, RAF Station Wunstorf, Germany, 1946/ 47 EJ865, No. 80 Squadron, No. 123 Wing, RAF Station Wunstorf, Germany, October 1947 Conclusion This is another stunning looking kit from Eduard who seem to be bringing us what we want at the moment. Highly recommended. Review sample courtesy of
-
F4F Undercarriage BRONZE (648779 for Eduard) 1:48 Eduard Brassin We’ve just reviewed the super new tool Wildcat from Eduard, and this is one of the many aftermarket sets that they have released at the same time for those that want to increase the level of detail over and above what’s achievable using injection moulded styrene. As is now usual with Eduard's smaller resin sets, they arrive in a shallow Brassin cardboard box, with the resin parts safely cocooned in bags, and the instructions folded around acting as padding. This set enhances the styrene landing gear with metal main struts and 3D printed resin supports on one side, utilising some of the kit parts for the other side. In the box are a pair of cast bronze main struts, which need very little in the way of preparation, just removing the sprue clipping point from the upper tubular section, which is best done with a motor tool and abrasive disc, taking your time so the part doesn’t overheat and you don't go past the moulded-in limit (you can just see this in the pic above). With that done, the resin parts are removed from their printing bases and glued in place in the same manner as the original kit parts. The other side of the support is taken from the kit, using parts L1 and L2, as well as the lower supports from the kit, which are parts L6 and L7. The main benefit of the bronze is strength, but the included 3D printed centreline gear bay doors are a big improvement on the kit parts and are printed as single parts with no fiddly gluing of small bits together. Very highly recommended. Review sample courtesy of
-
F4F-3 Cockpit w/Reflector Gunsight PRINT (648777 for Eduard) 1:48 Eduard Brassin We’ve just reviewed the super new tool Wildcat from Eduard, and this is one of the many aftermarket sets that they have released at the same time for those that want to increase the level of detail over and above what’s achievable using injection moulded styrene. As is now usual with Eduard's larger resin sets, they arrive in a deep Brassin cardboard box, with the resin parts safely cocooned in bags, and the instructions folded around acting as padding. There are three Ziploc bags within the box, two containing directly 3D printed parts, the other containing a fret of nickel-plated pre-painted Photo-Etch (PE), a tiny slip of acetate and a small decal sheet, both protected by a small sheet of white card. On emptying the parts out of the bag, the first thing you notice is the sheer level of detail present, but also the relatively small parts count thanks to the capabilities of 3D printers, where supports are all that is required to protect overhangs, and there is no degrading of mould fidelity over time because there are no moulds to wear out. The short parts list is also evident immediately on viewing the instructions, which begin with an ostensibly complete aft cockpit assembly, to which you add the seat with either painted PE lap belts only for the initial batch, or a full set of four-point belts for later production. The control column slips into a deep recess in the gaiter, some half-moon levers are added at the sides of the pilot, then the forward bulkhead with integral tank, plus a separate head cushion are mated to the cockpit. The side consoles are slotted between the two bulkheads with detailed painting guide and decal placement instructions complete those, then a little wire from your own stocks is threaded through sections of the cockpit, and the kit bulkhead is brought in from behind. The beautifully detailed rudder pedals are a single part that is truly amazing to behold, and it too has its own painting instructions and two decals for the centre of the piece. The kit insert to the tank is slotted into the 3D printed part to complete it, and then you have a choice of how to complete the instrument panel, using a blank panel with two-layer PE dial sections plus some tiny levers, or a detailed printed panel to which you add a decal, or if you’re very brave, paint fully yourself. The small angled coaming with moulded-in reflector gunsight is added atop the panel that is locked in on two pegs, and a tiny piece of acetate sheet is glued to the top of the sight to finish off. The cockpit can then be inserted into the fuselage as per the kit instructions, but with a small resin part fixed to the starboard interior, and a pair of tiny pegs are removed from the styrene part. If you are a little anxious about removing the 3D printed parts from their printing bases, and having to deal with all those tendril-like fingers that hold them in place and support them during printing and curing, fret not. As this is the first time I have dealt with a completely 3D printed cockpit from Eduard, I took the precaution of removing the parts from their bases and preparing them as if for assembly. It didn’t take me long, as I used the new CMK Razor Saw set we reviewed a wee while ago here. I used the square blade chucked all the way over on the fine-toothed blade side, and once I’d cut the attachment points, I snapped off the fingers so I could work on the next side easily. Some parts you can just saw at the base of the supports, but it gets messy and you can’t quite see what you’re cutting. Here’s a quick pic of the mess I was making during the removal process: After a little sanding of the forest of tiny ‘pimples’ that were left under parts and the more delicate parts being trimmed by a new #11 blade, the results were very pleasing, as you can see below: There are detailed painting and decaling instructions given throughout the leaflet, in Eduard’s usual Gunze Aqueous and lacquer ranges, using H and C codes respectively. Very highly recommended. Review sample courtesy of
-
Latest addition to my collection: Avia S-199, 1/72, Eduard kit. Only deviation from OOB are the painted markings. Comments are welcome. GX9A5457_03 by Iulian Macovei, on Flickr GX9A5459_03 by Iulian Macovei, on Flickr GX9A5461_03 by Iulian Macovei, on Flickr GX9A5472_03 by Iulian Macovei, on Flickr
-
Here is my go at this kit. I have had this kit for a while and after seeing the state of the box I thought I had better build it before the box falls apart. As I do most of my aircraft kits as inflight displays that's what I am going to do with this one. You do get a pilot with the kit which makes a change but I have decided to use an Aires resin pilot. I have used an Aires pilot before for an Eduard Spitfire Mk. IX, both the fit and detail are excellent, so I got one for this build. I am just waiting for the some more aftermarket items to be delivered, an Eduard masking set and some resin exhausts. After studying the kit instructions I decided to tackle the rear part of the cockpit first. Using a razor saw I carefully removed the body and seat of the resin pilot from the moulding. The body only required a tiny amount of cleaning up. The reason I started with the pilot first is because, I wanted to use the angle of the seat as a reference point for the angle of the bulkhead just behind seat. I couldn't use the moulding on the fuselage halves as they weren't very good. Once I was happy I glued the rear cockpit together. I added bits of scrap plastic to the parts to give it a bit more strength and to keep them a lined while the glue was curing. Next I moved on to the mount. First I decided where the hole is going to be drilled to take a brass bolt. The good thing about this kit is that there is loads of space so the hole went right in the middle of the wing. I drilled a small hole then I drill one the diameter of the bolt. Doing it this way I think it makes a tidier job and allows for any errors just incase the hole is in the wrong place if I have overlooked something. I use brass bolts because I have lots of them that's the only reason. So with the bolt in place in the plastic I use epoxy to make a good bond.
-
F4F Seat PRINT (672291 for Arma Hobby) 1:72
Mike posted a topic in Aftermarket (updates/conversions)
F4F Seat PRINT (672291 for Arma Hobby) 1:72 Eduard Brassin Although this set arrives in a flat package, the directly 3D printed parts are safe inside a clear plastic clamshell box inside the package, which also has a sticky pad inside to prevent the parts from rattling about. This set has onew printed resin seat on its own print platform, with the parts attached to the base via thin tendril-like fingers that are easy to cut off and sand the little upstands away, leaving the parts ready for action. There is also a small fret of STEEL Photo-Etch (PE) that are also pre-printed with seatbelt parts, which includes four belts and a single comfort-pad for underneath the buckle. Once removed from the print-base, the seat is a drop-in replacement, and after painting it should be draped with the seatbelts, the shoulder straps in a single Y-shape that is folded over the rear of the seat-back, while the lap belts are attached to the sides of the seat and folded over as if the pilot has just left his cockpit. Detail is fabulous as you’d imagine from 3D Printed resin and PE, which should be easy enough to add some extra detail to your Arma Wildcat. Highly recommended. Review sample courtesy of -
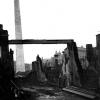
 Bf 110E S9NN, flown by Lt Herbert Kutscha on the Russian front, sometime during mid to late 1943, while his unit was attached to SKG 210. Kutscha was a career military man, fighting in Poland, during the Phoney War, the invasion of the West and Battle of Britain before going to the Eastern Front. In the Bf 110, he scored 22 victories, including 4 RAF fighters over Britain and a Swiss Bf 109E. Included in his score were numerous tanks, rail cars, trucks and artillery pieces destroyed while conducting low level bombing and straffing raids. Transfering to JG3 and retraining on the Bf 109G, Kutscha fought in Italy, before coming home to conduct defence of the Reich operations. He was shot down by a P-47 during 'Big Week' and seriously injured before returning to duty, fighting over France during the battle of Normandy. Transferred to JG 27, he was again shot down over the Ardennes on Christmas Day 1944. Escaping back to German lines, he was transferred to JG 11, where he would fight to the end of the war, scoring a further 25 victories in the Bf 109G. Herbert Kutscha was one of the lucky few to survive fighting from the first, to the last day of WW2 in Europe. He passed away in 2003. Eduards weekend edition kit looks very nice in the box and builds just as well. It comes with a lot of other parts, including a new fuselage and canopy so I think you could probably make a D model with what is supplied in the box (Iraqi anyone?). As it's a weekend edition kit, only one decal option is included. Detail is is very nice, my only critique there is the way they did the nose, having you insert the guns from the back before you close up. This is frustrating as the wasp decal covers some of the machine gun ports, so you need to finish this part first, or cut the guns away and insert them later. It would also have been nice for Eduard to include the RLM 74/75 upper camouflage pattern to go under the winter white wash as they claim this was patchy on his aircraft. In any case, I found a picture of this machine operating later in 1943 when most of the white wash had been removed, thus I chose not to put it on.
- 8 replies
-
- 44
-
-
-
- 110
- Russian Front
- (and 1 more)
-
Eduard F-15E/I/K Wheels (648745 for GWH) 1:48
Mike posted a topic in Aftermarket (updates/conversions)
F-15E/I/K Wheels (648745 for GWH) 1:48 Eduard Brassin Kit wheels are generally in two halves, which means you have the resultant joins to deal with, possible mould-slip issues on single part wheels, and sometimes less than stellar detail due to the moulding limitations of styrene injection technology, especially in the tread department. That's where replacement resin wheels come in, with their lack of seamline and superior detail making a compelling argument. They are also usually available at a reasonable price, and can be an easy introduction to aftermarket and resin handling, as they are usually a drop-in replacement. This set includes three resin wheels for the nose and main gear legs, plus a sheet of pre-cut kabuki tape masking material (not pictured) to allow you to cut the demarcation between the hubs and tyres with little effort. The wheels are attached to their casting blocks at the bottom where you’ll also find a very slight sag to the tyres, indicating the weight of the aircraft on the compressible air and rubber parts. Removal from the block is achieved by a quick whizz with a razor-saw, taking care to avoid breathing in the dust as it can be harmful if it gets deep in your lungs. Don’t say I didn’t warn you. Highly recommended. Review sample courtesy of -
Luftwaffe Rudder Pedals PRINT (672292) 1:72 Eduard Brassin Although this set arrives in a flat package, the directly 3D printed parts are safe inside a clear plastic clamshell box inside the package, which also has a sticky pad inside to prevent the parts from rattling about. This set has six printed resin parts on two print platforms, with the parts attached to the base via thin tendril-like fingers that are easy to cut off and sand the little upstands away, leaving the parts ready for action. It contains six rudder pedals on a single printing base, so three pairs with excellent detail, far beyond what you could achieve in either injection moulded styrene or standard resin. The only real competitor would be Photo-Etch (PE) brass, but folding and gluing brass isn’t for everyone, especially at this scale. They’re drop-in replacements for any kit parts, and come with the actuators behind them, so should be pretty easy to put in place in your cockpit once you’ve cleaned away the tiny attachment points of the fingers, especially those with a glass nose like the He.111. Highly recommended. Review sample courtesy of

.thumb.jpg.d3635a7ef6507d35f372dd09671fe96f.jpg)