Search the Community
Showing results for tags 'Dragon'.
-
I decided that I needed a Porsche turreted King Tiger in my collection. After doing some research last year during the Tiger GB I decided that one of the first 5 King tigers to enter service with s.Pz.Kp.(Fkl)316 would make an interesting model to build. The Dragon kit provides decals for one of these tanks, white 13, however it is not possible to build this tank with just what is provided in the box. These first tanks had some different features and I will highlight these as I proceed with build. The Dragon kit with moulded zimmerit is a good basis as all the King Tigers with the Porsche turret had a zimmerit coating, the kit also includes a turned aluminium barrel and an etched fret for the intake mesh and tool brackets. For my reference material I will use the Waldemar Trojca King Tiger book. Starting at the top, the first problem is with the turret, Dragon has represented the cupola as being welded to the turret roof (weld highlighted with a black wash) all the Porsche turrets had the cupola bolted on, so the moulded representation of the weld needs to be removed and a plasticard insert added to the cupola underside to replace the thickness of the removed material. The roof panel welds should be flush or proud of the panels so they need to be improved with some stretched sprue melted in with thin glue. That was quickly dealt with and now looks like this: Thanks for having a peek, some work on the hull tomorrow.
- 57 replies
-
- 11
-

-
Hallo again My first T-34. The kit is not a correct one. My verdict is acceptable. Fast build. No interior at all. Did any of you modeller a tank with interior? Since I have nearly all of them, AfV and MiniArt, RFM and Takom. Happy modelling
-
Hello Here’s my present project : th Su 100. By Dragon in 1/35 scale First I had to gather data and blueprints concerning the beast. I found a couple of well documented websites. where these plans are availible : http://armchairgeneral.com/rkkaww2//galleries/SP_guns/SU_100_bp.htm http://armchairgeneral.com/rkkaww2/galleries/SP_guns/SU_100_int.htm And a 3D interior représentation https://3docean.net/item/su-100-with-interior-camo/15656562 Here’s the true model i want to do This picture was taken from "The Battle of Algiers" movie (circa. 1970) from the realisator Di Pontecorvo but i xill change the french flag for the algerian one this tank was used for the movie and The camouflage was likely the same as the syrian armours and this only from 1963 to 1967. Algerian Su-100 were brought from USSR in 1963 (60 units) with t-34/85 (150 units) The model : Like I said in the title of this project it's a Su-100 from Dragon in 1/35 scale. An average of 450 pieces, not bad.. A little PE plate, and very good details Well i think you all got the main idea of my project : building the interior an presenting the tank with all doors open … I started with the easiest works…. The rear panel. completed with plasti card. I added details using scratch parts built with a 0.25 mm aluminium foil. Then i completed the rear panel .. made a100 ammunition (i will use a mould to have a dozen or more of copies) and I’m thinking about iputing inside a lighting system. The driverside is almost done Honestly there’s is a lack of accuracy and a lot of mistakes comparing to the real one.. but i think it’s better to present a model with a fully equiped interior instead « an empty cane » (in my opinion) That’s all for today.
-
Afternoon all.....a quick turn around project made from a defunct Dragon Stug III kit that had lost it's parts to install the gun mantlet etc. So, what to do with it..........convert it to a support vehicle. I didn't get to take images of the build so no build blog. There was not much to it other than build a new upper structure and canvas topped hinged cover. The addition of additional racks on the sides for fuel and additional supplies. Nothing special as regards tracks ( rubber band that came with the kit) or PE...used it as a filler between projects.....and some experimenting in weathering etc. Hope you like.
- 14 replies
-
- 30
-
-
After seeing an impressive image of a Churchill Mk.IV AVRE tank in the narrow streets of Bergen op Zoom (The Netherlands), during the town's liberation in October 1944, I just had to build one in my favourite scale. Dragon has produced a very nice kit of this obstacle buster tank and as luck would have, I managed to find a reasonably priced one on eBay. Building was pretty straightforward and even the flexible DS track behaved as they should. After construction the whole model was sprayed British dark green, after which the tracks and tools on the back were painted gun metal and the exhaust given a rust colour. The areas were decals were to go received a quick brush of Klear and after sticking them on, another layer to seal them in. Then everything was sprayed Tamiya flat clear from a spray can. Weathering was done using Tamiya weathering set A (mud) as well as the mud 'marker' pen. I also added some stuff from Blackdog's 1/72 British WW II equipment accessories set and two figures to round it of. Peter On to the pics
-
This is a shelf queen that has sat at the back of my cabinet for well over 15 years. In a fit of "completionitis" I had a go at weathering it back to life. I originally handpainted the camo, Now I'd spray the scheme which is unique and well known. There have been various attributions over the years and in hindsight, foolishly I badged this as a 1stSS panzer division machine which was one suggestion. The figures presented a chance to paint some German wnter camo schemes which I haven't done for some time. It was an exercise in weathering if nothing else Thanks for looking Rob
-
 I started this build several years ago, and it has been languishing on the shelf of doom, glaring at me ever since. So Having already completed another SQ (Centaur), I thought, why not get on and finish this one too. There is no real WIP ,just a page of updates, as I built this long before I joined BM. I'll get around to making a base someday, but for now I've added a couple of figures which are old Tamiya ones from the Cromwell, suitably modified and given Hornet heads and wiring for their radios. Anyway, I hope that you like it. I'm reasonably satisfied with it. The basic history of this build can be found here; Thanks for looking. John.
 -
 Hello Chaps, During my recent spate of "Hairy Stick" painting, I came across this kit buried in my stash with 3 other 1/144 scale kits. They were buried for good reason- i generally prefer large scale models that I see better with my aging eyes. But, I must have been going through a patch of masochistic delirium and decided to have a go. But that said, after wearing 4x magnification Opti-Visors during the whole build so that I could "see" what I was attempting, then taking them off at the end, my vision was blurred for a few days after trying to readjust. So, I'll never attempt one again! I completed this build during the first week of this month (February 2017). I got lazy with this one and didn't attempt any scratch-building in the cockpit! Astonishingly enough, this kit included some stencils which were hardly visible with magnification, let alone with the naked eye, the main decals were the size of the average stencil! The kit includes movable wings, so the photos below will show some images where the wings are both open and closed. The last 4 photos include two with the model next to a US Quarter coin- slightly smaller than a UK 10 pence coin and two with the model next to my Revell 1/32 Supermarine Spitfire Mk.IIa to provide an idea of scale and how small this model is.... If you'd like to watch my YouTube "Build Video" for this model, there here is the link to it: Thanks in advance for looking at this post and the video, if you should watch that, and for any comments left, much appreciated! In the meantime, until my next build presentation ( Italeri 1/72 F-16 A/B NATO Falcon), happy modeling! Cheers, Martin
- 9 replies
-
- 10
-
-
- Dragon
- 1:144 Scale
- (and 1 more)
-
I have several shelf queens sitting around in various stages of build, and I thought it time to get another one finished out of the way. I completed the Centaur last year and this one has been glaring at me ever since. Ironically, given what I’m building at the moment, this one is a Sherman lll with welded hoods, only this one is in 1/35th scale. Again, like my current build, it is in Light Mud/Blue Black based in Italy, but this one is a British vehicle as opposed to the NZ one that I’m building in 1/48th. I’d got all the way to the decaling stage with this, but made a right royal mess of the wash that I applied. So I obtained a duplicate set of decals for “Clive”, and gave it a light blowing over with thin Light Mud. I then repainted the Blue Black cammo, and that’s how it’s sat for the past five or more years. So last night it was given a thorough wash to remove the oodles of accumulated dust and left to dry, awaiting the new decals. A (tiny) bit of history of this model. This is a Dragon kit and a lot of the parts on the model were in the box. Things such as the inverted sand shields which were welded to the rear, and the cages for the fuel cans on the front track guards. These were part of an etched set included in the kit. The crew’s kit came from various manufacturers such as Verlinden. OK, so now that it's cleaned up and given a coat of varnish, the new decals will go on and then hopefully I can get on and get this off of the shelf of doom. John.
-
 Hi! Seing Diablo rsv's Conqueror made me say to myself: "Myself" - I said - "It's time you finished you Conqueror as well!" 'This is 'the other one' from Dragon - with all the issues, which I started some years ago. It's build OOTB except from a new barrel from Aber, which in hindsight I could have done without, as the pictures will show you! So without further ado: I know how you British love your tea so I had to make a 'cuppa'! And the 'Beauty shot": No WIP I'm afraid - I just started this as a interim project! Cheers Hans J
 -
 Hello modeling friends. I think its more than 30 years ago I build an Opel Blitz and it was also my last. The fit of the Italeri kit was so bad, I never bought an Opel Blitz again. So after many many years a Dragon kit caught my eye. I bought it for my stash, it wasn't cheap and I don't see them that much, so lucky me. Quick peep in the box made me a very happy guy (the details - oh my god). Two months ago Hannants Special Offerings shows the Cyber Hobby Opel Blitz kit are on sale. It is in fact the same kit, except the Dragon has more options inside the box. More about that later. I took the advantage and bought two kits for the prize of one Dragon. Another great shot for my stash. Box Art Dragon & Cyber Hobby Box Art may differ a lot, inside the boxes Dragon gives some options to choose from. 6 hole rims vs 8 hole rims and the low & high side boards for the cargo bed. Cyber Hobby offers only low side boards and 6 hole rims, which are in fact commercial / civilian type rims. The 8 hole rims Opel Blitz are special builds for the Wehrmacht. Why building 2 trucks at the same time? I want them to look the same, same colors and weathering, same theater and company to serve for. The cargo beds are interesting because of the outstanding details and I want the sides in open position for loading / unloading. After I finished the AA campaign last week, I started with the 2cm 38 Flak from the Dragon kit, just for fun, sort of 'after party'. A very nice a detailed gun, but I don't want the gun in the back of a truck. Together with the platform it will be on display in my vitrine, waiting for its destiny. Then I opened Britmodeler to look for news, builds, my favorite build logs and I saw someone building the Tamiya Opel Blitz kit with a nice tittle for a build log: "Workhorse of the Reich - The Opel Blitz". Following along and having some conversation about the kit, I had to start my own kits. Steve came up with a nice suggestion, start a build log, just for comparison and link that into my build log, should be fun. Well I agreed so here it is Steve aka Big X - A build log for comparison. A lot of work has been done already, it has some primer a the chassis has a base color sprayed on. More to come very soon I need to organize some photos and pick up a story line. Robert Jan
 -
At 17.15 on the 25th of April 1978, in Swan Hunters Neptune Yard, the wife of the Secretary of State for Defence performed the traditional christening at the launch of what would become HMS Exeter, D89. She was a Type 42 Destroyer, second batch, and carried Sea Dart missiles along with a Mk8 4.5" gun. She would go on to serve with distinction in the Royal Navy for over 28 years. Several months later, in Frimley Park Hospital, with a much reduced crowd and to a lot less ceremony, (Although I wouldn't put it passed my Dad to have opened a bottle on my head, may ask him about that) I appeared. A batch one Son, armed, eventually, with large front teeth (x2), ginger hair (as launched, over time this has thinned and darkened) and a warped sense of humour. Would go on to do a lot of stupid stuff (distinction in stupidity) around the world until being tied up (married) at the same time as Exeter was put into Extended Readiness. So this is my entry to the GB, HMS Exeter D89 1/700 by Dragon. I also have the Skywave/Pit Road boxing of this kit so I may do two entry's, well see as we go. At first I was going to build her just because She was launched in '78, was a RN ship, and there was a kit of her avaliable at a sensible price. But the more I looked into her service, and history, the more I found strange mirrors to my own life. -Falklands in '82, Just as I started school and the first thing I really remember watching on the news with my Dad, who's ex RN and had only been out a few years then. -Gulf War, same time as I moved to Secondary school. -A score of deployments to places I've subsequently been to myself. -She entered Extended Readiness at the same time I stopped wandering the world and got hitched, so She stopped having fun at the same time as me! She'll be spruced up with the White Ensign Type 42 Destroyer Photo Etch, which happily comes with enough parts for two kits(I know one set is for the extended batch 3 ships, a bit of trimming may be needed). I'm looking to do her as She was in the Falklands, with her hull coated in an experimental vivid bright blue co-polymer, anti-fouling boot topping. She also had a black stripe up from the boot topping to the funnel as the Argentinean Navy had their own Type 42's. I'm not sure that I'll do her in a sea scape, I want to but well see if time allows. Obligatory spruce shots, All untouched and in the bags, even the PE which ironically was delivered today, Just in time for the kick off of the GB! I'm really looking forward to this group build, think it'll be a lot of fun! Sorry for the long introduction, couldn't help myself! Well I'm ready to go, will be posting progress soon, and a bit of the history of the ship as we go. Any and All welcome to join in and see what happens to the kit, should be interesting. Happy Modelling All Geoff
- 53 replies
-
- 15
-
-
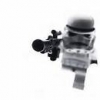
Hi everyone, first time poster here. Recently finished a 1/72 scale King Tiger from Dragon. Thought I would share the results. If you think this should be moved to the diorama section, let me know. Thanks! Photos taken on my phone and square cropped for instagram, sorry about that!
-
This was done as a quick build between projects, and only took eight hours work to complete. It would have been quicker, but the escape rocket mast is VERY fiddly to put together, with more parts than the rest of the rocket put together, and the lack of proper instructions doesn't help. Also the main body of the rocket is presented as tubes, presumably to eliminate sanding of seams; it doesn't. There is a prominent mould seam down both sides of each of the four sections, and a lot of sanding and polishing smooth is still required. As it was a quick build, I didn't research the colour scheme too much and just followed the instructions on the box, so there are inaccuracies. No weathering was done, as this thing was only used once... Only one pic, as it doesn't look much different from the other side. Cheers, Dean
-
I'm having a bit of a ponder over on the TID Tug so . . . Now I'll be truthful, nothing was further from my mind than a 1/350 boat ( I was given this model by a good friend who always seems to be leading me astray). I was looking around for something from the etch set that might help the tug. No joy on the part but I got to looking at the detail Dragon had included with slide moulding Now with things on hold on the tug, the fact that I've never built anything smaller than 1/200. There are some very nice multi media kits out there in 1/350. The fact that I have an involuntary tremor in my left hand which is never going to get better (I mean that as an encouragement to others, not an excuse). There was no time like the present No promises that this can be completed but here we go ....... Start of main guns Superstructure So far so good Thanks for looking in Kev
-
Has anyone else seen the Dragon 1/35 scale AT-AT and have any better information than that on the Dragon website. all i found was a picture, no measurements or anything so no idea of sizes or anything?
-
Firstly the Dragon Me262A-1a. Not the easiest kit with some poor fit in places. Lots of detail and some very small etched metal parts. Finished with Hataka and Vallejo colours in an RLM 76, 81 and 82 scheme with decals of Yellow 5 KG(J)6 from Xtradecal sheet 48-179. z20190908_202705 by Derek N.Ferguson, on Flickr z20190908_202649 by Derek N.Ferguson, on Flickr z20190908_202640 by Derek N.Ferguson, on Flickr z20190908_202630 by Derek N.Ferguson, on Flickr Secondly the Hasegawa/Dragon Me262B-1a. Essentially the same kit as the A-1a with some extra bits. Again finished with Hataka and Vallejo colours. Decals again from an Xtradecal sheet. z20190908_202908 by Derek N.Ferguson, on Flickr z20190908_202858 by Derek N.Ferguson, on Flickr z20190908_202846 by Derek N.Ferguson, on Flickr z20190908_202832 by Derek N.Ferguson, on Flickr
-
 Enjoying the build and all the research on my King Tiger, but one is not enough, so I have delved into the stash and decided to start this as a weight watcher special Battle of the Bulge entry, or as the Germans called it Wacht am Rhein. No zimmerit, the kit will be OOB except for an Armorscale barrel.
 -
Lt Dick Winters undertook a reconnaissance at about 0830, after which he collected a team of 12 men from his own and other companies. Beyond knowledge of the general location of the gun emplacements south of Le Grand Chemin and without information of the other side of the hedgerow, Winters' team attacked Brécourt Manor, located three miles southwest of Utah Beach and north of the village of Sainte-Marie-du-Mont. There he discovered No. 6 Battery of the 90th Artillery Regiment, consisting of four 105mm howitzers connected by trenches and defended by a company of soldiers. Pictures of the tree line in the grounds today Map of the Gun position. Unfortunately my only reference was the Band of Brothers series, as the chap that owns the manor doesn't let visitors into the field. My build to capture the break in and the first Gun.
- 19 replies
-
- 17
-
-
- Dragon
- Brecourt Manor
- (and 1 more)
-
 Lt Dick Winters undertook a reconnaissance at about 0830, after which he collected a team of 12 men from his own and other companies. Beyond knowledge of the general location of the gun emplacements south of Le Grand Chemin and without information of the other side of the hedgerow, Winters' team attacked Brécourt Manor, located three miles southwest of Utah Beach and north of the village of Sainte-Marie-du-Mont. There he discovered No. 6 Battery of the 90th Artillery Regiment, consisting of four 105mm howitzers connected by trenches and defended by a company of soldiers. Pictures of the tree line in the grounds today Map of the Gun position. 2 Dragon kits so far,
- 82 replies
-
- 18
-
-
Cleared off the bench I'll try to finish this Russian truck. We shall see...
-
With the varnish still drying, I'm calling this one done and photographing it. Aerials need to be fitted and, rather distressingly, I appear to have lost a small part that fits on the rear of the commander's hatch This is Dragon's Sherman Firefly 1c. I've had it in my stash for years, always meaning to build it , but put off by the individual track links. I haven't the patience to put them together, and bought AFV club's T62 Track for M4 VVSS. No idea if it correct for this Sherman, but I wasn't about to put those links together. Having bought the tracks, I put them somewhere 'safe', which meant I 'lost' them, then 'found' them, only to 'lose' them again as I didn't have time to build the tank. Roll of a few repeat iterations and years, and I finally manage to get both together, start the build, then stop the build for house improvements i.e. double glazing and replacement kitchen. I finally get up the gumption to restart the build, got to the point of painting it olive drab, only I discovered I had sprayed faded olive drab - a sort of sand. Back the tank went to the shelf of doom as I figured what to do. I normally do aircraft, and turn to tanks when I get fed up with the rigours of getting perfect finishes on planes. However, my tanks are usually completed as fresh out of the factory i.e. a simple paint job, with no weathering. I finally worked up the enthusiasm to get going on this tank again, and decided to spread some sort of dark green over it in a desperate attempt to make it look sun faded. Basically I sprayed a little, brush painted a little, dry brushed a little, splashed it all over a little, and relied heavily on transparent burnt sienna and burnt umber for the rusty bits. I don't really have a clue what I am doing, as I normally go for a pristine finish. After about a half a day elapsed time of faffing around like this, I'd had enough and decided it was time to fit the AFV tracks. First a clean with soapy water. Then a coat of Halfords Flexible Vinyl spray. I find it is gives a good base for paints. However, when dry fitting the tracks I noticed they looked a little tight...too tight in fact to fit the tracks. Undaunted I simply stretched the tracks, and soon one began to fit better, and then the other one snapped in half! The air turned blue for several minutes. In the end, I worked out a plan. Stick the broken track together with the overlapping joint provided by AFV. I used superglue, rather than the technique of applying a hot screwdriver to melt the nibs on the joint. Then I offered the track up to the tank, ensuring the broken end met over a lower wheel. The track was then stuck to the road wheels with copious quantities of super glue. I wasn't really enamoured by the Dragon kit. Attachment points seemed vague to non-existent, while the front sprockets wouldn't fit; needing a bit of hacking. It also seemed over engineered. You can see part of the problem with the left front track. It looks splayed, much Wall-E when he got squished. You might also note a little raised bit in the middle of the right track. There were a few other areas which caused me much lip pursing. I like my old, simple Tamiya tank kits. I sort of painted the yellow triangle, but tried to make it look as is this was a tank that had gone through quite a bit, with the crew having to repair and paint bits. I didn't bother with unit markings. Quite a few photos I see of Fireflies show no unit markings; either deliberate or simply hidden under much grime. Also, it occurred to me that if you were in Panther or Tiger country, the last thing you need is a nice bright, colourful unit insignia to make it easier to spot you. Alternatively, I could have loaded up the tank with all sorts of equipment, and thus neatly hide any unit markings. I was too lazy to do so. I have another, exciting, tank to be getting on with. I photographed the tank in the garden in full sun. In many ways this was a mistake. The sun tended to remove contrast and sort of bleach out the colours. The faded tops and sides do not look as sandy as on the model, and the green I splashed about is simply not green enough. Sigh. Better efforts required next time. Just for the record. My camera/lens combo is a Canon 800D with a Sigma 150-600mm contemporary. I simply stood about 3m (10 feet) away from the tank, zoomed in, and photographed it. I had a minimal field of depth. It seems to work, and provides a nice hazy background. I was too lazy to switch lenses. The overhead shots were obtained by me leaning out of the first floor bedroom window. 🙂 🙂 🙂 Glad none of the neighbours were about. I shall now take my next, continued build, from the shelf of doom. A King Tiger (Late). I have the turret built, but that's about it. I will complete this one, before tackling a Tortoise and then Crocodile. Angus
-
Heres my proof of life picture, not sure how I'm going to display the beast. I've got some ideas, I've picked up some figures just in case.
-
 Platz is to release a 1/72nd Heinkel He.219A-7 Uhu kit (manufactured by Dragon) - ref. AE-1 Release expected in July 2016 Sources: http://www.platz-hobby.com/index.php?main_page=product_info&products_id=5446&language=en http://www.platz-hobby.com/products/5446.html http://www.1999.co.jp/eng/10383511 V.P.
 -
 Afternoon all....well, finally got the time to sit down and set up the build log. This is to be the contribution to the GB. Only two test units being built in reality, and a further ten for test purposes on the Eastern Front. Once under test, it was realised that the 105mm howitzer could easily fit on the obsolete Panzer II chassis, becoming the Wespe; so the proposed further 200 were cancelled as the Panzer IV chassis's were needed to supply combat Panzer IV's due to urgent need on the Eastern Front from the losses of 1941 and early '42. All ten production vehicles served with the Panzer-Artillerie-Regiment 16, attached to the 16.Panzer-Division on the Eastern Front. The Division was held in reserve during the Balkan Campaign, but took part in the invasion of the Soviet Union, Operation Barbarossa, in June 1941. It was used in the southern sector of the Front, advancing to Stalingrad via Lvov, Pervomaisk, Zaporozhe, Taganrog, Makeevka and Artemorsk. The 10.5cm leFH 18/1 (Sf) auf Geschutzwagen IVb joined the rest of 16.Panzer-Division in late December early January. The regiment was destroyed in early 1943 in the Stalingrad pocket. Overall it'll be a clean build and apart from mud and dust, not too much wear and tear as is seen on the AFV's of this front. I have developed a build plan and schedule to efficiently build, and try and have the most time for the painting sequence, as I intend to use a new product for the making of mud. I'll need to spend some time practicing that first. The hardest part will be the PE phase.....lot's of tool clamps..... I have prepped as much as I can as I have a feeling the Christmas fortnight will be a zero build time as I have to pack away the bench as it's in the spare room,(family visiting...) All my part spru's are washed and ready to go, just filling the time trying to confirm some Dragon Model issue's as regards the reality of the interior ammo storage; which I think they have wrong. I discovered a pic of Voyager Model upgrade with an additional ammo locker, not specified in the Dragon build instruction sheet -even though supplied. Plus to complicate things, a photo has popped up with the ammo cabinets at an angle in the fighting compartment.......nothing but issue's. Anyway, hope to post first progress by the 16th, as we have rain over the weekend.......must always see a positive somewhere on a grey day...😁 Simon.


.thumb.jpg.b4a5069fd2c2dd5708ce1694345c5b11.jpg)